
Redis中遍历大数据量的key:keys与scan命令
keys命令
keys * 、keys id:* 分别是查询全部的key以及查询前缀为id:的key。
缺点:
1、没有 offset、limit 参数,一次返回所有满足条件的 key。
2.keys算法是遍历算法,复杂度是O(n),也就是数据越多,时间复杂度越高。
3.数据量达到几百万,keys这个指令就会导致 Redis 服务卡顿,因为 Redis 是单线程程序,顺序执行所有指令,其它指令必须等到当前的 keys 指令执行完了才可以继续。
scan命令
那我们如何去遍历大数据量呢?我们可以采用redis的另一个命令scan。我们看一下scan的特点
-
复杂度虽然也是 O(n),但是它是通过游标分步进行的,不会阻塞线程
-
提供 count 参数,不是结果数量,是redis单次遍历字典槽位数量(约等于)
-
同 keys 一样,它也提供模式匹配功能;
-
服务器不需要为游标保存状态,游标的唯一状态就是 scan 返回给客户端的游标整数;
-
返回的结果可能会有重复,需要客户端去重复,这点非常重要;
-
单次返回的结果是空的并不意味着遍历结束,而要看返回的游标值是否为零
scan命令格式
SCAN cursor [MATCH pattern] [COUNT count]
命令解释:scan 游标 MATCH <返回和给定模式相匹配的元素> count 每次迭代所返回的元素数量
SCAN命令是增量的循环,每次调用只会返回一小部分的元素。所以不会让redis假死。
SCAN命令返回的是一个游标,从0开始遍历,到0结束遍历。
redis > scan 0 match user_token* count 5
 1) "6"
 2) 1) "user_token:1000"
 2) "user_token:1001"
 3) "user_token:1010"
 4) "user_token:2300"
 5) "user_token:1389"
从0开始遍历,返回了游标6,又返回了数据,继续scan遍历,就要从6开始
redis > scan 6 match user_token* count 5
 1) "10"
 2) 1) "user_token:3100"
 2) "user_token:1201"
 3) "user_token:1410"
 4) "user_token:5300"
 5) "user_token:3389"
Redis的结构
Redis使用了Hash表作为底层实现,原因不外乎高效且实现简单。说到Hash表,很多Java程序员第一反应就是HashMap。没错,Redis底层key的存储结构就是类似于HashMap那样数组+链表的结构。其中第一维的数组大小为2n(n>=0)。每次扩容数组长度扩大一倍。
scan命令就是对这个一维数组进行遍历。每次返回的游标值也都是这个数组的索引。limit参数表示遍历多少个数组的元素,将这些元素下挂接的符合条件的结果都返回。因为每个元素下挂接的链表大小不同,所以每次返回的结果数量也就不同。
SCAN的遍历顺序
关于scan命令的遍历顺序,我们可以用一个小栗子来具体看一下。
|
1
2
3
4
5
6
7
8
9
10
11
12
13
14
15
16
|
127.0.0.1:6379> keys *1) "db_number"2) "key1"3) "myKey"127.0.0.1:6379> scan 0 MATCH * COUNT 11) "2"2) 1) "db_number"127.0.0.1:6379> scan 2 MATCH * COUNT 11) "1"2) 1) "myKey"127.0.0.1:6379> scan 1 MATCH * COUNT 11) "3"2) 1) "key1"127.0.0.1:6379> scan 3 MATCH * COUNT 11) "0"2) (empty list or set) |
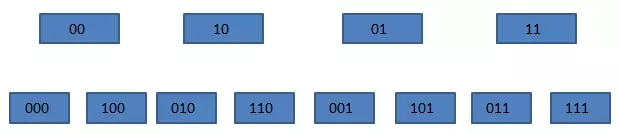
我们的Redis中有3个key,我们每次只遍历一个一维数组中的元素。如上所示,SCAN命令的遍历顺序是
0->2->1->3
这个顺序看起来有些奇怪。我们把它转换成二进制就好理解一些了。
00->10->01->11
我们发现每次这个序列是高位加1的。普通二进制的加法,是从右往左相加、进位。而这个序列是从左往右相加、进位的。这一点我们在redis的源码中也得到印证。
在dict.c文件的dictScan函数中对游标进行了如下处理
|
1
2
3
|
v = rev(v);v++;v = rev(v); |
意思是,将游标倒置,加一后,再倒置,也就是我们所说的“高位加1”的操作。
这里大家可能会有疑问了,为什么要使用这样的顺序进行遍历,而不是用正常的0、1、2……这样的顺序呢,这是因为需要考虑遍历时发生字典扩容与缩容的情况(不得不佩服开发者考虑问题的全面性)。
我们来看一下在SCAN遍历过程中,发生扩容时,遍历会如何进行。加入我们原始的数组有4个元素,也就是索引有两位,这时需要把它扩充成3位,并进行rehash。
原来挂接在xx下的所有元素被分配到0xx和1xx下。在上图中,当我们即将遍历10时,dict进行了rehash,这时,scan命令会从010开始遍历,而000和100(原00下挂接的元素)不会再被重复遍历。
再来看看缩容的情况。假设dict从3位缩容到2位,当即将遍历110时,dict发生了缩容,这时scan会遍历10。这时010下挂接的元素会被重复遍历,但010之前的元素都不会被重复遍历了。所以,缩容时还是可能会有些重复元素出现的。
Redis的rehash
rehash是一个比较复杂的过程,为了不阻塞Redis的进程,它采用了一种渐进式的rehash的机制。
|
1
2
3
4
5
6
7
8
9
10
11
12
13
14
|
/* 字典 */typedef struct dict { // 类型特定函数 dictType *type; // 私有数据 void *privdata; // 哈希表 dictht ht[2]; // rehash 索引 // 当 rehash 不在进行时,值为 -1 int rehashidx; /* rehashing not in progress if rehashidx == -1 */ // 目前正在运行的安全迭代器的数量 int iterators; /* number of iterators currently running */} dict |
在Redis的字典结构中,有两个hash表,一个新表,一个旧表。在rehash的过程中,redis将旧表中的元素逐步迁移到新表中,接下来我们看一下dict的rehash操作的源码。
|
1
2
3
4
5
6
7
8
9
10
11
12
13
14
15
16
17
18
19
20
21
22
23
24
25
26
27
28
29
30
31
32
33
34
35
36
37
38
39
40
41
42
43
44
45
46
47
48
49
50
51
52
53
|
/* Performs N steps of incremental rehashing. Returns 1 if there are still * keys to move from the old to the new hash table, otherwise 0 is returned. * * Note that a rehashing step consists in moving a bucket (that may have more * than one key as we use chaining) from the old to the new hash table, however * since part of the hash table may be composed of empty spaces, it is not * guaranteed that this function will rehash even a single bucket, since it * will visit at max N*10 empty buckets in total, otherwise the amount of * work it does would be unbound and the function may block for a long time. */int dictRehash(dict *d, int n) { int empty_visits = n*10; /* Max number of empty buckets to visit. */ if (!dictIsRehashing(d)) return 0; while(n-- && d->ht[0].used != 0) { dictEntry *de, *nextde; /* Note that rehashidx can't overflow as we are sure there are more * elements because ht[0].used != 0 */ assert(d->ht[0].size > (unsigned long)d->rehashidx); while(d->ht[0].table[d->rehashidx] == NULL) { d->rehashidx++; if (--empty_visits == 0) return 1; } de = d->ht[0].table[d->rehashidx]; /* Move all the keys in this bucket from the old to the new hash HT */ while(de) { uint64_t h; nextde = de->next; /* Get the index in the new hash table */ h = dictHashKey(d, de->key) & d->ht[1].sizemask; de->next = d->ht[1].table[h]; d->ht[1].table[h] = de; d->ht[0].used--; d->ht[1].used++; de = nextde; } d->ht[0].table[d->rehashidx] = NULL; d->rehashidx++; } /* Check if we already rehashed the whole table... */ if (d->ht[0].used == 0) { zfree(d->ht[0].table); d->ht[0] = d->ht[1]; _dictReset(&d->ht[1]); d->rehashidx = -1; return 0; } /* More to rehash... */ return 1;} |
通过注释我们就能了解到,rehash的过程是以bucket为基本单位进行迁移的。所谓的bucket其实就是我们前面所提到的一维数组的元素。每次迁移一个列表。下面来解释一下这段代码。
- 首先判断一下是否在进行rehash,如果是,则继续进行;否则直接返回。
- 接着就是分n步开始进行渐进式rehash。同时还判断是否还有剩余元素,以保证安全性。
- 在进行rehash之前,首先判断要迁移的bucket是否越界。
- 然后跳过空的bucket,这里有一个empty_visits变量,表示最大可访问的空bucket的数量,这一变量主要是为了保证不过多的阻塞Redis。
- 接下来就是元素的迁移,将当前bucket的全部元素进行rehash,并且更新两张表中元素的数量。
- 每次迁移完一个bucket,需要将旧表中的bucket指向NULL。
- 最后判断一下是否全部迁移完成,如果是,则收回空间,重置rehash索引,否则告诉调用方,仍有数据未迁移。
由于Redis使用的是渐进式rehash机制,因此,scan命令在需要同时扫描新表和旧表,将结果返回客户端。
refer:
相关文章
- Redis安装完后redis-cli无法使用(redis-cli: command not found)
- Asp.NET WebApi+Redis实现单用户登录实战演练
- Redis 传送门
- spring boot单元测试之十:用embedded-redis库做Redis的mock(spring boot 2.4.3)
- spring boot单元测试之十:用embedded-redis库做Redis的mock(spring boot 2.4.3)
- Redis-Cluster实战--5.使用redis-cli安装
- Spring Boot使用redis处理重复点赞的问题
- Atititt java redis jedis 使用 Redis体系 Redis 命令 Redis 命令Redis 键(key)Redis 字符串(String)Redis 哈希(Hash)R
- 【服务器安装Redis】Centos7离线安装redis
- 〖Python 数据库开发实战 - Python与Redis交互篇②〗- 利用 redis-py 实现字符串类型的常用指令操作
- 〖Python 数据库开发实战 - Python与Redis交互篇⑥〗- redis-py 的事务函数
- 〖Python 数据库开发实战 - Python与Redis交互篇⑫〗- 综合案例 - 新闻管理系统 - 删除新闻(含redis缓存)
- 看故事学Redis:再不懂,我怀疑你是假个开发
- redis基础操作概念等笔记
- Redis 和 Memcached 的区别 Tair
- 深入浅出Redis-redis哨兵集群
- 面试官:讲讲Redis的五大数据类型?如何使用?(内含完整测试源码)
- centos/ubuntu arm版编译安装redis 稳定版 —— 筑梦之路
- Redis进阶学习10---redis最佳实践
- ASP.NET Core微服务(六)——Redis效率与sqlserver数据库对比
- 【redis】Redis缓存失效、雪崩、穿透、击穿、并发等案例分析难题解决方案
- 一张xmind带你全方面了解redis方方面面