
【三维目标检测】Pointpillars(二)
本文为博主原创文章,未经博主允许不得转载。
本文为专栏《python三维点云从基础到深度学习》系列文章,地址为“https://blog.csdn.net/suiyingy/article/details/124017716”。
数据和源码请参考上一篇博文:【三维目标检测】Pointpillars(一)_Coding的叶子的博客-CSDN博客。
PointPillars是一种基于体素的三维目标检测算法,发表在CVPR2019《PointPillars: Fast Encoders for Object Detection from Point Clouds》。它的主要思想是把三维点云转换成2D伪图像以便用2D目标检测的方式进行目标检测。PointPillars在配置为Intel i7 CPU和1080ti GPU上的预测速度为62Hz,在无人驾驶领域中常常能够使用上它,是一个落地且应用广泛的一个3D快速目标检测网络。
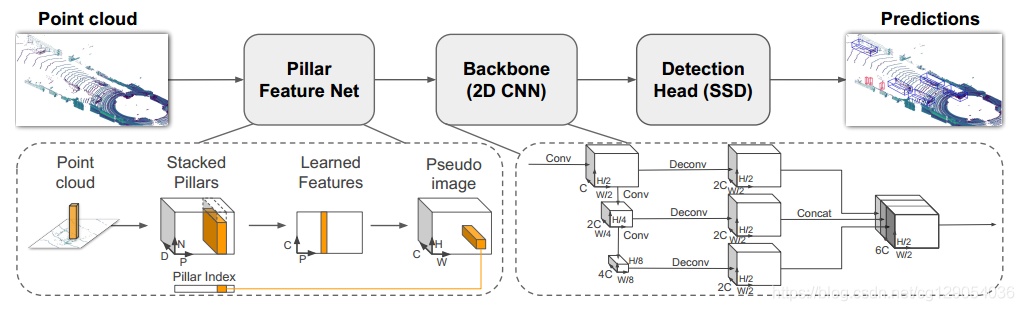
1 Pointpillars模型总体过程

2 主要模块解析
2.1 体素化
函数:self.voxelize(points)
Voxelization(voxel_size=[0.16, 0.16, 4], point_cloud_range=[0, -39.68, -3, 69.12, 39.68, 1], max_num_points=32, max_voxels=(16000, 40000), deterministic=True)输入:
(1)points,Nx4,原始点云,N表示点云数量,4表示特征维度,特征为坐标x、y、z与反射强度r。
(2)voxel_size:单位体素的尺寸,x、y、z方向上的尺度分别为0.16m、0.16m、4m。
(3)point_cloud_range:x、y、z方向的距离范围,结合(2)中体素尺寸可以得到总的体素数量为432x496x1,可以看到Z方向上只有一个体素。所有体素均表现为柱状。
(4)max_num_points:定义每个体素中取值点的最大数量,默认为32,在voxelnet中T=35。
(5)max_voxels:表示含有点云的体素最大数量,默认为16000。当数量超过16000时,仅保留16000,当数量不足16000时,则保留全部体素。
(6)deterministic:取值为True时,表示每次体素化的结果是确定的,而不是随机的。
输出:
(1)voxels:Mx32x4,体素中各个点的原始坐标和反射强度,M(M≤16000)个体素,每个体素最多5个点。
(2)num_points:Mx1,每个体素中点的数量,最小数量为1,最大数量为5。
(3)coors:体素自身坐标,Mx4,[batch_id, x, y, z]
2.2 体素特征提取VFE(voxel_encoder)
在voxelnet中,体素特征通过SVFE层提取,即连续两层VFE,其中VFE层提取体素特征用的是PointNet网络。而在该Pointpillars源码中,VFE层被进行了简化。
(1)对voxels(Mx32x4)中各个体素的坐标求均值,然后用体素中各个点的坐标减去均值,f_cluster,Mx32x3。
(2)将体素中点的坐标减去体素中心的坐标得到,f_center,Mx32x3。
(3)将上述voxels、f_cluster、f_center进行拼接,features,Mx32x10,并且将体素中没有点的位置的10维特征置为0。每个体素中默认设置了点的数量为32,但是不是所有的体素都有32个点,不足32个点的位置特征用0进行填充。
(4)PFNLayer:features经全连接FC(10, 64)得到Mx32x64维特征x,在体素点云数量上进行最大值池化提取体素的全局特征features,Mx64。
2.3 中间特征提取 middle_encoder
Second算法中采用了连续6个稀疏卷积进行特征提取,特征维度从16000x4变为7561x128,并进一步转化为out 256x200x176,最终转换成类似二维图像的方式进行特征提取。
Pointpillars的中间特征提取层将features (Mx64)每一维特征投影到各个体素当中,类似于二维图像,Mx64->432x496x4,即Mx64->214272x64,没有取值的地方像素值取为0。Canvas,64x496x432。由于体素在Z轴方向上的长度仅仅为1,所以投影后得到的是一个平面信息,这样后续可以直接用二维卷积进行特征提取,而不需要采用三维卷积或三维稀疏卷积操作。
2.4 主干网络特征提取
backbone:SECOND
1、2.3中out 64x496x432经连续4个3x3卷积(第一个步长为2):64x248x216,out1
2、out1 64x248x216经连续6个3x3卷积(第一个步长为2):128x124x108,out2
3、out2 128x124x108经连续6个3x3卷积(第一个步长为2):256x62x54,out3
Out1: 64x496x432 -> 64x248x216
Sequential(
  (0): Conv2d(64, 64, kernel_size=(3, 3), stride=(2, 2), padding=(1, 1), bias=False)
  (1): BatchNorm2d(64, eps=0.001, momentum=0.01, affine=True, track_running_stats=True)
  (2): ReLU(inplace=True)
  (3): Conv2d(64, 64, kernel_size=(3, 3), stride=(1, 1), padding=(1, 1), bias=False)
  (4): BatchNorm2d(64, eps=0.001, momentum=0.01, affine=True, track_running_stats=True)
  (5): ReLU(inplace=True)
  (6): Conv2d(64, 64, kernel_size=(3, 3), stride=(1, 1), padding=(1, 1), bias=False)
  (7): BatchNorm2d(64, eps=0.001, momentum=0.01, affine=True, track_running_stats=True)
  (8): ReLU(inplace=True)
  (9): Conv2d(64, 64, kernel_size=(3, 3), stride=(1, 1), padding=(1, 1), bias=False)
  (10): BatchNorm2d(64, eps=0.001, momentum=0.01, affine=True, track_running_stats=True)
  (11): ReLU(inplace=True)
)
Out2:64x248x216 -> 128x124x108
Sequential(
  (0): Conv2d(64, 128, kernel_size=(3, 3), stride=(2, 2), padding=(1, 1), bias=False)
  (1): BatchNorm2d(128, eps=0.001, momentum=0.01, affine=True, track_running_stats=True)
  (2): ReLU(inplace=True)
  (3): Conv2d(128, 128, kernel_size=(3, 3), stride=(1, 1), padding=(1, 1), bias=False)
  (4): BatchNorm2d(128, eps=0.001, momentum=0.01, affine=True, track_running_stats=True)
  (5): ReLU(inplace=True)
  (6): Conv2d(128, 128, kernel_size=(3, 3), stride=(1, 1), padding=(1, 1), bias=False)
  (7): BatchNorm2d(128, eps=0.001, momentum=0.01, affine=True, track_running_stats=True)
  (8): ReLU(inplace=True)
  (9): Conv2d(128, 128, kernel_size=(3, 3), stride=(1, 1), padding=(1, 1), bias=False)
  (10): BatchNorm2d(128, eps=0.001, momentum=0.01, affine=True, track_running_stats=True)
  (11): ReLU(inplace=True)
  (12): Conv2d(128, 128, kernel_size=(3, 3), stride=(1, 1), padding=(1, 1), bias=False)
  (13): BatchNorm2d(128, eps=0.001, momentum=0.01, affine=True, track_running_stats=True)
  (14): ReLU(inplace=True)
  (15): Conv2d(128, 128, kernel_size=(3, 3), stride=(1, 1), padding=(1, 1), bias=False)
  (16): BatchNorm2d(128, eps=0.001, momentum=0.01, affine=True, track_running_stats=True)
  (17): ReLU(inplace=True)
)
Out3:128x124x108 -> 256x62x54
Sequential(
  (0): Conv2d(128, 256, kernel_size=(3, 3), stride=(2, 2), padding=(1, 1), bias=False)
  (1): BatchNorm2d(256, eps=0.001, momentum=0.01, affine=True, track_running_stats=True)
  (2): ReLU(inplace=True)
  (3): Conv2d(256, 256, kernel_size=(3, 3), stride=(1, 1), padding=(1, 1), bias=False)
  (4): BatchNorm2d(256, eps=0.001, momentum=0.01, affine=True, track_running_stats=True)
  (5): ReLU(inplace=True)
  (6): Conv2d(256, 256, kernel_size=(3, 3), stride=(1, 1), padding=(1, 1), bias=False)
  (7): BatchNorm2d(256, eps=0.001, momentum=0.01, affine=True, track_running_stats=True)
  (8): ReLU(inplace=True)
  (9): Conv2d(256, 256, kernel_size=(3, 3), stride=(1, 1), padding=(1, 1), bias=False)
  (10): BatchNorm2d(256, eps=0.001, momentum=0.01, affine=True, track_running_stats=True)
  (11): ReLU(inplace=True)
  (12): Conv2d(256, 256, kernel_size=(3, 3), stride=(1, 1), padding=(1, 1), bias=False)
  (13): BatchNorm2d(256, eps=0.001, momentum=0.01, affine=True, track_running_stats=True)
  (14): ReLU(inplace=True)
  (15): Conv2d(256, 256, kernel_size=(3, 3), stride=(1, 1), padding=(1, 1), bias=False)
  (16): BatchNorm2d(256, eps=0.001, momentum=0.01, affine=True, track_running_stats=True)
  (17): ReLU(inplace=True)
)
Out = [out1, out2, out3] [ 64x248x216, 128x124x108, 256x62x54]
2.5 上采样拼接 self.neck
分别对out1、out2、out3进行上采样:
out1:64x248x216 -> 128x248x216
out2:128x124x108 -> 128x248x216
out3:256x62x54 -> 128x248x216
拼接out:128x248x216、128x248x216、128x248x216 ->384x248x216 (self.extract_feat)
2.6 检测头 self.bbox_head
分类head:384x248x216特征经过conv_cls(384x18)得到18x248x216个预测结果,共18个类别。
位置head:384x248x216特征经过conv_reg(384x42)得到42x248x216个预测结果。在Second中每个位置有3个anchor,每个anchor有7个参数,相比之下,这里每个位置有6个不同的anchor。
方向head:384x248x216特征经过conv_reg(384x12)得到12x248x216个预测结果。
与VoxelNet不同之处在于,Second增加了对方向的预测,更有利于模型的训练,特别是更加适用于方向预测相反的情况。如果仅采用位置head,那么在方向正好相反时,前6个参数的损失会非常小,而最后一个角度参数的损失会非常大。而损失函数是进行整体判别的,并不能区分这6个参数哪一个带来了损失函数的巨大变化,因而在反向传播时会对7个参数都进行调整。
Anchor3DHead(
  (loss_cls): FocalLoss()
  (loss_bbox): SmoothL1Loss()
  (loss_dir): CrossEntropyLoss(avg_non_ignore=False)
  (conv_cls): Conv2d(384, 18, kernel_size=(1, 1), stride=(1, 1))
  (conv_reg): Conv2d(384, 42, kernel_size=(1, 1), stride=(1, 1))
  (conv_dir_cls): Conv2d(384, 12, kernel_size=(1, 1), stride=(1, 1))
)
2.7 损失函数
分类损失:FocalLoss。
三维目标框回归损失:SmoothL1Loss。
方向损失:CrossEntropyLoss。
2.8 顶层结构
顶层结构主要包含以下三部分:
(1)特征提取:self.extract_feat,得到384x248x216特征,见2.5节。
(2)检测头:见2.6节。
(3)损失函数:见2.7节。
def forward_train(self, points, img_metas, gt_bboxes_3d, gt_labels_3d, gt_bboxes_ignore=None):
    x = self.extract_feat(points, img_metas)
    outs = self.bbox_head(x)
    loss_inputs = outs + (gt_bboxes_3d, gt_labels_3d, img_metas)
    losses = self.bbox_head.loss(
    *loss_inputs, gt_bboxes_ignore=gt_bboxes_ignore)
    return losses

#extract_feat模块
def extract_feat(self, points, img_metas=None):
    """Extract features from points."""
    voxels, num_points, coors = self.voxelize(points)
    voxel_features = self.voxel_encoder(voxels, num_points, coors)
    batch_size = coors[-1, 0].item() + 1
    x = self.middle_encoder(voxel_features, coors, batch_size)
    x = self.backbone(x)
    if self.with_neck:
        x = self.neck(x)
3 训练命令
python tools/train.py configs/pointpillars/hv_pointpillars_secfpn_6x8_160e_kitti-3d-3class.py4 运行结果

5 【python三维深度学习】python三维点云从基础到深度学习_Coding的叶子的博客-CSDN博客_python点云分割
更多三维、二维感知算法和金融量化分析算法请关注“乐乐感知学堂”微信公众号,并将持续进行更新。
本文为博主原创文章,未经博主允许不得转载。
本文为专栏《python三维点云从基础到深度学习》系列文章,地址为“https://blog.csdn.net/suiyingy/article/details/124017716”。
相关文章
- MindSpore实践:对篮球运动员目标的检测
- 目标检测中的多尺度特征结合方式
- 【1】从零开始学习目标检测:YOLO算法详解
- PaddleDetection目标检测数据准备——VOC数据集和COCO数据集
- 目标检测初体验(二)自制人脸检测功能
- C#图像处理-OpenCVSharp教程(三十三) OpenCVSharp特征检测与匹配(二)---SIFT特征匹配
- 深度学习之目标检测 第4章 深度学习目标检测方法
- 《中国人工智能学会通讯》——11.12 三维目标检测识别
- 使用Python,OpenCV执行视觉显著性检测(Visual Saliency Detection)
- 目标检测5--旷视YOLOX算法介绍
- 检测一下你的专业指数:2015年十大测试工具你认识几个?
- Ubuntu20.04部署yolov5目标检测算法,无人车/无人机应用
- 【三维目标检测】FCAF3D(二)
- 【三维目标检测】SSN(一)
- 【三维目标检测】VoteNet(二)
- 【三维目标检测】VoteNet(一)
- 【三维目标检测】Part-A2(二)
- 【三维目标检测】CenterPoint(一)
- 【三维目标检测】PointRCNN(一)
- 【三维目标检测】3DSSD(二)
- 【三维目标检测】3DSSD(一)
- 【三维目标检测】Complex-Yolov4详解(一): 数据处理
- 【三维目标检测】VoxelNet(三):模型详解
- “伏魔”赏金 | WebShell检测之「模拟污点引擎」首次公测,邀你来战!