
【源码】用OpenCV和Python构建车辆检测
简介
本篇文章中实现车辆检测采用视频中无监督目标检测方法,即不使用任何标记数据的目标检测。使用帧差分技术。
帧差分
视频是一组按正确顺序堆叠在一起的帧。所以,当我们看到一个物体在视频中移动时,这意味着这个物体在每一个连续的帧上都处于不同的位置。
如果我们假设在一对连续的帧中除了该目标之外,没有其他物体移动,那么第一帧与第二帧的像素差将突出显示移动目标的像素,从而我们可以得到移动物体的像素和坐标。这就是帧差分法的工作原理。
举个例子。考虑视频中的以下两个帧:
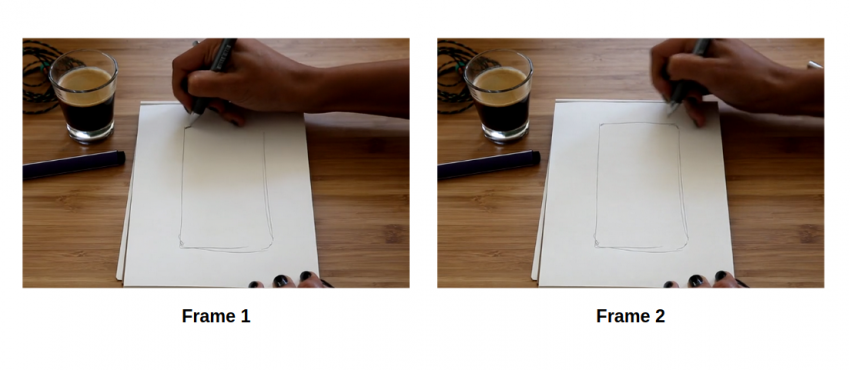
你能看出这两帧的区别吗?
握笔手的位置从第1帧变为第2帧。其余的物体根本没有移动。所以,正如前面提到的,为了定位移动目标,我们将执行帧差分。结果如下:

你可以看到高亮或白色区域,这是手最初出现的地方。除此之外,记事本的边缘也会突出显示一点。这可能是由于手的移动改变了光照。建议不要对静止物体进行不必要的检测。因此,我们需要对帧执行某些图像预处理步骤。
构建车辆检测
导入库
import os
import re
import cv2 # opencv library
import numpy as np
from os.path import isfile, join
import matplotlib.pyplot as plt
导入视频帧
请从此链接下载原始视频的帧。
将框架保存在工作目录中名为“frames”的文件夹中。从该文件夹中,我们将导入帧并将其保存在列表中:
# get file names of the frames
col_frames = os.listdir('frames/')

# sort file names
col_frames.sort(key=lambda f: int(re.sub('\D', '', f)))

# empty list to store the frames
col_images=[]

for i in col_frames:
    # read the frames
    img = cv2.imread('frames/'+i)
    # append the frames to the list
    col_images.append(img)
数据探索
让我们显示两个连续的帧:
# plot 13th frame
i = 13

for frame in [i, i+1]:
    plt.imshow(cv2.cvtColor(col_images[frame], cv2.COLOR_BGR2RGB))
    plt.title("frame: "+str(frame))
    plt.show()
很难在这两个框架中找到区别,不是吗?如前所述,获取两个连续帧的像素值的差值将有助于我们观察移动目标。那么,让我们在上面两个帧上使用该技术:
# convert the frames to grayscale
grayA = cv2.cvtColor(col_images[i], cv2.COLOR_BGR2GRAY)
grayB = cv2.cvtColor(col_images[i+1], cv2.COLOR_BGR2GRAY)

# plot the image after frame differencing
plt.imshow(cv2.absdiff(grayB, grayA), cmap = 'gray')
plt.show()
现在我们可以清楚地看到第13帧和第14帧中的移动目标。其他没有移动的东西都被减去了。
图像预处理
让我们看看对上面的图像应用阈值后会发生什么:
diff_image = cv2.absdiff(grayB, grayA)

# perform image thresholding
ret, thresh = cv2.threshold(diff_image, 30, 255, cv2.THRESH_BINARY)

# plot image after thresholding
plt.imshow(thresh, cmap = 'gray')
plt.show()
现在,移动物体(车辆)看起来更像我们期望看到的那样了,大部分噪音(不希望出现的白色区域)都消失了。但是,突出显示的区域有点零碎。因此,我们可以对该图像应用图像膨胀:
# apply image dilation
kernel = np.ones((3,3),np.uint8)
dilated = cv2.dilate(thresh,kernel,iterations = 1)

# plot dilated image
plt.imshow(dilated, cmap = 'gray')
plt.show()
移动的物体有更多的实心高亮区域。希望帧中每个目标的轮廓数不超过3。
但是,我们不会使用整个框架来检测移动的车辆。我们将首先选择一个区域,如果车辆进入该区域,则仅检测到该区域。
那么,我们将会使用的区域:
# plot vehicle detection zone
plt.imshow(dilated)
cv2.line(dilated, (0, 80),(256,80),(100, 0, 0))
plt.show()
水平线y = 80以下的区域是我们的车辆检测区域。我们将只检测在这个区域发生的任何移动。你还可以创建自己的检测区。
现在让我们在上述帧的检测区域中找到轮廓:
# find contours
contours, hierarchy = cv2.findContours(thresh.copy(),cv2.RETR_TREE,cv2.CHAIN_APPROX_NONE)
上面的代码查找整个图像中的所有轮廓,并将它们保存在变量"contours"中。由于我们只需要找到检测区域中存在的轮廓,我们将对发现的轮廓进行两次检查。
第一个检查是轮廓左上角的y坐标是否应大于等于80(我这里包括另一个检查,x坐标小于等于200)。另一个检查是轮廓的面积是否大于等于25。在cv2.courtoArea() 函数的帮助下,你可以找到轮廓区域。
valid_cntrs = []

for i,cntr in enumerate(contours):
    x,y,w,h = cv2.boundingRect(cntr)
    if (x <= 200) & (y >= 80) & (cv2.contourArea(cntr) >= 25):
        valid_cntrs.append(cntr)

# count of discovered contours
len(valid_cntrs)
接下来,让我们绘制轮廓和原始帧:
dmy = col_images[13].copy()

cv2.drawContours(dmy, valid_cntrs, -1, (127,200,0), 2)
cv2.line(dmy, (0, 80),(256,80),(100, 255, 255))
plt.imshow(dmy)
plt.show()
太酷了!只有位于检测区域内的车辆轮廓可见。这就是我们在整个画面中检测车辆的方法
视频中的车辆检测
现在是时候对所有帧应用相同的图像变换和预处理操作,并找到所需的轮廓。重申一下,我们将遵循以下步骤:
- 对每对连续帧应用帧差分
- 对上一步的输出图像应用图像阈值
- 对上一步的输出图像进行图像放大
- 在上一步的输出图像中查找轮廓
- 检测区域出现的候选轮廓
- 保存帧与最终轮廓
# kernel for image dilation
kernel = np.ones((4,4),np.uint8)

# font style
font = cv2.FONT_HERSHEY_SIMPLEX

# directory to save the ouput frames
pathIn = "contour_frames_3/"

for i in range(len(col_images)-1):

    # frame differencing
    grayA = cv2.cvtColor(col_images[i], cv2.COLOR_BGR2GRAY)
    grayB = cv2.cvtColor(col_images[i+1], cv2.COLOR_BGR2GRAY)
    diff_image = cv2.absdiff(grayB, grayA)

    # image thresholding
    ret, thresh = cv2.threshold(diff_image, 30, 255, cv2.THRESH_BINARY)

    # image dilation
    dilated = cv2.dilate(thresh,kernel,iterations = 1)

    # find contours
    contours, hierarchy = cv2.findContours(dilated.copy(), cv2.RETR_TREE,cv2.CHAIN_APPROX_NONE)

    # shortlist contours appearing in the detection zone
    valid_cntrs = []
    for cntr in contours:
        x,y,w,h = cv2.boundingRect(cntr)
        if (x <= 200) & (y >= 80) & (cv2.contourArea(cntr) >= 25):
            if (y >= 90) & (cv2.contourArea(cntr) < 40):
                break
            valid_cntrs.append(cntr)

    # add contours to original frames
    dmy = col_images[i].copy()
    cv2.drawContours(dmy, valid_cntrs, -1, (127,200,0), 2)

    cv2.putText(dmy, "vehicles detected: " + str(len(valid_cntrs)), (55, 15), font, 0.6, (0, 180, 0), 2)
    cv2.line(dmy, (0, 80),(256,80),(100, 255, 255))
    cv2.imwrite(pathIn+str(i)+'.png',dmy)
准备视频
在这里,我们为所有帧中的所有移动车辆添加了轮廓。现在是时候堆叠帧并创建视频了:
# specify video name
pathOut = 'vehicle_detection_v3.mp4'

# specify frames per second
fps = 14.0
接下来,我们将阅读列表中的最后一帧:
frame_array = []
files = [f for f in os.listdir(pathIn) if isfile(join(pathIn, f))]
files.sort(key=lambda f: int(re.sub('\D', '', f)))
for i in range(len(files)):
    filename=pathIn + files[i]

    #read frames
    img = cv2.imread(filename)
    height, width, layers = img.shape
    size = (width,height)

    #inserting the frames into an image array
    frame_array.append(img)
制作目标检测视频
最后,我们将使用以下代码制作目标检测视频:
out = cv2.VideoWriter(pathOut,cv2.VideoWriter_fourcc(*'DIVX'), fps, size)

for i in range(len(frame_array)):
    # writing to a image array
    out.write(frame_array[i])

out.release()
全代码
#导入库
import os
import re
import cv2 # opencv library
import numpy as np
from os.path import isfile, join
import matplotlib.pyplot as plt


# 导入视频帧
# get file names of the frames
col_frames = os.listdir('frames/')

# sort file names
col_frames.sort(key=lambda f: int(re.sub('\D', '', f)))

# empty list to store the frames
col_images=[]

for i in col_frames:
    # read the frames
    img = cv2.imread('frames/'+i)
    # append the frames to the list
    col_images.append(img)

# 数据探索
# plot 13th frame
i = 13

for frame in [i, i+1]:
    plt.imshow(cv2.cvtColor(col_images[frame], cv2.COLOR_BGR2RGB))
    plt.title("frame: "+str(frame))
    plt.show()

# 像素差值展示
# convert the frames to grayscale
grayA = cv2.cvtColor(col_images[i], cv2.COLOR_BGR2GRAY)
grayB = cv2.cvtColor(col_images[i+1], cv2.COLOR_BGR2GRAY)

# plot the image after frame differencing
plt.imshow(cv2.absdiff(grayB, grayA), cmap = 'gray')
plt.show()

# 图像预处理
diff_image = cv2.absdiff(grayB, grayA)

# perform image thresholding
ret, thresh = cv2.threshold(diff_image, 30, 255, cv2.THRESH_BINARY)

# plot image after thresholding
plt.imshow(thresh, cmap = 'gray')
plt.show()

# 图像膨胀
# apply image dilation
kernel = np.ones((3,3),np.uint8)
dilated = cv2.dilate(thresh,kernel,iterations = 1)

# plot dilated image
plt.imshow(dilated, cmap = 'gray')
plt.show()

# 区域选定
# plot vehicle detection zone
plt.imshow(dilated)
cv2.line(dilated, (0, 80),(256,80),(100, 0, 0))
plt.show()

# find contours
contours, hierarchy = cv2.findContours(thresh.copy(),cv2.RETR_TREE,cv2.CHAIN_APPROX_NONE)

#
valid_cntrs = []

for i,cntr in enumerate(contours):
    x,y,w,h = cv2.boundingRect(cntr)
    if (x <= 200) & (y >= 80) & (cv2.contourArea(cntr) >= 25):
        valid_cntrs.append(cntr)

# count of discovered contours
len(valid_cntrs)

dmy = col_images[13].copy()

cv2.drawContours(dmy, valid_cntrs, -1, (127,200,0), 2)
cv2.line(dmy, (0, 80),(256,80),(100, 255, 255))
plt.imshow(dmy)
plt.show()

# kernel for image dilation
kernel = np.ones((4,4),np.uint8)

# font style
font = cv2.FONT_HERSHEY_SIMPLEX

# directory to save the ouput frames
pathIn = "contour_frames_3/"

for i in range(len(col_images)-1):

    # frame differencing
    grayA = cv2.cvtColor(col_images[i], cv2.COLOR_BGR2GRAY)
    grayB = cv2.cvtColor(col_images[i+1], cv2.COLOR_BGR2GRAY)
    diff_image = cv2.absdiff(grayB, grayA)

    # image thresholding
    ret, thresh = cv2.threshold(diff_image, 30, 255, cv2.THRESH_BINARY)

    # image dilation
    dilated = cv2.dilate(thresh,kernel,iterations = 1)

    # find contours
    contours, hierarchy = cv2.findContours(dilated.copy(), cv2.RETR_TREE,cv2.CHAIN_APPROX_NONE)

    # shortlist contours appearing in the detection zone
    valid_cntrs = []
    for cntr in contours:
        x,y,w,h = cv2.boundingRect(cntr)
        if (x <= 200) & (y >= 80) & (cv2.contourArea(cntr) >= 25):
            if (y >= 90) & (cv2.contourArea(cntr) < 40):
                break
            valid_cntrs.append(cntr)

    # add contours to original frames
    dmy = col_images[i].copy()
    cv2.drawContours(dmy, valid_cntrs, -1, (127,200,0), 2)

    cv2.putText(dmy, "vehicles detected: " + str(len(valid_cntrs)), (55, 15), font, 0.6, (0, 180, 0), 2)
    cv2.line(dmy, (0, 80),(256,80),(100, 255, 255))
    cv2.imwrite(pathIn+str(i)+'.png',dmy)

# 准备视频
# specify video name
pathOut = 'vehicle_detection_v3.mp4'

# specify frames per second
fps = 14.0

frame_array = []
files = [f for f in os.listdir(pathIn) if isfile(join(pathIn, f))]
files.sort(key=lambda f: int(re.sub('\D', '', f)))

for i in range(len(files)):
    filename=pathIn + files[i]

    #read frames
    img = cv2.imread(filename)
    height, width, layers = img.shape
    size = (width,height)

    #inserting the frames into an image array
    frame_array.append(img)

out = cv2.VideoWriter(pathOut,cv2.VideoWriter_fourcc(*'DIVX'), fps, size)

for i in range(len(frame_array)):
    # writing to a image array
    out.write(frame_array[i])

out.release()
文件格式
初始化时你的文件的格式为:
.
├── 车辆识别.py
├── frames
└── contour_frames_3
相关文章
- python常用魔法函数
- 干货 | 轮廓逼近原理与OpenCV应用(附Python-OpenCV文档下载)
- OpenCV获取不规则区域的最大内切圆(附Python / C++源码)
- OpenCV轮廓最大内接矩形(带角度)-计算与绘制(Python / C++源码)
- 基于OpenCV DNN模块给黑白老照片上色(附Python/C++源码)
- Python-OpenCV应用实例 | 通过手势控制系统音量大小实现步骤(附源码)
- 实战 | 用Python和OpenCV搭建一个老人跌倒智能监测系统 (步骤 + 源码)
- 一行代码实现灰色铅笔画、彩色铅笔画和卡通画效果(C++/Python OpenCV源码)
- C++ Python OpenCV基础与应用视频教程 免费高清视频
- python opencv 找到圆点标定板所有点后通过距离找两个角点4
- python对csv文件读写的两种方式 和 读写文件编码问题处理
- python手册
- 使用Python,OpenCV追踪对象的轨迹,来确定其移动方向
- Python,OpenCV进行直方图反投影
- 使用Python和OpenCV进行文本偏斜校正
- 使用Python和OpenCV进行图像拼接和全景图构建
- 使用OpenCV,Python和dlib进行眨眼检测及计数
- 使用Python,OpenCV确定对象的颜色
- Aspose.Slides for Python演示文稿指定幻灯片放映设置
- 使用Python+OpenCV进行图像模板匹配(Match Template)
- python简单C/S模式示例
- python-opencv-图像马赛克效果
- python--opencv-图像色彩转换
- python--openCV
- python opencv二值化阈值图像分割