
[AWS] AWS - Install and Configure CLI v2
The AWS Command Line Interface (AWS CLI) is a command-line tool that allows you to interact with AWS services using commands in your terminal/command prompt.
AWS CLI enables you to run commands to provision, configure, list, delete resources in the AWS cloud. Before you run any of the aws commands, you need to follow three steps:
- Install AWS CLI
- Create an IAM user with Administrator permissions
- Configure the AWS CLI
Step 1. Install AWS CLI v2
Refer to the official AWS instructions to install/update AWS CLI (version 2) based on your underlying OS. You can verify the installation using the following command in your terminal (macOS)/cmd (Windows).
# Display the folder that contains the symlink to the aws cli tool
which aws
# See the current version
aws --version
See the sample output below. Note that the exact version of AWS CLI and Python may vary in your system.
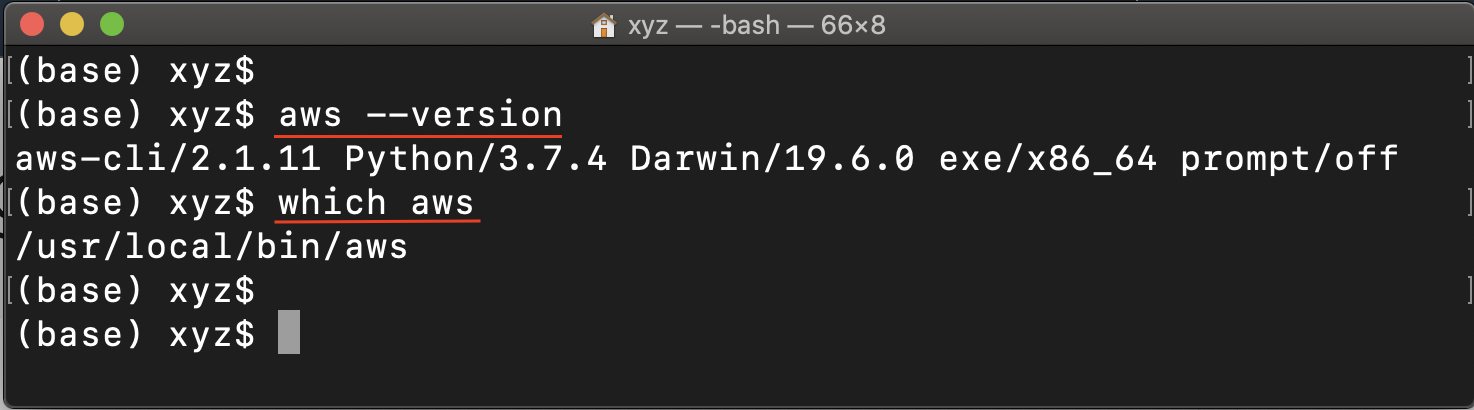
Mac/Linux/Windows: Verify the successful installation of AWS CLI 2
Step 2. Create an IAM user
In this step, you will create an IAM user with Administrator permissions who is allowed to perform any action in your AWS account, only through CLI. After creating such an IAM user, we will use its Access key (long-term credentials) to configure the AWS CLI locally.
Let’s create an AWS IAM user, and copy its Access key.
AWS Identity and Access Management (IAM) service allows you to authorize users / applications (such as AWS CLI) to access AWS resources.
The Access key is a combination of an Access Key ID and a Secret Access Key. Let's see the steps to create an IAM user, and generate its Access key.
- Navigate to the IAM Dashboard, and create an IAM user.
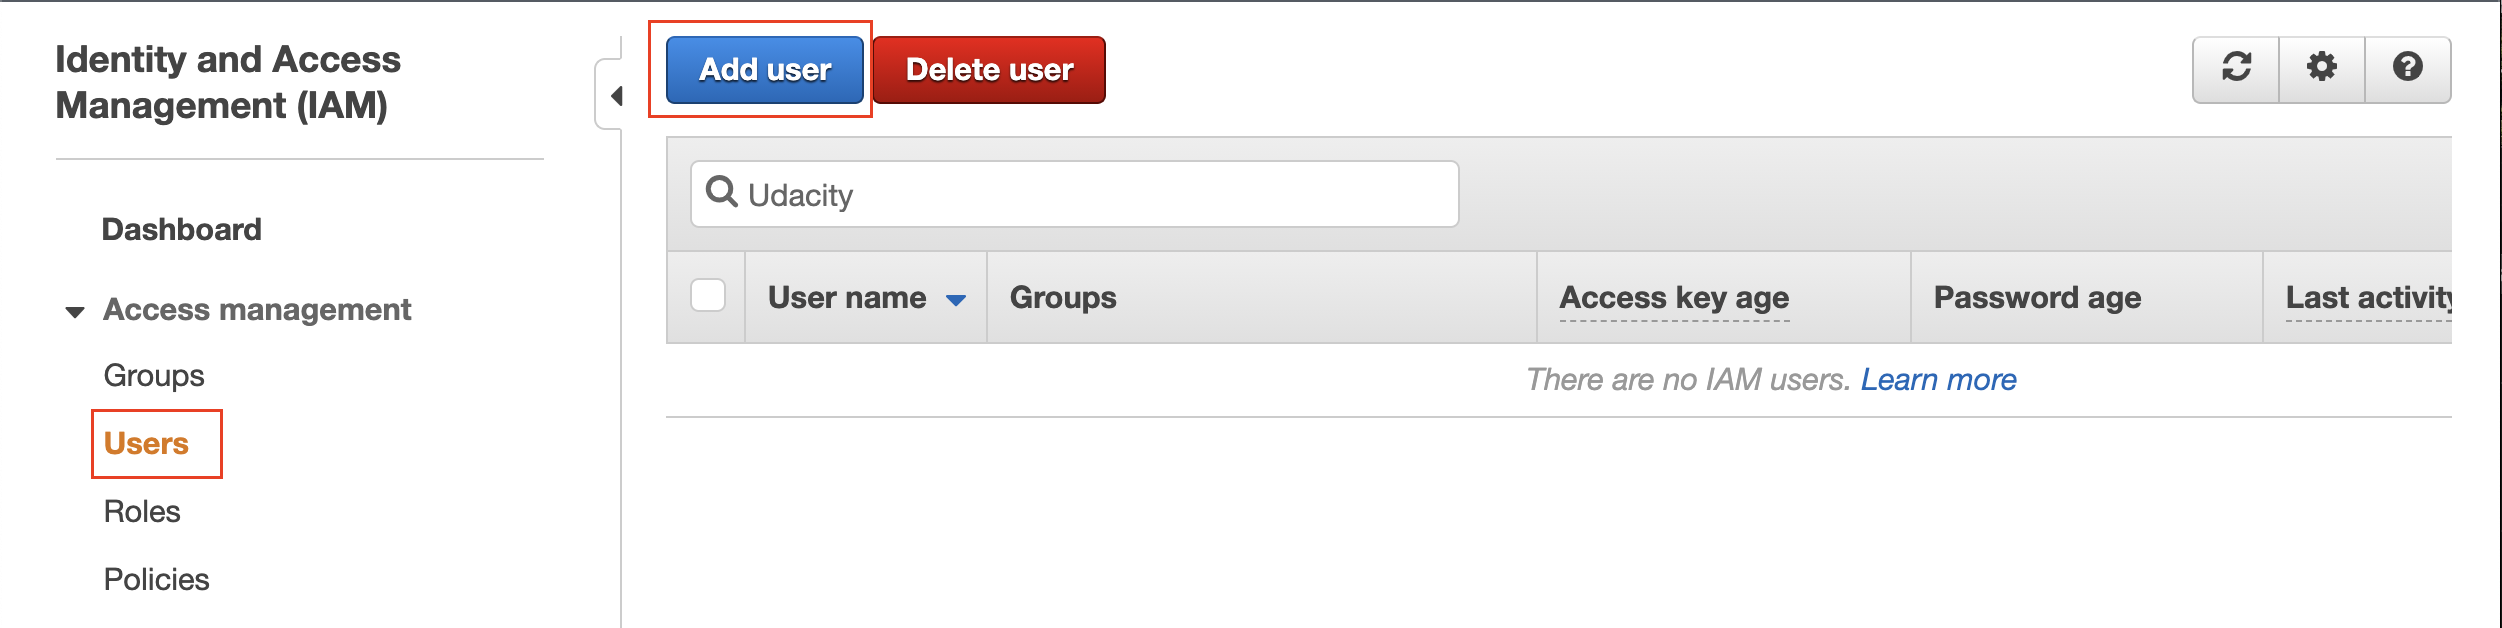
Add a new IAM user
- Set the user details, such as the name, and access type as Programmatic access only.
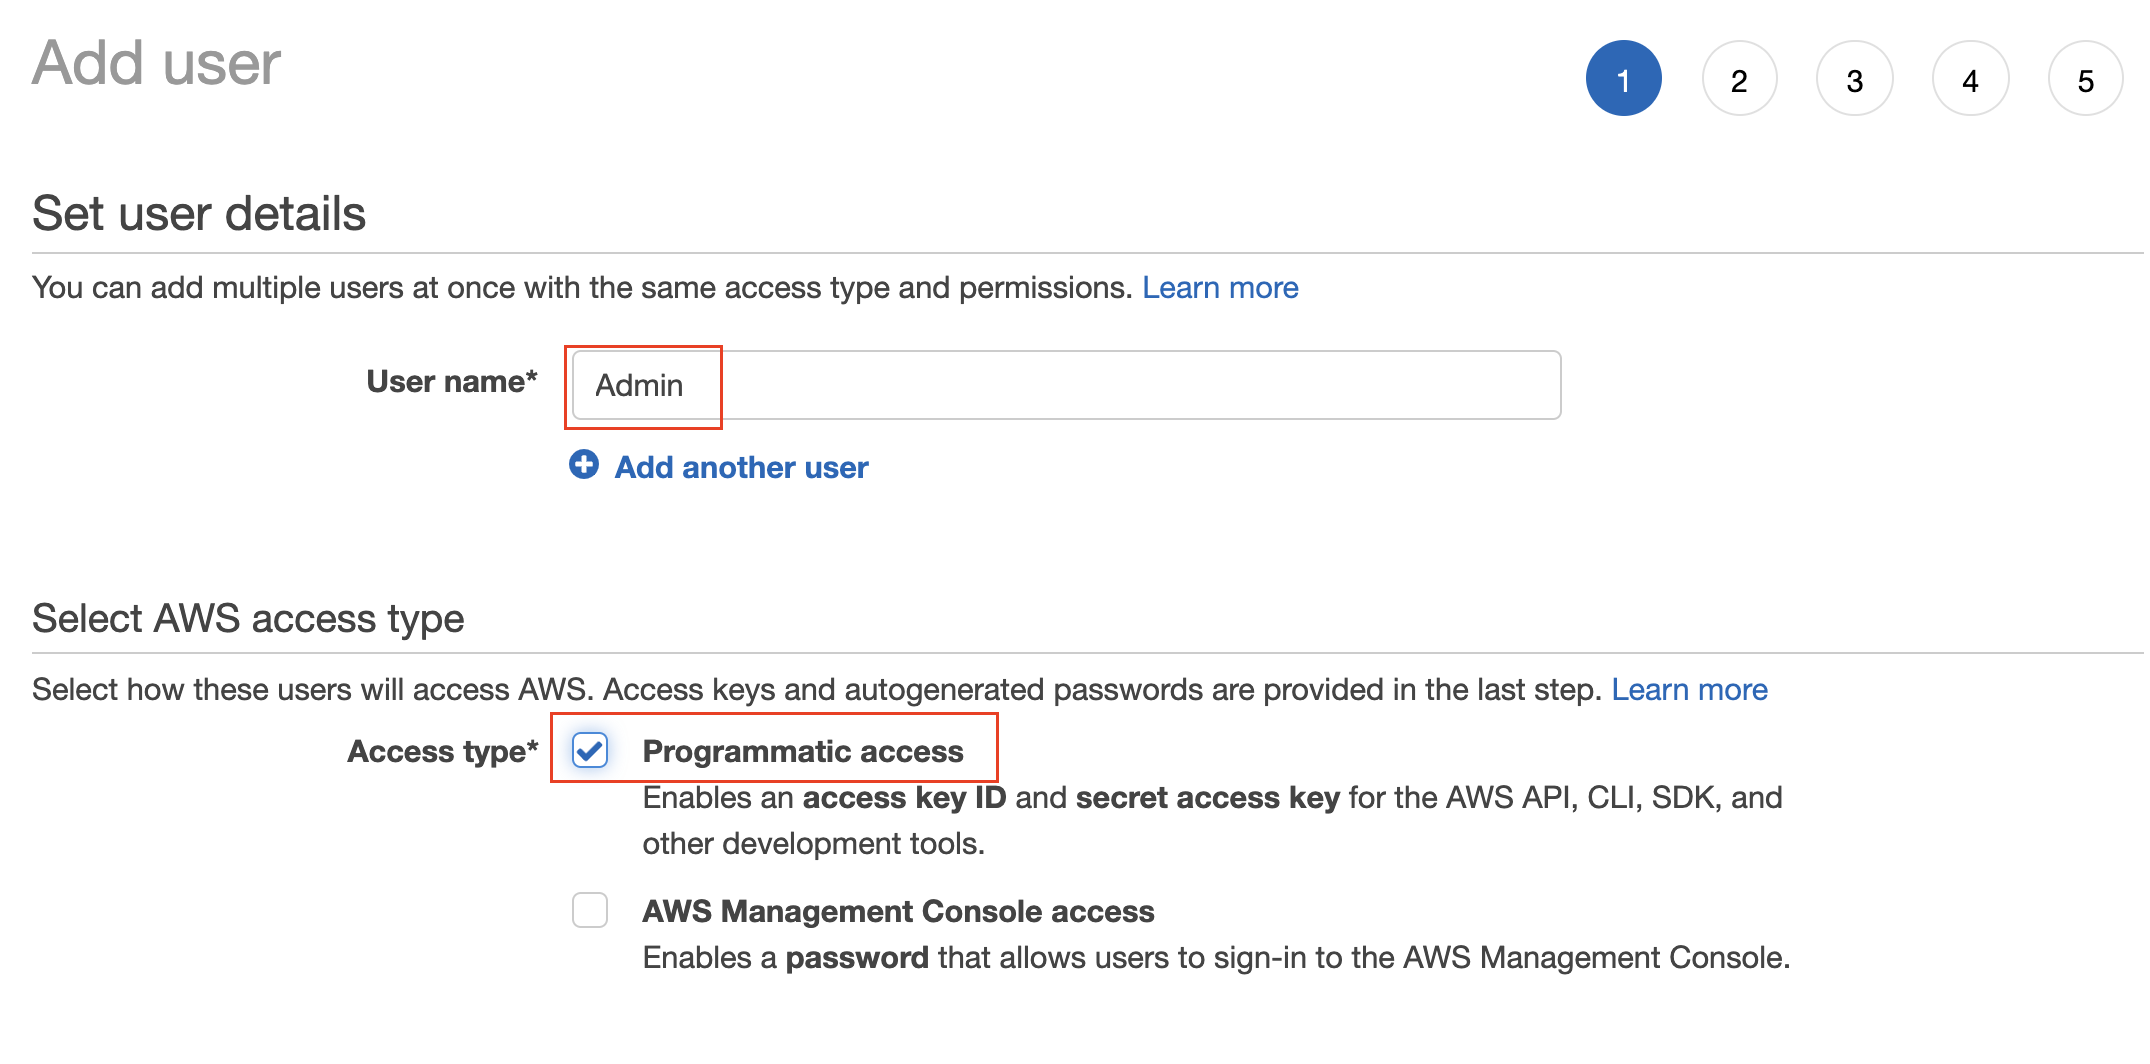
Set the user name, and type (mode) of access
- Set the permissions to the new user by attaching the AWS Managed AdministratorAccess policy from the list of existing policies.
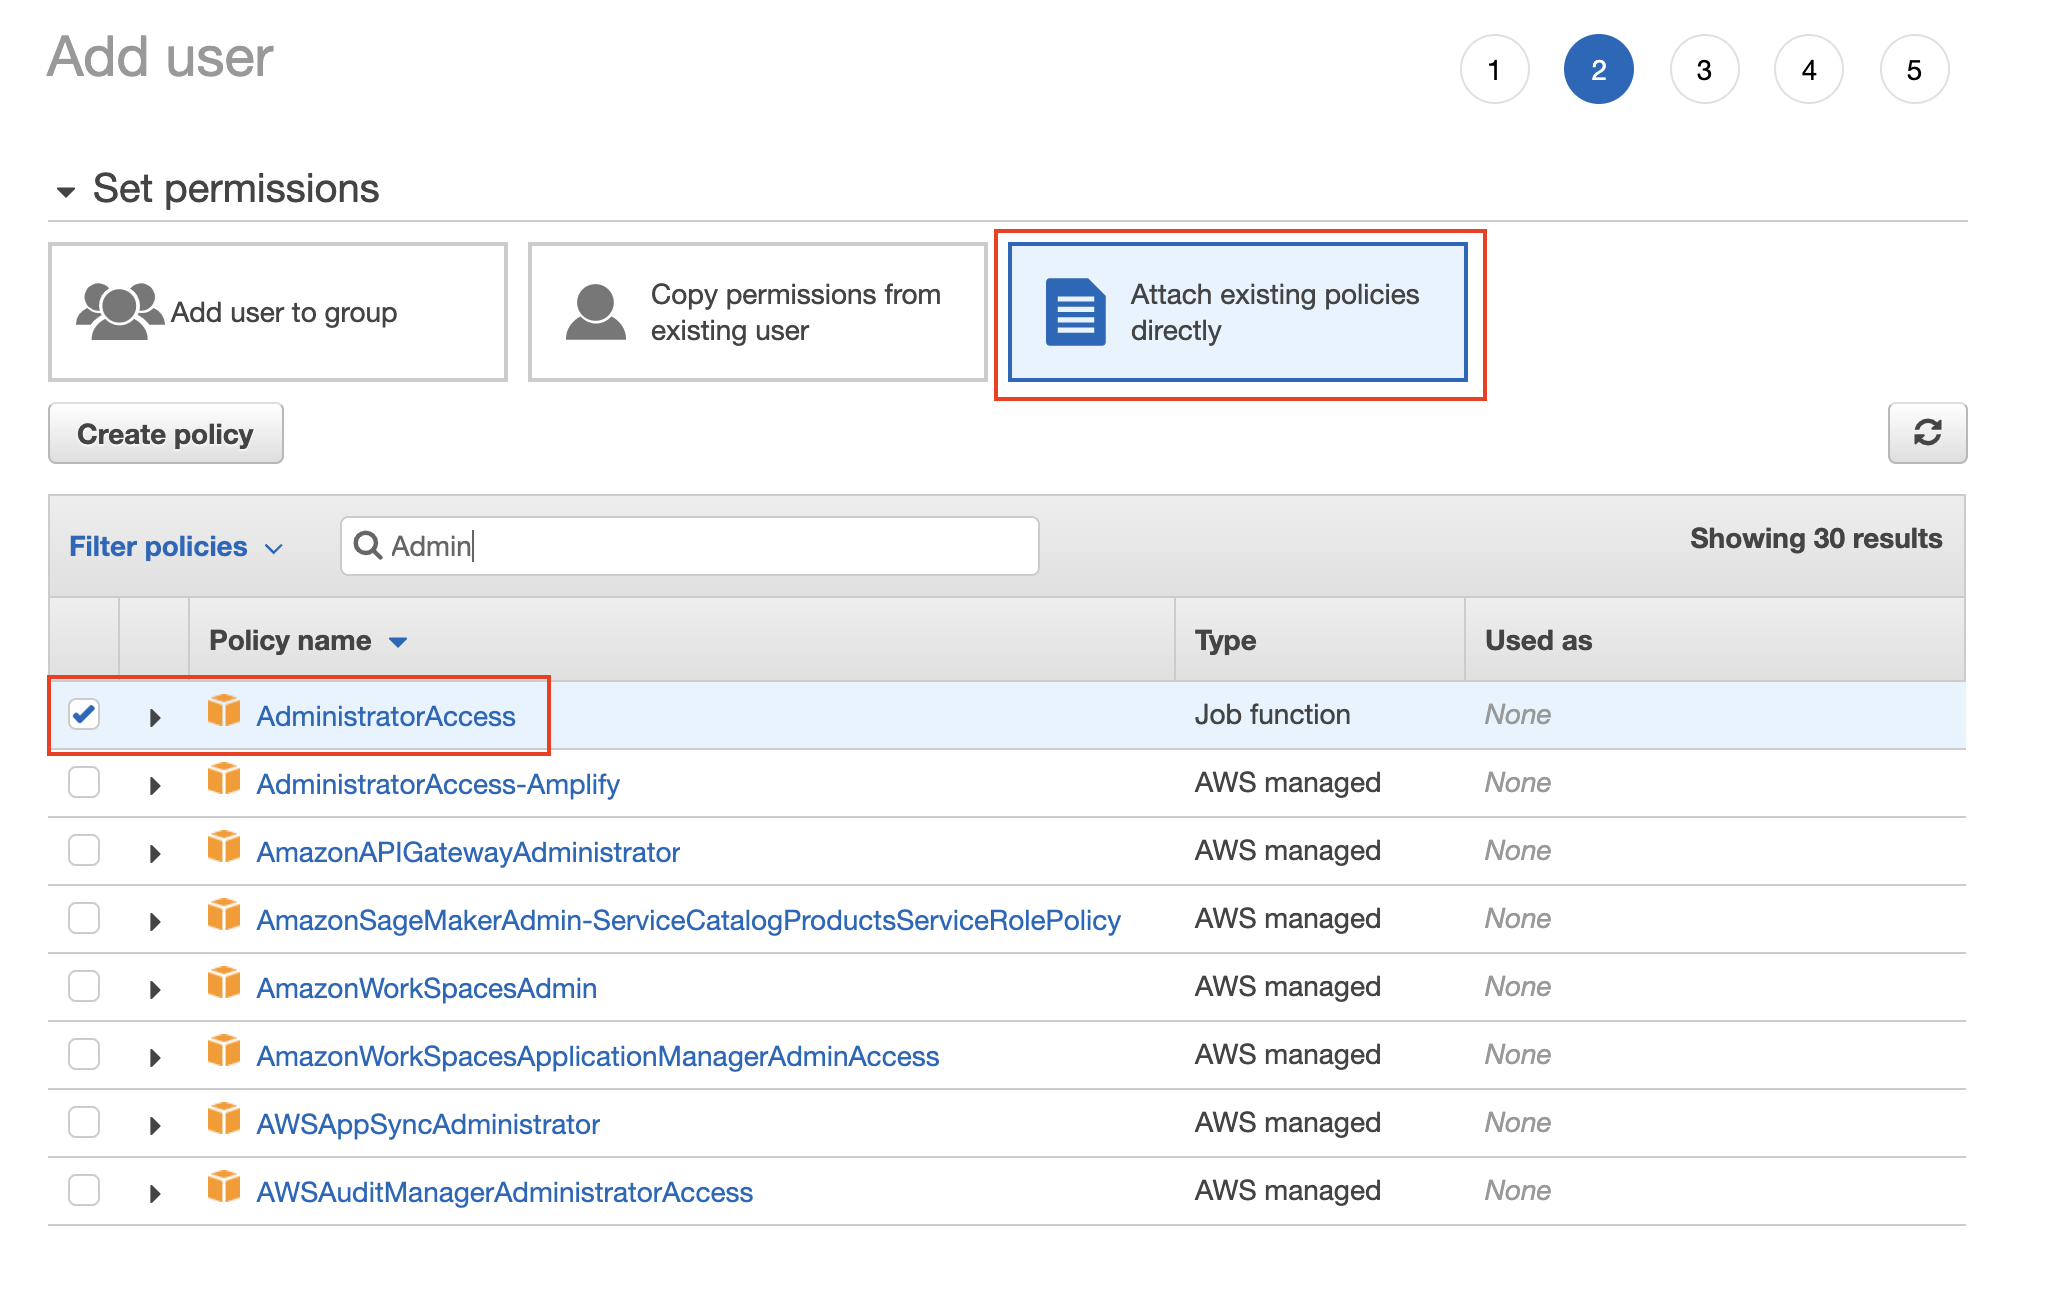
Attach the AdministratorAccess policy from the list of pre-created policies
- Provide tags [optional], review the details of the new user, and finally create the new user.
- After a user is created successfully, download the access key file (.csv) containing the Access Key ID and a Secret Access Key. You can even copy the keys and stay on the same page. Don’t skip this step as this will be your only opportunity to download the secret access key file.
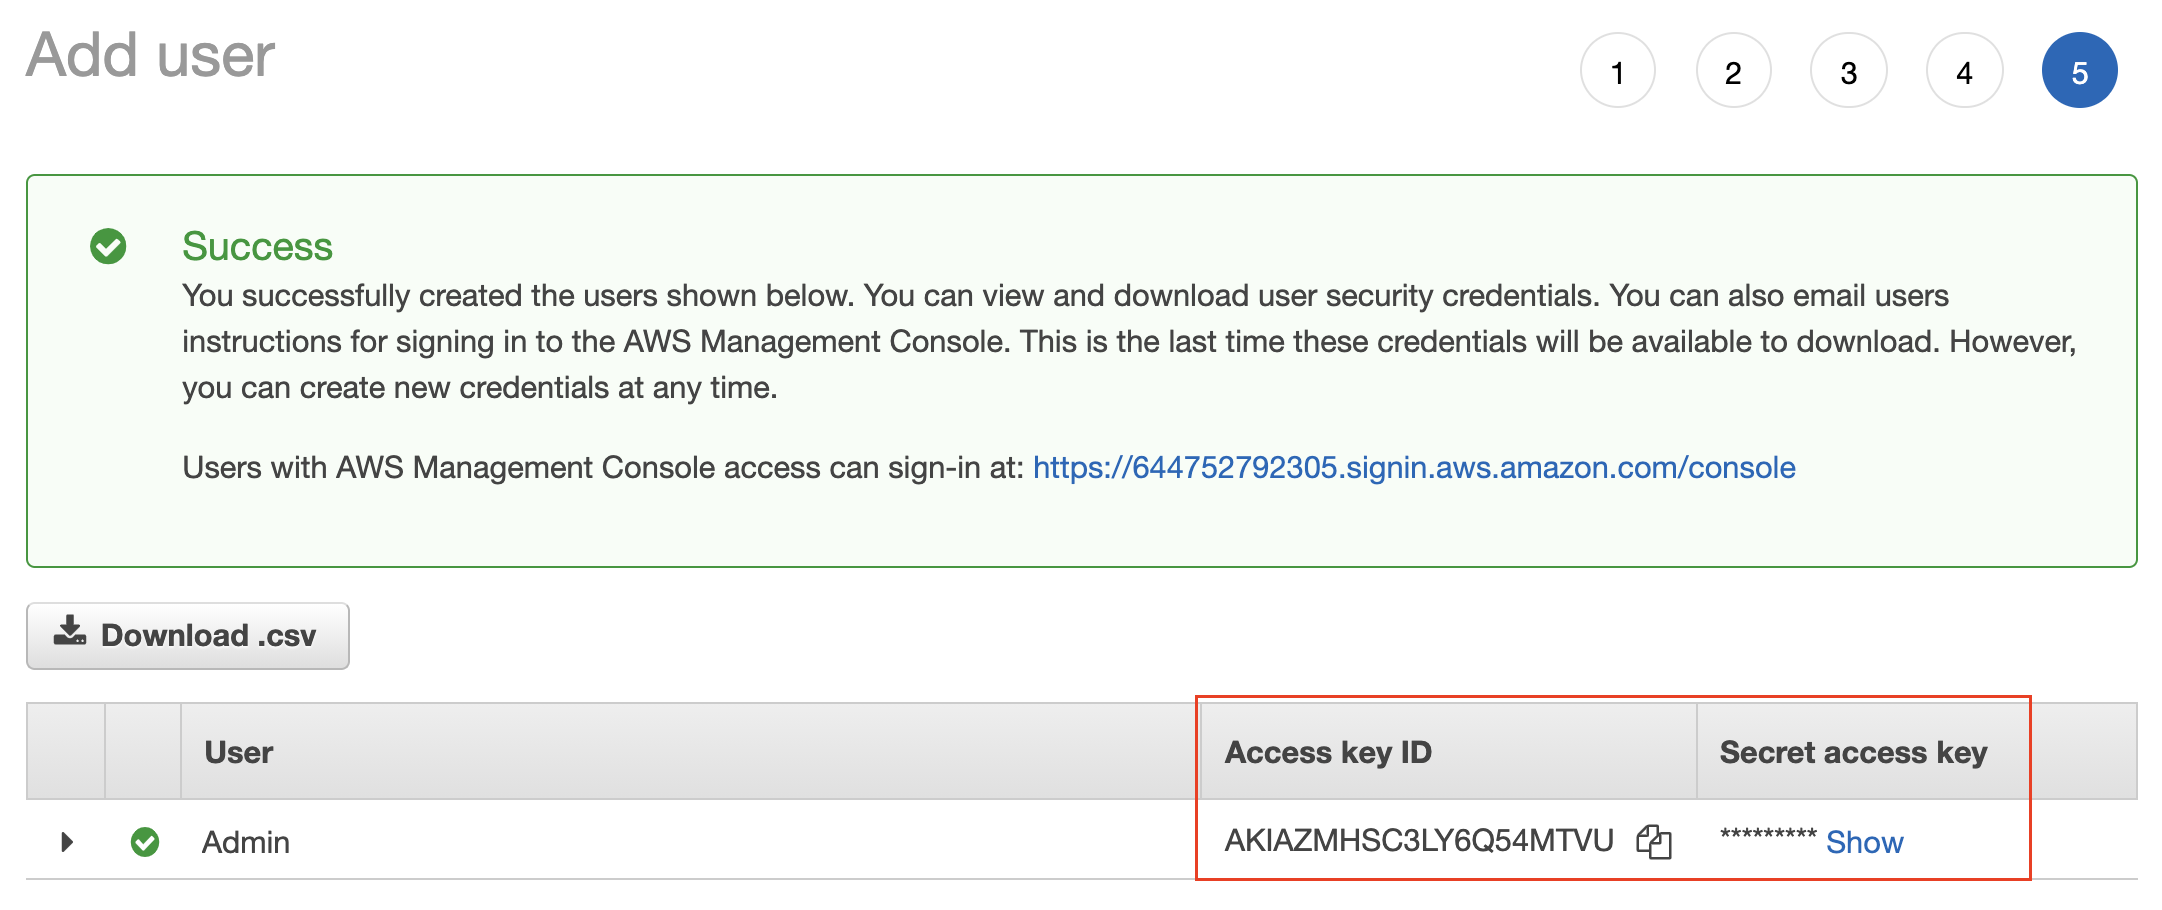
Copy the Access key of the new user OR download the .csv file containing the Access key
Step 3. Configure the AWS CLI
You will need to configure the following four items on your local machine before you can interact with any of the AWS services:
- Access key - It is a combination of an Access Key ID and a Secret Access Key. Together, they are referred to as Access key. You can generate an Access key from the AWS IAM service, and specify the level of permissions (authorization) with the help of IAM Roles.
- Default AWS Region - It specifies the AWS Region where you want to send your requests by default.
- Default output format - It specifies how the results are formatted. It can either be a json, yaml, text, or a table.
- Profile - A collection of settings is called a profile. The default profile name is
default, however, you can create a new profile using theaws configure --profile new_namecommand. A sample command is given below.
If you have closed the web console that showed the access key, you can open the downloaded access key file (.csv) to copy the keys later. It should be something similar to:
AWSAccessKeyId=WANI9WATIG63GKCXA89VC74A
AWSSecretKey=kMT2Jn5NPkq1GxtoUqwUbgHtPbsf1ODm/Pbsf1OD
Mac/Linux: List your present configuration, and then configure your default aws profile
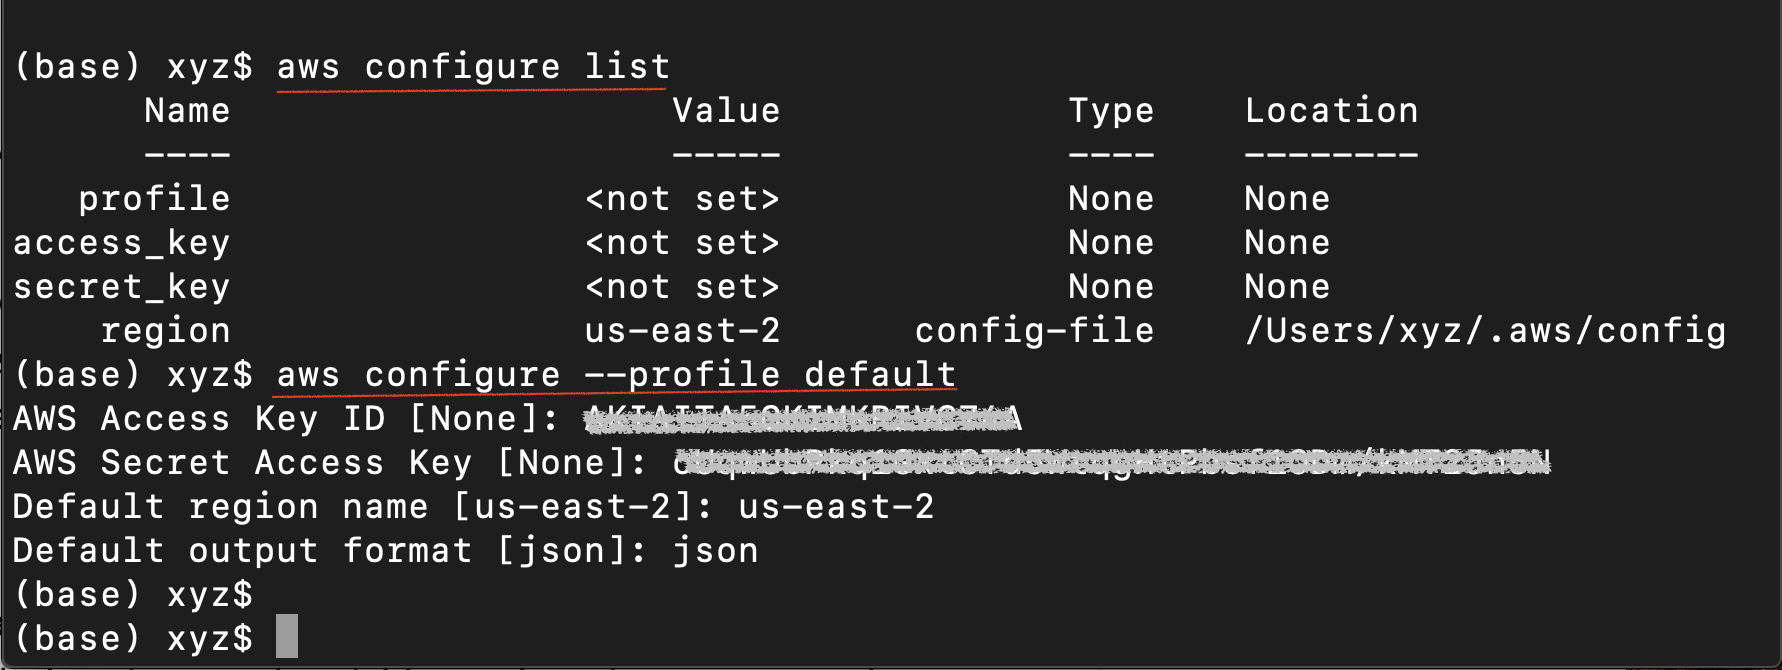
- Navigate to the home directory and check the current configuration:
# Navigate to the home directory cd # View the current configuration aws configure list - Set the default profile credentials
The command above will store the access key in a default fileaws configure --profile default~/.aws/credentialsand store the profile in the~/.aws/configfile. Upon prompt, paste the copied access key (access key id and secret access key). Enter the default region asus-east-1and output format asjson.
- Let the system know that your sensitive information is residing in the .aws folder
export AWS_CONFIG_FILE=~/.aws/config
export AWS_SHARED_CREDENTIALS_FILE=~/.aws/credentials
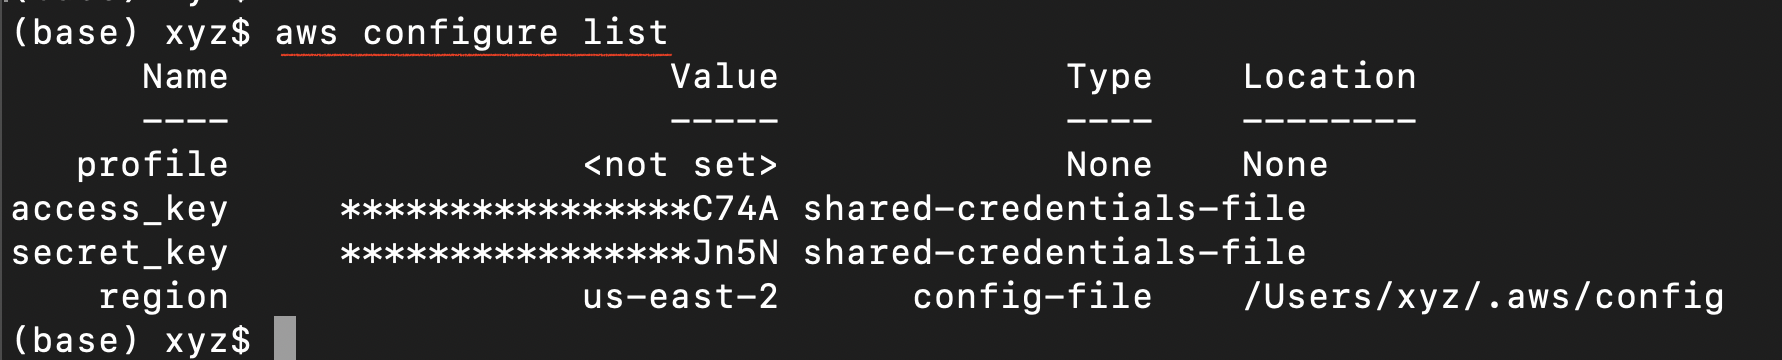
Mac/Linux: A successful configuration
- After a successful credential set-up, your "credentials" file will look like:
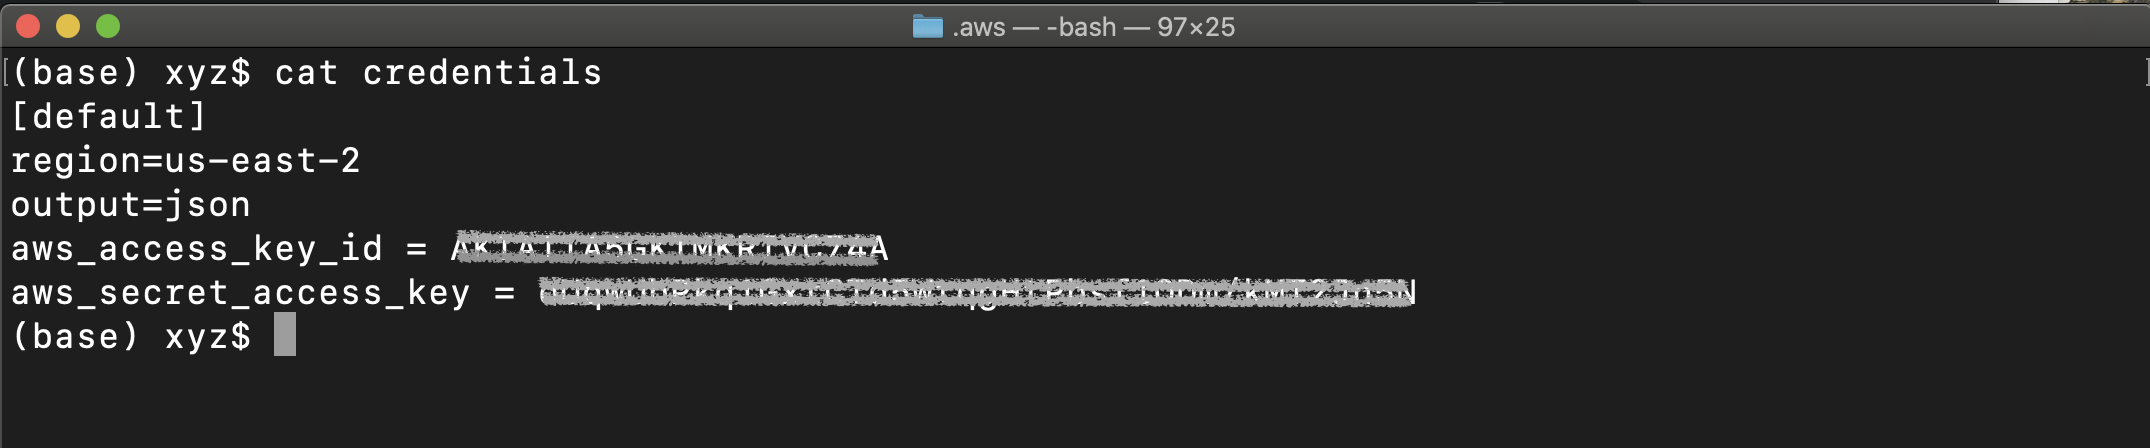
Mac/Linux: View the credentials file using cat ~/.aws/credentials command
- Windows users with GitBash only
You will have to set the environment variables. Run the following commands in your GitBash terminal:setx AWS_ACCESS_KEY_ID AKIAIOSFODNN7EXAMPLE setx AWS_SECRET_ACCESS_KEY wJalrXUtnFEMI/K7MDENG/bPxRfiCYEXAMPLEKEY setx AWS_DEFAULT_REGION us-west-2
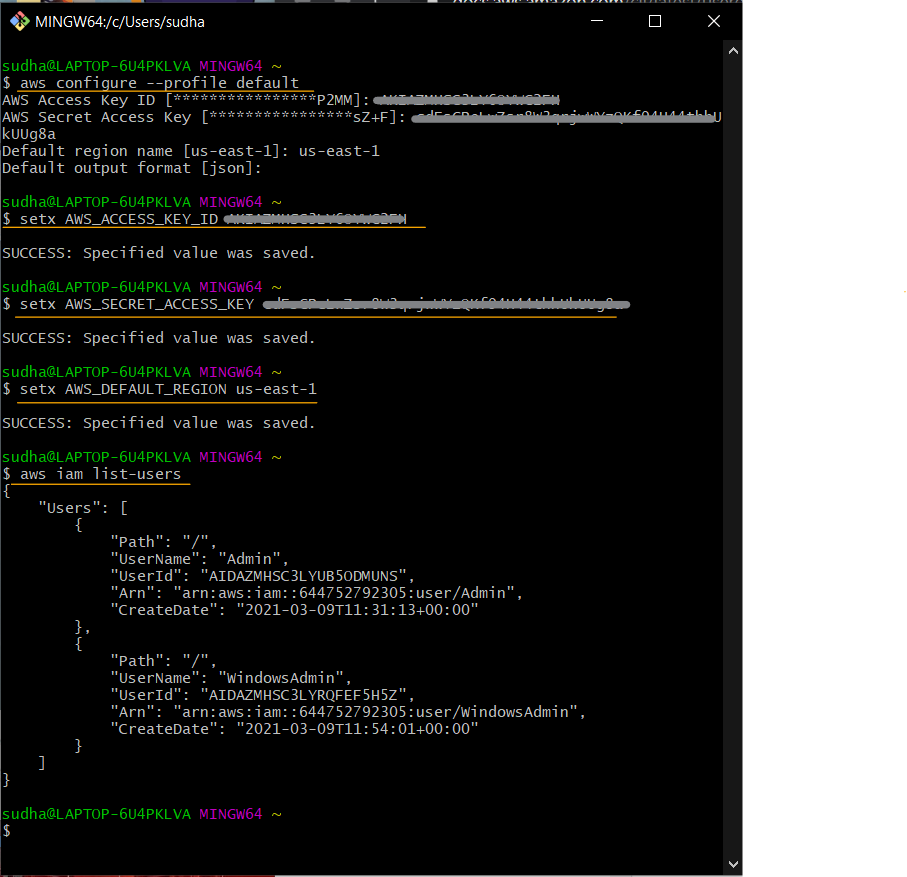
Windows: Successful configuration using the GitBash terminal
Step 4. Run your first AWS CLI command
- Check the successful configuration of the AWS CLI, by running an AWS command:
The output will display the details of the recently created user:aws iam list-users{ "Users": [ { "Path": "/", "UserName": "Admin", "UserId": "AIDAZMXYZ3LY2BNC5ZM5E", "Arn": "arn:aws:iam::388752792305:user/Admin", "CreateDate": "2021-01-28T13:44:15+00:00" } ] }
Troubleshoot
If you are facing issues while following the commands above, refer to the detailed instructions here -
Updating the specific variable in the configuration
In the future, you can set a single value, by using the command, such as:
# Syntax
# aws configure set <varname> <value> [--profile profile-name]
 aws configure set default.region us-east-2
It will update only the region variable in the existing default profile.
相关文章
- Matano:一款针对AWS的开源安全湖平台
- 2022 H1中国公有云服务市场:阿里云、华为云、腾讯云、天翼云、AWS排名前五
- LambdaGuard:一款针对AWS无服务器环境安全的审计工具
- MySQL Error number: MY-011429; Symbol: ER_KEYRING_AWS_FAILED_TO_INIT_DUE_TO_PLUGIN_INTERNAL_ERROR; SQLSTATE: HY000 报错 故障修复 远程处理
- MySQL Error number: MY-011437; Symbol: ER_KEYRING_AWS_FAILED_TO_CONNECT_KMS; SQLSTATE: HY000 报错 故障修复 远程处理
- MySQL Error number: MY-011440; Symbol: ER_KEYRING_AWS_FAILED_TO_RE_ENCRYPT_KEY; SQLSTATE: HY000 报错 故障修复 远程处理
- [免费] 亚马逊AWS中国及海外服务器免费用12个月 最长可领取24个月
- 继谷歌云TPU之后,AWS也推出 AI 芯片 Inferentia
- 条件MySQL 子句之间`AND`操作符多条件查询(mysql多个and)
- 快速部署MySQL借助AWS服务实现轻松搞定(aws服务安装mysql)
- AWS快速拉取MySQL日志,轻松管理日志记录(aws拉取mysql日志)
- azure sql比较分析AWS MySQL 与 Azure SQL的区别(aws mysql 还是)
- AWS MySQL服务价格深度剖析(aws mysql 价格)
- AWS实现无缝迁移至Oracle(aws去oracle)
- 深入探索AWS与Oracle的强强合作(aws与oracle)