
在QT设计器中如何为普通的widget添加菜单和工具栏
Qt 如何 设计 添加 菜单 普通 Widget 工具栏
2023-09-27 14:27:33 时间
为了解决非主窗体的菜单栏和工具栏的可视化操作,我这几天有时间就摸索了一下,的确发现了比较好的方法,也就是不通过c代码,可视化操作也是可以实现的。
前面的博文我们说到了主窗体的菜单和工具栏如何添加和设计,可以参考我前面的博文《如何为QT窗体添加工具栏和菜单栏》
我们知道,不通过编写代码只能给主窗体添加菜单栏工具栏和状态栏,实际上我们在设计器中是可以很明显看到他们的,但在普通的窗体中就没有他们的身影,我们打开设计器发现第一层级的类是QMainWindow:
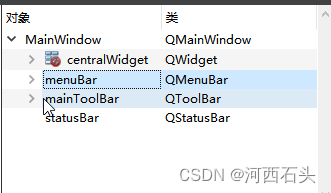
UI文件的结构
如果我们自己建立一个窗体,则没有菜单栏工具栏和状态栏,常规的做法(我感觉也是很麻烦很不直观的办法就是在cpp源代码中用代码添加,不太直观,我我喜欢直观),一般来说一个干净的widget窗体是这样的:
没有添加菜单工具栏的情况
<?xml version="1.0" encoding="UTF-8"?>
<ui version="4.0">
 <class>newForm</class>
 <widget class="QWidget" name="newForm">
  <property name="geometry">
   <rect>
    <x>0</x>
    <y>0</y>
    <width>547</width>
    <height>408</height>
   </rect>
  </property>
  <property name="windowTitle">
   <string>Form</string>
  </property>
 </widget>
 <resources/>
 <connections/>
</ui>
添加了菜单工具栏的情况
一个有菜单栏和工具栏的mainform是这样的:
<?xml version="1.0" encoding="UTF-8"?>
<ui version="4.0">
 <class>MainWindow</class>
 <widget class="QMainWindow" name="MainWindow">
  <property name="geometry">
   <rect>
    <x>0</x>
    <y>0</y>
    <width>400</width>
    <height>329</height>
   </rect>
  </property>
  <property name="windowTitle">
   <string>MainWindow</string>
  </property>
  <widget class="QWidget" name="centralWidget">
   <widget class="CustomTextEdit" name="textEdit">
    <property name="geometry">
     <rect>
      <x>10</x>
      <y>40</y>
      <width>381</width>
      <height>231</height>
     </rect>
    </property>
   </widget>
  </widget>
  <widget class="QMenuBar" name="menuBar">
   <property name="geometry">
    <rect>
     <x>0</x>
     <y>0</y>
     <width>400</width>
     <height>23</height>
    </rect>
   </property>
   <widget class="QMenu" name="menu">
    <property name="title">
     <string>菜单</string>
    </property>
    <addaction name="actionmenu1"/>
    <addaction name="actionmenu2"/>
   </widget>
   <addaction name="menu"/>
  </widget>
  <widget class="QToolBar" name="mainToolBar">
   <attribute name="toolBarArea">
    <enum>TopToolBarArea</enum>
   </attribute>
   <attribute name="toolBarBreak">
    <bool>false</bool>
   </attribute>
   <addaction name="action_1"/>
  </widget>
  <widget class="QStatusBar" name="statusBar"/>
  <action name="actionmenu1">
   <property name="text">
    <string>menu1</string>
   </property>
  </action>
  <action name="actionmenu2">
   <property name="text">
    <string>menu2</string>
   </property>
  </action>
  <action name="action_1">
   <property name="text">
    <string>工具栏1</string>
   </property>
   <property name="toolTip">
    <string>工具栏提示1</string>
   </property>
  </action>
 </widget>
 <layoutdefault spacing="6" margin="11"/>
 <customwidgets>
  <customwidget>
   <class>CustomTextEdit</class>
   <extends>QTextEdit</extends>
   <header location="global">customtextedit.h</header>
  </customwidget>
 </customwidgets>
 <resources/>
 <connections/>
</ui>
动手改造UI文件
我们对比会发现,主窗体的任意控件都是通过添加来实现的,明白了这个其实很好操作,添加我们需要的控件类标签即可,当然标签是可以嵌套的,主窗体中就采用了嵌套的方式(因为widget本来就是可以嵌套的)。如:
<widget class="QWidget" name="toolBar">
我们可以仿照这个布局来设计一下我们的窗体
<?xml version="1.0" encoding="UTF-8"?>
<ui version="4.0">
 <class>newForm</class>
 <widget class="QWidget" name="newForm">
  <property name="geometry">
   <rect>
    <x>0</x>
    <y>0</y>
    <width>471</width>
    <height>424</height>
   </rect>
  </property>
  <property name="windowTitle">
   <string>Form</string>
  </property>
 </widget>

//上面部分是窗体的标题等信息

//下面就是窗体中心部分的设计,就是容纳控件的部分区域
 <widget class="QWidget" name="centralWidget">
  <widget class="newTextEdit" name="textEdit">
   <property name="geometry">
    <rect>
     <x>30</x>
     <y>130</y>
     <width>411</width>
     <height>211</height>
    </rect>
   </property>
  </widget>
 </widget>

//这里是对自定义控件的说明
 <customwidgets>
  <customwidget>
   <class>newTextEdit</class>
   <extends>QTextEdit</extends>
   <header location="global">newtextedit.h</header>
  </customwidget>
 </customwidgets>
 <resources/>
 <connections/>
</ui>
增加菜单工具栏
知道了它的特点后,我们就可以根据我们的需要添加菜单和工具栏了。我们来看看修改后的代码
<?xml version="1.0" encoding="UTF-8"?>
<ui version="4.0">
//描述为对应窗体类名,也是第一层widget
<class>newForm</class>
<widget class="QWidget" name="newForm">
  <property name="geometry">
   <rect>
    <x>0</x>
    <y>0</y>
    <width>460</width>
    <height>300</height>
   </rect>
  </property>

//第二层标准控件类描述,这里我们特意拿出菜单栏工具栏容器类的widget
<widget class="QMenuBar" name="menuBar">
 <property name="geometry">
  <rect>
   <x>0</x>
   <y>0</y>
   <width>460</width>
   <height>23</height>
  </rect>
 </property>

 //第三层菜单类widget
 <widget class="QMenu" name="menu">
  <property name="title">
   <string>菜单</string>
  </property>
  <addaction name="actionmenu1"/>
  <addaction name="actionmenu2"/>
 </widget>
 <addaction name="menu"/>
</widget>
//第三层工具栏类widget
 <widget class="QToolBar" name="mainToolBar">
   <property name="geometry">
    <rect>
     <x>0</x>
     <y>24</y>
     <width>51</width>
     <height>21</height>
    </rect>
   </property>
   //action详细属性可以描述在控件层内,也可以描述在菜单工具栏状态栏的第二层结尾处
   <action name="action">
    <property name="text">
     <string>按钮</string>
    </property>
    <property name="toolTip">
     <string>水电费</string>
    </property>
   </action>
   <addaction name="action"/> //这句是表明在控件中增加了一个动作action,只能描述在控件层widget中
  </widget>
  <widget class="newTextEdit" name="textEdit">
   <property name="geometry">
    <rect>
     <x>30</x>
     <y>130</y>
     <width>400</width>
     <height>100</height>
    </rect>
   </property>
  </widget>
 </widget>

//自定义控件描述
 <customwidgets>
  <customwidget>
   <class>newTextEdit</class>
   <extends>QTextEdit</extends>
   <header location="global">newtextedit.h</header>
  </customwidget>
 </customwidgets>
 <resources/>
 <connections/>
</ui>
增加后的效果
和主窗体一样,我们也可以在设计器中明显的看到他们了,你看,是不是我们并不在主窗体里面啊!
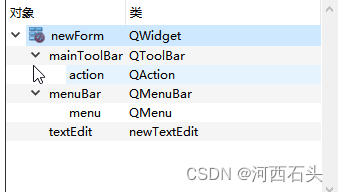
到离这里,你就可以和主窗体一样用鼠标在设计器上很便利的添加菜单和工具按钮了。
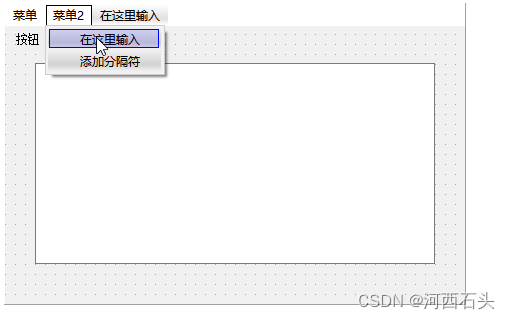
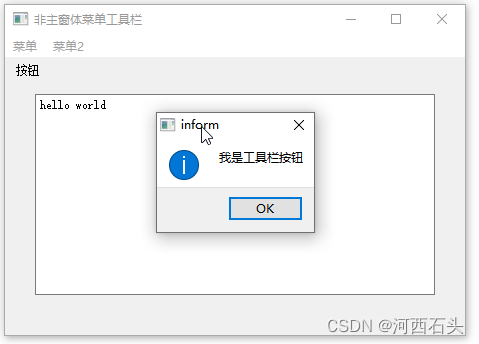
运行效果如下:
相关文章
- 【ARM-Linux开发】【Qt开发】Qt Creator自定义编译运行步骤
- 【QT开发】QT在windows下的exe应用程序如何在别人的电脑上直接运行
- 【QT开发】QT在windows下的exe应用程序如何在别人的电脑上直接运行
- 【QT】QT样式表语法
- Qt·QThreadPool
- PyQt(Python+Qt)学习随笔:QMainWindow的setDockNestingEnabled作用案例图解
- PyQt(Python+Qt)学习随笔:QTabWidget选项卡部件概述和属性介绍
- PyQt(Python+Qt)学习随笔:树型部件QTreeWidget中使用sortItems进行项排序
- PyQt(Python+Qt)学习随笔:Qt Designer中建立CommandLinkButton信号与Action的槽函数连接
- QT 读取txt 文件
- QT系统托盘应用程序
- QT的学习(一)如何查阅QT文档?(以QPushButton为例)
- QT当类有多个不同类型的同名信号时如何处理QOverload?
- Qt编译错误“GL/gl.h:No such file or directory”的解决方法
- 【C 语言】Windows 下使用 gcc 编译器 ( 常用的编译器 | Qt 中的 gcc 编译器 | 独立安装 MinGW )
- qt自定义控件-旋转风扇
- qt之sqlite存储大数据(事务更快)
- Qt 进程和线程之一:运行一个进程和进程间通信