
微信小程序api详细教程
一. 写在开头
学习微信api,我们可以查阅微信官方学习文档API,由于里面内容很多,在这里我就总结了一些常用的api可供参考。
二. 微信api的介绍
1. 基础
- wx.getWindowInfoSync()获取系统信息
(1)statusBarHeight 状态栏高度
(2) windowWidth 可用窗口的宽
(3) windowHeight 可用窗口的高
(4)safeArea 安全区域
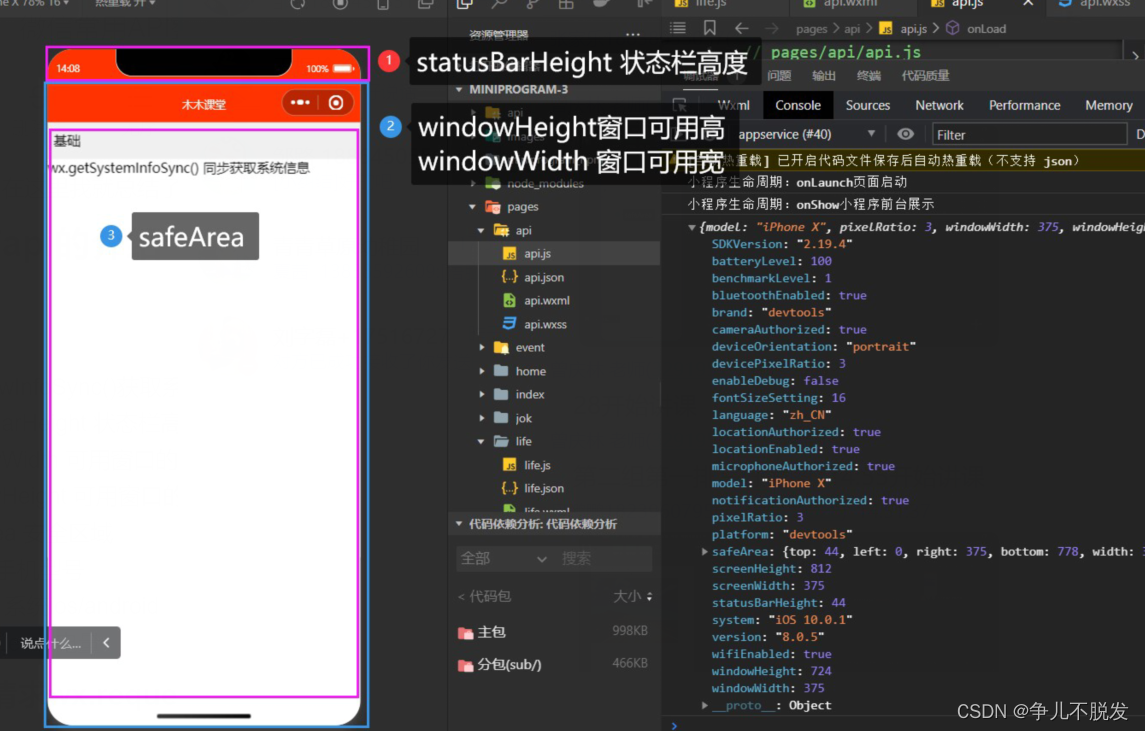
(5)model 手机型号
(6)system 系统ios/android
(7) batteryLevel 电量
2. 路由(详细信息请看上一篇小程序文章)
(1)wx.navigateTo({}) 跳转
(2) wx.redirectTo()重定向
(3)wx.switchTab() 切换底部栏
(4) wx.navigateBack( ) 返回
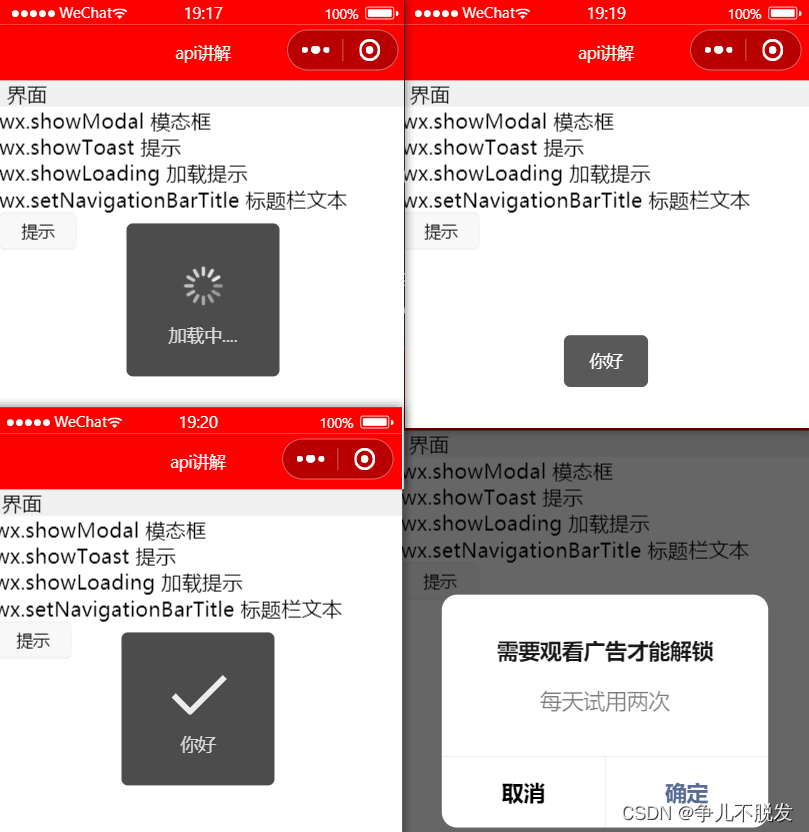
3.界面
- 交互
(1)wx.showModal 模态框
(2)wx.showToast 提示
(3)wx.showLoading加载提示
(4) wx.setNavigationBarTitle 标题栏文本
1.js代码
showTip(){
    wx.setNavigationBarTitle({
      title: 'api讲解',
    })
    wx.setNavigationBarColor({
      frontColor:'#ffffff',
      backgroundColor:"#ff0000",
      animation:{
        duration:400,
        timingFunc:"easeIn"
      }
    })
    // wx.setNavigationBarColor({
    //     frontColor:'#ff0000',
    //     backgroundColor:"#000000",
    // })
    // wx.showModal({
    //   title:"需要观看广告才能解锁",
    //   content:"每天试用两次"
    // })
    wx.showToast({
      title: '你好',
      icon:"success"
    })
    // wx.showLoading({
    //   title:'加载中....'
    // })
    // setTimeout(()=>{
    //   wx.hideLoading();
    // },2000)
  },
2.wxml代码
<view  class="title">界面</view>
<view>wx.showModal 模态框</view>
<view>wx.showToast 提示</view>
<view>wx.showLoading 加载提示</view>
<view> wx.setNavigationBarTitle 标题栏文本</view>
<button size="mini" bindtap="showTip">提示</button>
- 下拉刷新
wx.stopPullDownRefresh
wx.startPullDownRefresh
4.网络
-
wx.request网络请求
(1) url 请求的地址
(2) data 数据(post)
(3) timeout超时事件
(4)header 请求头
(5)method 方式 post|get|put|delete
(6) success 成功回调函数
(7) fail 失败回调
(8)complete完成(成功和失败都会执行)会结束加载提示 -
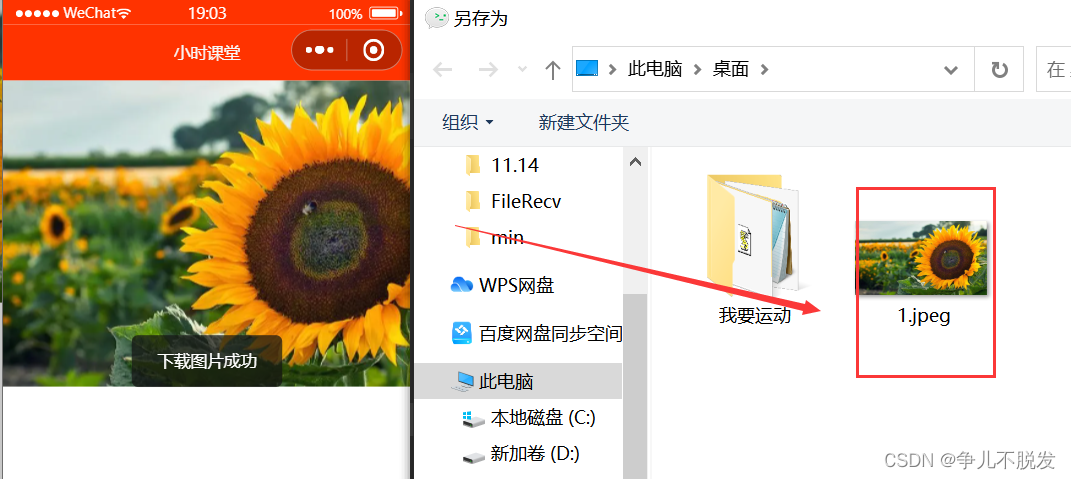
下载
wx.downloadFile 下载文件
wx.saveImageToPhotosAlbum 保存图片到相册
下图就是把图片下载保存到本地
1.js代码(data里面写图片路径)
data: {
    pic:"https://img0.baidu.com/it/u=2028084904,3939052004&fm=253&app=138&size=w931&n=0&f=JPEG&fmt=auto?sec=1668531600&t=ed94434b39c6e8e4c6c35e423c366e41"
  },
downPic(){
    wx.downloadFile({
      url: this.data.pic,
      success(res){
        console.log(res);
        wx.saveImageToPhotosAlbum({
          filePath: res.tempFilePath,
          success(){
            wx.showToast({
              title:'下载图片成功',
              icon:"none"
            })
          }
        })
      }
    })
  },
2.wxml 代码
<image src="{{pic}}" mode="aspectFill" bindtap="downPic" />
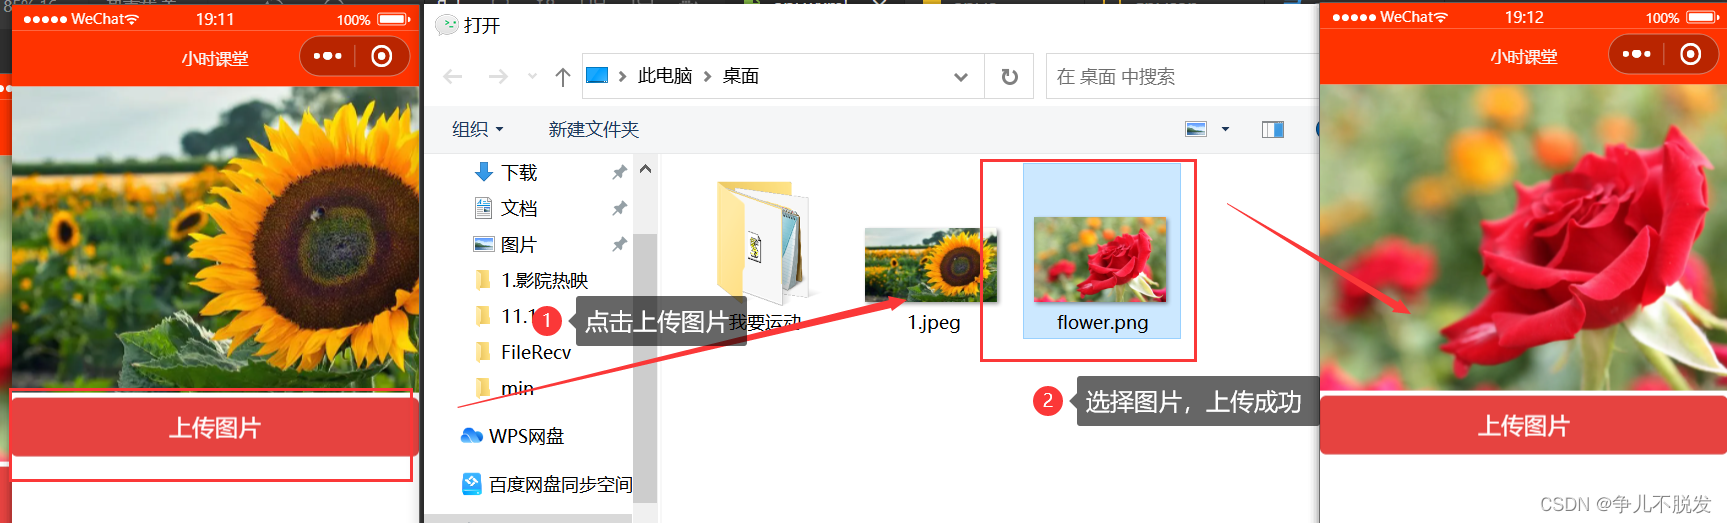
- wx.uploadFile 上传
wx.chooseMedia 选择图片或者视频
wx.chooseImage从相册选择图片
1.js代码
upImg(){
    var that=this;
    //选择图片 媒体
    wx.chooseMedia({
      count:1,//媒体数量
      success(res){
        console.log(res);
      //获取选择的第0个图片临时地址
        var tempFile=res.tempFiles[0].tempFilePath;
        wx.uploadFile({
          filePath: tempFile,
          name: 'file',
          url: 'http://dida100.com/ajax/file.php',
          success:res=>{
            console.log(res);
            var data=JSON.parse(res.data);
            that.setData({pic:"http://dida100.com"+data.pic})
          }
        })
      }
    })
  },
2.wxml代码
<image src="{{pic}}" mode="aspectFill" bindtap="downPic" />
<button type="warn" bindtap="upImg">上传图片</button>
5. 开放接口
open-type:share触发分享(都会弹框需要授权),像下图这样,弹出一个窗口,点击允许即可
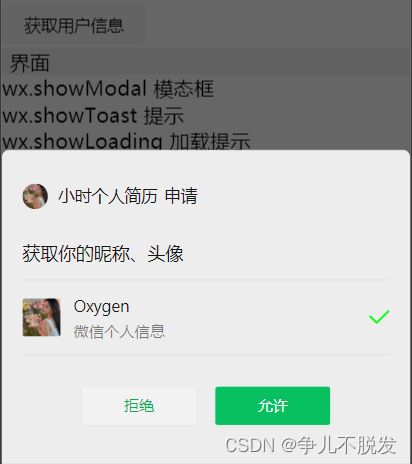
1.用户信息
(1)wx.getUserProfile 获取用户信息
页面产生点击事件(例如 button 上 bindtap 的回调中)后才可调用,每次请求都会弹出授权窗口,用户同意后返回 userInfo。该接口用于替换 wx.getUserInfo
(2)wx.getUserInfo获取用户信息。
(3) wx.chooseAvatar获取用户的头像

1.写如下的js代码
 getUser(){
    var that=this;
    wx.getUserProfile({
      desc: '需要获取您的昵称',
      success:res=>{
        console.log(res);
        that.setData({"userInfo":res.userInfo})
        wx.setStorageSync('userInfo', res.userInfo)
      }
    })
  },
- 写如下的wxml代码
<view>
  <image src="{{userInfo.avatarUrl}}" mode="" style="width:100px;height:100px;"/>
  <view>{{userInfo.nickName}}</view>
</view>
<button  size="mini" bindtap="getUser">获取用户信息</button>
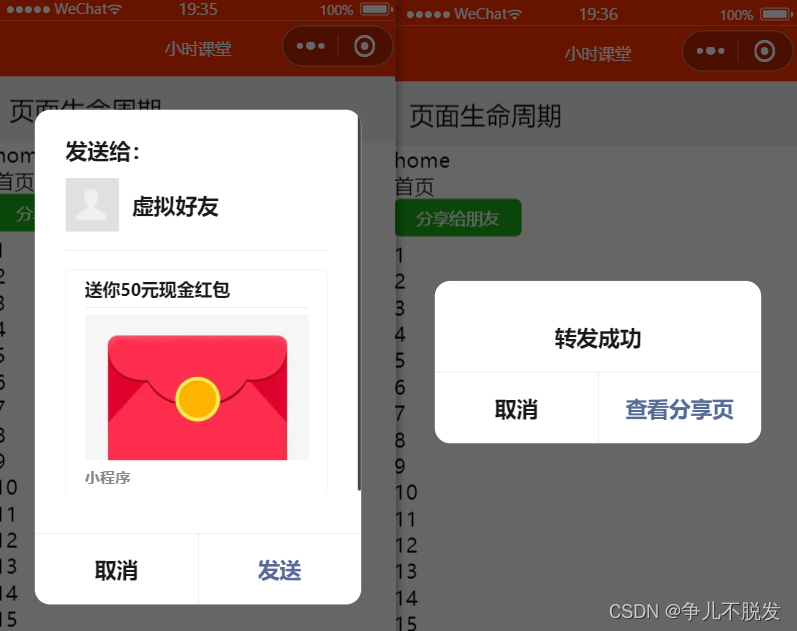
7. 页面生命周期实现分享朋友与分享到朋友圈
(1)onShareAppMessage 右上角分享 点击分享
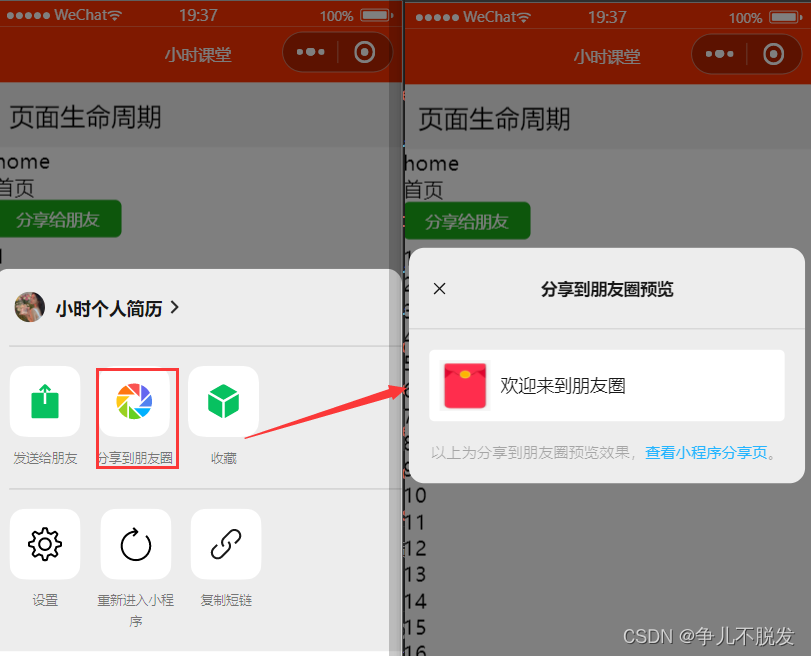
(2)onShareTimeLine 分享到朋友圈
wxml代码
<button size="mini" type="primary" open-type="share">分享给朋友</button>
<view wx:for="{{100}}" wx:key="item">
  {{item+1}}
</view>
js代码
 onShareAppMessage() {
    return{
      title:"送你50元现金红包",
      path:"/pages/yidian/yidian",
      imageUrl:"https://img1.baidu.com/it/u=2192736850,1088345825&fm=253&app=138&size=w931&n=0&f=JPEG&fmt=auto?sec=1668531600&t=1b750f56e87bdeaa7af99d0aaf1af1a6"

    }
  },
  onShareTimeline(){
    return{
         title:"欢迎来到朋友圈",
         query:"/pages/event/event?name=mumu&age=18",
         imageUrl:"https://img1.baidu.com/it/u=2192736850,1088345825&fm=253&app=138&size=w931&n=0&f=JPEG&fmt=auto?sec=1668531600&t=1b750f56e87bdeaa7af99d0aaf1af1a6"

    }


  },
3.写在结尾
其实我们会发现学习小程序的时候,很多功能的实现还是很有趣的,坚持下去,我们终会有收获的。如果对你有用,不要忘了一键三连哦,你的支持将是我最大的动力。
相关文章
- 基本使用——OkHttp3详细使用教程
- PHP PC端微信扫码支付【模式二】详细教程-附带源码(转)
- 微信公众平台开发教程--自定义菜单
- Linux+Redis实战教程_day02_消息订阅与发布_多数据库_redis批量操作-事务_redis持久化
- .Netcore 2.0 Ocelot Api网关教程(3)- 路由聚合
- 开源实时音视频技术WebRTC在Windows下的简明编译教程
- 【cocos 2d微信小游戏开发教程】基础使用笔记分享(三)
- 【cocos 2d微信小游戏开发教程】基础使用笔记分享(一)
- VSCode安装教程(图文详解,简单搞定)
- Spring Boot2 系列教程(二十九)Spring Boot 整合 Redis
- React Native iOS混合开发实战教程
- Koa2教程(常用中间件篇)
- 微信公众账号开发教程(二) 基础框架搭建——转自http://www.cnblogs.com/yank/p/3392394.html