
python opencv 斑点和直线检测
2023-09-27 14:25:48 时间

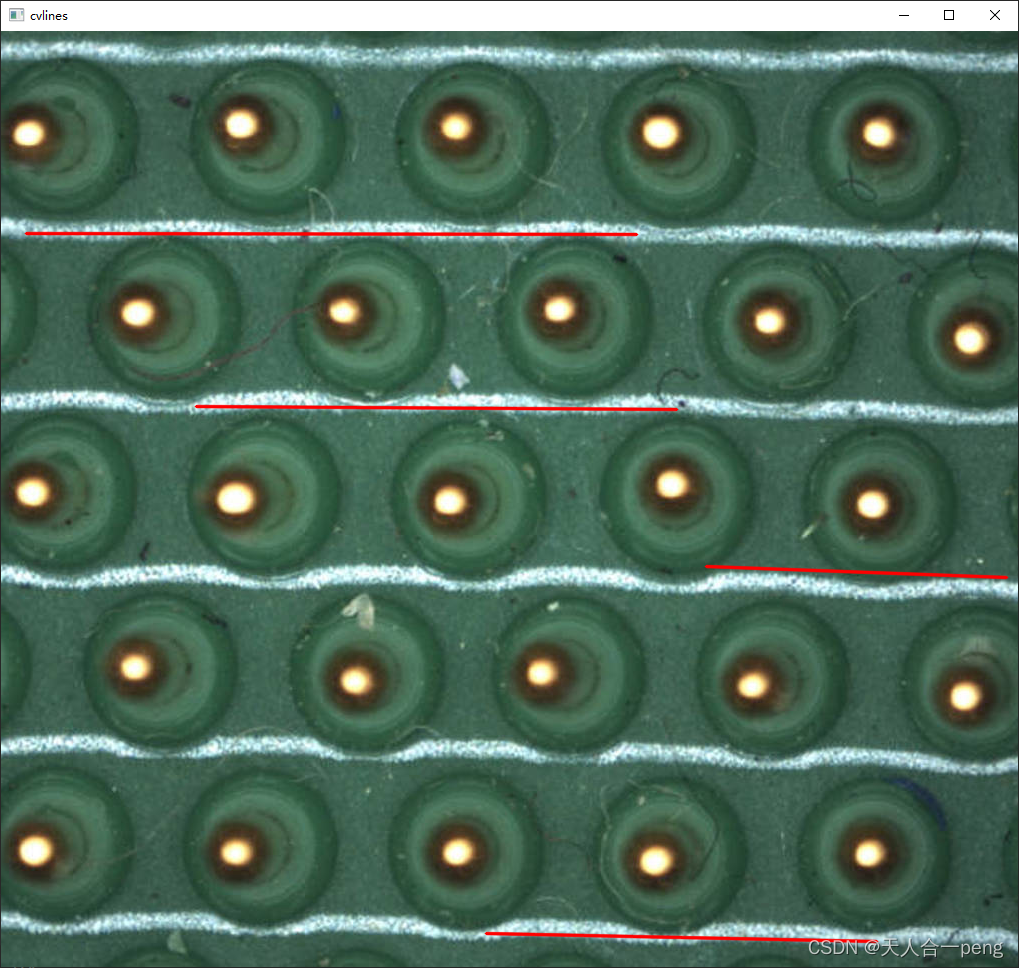
检测结果

找白色的线
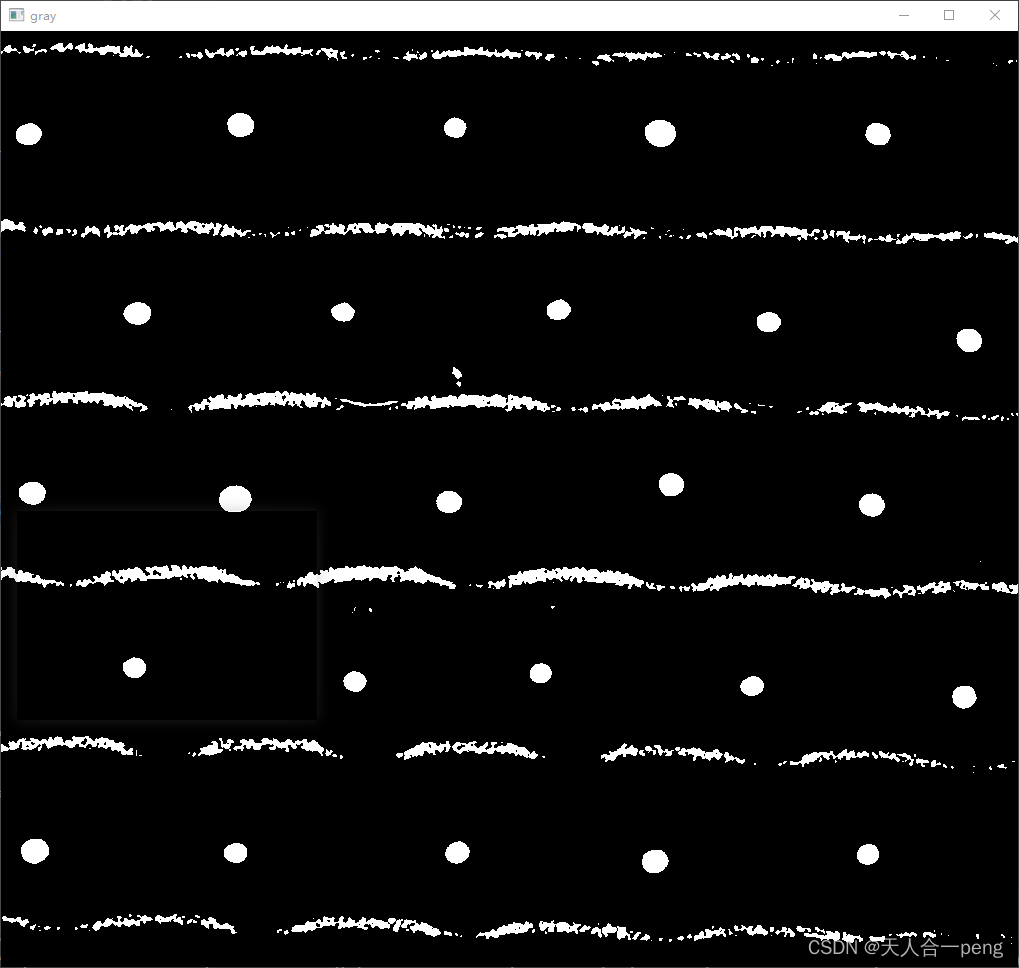
线可以通过长度调节
# coding:utf-8
import math
import cv2
import numpy as np

def findNeedlePoints(img):
    gray_src= cv2.cvtColor(img,cv2.COLOR_BGR2GRAY)
    minThreshValue = 200
    _, gray = cv2.threshold(gray_src, minThreshValue, 255, cv2.THRESH_BINARY)
    erosion_size = 3
    # element = cv2.getStructuringElement(cv2.MORPH_ELLIPSE, (2 * erosion_size + 1, 2 * erosion_size + 1),
    #                                     (erosion_size, erosion_size))
    element = cv2.getStructuringElement(cv2.MORPH_ERODE, (2 * erosion_size + 1, 2 * erosion_size + 1),
                                        (erosion_size, erosion_size))
    #MORPH_ELLIPSE 不同的测试一下
    erosion_gray = cv2.erode(gray, element, 3)

    cv2.imshow("erosion_gray", erosion_gray)

    paramsIn = cv2.SimpleBlobDetector_Params()
    paramsIn.filterByArea = True

    # 不同图片应该调节的参数
    paramsIn.minArea = 200
    paramsIn.maxArea = 1000
    paramsIn.minDistBetweenBlobs = 90
    paramsIn.filterByColor = True
    paramsIn.filterByConvexity = False
    paramsIn.minThreshold = 100*2
    paramsIn.maxThreshold = 1000

    # 图像取反
    needleGray = 255 - erosion_gray.copy()
    # 中值滤波和腐蚀去噪
    needleGray = cv2.medianBlur(needleGray, 3)

    # cv2.imshow('needleGray', needleGray)


    erosion_size = 2
    element = cv2.getStructuringElement(cv2.MORPH_RECT, (2 * erosion_size + 1, 2 * erosion_size + 1),
                                        (erosion_size, erosion_size))
    needlePoints = cv2.erode(needleGray, element, 1)
    cv2.imshow('needle=Points', needlePoints)

    detector2 = cv2.SimpleBlobDetector_create(paramsIn)
    needleKeypoints = detector2.detect(needlePoints)
    # opencv
    needle_keypoints = cv2.drawKeypoints(needlePoints, needleKeypoints, np.array([]), (255, 0, 0),
                                         cv2.DRAW_MATCHES_FLAGS_DRAW_RICH_KEYPOINTS)

    allNeedlePoints = []
    if needleKeypoints is not None:
        for i in range(len(needleKeypoints)):
            allNeedlePoints.append(needleKeypoints[i].pt)


    color_img = cv2.cvtColor(needle_keypoints, cv2.COLOR_BGR2RGB)
    # needle_img = cv2.cvtColor(im_with_keypoints, cv2.COLOR_BGR2RGB)

    cv2.imshow('holeShow', color_img)
    # cv2.imshow('needleShow', needle_img)

    cv2.waitKey()


def findWhiteLines(img):
    minThreshValue = 200
    gray_src= cv2.cvtColor(img,cv2.COLOR_BGR2GRAY)
    _, gray = cv2.threshold(gray_src, minThreshValue, 255, cv2.THRESH_BINARY)
    cv2.imshow("gray", gray)
    # erosion_size = 3
    # element = cv2.getStructuringElement(cv2.MORPH_ELLIPSE, (2 * erosion_size + 1, 2 * erosion_size + 1),
    #                                     (erosion_size, erosion_size))
    # erosion_dst = cv2.erode(gray, element, 3)
    # cv2.imshow("erosion", erosion_dst)
    lsd = cv2.createLineSegmentDetector(2, 0.1)
    dlines = lsd.detect(gray)


    if dlines is not None:
        for dline in dlines[0]:
            x0 = int(round(dline[0][0]))
            y0 = int(round(dline[0][1]))
            x1 = int(round(dline[0][2]))
            y1 = int(round(dline[0][3]))
            if np.linalg.norm(np.array([x0, y0]) - np.array([x1, y1])) > 300:
              cv2.line(img, (x0, y0), (x1, y1), (0, 0, 255), 2, cv2.LINE_AA)


    cv2.imshow("cvlines", img)
    cv2.waitKey()


if __name__ == "__main__":

    # # 单张图片测试
    img = cv2.imread("images/CircleLinker/CLinker10.jpg",1)
    # img = cv2.imread("images/Snap_0.jpg",1)
    # img = cv2.imread("images/Holes/Hole2.jpg",1)
    if img is not None:
        findNeedlePoints(img)
        # mainFigure(img)
        findWhiteLines(img)

    else:
        print("no image")

    # # # 所有图片测试
    # for i in range(5):
    #     fileName = "Zhen" + str(i+1) + ".jpg"
    # # img = cv2.imread("circles/Snap_007.jpg",1)
    #     img = cv2.imread("images/ZhenJiao/" + fileName,1)
    #     print(fileName)
    #     mainFigure(img)
相关文章
- Jmeter 接口自动化和 Python 接口自动化,到底选哪个?
- Python for循环的用法,怎么前面还有一个变量或函数?
- 【华为OD机试真题 python】硬件产品销售方案【2023 Q1 | 200分】
- 【华为OD机试真题 python】微服务的集成测试【2023 Q1 | 100分】
- python使用正则验证是否是md5加密格式
- 火遍全世界的Python,为啥这么牛?
- Python-OpenCV难道比C++_OpenCV快?以调用Canny边缘检测函数为例
- 探索尝试:用OpenCV官方发布的build包替换Pip命令安装的Python包(以失败告终)
- Python爬虫技术--基础篇--内建模块hashlib和hmac
- Python爬虫技术--基础篇--函数式编程(下篇)
- 《NLTK基础教程——用NLTK和Python库构建机器学习应用》——2.11 小结
- Python OpenCV实现鼠标绘制矩形框和多边形
- OpenCV+yolov3实现目标检测(C++,Python)
- 基于Python+MongoDB 实现(Web)当代数据管理系统(网上书城)【100010289】
- python 字典推导式
- 如何在OpenCV Python中翻转图像?
- Python代码库OpenCV之10圆检测circle detection 霍夫曼(含代码)
- Python代码库OpenCV之04读取图片绘制直方图(含代码)
- Python代码库OpenCV之02Numpy的基础使用(含代码)
- python使用flask模块和前端交互基础
- Python Pillow(PIL 第三方模块)和 cv2 (opencv第三方模块)对图片的 resize 操作 (缩放图片大小)
- 第一章 opencv与python介绍及环境搭建
- 2022&2023华为OD机试 - 第 k 长子串(Python)
- python 有效位数计算
- python 3.7.4 安装 opencv(windows7+pycharm),拍照功能
- 小学生Python编程 —— 欢乐钢琴
- 【图像处理】——Python实现几何变换(自定义+opencv库)
- 【图像处理】——Python OpenCV实现形态学膨胀、腐蚀开闭操作(可以用于图像滤波、图像分割等)
- Python opencv-python 简单测试
- torchvision 的 transforms 与 python 的图像接口opencv、skimage和PIL 相关总结