
【Harmony OS】【ARK UI】【Demo】加载动画实现
2023-09-11 14:20:22 时间
在HarmonyOS 中加载动画实现是很常见的技术,今天分享怎么实现加载动画的功能,分为“准备阶段”,“代码实现”,“运行效果”三步进行实现。
1.准备阶段
我们需要准备一张加载的图片(如下图所示),把图片放在resource/base/media/目录下(如图所示),我们还需要学习“显式动画”,“组件内转场”,“ 定时器”这个三篇资料


2. 代码实现
2.1绘画界面
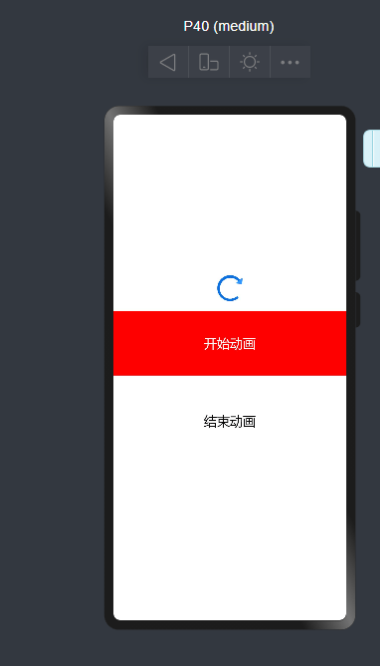
一个张图片显示加载,一个text显示开启动画,一个text显示关闭动画,代码和效果如下,
@Entry
@Component
struct LoadAnimation {


  build() {
    Flex({ direction: FlexDirection.Column, alignItems: ItemAlign.Center, justifyContent: FlexAlign.Center }) {
      Image($r("app.media.loading"))
        .objectFit(ImageFit.Contain)
        .height(40)
        .aspectRatio(1)
        .width(40)
        .margin({ bottom: 5 })
      Text("开始动画").width("100%").height(100)
      .textAlign(TextAlign.Center).backgroundColor(Color.Red)
        .fontColor(Color.White).fontSize(20)
      .margin(10)


      Text("结束动画").width("100%").height(100)
        .textAlign(TextAlign.Center).backgroundColor(Color.White)
        .fontColor(Color.Black).fontSize(20)
        .margin(10)
    }
    .width('100%')
    .height('100%')
  }
}
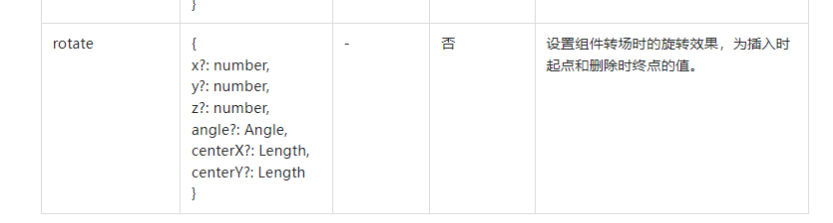
2.2 给Image添加旋转属性,参考资料“组件内转场”的rotate属性,代码如下
Image($r("app.media.loading"))
        .objectFit(ImageFit.Contain)
        .height(40)
        .aspectRatio(1)
        .width(40)
        .margin({ bottom: 5 })
        .rotate({ x: 0, y: 0, z: 1, angle: this.rotateAngle })
2.3实现开启动画
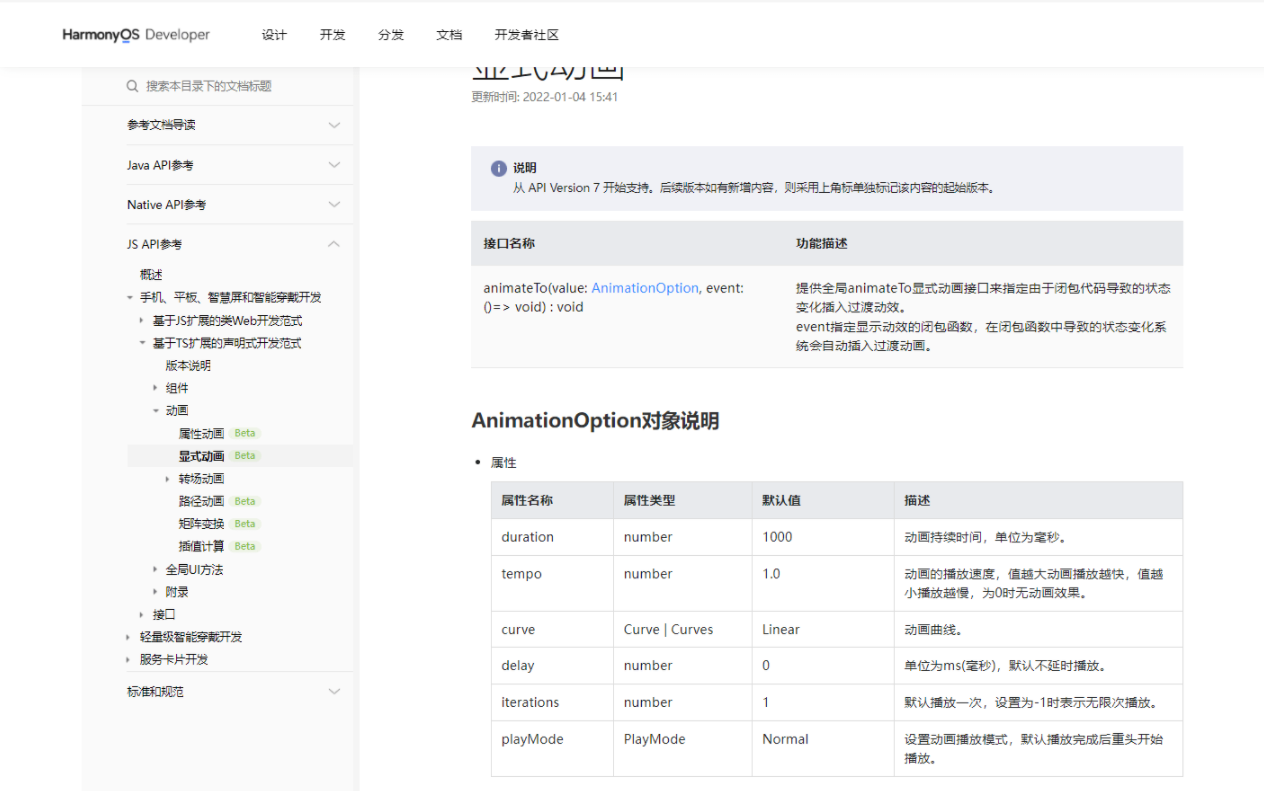
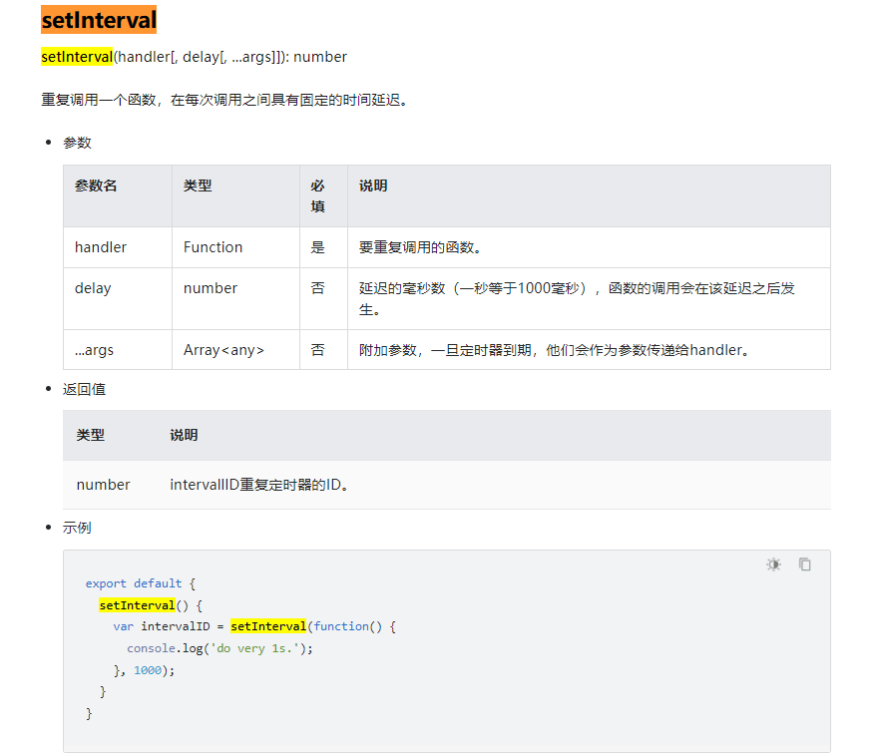
实现这个功能我们需要学习“显式动画”的animateTo的使用方法和“定时器”的setInterval功能实现
代码如下
startRotate() {
    this.rotateTimeOut = setInterval(() => {
      this.rotateAngle = 0
      animateTo({ duration: 800 }, () => {
        this.rotateAngle = 360
      })
    }, 800)
  }
2.4关闭动画按钮点击实现实现
我们清除定时器就可以了,代码如下
  clearAnimation(){
    clearInterval(this.rotateTimeOut)
  }
3.运行效果
3.1全部代码如下
@Entry
@Component
struct LoadAnimation {
  @State rotateAngle:number=0
  private rotateTimeOut: any //计时器
  startRotate() {
    this.rotateTimeOut = setInterval(() => {
      this.rotateAngle = 0
      animateTo({ duration: 800 }, () => {
        this.rotateAngle = 360
      })
    }, 800)
  }
  clearAnimation(){
    clearInterval(this.rotateTimeOut)
  }

  build() {
    Flex({ direction: FlexDirection.Column, alignItems: ItemAlign.Center, justifyContent: FlexAlign.Center }) {
      Image($r("app.media.loading"))
        .objectFit(ImageFit.Contain)
        .height(40)
        .aspectRatio(1)
        .width(40)
        .margin({ bottom: 5 })
        .rotate({ x: 0, y: 0, z: 1, angle: this.rotateAngle })
      Text("开始动画").width("100%").height(100)
      .textAlign(TextAlign.Center).backgroundColor(Color.Red)
        .fontColor(Color.White).fontSize(20)
      .margin(10)
      .onClick(this.startRotate.bind(this))

      Text("结束动画").width("100%").height(100)
        .textAlign(TextAlign.Center).backgroundColor(Color.White)
        .fontColor(Color.Black).fontSize(20)
        .margin(10)
        .onClick(this.clearAnimation.bind(this))
    }
    .width('100%')
    .height('100%')
  }
}
3.2运行效果
| 更多相关学习资料: https://developer.huawei.com/consumer/cn/forum/topic/0202798102556350281?fid=0102683795438680754?ha_source=zzh |
相关文章
- Codeforces Round #337 (Div. 2) 610C Harmony Analysis(脑洞)
- 【AGC、HMS、Harmony】鸿蒙API9中集成AGC、HMS服务相关问题
- 【Harmony OS】【ARK UI】自定义弹窗
- 【Harmony OS】【ArkUI】ets开发 创建视图与构建布局
- 【Harmony OS】【FAQ】鸿蒙问题合集1
- 【Harmony OS】【ARK UI】ets使用第三方类库crypto实现加密解密
- 【Harmony OS】【ARK UI】js或ETS如何获取状态栏高度
- 【Harmony OS】【JAVA UI】鸿蒙智能手表开发,如何判断未联网
- 【Harmony OS】【ARK UI】ets实现文件读写操作
- 【Harmony OS】【ARK UI】ETS 的 List 实现下拉刷新功能实现
- 【Harmony OS】【JAVA UI】webView 动画加载资源加载动画交互
- Harmony OS 开发避坑指南——源码下载和编译
- 【Harmony OS】【ArkUI】ets开发 创建视图与构建布局
- 【Harmony OS】【JAVA UI】abilitySlice和ability跳转方式
- 【Harmony OS】【ARK UI】Date 基本操作
- 【Harmony OS】【ARK UI】ETS 上下文基本操作
- 【Harmony OS】【ARK UI】ets使用第三方类库crypto实现加密解密
- 【Harmony OS】【JAVA UI】鸿蒙系统中怎么使用Parcel进行存储数据或数据传递