
Android实现车辆检测(含Android源码 可实时运行)
Android实现车辆检测(含Android源码 可实时运行)
目录
Android实现车辆检测(含Android源码 可实时运行)
1. 前言
本篇博客是《YOLOv5实现车辆检测(含车辆检测数据集+训练代码)》续作Android篇,主要分享将Python训练后的YOLOv5的车辆检测模型移植到Android平台。我们将开发一个简易的、可实时运行的车辆检测Android Demo。
考虑到原始YOLOv5的模型计算量比较大,鄙人在YOLOv5s基础上,开发了一个非常轻量级的的车辆检测模型yolov5s05_320。从效果来看,Android车辆检测模型的检测效果还是可以的,高精度版本YOLOv5s平均精度平均值mAP_0.5=0.57192,而轻量化版本yolov5s05_416平均精度平均值mAP_0.5=0.47022左右。APP在普通Android手机上可以达到实时的检测识别效果,CPU(4线程)约30ms左右,GPU约25ms左右 ,基本满足业务的性能需求。
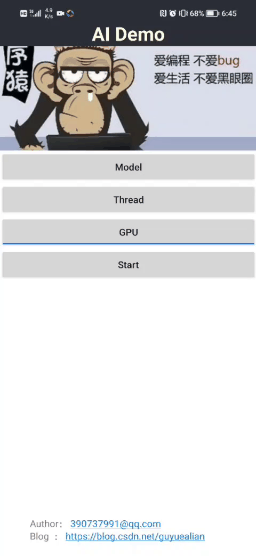
先展示一下Android Demo效果:
 |  |
|
【Android APP体验】https://download.csdn.net/download/guyuealian/87244599
【项目源码下载】 Android实现车辆检测(含Android源码 可实时运行)
【尊重原创,转载请注明出处】https://panjinquan.blog.csdn.net/article/details/128190532
更多项目《智能驾驶 车牌检测和识别》系列文章请参考:
- 智能驾驶 车牌检测和识别(一)《CCPD车牌数据集》:https://blog.csdn.net/guyuealian/article/details/128704181
- 智能驾驶 车牌检测和识别(二)《YOLOv5实现车牌检测(含车牌检测数据集和训练代码)》:https://blog.csdn.net/guyuealian/article/details/128704068
- 智能驾驶 车牌检测和识别(三)《CRNN和LPRNet实现车牌识别(含车牌识别数据集和训练代码)》:https://blog.csdn.net/guyuealian/article/details/128704209
- 智能驾驶 车牌检测和识别(四)《Android实现车牌检测和识别(可实时车牌识别)》:https://blog.csdn.net/guyuealian/article/details/128704242
- 智能驾驶 车牌检测和识别(五)《C++实现车牌检测和识别(可实时车牌识别)》:https://blog.csdn.net/guyuealian/article/details/128704276
- 智能驾驶 红绿灯检测(一)《红绿灯(交通信号灯)数据集》:https://blog.csdn.net/guyuealian/article/details/128222850
- 智能驾驶 红绿灯检测(二)《YOLOv5实现红绿灯检测(含红绿灯数据集+训练代码)》:https://blog.csdn.net/guyuealian/article/details/128240198
- 智能驾驶 红绿灯检测(三)《Android实现红绿灯检测(含Android源码 可实时运行)》:https://blog.csdn.net/guyuealian/article/details/128240334
-
智能驾驶 车辆检测(一)《UA-DETRAC BITVehicle车辆检测数据集》:https://blog.csdn.net/guyuealian/article/details/127907325
-
智能驾驶 车辆检测(二)《YOLOv5实现车辆检测(含车辆检测数据集+训练代码)》:https://blog.csdn.net/guyuealian/article/details/128099672
-
智能驾驶 车辆检测(三)《Android实现车辆检测(含Android源码 可实时运行)》:https://blog.csdn.net/guyuealian/article/details/128190532
2. 车辆检测数据集说明
目前收集了约10W+的车辆检测数据集:UA-DETRAC车辆检测数据集+Vehicle-Dataset车辆检测数据集+BITVehicle车辆检测数据集
关于车辆检测数据集使用说明和下载,详见另一篇博客说明:《UA-DETRAC BITVehicle车辆检测数据集(含下载地址)》
3. 基于YOLOv5的车辆检测模型训练
官方YOLOv5给出了YOLOv5l,YOLOv5m,YOLOv5s等模型。考虑到手机端CPU/GPU性能比较弱鸡,直接部署yolov5s运行速度十分慢。所以本人在yolov5s基础上进行模型轻量化处理,即将yolov5s的模型的channels通道数全部都减少一半,并且模型输入由原来的640×640降低到416×416或者320×320,该轻量化的模型我称之为yolov5s05。从性能来看,yolov5s05比yolov5s快5多倍,而mAP下降了10%(0.57→0.47),对于手机端,这精度勉强可以接受。
下面是yolov5s05和yolov5s的参数量和计算量对比:
| 模型 | input-size | params(M) | GFLOPs | mAP0.5 |
| yolov5s | 640×640 | 7.2 | 16.5 | 0.57192 |
| yolov5s05 | 416×416 | 1.7 | 1.8 | 0.47022 |
| yolov5s05 | 320×320 | 1.7 | 1.1 | 0.44788 |
yolov5s05和yolov5s训练过程完全一直,仅仅是配置文件不一样而已;碍于篇幅,本篇博客不在赘述,详细训练过程请参考:YOLOv5实现车辆检测(含车辆检测数据集+训练代码)
4.车辆检测模型Android部署
(1) 将Pytorch模型转换ONNX模型
训练好yolov5s05或者yolov5s模型后,你需要将模型转换为ONNX模型,并使用onnx-simplifier简化网络结构
# 转换yolov5s05模型
python export.py --weights "runs/yolov5s05_320/weights/best.pt" --img-size 320 320

# 转换yolov5s模型
python export.py --weights "runs/yolov5s_640/weights/best.pt" --img-size 640 640
GitHub: https://github.com/daquexian/onnx-simplifier
Install: pip3 install onnx-simplifier
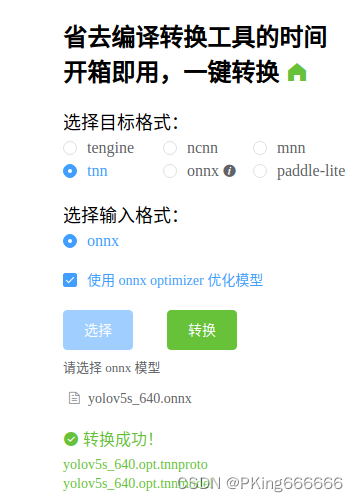
(2) 将ONNX模型转换为TNN模型
目前CNN模型有多种部署方式,可以采用TNN,MNN,NCNN,以及TensorRT等部署工具,鄙人采用TNN进行Android端上部署:
TNN转换工具:
- (1)将ONNX模型转换为TNN模型,请参考TNN官方说明:TNN/onnx2tnn.md at master · Tencent/TNN · GitHub
- (2)一键转换,懒人必备:一键转换 Caffe, ONNX, TensorFlow 到 NCNN, MNN, Tengine (可能存在版本问题,这个工具转换的TNN模型可能不兼容,建议还是自己build源码进行转换,2022年9约25日测试可用)
(3) Android端上部署模型
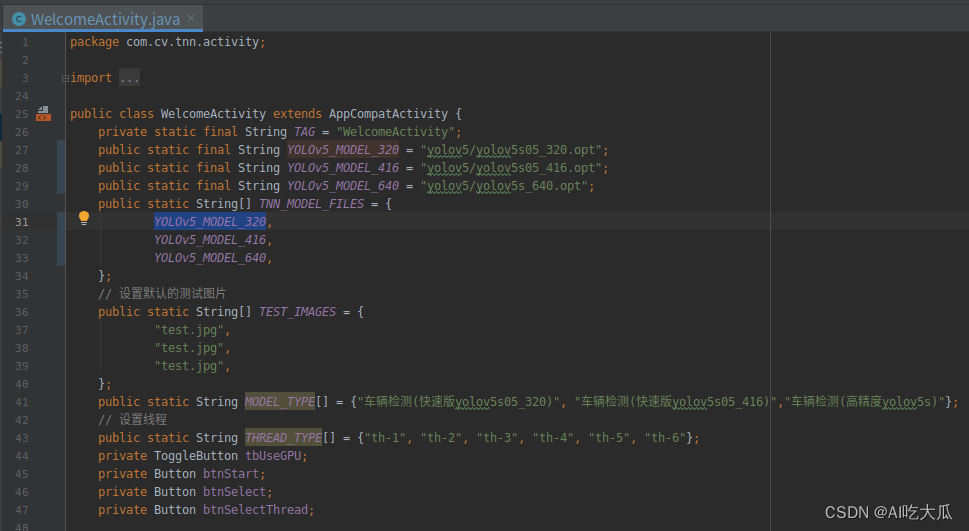
项目实现了Android版本的车辆检测Demo,部署框架采用TNN,支持多线程CPU和GPU加速推理,在普通手机上可以实时处理。Android源码核心算法YOLOv5部分均采用C++实现,上层通过JNI接口调用
package com.cv.tnn.model;

import android.graphics.Bitmap;

public class Detector {

    static {
        System.loadLibrary("tnn_wrapper");
    }


    /***
     * 初始化模型
     * @param model: TNN *.tnnmodel文件文件名(含后缀名)
     * @param root:模型文件的根目录,放在assets文件夹下
     * @param model_type:模型类型
     * @param num_thread:开启线程数
     * @param useGPU:关键点的置信度,小于值的坐标会置-1
     */
    public static native void init(String model, String root, int model_type, int num_thread, boolean useGPU);

    /***
     * 检测
     * @param bitmap 图像(bitmap),ARGB_8888格式
     * @param score_thresh:置信度阈值
     * @param iou_thresh:  IOU阈值
     * @return
     */
    public static native FrameInfo[] detect(Bitmap bitmap, float score_thresh, float iou_thresh);
}
如果你想在这个Android Demo部署你自己训练的YOLOv5模型,你可将训练好的Pytorch模型转换ONNX ,再转换成TNN模型,然后把TNN模型代替你模型即可。
(4) 一些异常错误解决方法
-
TNN推理时出现:Permute param got wrong size
官方YOLOv5: GitHub - ultralytics/yolov5: YOLOv5 🚀 in PyTorch > ONNX > CoreML > TFLite
如果你是直接使用官方YOLOv5代码转换TNN模型,部署TNN时会出现这个错误Permute param got wrong size,这是因为TNN最多支持4个维度计算,而YOLOv5在输出时采用了5个维度。你需要修改model/yolo.py文件

export.py文件设置model.model[-1].export = True:
.....
    # Exports
    if 'torchscript' in include:
        export_torchscript(model, img, file, optimize)
    if 'onnx' in include:
        model.model[-1].export = True  # TNN不支持5个维度,修改输出格式
        export_onnx(model, img, file, opset, train, dynamic, simplify=simplify)
    if 'coreml' in include:
        export_coreml(model, img, file)

    # Finish
    print(f'\nExport complete ({time.time() - t:.2f}s)'
          f"\nResults saved to {colorstr('bold', file.parent.resolve())}"
          f'\nVisualize with https://netron.app')

.....
- TNN推理时效果很差,检测框一团麻

这个问题,大部分是模型参数设置错误,需要根据自己的模型,修改C++推理代码YOLOv5Param模型参数。
struct YOLOv5Param {
    ModelType model_type;                  // 模型类型,MODEL_TYPE_TNN,MODEL_TYPE_NCNN等
    int input_width;                       // 模型输入宽度,单位:像素
    int input_height;                      // 模型输入高度,单位:像素
    bool use_rgb;                          // 是否使用RGB作为模型输入(PS:接口固定输入BGR,use_rgb=ture时,预处理将BGR转换为RGB)
    bool padding;
    int num_landmarks;                     // 关键点个数
    NetNodes InputNodes;                   // 输入节点名称
    NetNodes OutputNodes;                  // 输出节点名称
    vector<YOLOAnchor> anchors;
    vector<string> class_names;            // 类别集合
};
input_width和input_height是模型的输入大小;vector<YOLOAnchor> anchors需要对应上,注意Python版本的yolov5s的原始anchor是
anchors:
  - [10,13, 16,30, 33,23]  # P3/8
  - [30,61, 62,45, 59,119]  # P4/16
  - [116,90, 156,198, 373,326]  # P5/32
而yolov5s05由于input size由原来640变成320,anchor也需要做对应调整:
anchors:
  - [ 5,6,   8,15 , 16,11 ]
  - [ 15,30,  31,22, 29,59 ]
  - [ 58,45 , 78,99, 186,163 ]
因此C++版本的yolov5s和yolov5s05的模型参数YOLOv5Param如下设置
//YOLOv5s模型参数
static YOLOv5Param YOLOv5s_640 = {MODEL_TYPE_TNN,
                                         640,
                                         640,
                                         true,
                                         true,
                                         0,
                                         {{{"images", nullptr}}}, //InputNodes
                                         {{{"boxes", nullptr},   //OutputNodes
                                           {"scores", nullptr}}},
                                         {
                                                 {"434", 32,
                                                  {{116, 90}, {156, 198}, {373, 326}}},
                                                 {"415", 16, {{30, 61}, {62, 45}, {59, 119}}},
                                                 {"output", 8,
                                                  {{10, 13}, {16, 30}, {33, 23}}}, //
                                         },
                                         HELMET_NAME};

//YOLOv5s05模型参数
static YOLOv5Param YOLOv5s05_ANCHOR_416 = {MODEL_TYPE_TNN,
                                                  416,
                                                  416,
                                                  true,
                                                  true,
                                                  0,
                                                  {{{"images", nullptr}}}, //InputNodes
                                                  {{{"boxes", nullptr},   //OutputNodes
                                                    {"scores", nullptr}}},
                                                  {
                                                          {"434", 32,
                                                           {{75, 58}, {101, 128}, {242, 211}}},
                                                          {"415", 16,
                                                           {{19, 39}, {40, 29}, {38, 77}}},
                                                          {"output", 8,
                                                           {{6, 8}, {10, 19}, {21, 14}}}, //
                                                  },
                                                  HELMET_NAME};
//YOLOv5s05模型参数
static YOLOv5Param YOLOv5s05_ANCHOR_320 = {MODEL_TYPE_TNN,
                                                  320,
                                                  320,
                                                  true,
                                                  true,
                                                  0,
                                                  {{{"images", nullptr}}}, //InputNodes
                                                  {{{"boxes", nullptr},   //OutputNodes
                                                    {"scores", nullptr}}},
                                                  {
                                                          {"434", 32,
                                                           {{58, 45}, {78, 99}, {186, 163}}},
                                                          {"415", 16,
                                                           {{15, 30}, {31, 22}, {29, 59}}},
                                                          {"output", 8,
                                                           {{5, 6}, {8, 15}, {16, 11}}}, //
                                                  },
HELMET_NAME};- 运行APP闪退:dlopen failed: library "libomp.so" not found
参考解决方法:解决dlopen failed: library “libomp.so“ not found_PKing666666的博客-CSDN博客_dlopen failed
5. 车辆检测效果
Android APP体验 : https://download.csdn.net/download/guyuealian/87244599
APP在普通Android手机上可以达到实时的车辆检测效果,CPU(4线程)约30ms左右,GPU约25ms左右 ,基本满足业务的性能需求。
| |
|
6.项目源码下载
【Android APP体验】https://download.csdn.net/download/guyuealian/87244599
【车辆检测Android源码下载】 Android实现车辆检测(含Android源码 可实时运行)
整套Android项目源码内容包含:
- 提供快速版yolov5s05车辆检测模型,在普通手机可实时检测识别,CPU(4线程)约30ms左右,GPU约25ms左右
- 提供高精度版本yolov5s车辆检测模型,CPU(4线程)约250ms左右,GPU约100ms左右
- Demo支持图片,视频,摄像头测试
所有依赖库都已经配置好,可直接build运行,若运行出现闪退,请参考dlopen failed: library “libomp.so“ not found 解决。
如果你需要车辆检测数据集:UA-DETRAC BITVehicle车辆检测数据集(含下载地址)
如果你需要车辆训练代码:YOLOv5实现车辆检测(含车辆检测数据集+训练代码)
更多项目《智能驾驶 车牌检测和识别》系列文章请参考:
- 智能驾驶 车牌检测和识别(一)《CCPD车牌数据集》:https://blog.csdn.net/guyuealian/article/details/128704181
- 智能驾驶 车牌检测和识别(二)《YOLOv5实现车牌检测(含车牌检测数据集和训练代码)》:https://blog.csdn.net/guyuealian/article/details/128704068
- 智能驾驶 车牌检测和识别(三)《CRNN和LPRNet实现车牌识别(含车牌识别数据集和训练代码)》:https://blog.csdn.net/guyuealian/article/details/128704209
- 智能驾驶 车牌检测和识别(四)《Android实现车牌检测和识别(可实时车牌识别)》:https://blog.csdn.net/guyuealian/article/details/128704242
- 智能驾驶 车牌检测和识别(五)《C++实现车牌检测和识别(可实时车牌识别)》:https://blog.csdn.net/guyuealian/article/details/128704276
- 智能驾驶 红绿灯检测(一)《红绿灯(交通信号灯)数据集》:https://blog.csdn.net/guyuealian/article/details/128222850
- 智能驾驶 红绿灯检测(二)《YOLOv5实现红绿灯检测(含红绿灯数据集+训练代码)》:https://blog.csdn.net/guyuealian/article/details/128240198
- 智能驾驶 红绿灯检测(三)《Android实现红绿灯检测(含Android源码 可实时运行)》:https://blog.csdn.net/guyuealian/article/details/128240334
-
智能驾驶 车辆检测(一)《UA-DETRAC BITVehicle车辆检测数据集》:https://blog.csdn.net/guyuealian/article/details/127907325
-
智能驾驶 车辆检测(二)《YOLOv5实现车辆检测(含车辆检测数据集+训练代码)》:https://blog.csdn.net/guyuealian/article/details/128099672
-
智能驾驶 车辆检测(三)《Android实现车辆检测(含Android源码 可实时运行)》:https://blog.csdn.net/guyuealian/article/details/128190532
相关文章
- Android开发之搜Ya项目说明(3)
- android FragmentpagerAdapter和FragmentStatePagerAdapter的区别
- Android API之android.view.View.MeasureSpec
- Android中的音频播放(MediaPlayer和SoundPool)
- Android应用程序与SurfaceFlinger服务的关系概述和学习计划 .
- 【VLC-Android】Mac下编译vlc-android
- Android stuido 解决Caused by: android.view.InflateException: Binary XML file line #8: Binary XML file
- Android Studio / IDEA 中.android 文件夹移动出默认位置
- Android Studio找不到SystemProperties
- Android【报错】android.content.ActivityNotFoundException:activity in yourAndroidManifest.?
- Android【报错】Failed to resolve: com.android.support:appcompat-v7:28.0.0-alpha【报错】
- Android GridLayout 网格布局
- Android源码中com.android.support依赖迁移到AndroidX库
- Android 12.0 根据包名授予WRITE_SETTINGS权限
- 视频直播源码在Android端实现1对1音视频实时通话
- Android 底部TabActivity(1)——FragmentActivity
- Android的Bitmap和BitmapDrawable类解析-android学习之旅(六十)
- Please ensure that adb is correctly located at 'D:Androidandroid-sdkplatform-toolsadb.exe' and
- Android使adb作为host运行在arm64平台(二十七)
- Android.mk的一些FAQ
- Android 开源项目android-open-project解析之(三) ScrollView,TimeView,TipView,FlipView
- Lenovo k860i 移植Android 4.4 cm11进度记录【下篇--实时更新中】
- Android 开发 --Unable to resolve target 'android-19'
- android:shape的使用(+圆角ListView)(转)
- 【Android进阶】5、Android 的断点调试、LogCat 与 Android Lint
- Android Studio 4.2.2 Kotlin(不能进入类)的报错提示:Cannot find declaration to go to
- Android 解决之依赖包中添加的com.android.support版本不同导致冲突的问题
- 迁移到Android后android.support.v4.content.FileProvider运行崩溃