
【毕设Day14】
毕设Day14
前言
第14天啦!!!加油加油加油!!!
一、新增疫情新闻列表
1.CovidInfo文件接收Home组件传过来的数据
  props: {
    // 疫情描述
    covidInfo: {
      type: Object,
      default: function () {
        return {};
      },
    },
    // 疫情新闻
    news: {
      type: Array,
      default: function () {
        return [];
      },
    },
  },
2.展示数据
    <!-- 疫情热门新闻 -->
    <div class="hot">
      <!-- 标题 -->
      <div class="title">
        <i></i>
        <img src="../../assets/images/hot.png" alt="" class="icon" />
        <a href=""
          >查看更多 <img src="../../assets/images/more.png" alt="" />
        </a>
      </div>
      <!-- 疫情新闻列表 -->
      <div class="list">
        <ul>
          <li v-for="item in news" :key="item.id">
            <a :href="item.sourceUrl">
              <div>
                <span>最新</span>{{ item.title }}
                <img src="../../assets/images/right.png" alt="" />
              </div>
            </a>
          </li>
        </ul>
      </div>
    </div>
二、新增疫情导航栏
1.新建风险地区Area、核酸检测Test、出行政策Travel、防疫物资Prevention
CovidNav文件使用路由跳转
    <div class="list">
      <div>
        <router-link to="/Area">
          <img src="../../../assets/images/1.png" alt="" />
          <div>风险地区</div>
        </router-link>
      </div>
      <div>
        <router-link to="/test">
          <img src="../../../assets/images/2.png" alt="" />
          <div>核酸检测</div>
        </router-link>
      </div>
      <div>
        <router-link to="/prevention">
          <img src="../../../assets/images/3.png" alt="" />
          <div>防疫物资</div>
        </router-link>
      </div>
      <div>
        <router-link to="/travel">
          <img src="../../../assets/images/4.png" alt="" />
          <div>出行政策</div>
        </router-link>
      </div>
    </div>
2.路由导入
  {
    // 风险地区
    path: '/area',
    name: 'Area',
    component: () => import( /* webpackChunkName: "about" */ '../views/Covid/Covidnav/Area.vue')
  },
  {
    // 核酸检测
    path: '/test',
    name: 'Test',
    component: () => import( /* webpackChunkName: "about" */ '../views/Covid/Covidnav/Test.vue')
  },
  {
    // 防疫物资
    path: '/prevention',
    name: 'Prevention',
    component: () => import( /* webpackChunkName: "about" */ '../views/Covid/Covidnav/Prevention.vue')
  },
  {
    // 出行政策
    path: '/travel',
    name: 'Travel',
    component: () => import( /* webpackChunkName: "about" */ '../views/Covid/Covidnav/Travel.vue')
  },
三、新增风险地区Area页面
使用getCovidInfo接口获取数据
  created() {
    this.$api.getCovidInfo().then((res) => {
      console.log(res.data.newslist[0]);
      let riskarea = res.data.newslist[0].riskarea;
      // 解析
      this.high = riskarea.high;
      this.mid = riskarea.mid;
    });
  },
  <!-- 风险地区 -->
  <div class="area">
    <div class="bg">
      <div class="content">
        <div class="th">全国风险地区汇总</div>
        <!-- 1、高风险区 -->
        <template v-if="high.length > 0">
          <div class="title">
            <img src="../../../assets/images/high.png" alt="" />
            高风险区{{ high.length }}个
          </div>
          <ul class="list">
            <li v-for="(item, index) in high" :key="index">
              {{ item }}
            </li>
          </ul>
        </template>
        <!-- 2、中风险区 -->
        <template v-if="mid.length > 0">
          <div class="title">
            <img src="../../../assets/images/mid.png" alt="" />
            中风险区{{ mid.length }}个
          </div>
          <ul class="list">
            <li v-for="(item, index) in mid" :key="index">
              {{ item }}
            </li>
          </ul>
        </template>
      </div>
    </div>
  </div>
4.伪元素和伪类的区别

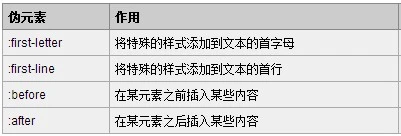
伪类,首先是类的一种, 作用于标签本身(状态)
伪元素, 首先是元素,作用于内容本身
5.使用伪元素添加蓝色小标签样式
<div class="th">
  <p><span>全国风险地区汇总</span></p>
</div>
  .th {
    position: relative;
    margin-bottom: 0.3rem;
    font-size: 0.34rem;
    letter-spacing: 0.01rem;
    span {
      position: absolute;
      bottom: 0.08rem;
    }
    p::before {
      display: inline-block;
      width: 0.1rem;
      height: 0.4rem;
      margin-right: 0.1rem;
      content: "";
      background-color: #4169e2;
    }
  }
效果图:

四、新增核酸检测Test页面
接口地址:http://apis.juhe.cn/springTravel/hsjg
返回格式:json
请求方式:http get/post
请求示例:http://apis.juhe.cn/springTravel/hsjg?key=xxxx&city_id=10191
接口备注:根据城市ID查询核酸检测机构,数据来源卫健委发布整理,更新同步可能有延迟,具体以实际为准。
注意:此接口需要传参城市id=》city_id
base.js文件添加查询核酸检测api
//查询核酸检测机构
    TravelTest: '/api/springTravel/hsjg'
index.js文件添加TravelTest方法
//查询核酸检测机构
    TravelTest(params) { //params={	city_id}
        return axios.get(base.TravelTest + '?key=' + Secret.travelKey, {
            params
        })
    }
1.调用travelCity的api,获取城市id(city_id)
获取城市数据并且进行转化
mounted() {
    this.$api
      .travelCity({
        key: Secret.travelKey,
      })
      .then((res) => {
        console.log(res.data.result); //如果调用接口次数达到上线,则打印"今日次数已达上限"
        if (res.data.result) {
          //let arr =  [{text:'',value:'',children[{}]},{}]
          let arr = [];
          res.data.result.forEach((element) => {
            //province
            let temp = {};
            temp.text = element.province;
            temp.value = element.province_id;
            temp.children = [];
            element.citys.forEach((item) => {
              let obj = {};
              obj.text = item.city;
              obj.value = item.city_id;
              temp.children.push(obj);
            });
            arr.push(temp);
          });
          this.options = arr;
          console.log(arr);
        } else {
          console.log("今日次数已达上限");
        }
      });
  },
2.将数据存放在options[ ],可以得到城市id(value)
options: [
        {
          text: "浙江省",
          value: "330000",
          children: [{ text: "杭州市", value: "330100" }],
        },
      ],
将城市id存放在this.city_id
// 全部选项选择完毕后,会触发 finish 事件
    onFinish({ value, selectedOptions }) {
      // console.log(value, selectedOptions, tabIndex);
      this.city_id = value;
      this.show = false;
      this.fieldValue = selectedOptions.map((option) => option.text).join("/");
    },
3.添加查询按键
点击查询,传参city_id ,调用TravelTest接口
    //查询城市的疫情政策
    searth() {
      console.log(this.city_id);
      // 请求接口
      this.$api
        .TravelTest({
          city_id: this.city_id,
        })
        .then((res) => {
          console.log("555", res.data);
          this.total = res.data.result.data;
          // total.forEach(element=>{

          // })
          console.log(this.toatl);
        });
    },
将数据放在this.total。
4.点击查询得到查询结果
<!-- 政策查询结果 -->
    <template v-if="total.length > 0">
      <div class="content">
        查询到{{ total.length }}个结果:
        <ul class="list" v-for="(item, index) in total" :key="index">
          <li>
            <p>检测机构:{{ item.name }}</p>
            <p>地址:{{ item.address }}</p>
            <p>咨询电话:{{ item.phone }}</p>
          </li>
        </ul>
      </div>
    </template>
    <template v-if="total.length < 0">
      <div class="content">
        <p>暂未查到相关数据!</p>
      </div>
    </template>

五、新增出行政策Trave(此页面同CovidVant页面)
接口地址:http://apis.juhe.cn/springTravel/query
返回格式:json
请求方式:http get/post
请求示例:http://apis.juhe.cn/springTravel/query?key=&from=10191&to=10349
接口备注:根据出入城市,查询出行防疫政策;以上政策整理自当地政府等公开发布的消息,如有更新或错漏,请以最新政策为准,建议在出行前咨询当地防疫部门、机场、火车站等
注意:此接口需要传参出发城市from和目的城市to
base.js文件添加查询出行防疫政策api
// 查询出行防疫政策
    travelQuery: '/api/springTravel/query',
index.js文件添加travelQuery方法
// 查询出行防疫政策
    travelQuery(params) { //params={from:'',to:''}
        return axios.get(base.travelQuery + '?key=' + Secret.travelKey, {
            params
        })
    },
1.使用travelCity的api,获取城市的id,存到options[ ]里面
  mounted() {
    this.$api
      .travelCity({
        key: Secret.travelKey,
      })
      .then((res) => {
        console.log(res.data.result); //如果调用接口次数达到上线,则打印"今日次数已达上限"
        if (res.data.result) {
          //let arr =  [{text:'',value:'',children[{}]},{}]
          let arr = [];
          res.data.result.forEach((element) => {
            //province
            let temp = {};
            temp.text = element.province;
            temp.value = element.province_id;
            temp.children = [];
            element.citys.forEach((item) => {
              let obj = {};
              obj.text = item.city;
              obj.value = item.city_id;
              temp.children.push(obj);
            });
            arr.push(temp);
          });
          this.options = arr;
          console.log(arr);
        } else {
          console.log("今日次数已达上限");
        }
      });
  },
在onFinish方法里面将value值存到this.from 和this.to
// 全部选项选择完毕后,会触发 finish 事件
    onFinish({ value, selectedOptions }) {
      // console.log(value, selectedOptions, tabIndex);
      this.from = value;
      this.show = false;
      this.fieldValue = selectedOptions.map((option) => option.text).join("/");
    },
    onFinish2({ value, selectedOptions }) {
      this.to = value;
      this.show2 = false;
      this.fieldValue2 = selectedOptions.map((option) => option.text).join("/");
    },
2.点击查询,调用travelQuery的api
点击查询,将参数from: this.from、to: this.to传给api方法,获取到出发地城市和目的地城市的数据this.from_info和this.to_info。
searth() {
      console.log(this.from, this.to);
      // 请求接口
      this.$api
        .travelQuery({
          from: this.from,
          to: this.to,
        })
        .then((res) => {
          console.log("555", res.data);
          this.from_info = res.data.result.from_info;
          this.to_info = res.data.result.to_info;
          console.log("11111", this.from_info);
        });
    },
3.使用Vant的Overlay 遮罩层,实现点击小图标,显示弹窗
<img :src="from_info.health_code_picture"
   alt=""
   @click="showimg = true"
  />
 <van-overlay :show="showimg" @click="showimg = false">
     <div class="wrapper">
       <div class="block" @click.stop>
         <img :src="from_info.health_code_picture" alt="" />
        </div>
      </div>
  </van-overlay>
4.增加“点击加载更多功能”
段落内容为info
            <div class="list" :class="{ isShow: isShow }">
              <div>
                <div class="info">
                  <p>{{ from_info.low_in_desc }}</p>
                  <p>{{ from_info.out_desc }}</p>
                </div>
                <div class="open-btn">
                  <p @click="showMore">{{ text }}</p>
                </div>
              </div>
            </div>
添加点击事件 @click=“showMore”
showMore() {
      this.isShow = !this.isShow;
      this.text = this.isShow ? "显示全部" : "收起";
    },
父容器绑定样式isShow(默认isShow: true)
.isShow {
  position: relative;
  height: 200px;
  overflow: hidden; /*设置文案容器高度,超出部分隐藏*/
}
  .list {
    position: relative;
    margin-top: 0.2rem;
    padding: 0.1rem;
    background: rgb(243, 245, 231);
    border-radius: 0.1rem;
    letter-spacing: 0.02rem;
    line-height: 0.5rem;

    .info {
      padding-bottom: 1.1rem;
    }
    .open-btn {
      // padding: 0.1rem;
      width: 7.32rem;
      position: absolute;
      bottom: 0;
      height: 0.8rem;
      // background: burlywood;
      background: rgb(243, 245, 231);
    }
    .open-btn p {
      text-align: center;
      color: chocolate;
      margin-top: 0.1rem;
      padding-right: 0.7rem;
    }
    }

5.实现出入图标效果

<span class="font">出</span>
<span class="word">离开{{ from_info.city_name }}</span>

<span class="font">入</span>
<span class="word">进入{{ to_info.city_name }}</span>
  .font {
    display: inline-block;
    width: 0.6rem;
    height: 0.6rem;
    border-radius: 50%;
    background: rgb(96, 96, 245);
    color: #eee;
    text-align: center;
    line-height: 0.6rem;
    margin: 0.4rem 0.2rem 0.1rem 0.3rem;
  }
  .word {
    font-size: 0.4rem;
    color: #000;
    letter-spacing: 0.05rem;
    font-weight: bold;
    vertical-align: middle;
    display: inline-block;
  }
六、新增NavBar导航栏组件
<div class="nar-bar">
    <div class="left"><slot name="left"></slot></div>
    <div class="center"><slot name="center"></slot></div>
    <div class="right"><slot name="right"></slot></div>
  </div>
.nar-bar {
  display: flex;
  line-height: 44px;
  z-index: 100;
  text-align: center;
  box-shadow: 0 2px 2px rgba(100, 100, 100, 0.1);
}
.left,
.right {
  width: 1.5rem;
}
.center {
  flex: 1;
}

七、使用iconfont图标
网址:https://www.iconfont.cn/
1.将所需图标加入购物车Unicode编码下载
注意:一定要加入购物车下载!

选择下载方式:
①Unicode编码下载
将下载的文件夹加入项目文件夹
②在App.vue文件引入(注意修改src路径)
@font-face {
  font-family: "iconfont";
  src: url("./assets/icon/iconfont.ttf?t=1645845949237") format("truetype");
}
.iconfont {
  font-family: "iconfont" !important;
  font-size: 16px;
  font-style: normal;
  -webkit-font-smoothing: antialiased;
  -moz-osx-font-smoothing: grayscale;
}
③页面中使用(每次加入了新的图标都要重新下载)
<span class="iconfont">3</span>
2.使用Font-class下载
①在App.vue文件中引入css文件
@import url("./assets/icon/iconfont.css");
②页面中使用
<span class="iconfont iconname"></span>
3.直接下载SVG矢量图
相关文章
- 毕设小窥
- 【毕设Day13】
- 【毕设Day12】
- 【毕设Day11】
- 【毕设Day10】
- 【毕设Day9】
- 【毕设Day8】
- 【毕设Day7】
- 【毕设Day6】
- 【毕设Day5】
- 【毕设Day4】
- 【毕设Day3】
- 【毕设Day2】
- 【毕设Day1】
- 毕业设计 基于SSM的毕设管理系统
- 【毕业设计/课程设计】基于SSM的毕设管理系统源码
- 一款基于java的超级棒的开源支付系统(用来毕设也不错),国内首款开源的互联网支付系统
- 从零开始的「校园商铺」毕设全栈开发—设计数据库
- 从零开始的「校园商铺」毕设全栈开发—环境搭建
- 从零开始的「校园商铺」毕设全栈开发—开题报告
- 第一代的收入做毕设
- java学生成绩管理系统,你的毕设我的心
- 毕设周报(2023.3.7)