
一键发布网页 博客到Hexo并自动部署的通用方法
环境:Chrome浏览器+插件+github action
目标:浏览任意网页后一键发布文章到Hexo
方式:使用github action,分步骤追加日期至MD文件头部
本文基于你已经完成了hexo的部署:
并将博客源代码部署到github
并实现了github action自动部署到username.github.io的page仓库或者vercel网站
步骤1:在chrome中安装简悦插件,并授权github
完成上述步骤后,打开任意网页,右键简悦聚焦模式,保存到github,这样文章就会自动出现到github 博客源代码仓库的source/post目录


步骤二 追加字符到md头部,并安装插件
这样保存到post目录下的文件虽然会自动部署到page仓库,但是缺少hexo要求的头部文件,会导致没有标题、时间、tag、分类,甚至直接部署失败,在github action你会看到类似下列报错:
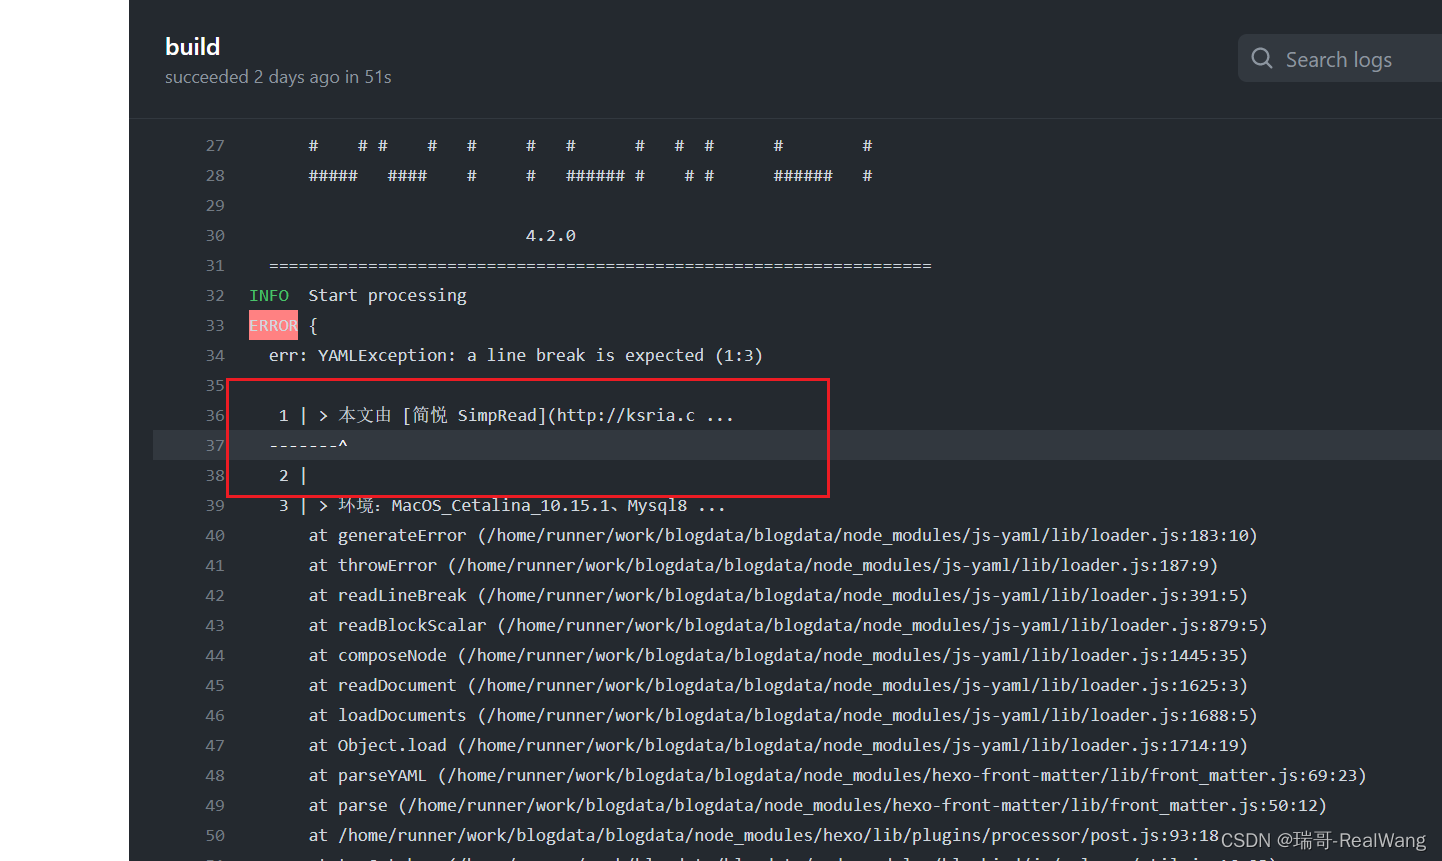
出现这种错误一最主要的原因是没有hexo要求的md文件头部字符串,第二个原因是内容有hexo无法转译的特殊字符串,头部文件一般长这样
---
title: Hello World
tag:
	- tag1
date: 2013/7/13 20:46:25
---
解决办法是在github action部署之前追加头部字符到md文件,并提交到仓库,之后在继续执行deploy任务
2.1新建github action
新建下列yml文件,放到github action workflow目录,这个任务会追加当前时间到md头部并剪切到分类目录转载
name: mv
on: push
jobs:
  build:
    runs-on: ubuntu-latest
    steps:
    - uses: actions/checkout@v2
      with:
        token: 替换为你的github token

    - uses: szenius/set-timezone@v1.0
      with:
        timezoneLinux: "Asia/Shanghai"


    - name: Create local changes
      run: |
        cd source/_posts
        sed -i '1s/^/---\n\n\n/' *.md
        sed -i "1s/^/date: $(date '+%Y\/%m\/%d %H:%M:%S')\n/" *.md
        sed -i '1s/^/---\n/' *.md
        mv *.md 转载/
    - uses: stefanzweifel/git-auto-commit-action@v4
      with:
        branch: main
        commit_user_name: 替换为你的github账户名
        commit_user_email: 替换为你的github邮箱
        commit_message: Automated Change 自动追加md文件头部
        file_pattern: source/_posts/*.md
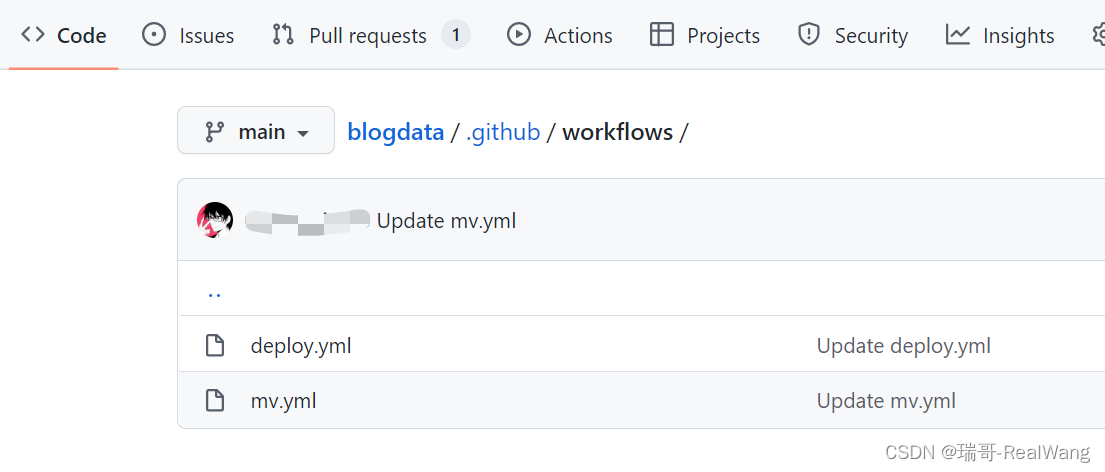
这个文件放到deploy平级目录,类似这样:
2.2 修改部署任务,将任务的执行顺序修改为在mv任务完成之后
name: Hexo-Deploy
on:
  workflow_run:
    workflows: ["mv"]
    branches: [main]
    types:
      - completed
jobs:
  build:
    runs-on: ubuntu-latest

    steps:
      - name: Checkout source
        uses: actions/checkout@v1
        with:
          ref: main
      - name: Configration hexo repo
        env:
          ACTION_DEPLOY_KEY: ${{ secrets.HEXO_DEPLOY_PRI }}

        run: |
          mkdir -p ~/.ssh/
          echo "$ACTION_DEPLOY_KEY" > ~/.ssh/id_rsa
          chmod 600 ~/.ssh/id_rsa
          ssh-keyscan github.com >> ~/.ssh/known_hosts
          git config --global user.email "你的邮箱"
          git config --global user.name "你的账户"
      - name: Checkout submodules
        run: |
          git submodule init
          git submodule update
      - name: Use Node.js ${{ matrix.node_version }}
        uses: actions/setup-node@v1
        with:
          node-version: '14'
      - name: Setup Hexo
        run: |
         npm install hexo-cli -g
         npm install
         npm install hexo-renderer-pug hexo-renderer-stylus hexo-generator-search hexo-abbrlink3 hexo-enhancer --save
         npm install hexo-wordcount --save
      - name: Get changed files
        id: changed-files
        uses: tj-actions/changed-files@v19

      - name: List all changed files
        run: |
          for file in ${{ steps.changed-files.outputs.all_changed_files }}; do
            echo "$file was changed"
          done
      - name: Hexo deploy
        run: |
          hexo clean
          hexo g
          hexo d
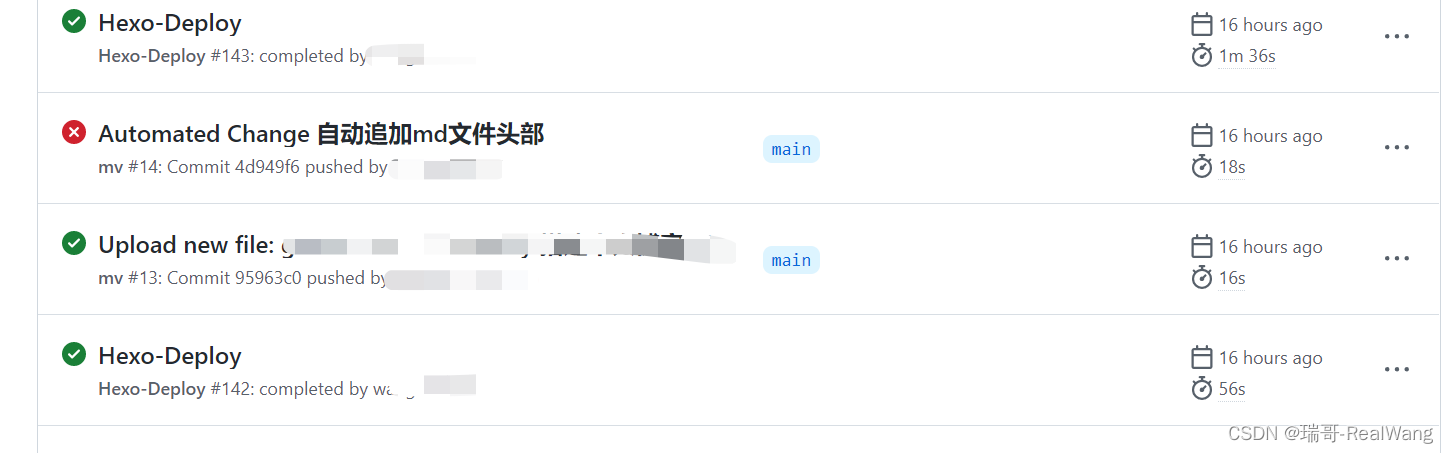
重新上传文件到post,会自动触发追加md文件到头部并剪切到其他目录,完成后触发deploy,效果类似这样:
如果post目录没有post文件,就会mv失败,导致任务失败,暂时没有优化,不影响使用
3.安装自动生成标题、标签、分类插件:
这样生成的文章解决了发布报错问题,也有了时间,但是没有标题、标签、分类,这里就要用到自动生成标题、时间、分类、标签、短链接的插件了:hexo-enhancer
3.1 安装插件 hexo-enhancer
npm install hexo-enhancer --save
文件的格式应该类似这样,但是我们上一步已经追加了时间,所有文件名就是标题名了
20091010-Title.md
2009-10-10_Title.md
2009-10-10-Title.md
2009/10/10#Title.md
2009/10/10@Title.md
[20091010]-Title.md
【20091010】Title.md
「20091010」-Title.md
3.2 增加自动标签
修改博客根目录_config.yml,文件,将标签关键字修改进去
keywords: HTML, 替换, Hexo
tags: Java, 替换, 你的, 标签
3.3 增加自动分类
直接在_post建子目录,文件丢进去自动生成分类
3.3 增加自动短链接
修改博客根目录_config.yml,文件,
permalink: :year/:abbrlink.html
# permalink: :year/:abbrlink
# permalink: posts/:abbrlink.html
# permalink: :year/:month/:day/:abbrlink.html
4.测试
经过上述操作后,保存任意网页到github后,会
4.1 先自动追加头部文件
4.2 自动剪切到转载分类
4.3 触发hexo deploy
4.4 触发hexo-enhancer插件自动生成标题、标签、分类、短链接
4.5 转译为静态文件发布到github.io pages页面
4.6 查看github网站或vercel网站确认正常