之前写的例子都是基于http协议的,但在局域网环境下,我希望可以获取更高的传输性能和更低的服务端资源占用,所以我尝试使用TCP协议来进行传输。网上的例子都讲得非常复杂,但终于让我找到一个简单的实现方法,记录如下:
在解决方案资源管理器中,需要添加两个引用:System.ServiceModel和WCFService。然后双击窗口,在Form_Load事件中编写如下代码:
Jquery ajax调用WCF服务
例子效果如下:原界面
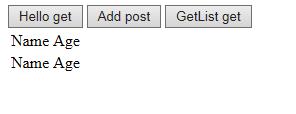
点击按钮GetList get后,通过指定的Url获取数据添加到table

新建一个控制台项目,添加IContract.cs,DBService.cs(为了简单,契约和服务都建在一个项目里面)
一、服务的发布
1、定义 契约接口
|
1
2
3
4
5
6
7
8
9
10
11
12
13
14
15
16
17
18
19
20
21
22
23
24
25
26
27
28
29
30
31
32
33
|
using System;
using System.Collections.Generic;
using System.Linq;
using System.Text;
using System.ServiceModel;
using System.ServiceModel.Web;
using System.Data;
namespace IContract
{
[ServiceContract]
public interface IContract
{
[OperationContract]
[WebInvoke( RequestFormat = WebMessageFormat.Json, ResponseFormat = WebMessageFormat.Json)]
double Add(double x, double y);
[OperationContract]
[WebGet( RequestFormat = WebMessageFormat.Json, ResponseFormat = WebMessageFormat.Json)]
string Hello(string mes);
[OperationContract]
[WebGet(RequestFormat = WebMessageFormat.Json, ResponseFormat = WebMessageFormat.Json)]
IList<User> getlist();
}
public class User
{
public string Name{get;set;}
public int Age { get; set; }
}
}
|
2、服务的实现
|
1
2
3
4
5
6
7
8
9
10
11
12
13
14
15
16
17
18
19
20
21
22
23
24
25
26
27
28
29
30
31
32
33
34
35
36
37
38
39
40
41
42
43
44
45
46
47
48
49
50
51
52
53
54
55
56
57
58
59
60
61
62
63
64
65
66
67
68
|
using IContract;
using System;
using System.Collections.Generic;
using System.Data;
using System.Linq;
using System.Reflection;
using System.ServiceModel.Activation;
using System.Text;
namespace DBService
{<br>
[AspNetCompatibilityRequirements(RequirementsMode = AspNetCompatibilityRequirementsMode.Allowed)]
public class DBService:IContract.IContract
{
public double Add(double x, double y)
{
return x+y;
}
public string Hello(string mes)
{
return "holle word:" + mes;
}
public IList<User> getlist()
{
DataTable dt = new DataTable();
dt.Columns.Add("Name");
dt.Columns.Add("Age",typeof(System.Int32));
dt.Rows.Add("joe", "20");
dt.Rows.Add("ethan", "25");
dt.Rows.Add("jane", "36");
IList<User> lst = dt.ToList<User>();
return lst;
}
}
public static class Extension
{
public static IList<T> ToList<T>(this DataTable dt)
{
var lst = new List<T>();
var plist = new List<System.Reflection.PropertyInfo>(typeof(T).GetProperties());
foreach (DataRow item in dt.Rows)
{
T t = System.Activator.CreateInstance<T>();
for (int i = 0; i < dt.Columns.Count; i++)
{
PropertyInfo info = plist.Find(p => p.Name == dt.Columns[i].ColumnName);
if (info != null)
{
if (!Convert.IsDBNull(item[i]))
{
info.SetValue(t, item[i], null);
}
}
}
lst.Add(t);
}
return lst;
///throw new NotImplementedException();
}
}
}
|
3、 启动服务
3.1、方式一:以代码方式发布服务(不使用配置文件),寄宿到控制台程序。
|
1
2
3
4
5
6
7
8
9
10
11
12
13
14
15
16
17
18
19
20
21
22
23
24
25
26
27
28
29
30
31
32
33
34
35
36
37
38
39
40
41
42
|
using System;
using System.Collections.Generic;
using System.Linq;
using System.Text;
using System.ServiceModel;
using System.ServiceModel.Web;
using System.ServiceModel.Description;
namespace WCFHost
{
class Program
{
static void Main(string[] args)
{
open();
}
static void host_Opened(object sender, EventArgs e)
{
Console.WriteLine("DBService opened successful");
}
static void open()
{
Uri uri = new Uri("http://localhost:8883/DBServer");
using (ServiceHost host = new ServiceHost(typeof(DBService.DBService), uri))
{
System.ServiceModel.Description.ServiceMetadataBehavior behavior = new System.ServiceModel.Description.ServiceMetadataBehavior();
behavior.HttpGetEnabled = true;
host.Description.Behaviors.Add(behavior);
ServiceEndpoint endpoint = host.AddServiceEndpoint(typeof(IContract.IContract), new WebHttpBinding(), string.Empty);
|
//System.ServiceModel.Description.WebScriptEnablingBehavior' is only intended for use with WebHttpBinding or similar bindings.
|
1
2
3
4
5
6
7
8
9
10
11
12
|
endpoint.Behaviors.Add(new WebScriptEnablingBehavior());
host.Opened += host_Opened;
host.Open();
Console.ReadLine();
}
}
}
}
|
3.2、方式二:使用配置文件进行配置,启动服务,寄宿到控制台程序。
新建一个配置文件App.config
|
1
2
3
4
5
6
7
8
9
10
11
12
13
14
15
16
17
18
19
20
21
22
23
24
25
26
27
28
29
30
31
32
|
<?xml version="1.0" encoding="utf-8" ?>
<configuration>
<system.serviceModel>
<behaviors>
<serviceBehaviors>
<behavior name="metadataBehavior">
<serviceMetadata httpGetEnabled="true" />
</behavior>
</serviceBehaviors>
<endpointBehaviors>
<behavior name="endpointbehavior">
<enableWebScript/>
</behavior>
</endpointBehaviors>
</behaviors>
<services>
<service behaviorConfiguration="metadataBehavior" name="DBService.DBService">
<endpoint address="" binding="webHttpBinding" contract="IContract.IContract"
behaviorConfiguration="endpointbehavior"/>
<host>
<baseAddresses>
<add baseAddress="http://127.0.0.1:8883/DBServer"/>
</baseAddresses>
</host>
</service>
</services>
</system.serviceModel>
</configuration>
|
代码开启服务,寄宿到控制台程序。
|
1
2
3
4
5
6
7
8
9
10
11
12
13
14
15
16
17
18
19
20
21
22
23
24
25
26
27
28
29
30
31
32
33
34
35
36
37
38
39
|
using System;
using System.Collections.Generic;
using System.Linq;
using System.Text;
using System.ServiceModel;
using System.ServiceModel.Web;
using System.ServiceModel.Description;
namespace WCFHost
{
class Program
{
static void Main(string[] args)
{
StartService();
}
private static void StartService()
{
try
{
ServiceHost host1 = new ServiceHost(typeof(DBService.DBService));
host1.Opened += host_Opened;
host1.Open();
Console.ReadLine();
}
catch (Exception e)
{
throw e;
}
}
static void host_Opened(object sender, EventArgs e)
{
Console.WriteLine("DBService opened successful");
}
}
}
|
二、验证服务是否发布成功
1、F5运行控制台程序,界面显示:DBService opened successful说明服务成功开启。
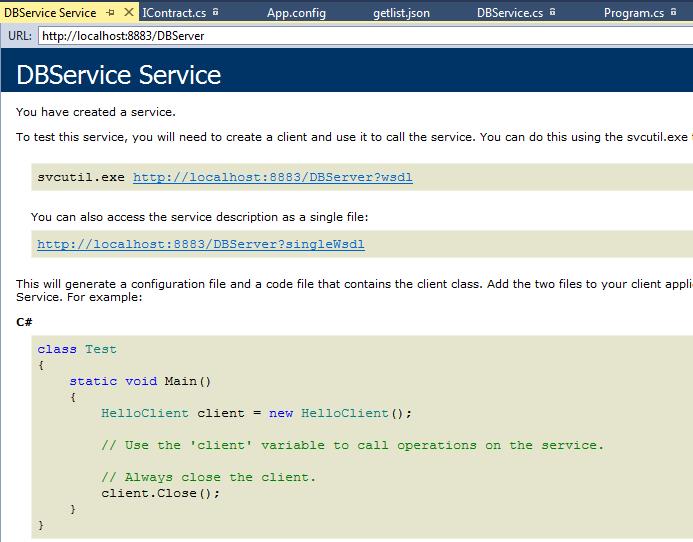
2、在浏览器中输入http://localhost:8883/DBServer,出现如下界面,服务寄宿成功。
3、服务中定义的get方法可以直接通过浏览器验证
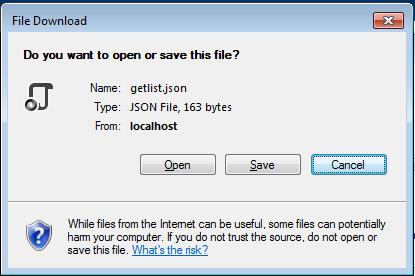
3.1、验证不带参数的方法: service地址+方法名称
在浏览器输入http://localhost:8883/DBServer/getlist 回车,会出现下面类似的提示

打开后文件内容为:
{"d":[{"__type":"User:#IContract","Age":20,"Name":"joe"},{"__type":"User:#IContract","Age":25,"Name":"ethan"},{"__type":"User:#IContract","Age":36,"Name":"jane"}]}
是 IList<User>的json格式数据。
3.2 带参数的方法,service地址+方法名称 + ? 参数1名称=值 & 参数2名称=值
在浏览器输入http://127.0.0.1:8883/DBServer/hello?mes=nihao
或者:http://127.0.0.1:8883/DBServer/hello?mes=”nihao“
会弹出是否打开or保存json文件,打开后内容为:{"d":"holle word:nihao"}
如果Add也标记为get,那么可以用此地址调用:http://127.0.0.1:8883/DBServer/Add?x=1&y=2
三、jquery调用
1、ajax调用WCF的代码(新建一个empty web项目,添加一个webform,添加文件夹js,添加jquery-1.8.3.min.js文件)
|
1
2
3
4
5
6
7
8
9
10
11
12
13
14
15
16
17
18
19
20
21
22
23
24
25
26
27
28
29
30
31
32
33
34
35
36
37
38
39
40
41
42
43
44
45
46
47
48
49
50
51
52
53
54
55
56
57
58
59
60
61
62
63
64
65
66
67
68
69
70
71
72
73
74
75
76
77
78
79
80
81
82
83
84
85
86
87
88
89
90
91
92
93
94
|
<%@ Page Language="C#" AutoEventWireup="true" CodeBehind="WebForm1.aspx.cs" Inherits="WebAjax.WebForm1" %>
<!DOCTYPE html>
<html xmlns="http://www.w3.org/1999/xhtml">
<head runat="server">
<title></title>
<script src="js/jquery-1.8.3.min.js"></script>
<script>
//1、Hello
function Hello() {
var mes = "ninhao";
$.ajax({
type: "get",
//type: "POST",
url: "http://localhost:8883/DBServer/hello?mes=" + mes,
//url: "http://localhost:8883/DBServer/hello", //post方式时的地址
dataType: "json",
//data: '{"mes":"nihao"}', //post方式是传递的输入参数
contentType: 'text/json',
success: function (data) {
alert("successful to get data:" + data.d);
},
error: function (data) {
alert(data.statusText);
},
});
}
//2、Add
function Add() {
$.ajax({
type: "POST",
url: "http://localhost:8883/DBServer/Add",
dataType: "json",
contentType: 'text/json',
data: '{"x":1,"y":2}',
success: function (data) {
alert("successful:" + data.d);
},
error: function (data) {
alert(data.statusText);
},
});
}
//3、获取用户list,添加到table后面
function getlist() {
$.ajax({
type: "get",
url: "http://localhost:8883/DBServer/getlist",
dataType: "json",
contentType: 'text/json',
success: function (data) {
var html = "";
$.each(data.d, function (index, item) {
var name = item.Name;
var age = item.Age;
html += "<tr><td>" + name + "</td><td>" + age + "</td></tr>";
});
//三种形式等价
//$("#mytable").after(html);
//$("#mytable tr").eq(0).after(html);
$("table tr:eq(0)").after(html);
},
error: function (data) {
alert(data.statusText);
},
});
}
</script>
</head>
<body>
<%--<form id="form1" runat="server">--%> <%--特别注意此处要注释掉,不然getlist看不到效果,table添加新行后立马就消失了--%>
<div>
<button onclick="Hello()">Hello get</button>
<button onclick="Add()">Add post</button>
<button onclick="getlist()">GetList get</button>
</div>
<table id="mytable">
<tr>
<td>Name</td>
<td>Age</td>
</tr>
<tr>
<td>Name</td>
<td>Age</td>
</tr>
</table>
<%--</form>--%>
</body>
</html>
|
四 jQuery调用WCF的要点:
1. 契约方法加属性[WebInvoke(RequestFormat = WebMessageFormat.Json, ResponseFormat = WebMessageFormat.Json, BodyStyle = WebMessageBodyStyle.WrappedRequest)]
2.服务类加属性 [AspNetCompatibilityRequirements(RequirementsMode = AspNetCompatibilityRequirementsMode.Allowed)]
3. binding="webHttpBinding"
4. <enableWebScript/> 或者
|
1
2
|
endpoint.Behaviors.Add(new WebScriptEnablingBehavior());
|
5. contentType: 'text/json'
五、使用System.ServiceModel.WebHttpBinding协议注意点
1、采用System.ServiceModel.WebHttpBinding协议,客户端不需要配置终结点,只需要指定一个Url即可使用ajax方法调用服务。
2、而且采用在客户端添加服务的办法是行不通的,添加服务后不会自动生成终结点配置,用客户端代理调用服务一直提示服务内部错误。
3. host.Open();报错The communication object, System.ServiceModel.ServiceHost, cannot be used for communication because it is in the Faulted state.
必须以管理员身份打开解决方案。
六 源代码
七、参考:
jquery ajax调用WCF,采用System.ServiceModel.WSHttpBinding协议
webHttpBinding、basicHttpBinding和wsHttpBinding区别
jQuery调用WCF需要注意的一些问题
学习 WCF (6)--学习调用WCF服务的各种方法
采用System.ServiceModel.WSHttpBinding或者basicHttpBinding 协议。客户端就不能直接在前端通过url直接访问服务了
它是基于SOAP协议的bing,会采用WSDL、XSD语言描述服务,你可以在客户端添加服务,通过使用客户端代理调用服务
例子效果如下,点击按钮通过服务获取数据,并把数据添加到table里面

1、定义契约以及自定义类型User
|
1
2
3
4
5
6
7
8
9
10
11
12
13
14
15
16
17
18
19
20
21
22
23
24
25
26
27
28
29
30
31
32
33
34
35
36
37
38
39
40
41
|
using System;
using System.Collections.Generic;
using System.Linq;
using System.Text;
using System.ServiceModel;
using System.ServiceModel.Web;
using System.Data;
using System.Runtime.Serialization;
namespace IContract
{
[ServiceContract]
[ServiceKnownType(typeof(User))]
public interface IContract
{
[OperationContract]
[WebInvoke(RequestFormat = WebMessageFormat.Json, ResponseFormat = WebMessageFormat.Json)]
double Add(double x, double y);
[OperationContract]
[WebInvoke(RequestFormat = WebMessageFormat.Json, ResponseFormat = WebMessageFormat.Json)]
string Hello(string mes);
[OperationContract]
[ServiceKnownType(typeof(User))]
[WebInvoke(RequestFormat = WebMessageFormat.Json, ResponseFormat = WebMessageFormat.Json)]
IList<User> getlist();
}
[Serializable]
[DataContract]
[ServiceKnownType(typeof(User))]
public class User
{
[DataMember]
public string Name{get;set;}
[DataMember]
public int Age { get; set; }
}
}
|
2、实现服务
|
1
2
3
4
5
6
7
8
9
10
11
12
13
14
15
16
17
18
19
20
21
22
23
24
25
26
27
28
29
30
31
32
33
34
35
36
37
38
39
40
41
42
43
44
45
46
47
48
49
50
51
52
53
54
55
56
57
58
59
60
61
62
63
64
65
66
|
using System;
using System.Collections.Generic;
using System.Data;
using System.Linq;
using System.Reflection;
using System.ServiceModel.Activation;
using System.Text;
using IContract;
namespace DBService
{
public class DBService:IContract.IContract
{
public double Add(double x, double y)
{
return x+y;
}
public string Hello(string mes)
{
return "holle word:" + mes;
}
public IList<User> getlist()
{
DataTable dt = new DataTable();
dt.Columns.Add("Name");
dt.Columns.Add("Age",typeof(System.Int32));
dt.Rows.Add("joe", "20");
dt.Rows.Add("ethan", "25");
dt.Rows.Add("jane", "36");
IList<User> lst = dt.ToList<User>();
return lst;
}
}
public static class Extension
{
public static IList<T> ToList<T>(this DataTable dt)
{
var lst = new List<T>();
var plist = new List<System.Reflection.PropertyInfo>(typeof(T).GetProperties());
foreach (DataRow item in dt.Rows)
{
T t = System.Activator.CreateInstance<T>();
for (int i = 0; i < dt.Columns.Count; i++)
{
PropertyInfo info = plist.Find(p => p.Name == dt.Columns[i].ColumnName);
if (info != null)
{
if (!Convert.IsDBNull(item[i]))
{
info.SetValue(t, item[i], null);
}
}
}
lst.Add(t);
}
return lst;
}
}
}
|
3、开启服务
|
1
2
3
4
5
6
7
8
9
10
11
12
13
14
15
16
17
18
19
20
21
22
23
24
25
26
27
28
29
30
31
32
33
34
35
36
37
38
39
40
41
42
43
44
45
46
47
48
49
50
51
52
53
54
55
56
57
58
59
60
61
62
63
|
using System;
using System.Collections.Generic;
using System.Linq;
using System.Text;
using System.ServiceModel;
using System.ServiceModel.Web;
using System.ServiceModel.Description;
namespace WCFHost
{
class Program
{
static void Main(string[] args)
{
StartService();
}
private static void StartService()
{
try
{
ServiceHost host1 = new ServiceHost(typeof(DBService.DBService));
host1.Opened += host_Opened;
host1.Open();
Console.ReadLine();
}
catch (Exception e)
{
throw e;
}
}
static void host_Opened(object sender, EventArgs e)
{
Console.WriteLine("DBService opened successful");
}
static void open()
{
Uri uri = new Uri("http://localhost:8883/DBServer");
using (ServiceHost host = new ServiceHost(typeof(DBService.DBService), uri))
{
System.ServiceModel.Description.ServiceMetadataBehavior behavior = new System.ServiceModel.Description.ServiceMetadataBehavior();
behavior.HttpGetEnabled = true;
host.Description.Behaviors.Add(behavior);
ServiceEndpoint endpoint = host.AddServiceEndpoint(typeof(IContract.IContract), new WSHttpBinding(), string.Empty);
host.Opened += host_Opened;
host.Open();
Console.ReadLine();
}
}
}
}
|
4、配置文件
|
1
2
3
4
5
6
7
8
9
10
11
12
13
14
15
16
17
18
19
20
21
22
23
24
25
26
27
28
|
<?xml version="1.0" encoding="utf-8" ?>
<configuration>
<system.web>
<compilation debug="true"></compilation>
</system.web>
<system.serviceModel>
<behaviors>
<serviceBehaviors>
<behavior name="metadataBehavior">
<serviceMetadata httpGetEnabled="true" />
</behavior>
</serviceBehaviors>
<endpointBehaviors>
</endpointBehaviors>
</behaviors>
<services>
<service behaviorConfiguration="metadataBehavior" name="DBService.DBService">
<endpoint address="" binding="wsHttpBinding" contract="IContract.IContract" ></endpoint>
<host>
<baseAddresses>
<add baseAddress="http://127.0.0.1:8883/DBServer"/>
</baseAddresses>
</host>
</service>
</services>
</system.serviceModel>
</configuration>
|
5、客户端添加服务,注意点,因为WCF默认 .NET collections 对象会以数组传递,为了传递我们自定义的List<User>,
需要在引用服务时设置DataType的collection type为System.Collections.Generic.List
可以在添加时,通过高级选项设置,对于已有的可以通过服务配置设置


添加服务会自动生成客户端代理及配置文件,如下:
|
1
2
3
4
5
6
7
8
9
10
11
12
13
14
15
16
17
18
19
20
21
22
23
24
|
<?xml version="1.0"?>
<configuration>
<system.web>
<compilation debug="true" targetFramework="4.0" />
</system.web>
<system.serviceModel>
<bindings>
<wsHttpBinding>
<binding name="WSHttpBinding_IContract" />
</wsHttpBinding>
</bindings>
<client>
<endpoint address="http://127.0.0.1:8883/DBServer" binding="wsHttpBinding"
bindingConfiguration="WSHttpBinding_IContract" contract="ServiceReference1.IContract"
name="WSHttpBinding_IContract">
<identity>
<userPrincipalName value="xiaochun-zhai@mercer.com" />
</identity>
</endpoint>
</client>
</system.serviceModel>
</configuration>
|
6、后端代码
|
1
2
3
4
5
6
7
8
9
10
11
12
13
14
15
16
17
18
19
20
21
22
23
24
25
26
27
28
|
using System;
using System.Collections.Generic;
using System.Linq;
using System.Web;
using System.Web.Services;
using System.Web.UI;
using System.Web.UI.WebControls;
namespace WebAjax
{
public partial class WebForm1 : System.Web.UI.Page
{
[WebMethod]
public static string SayHello()
{
return "Hello Ajax!";
}
[WebMethod]
public static IList<ServiceReference1.User> getlist()
{
ServiceReference1.ContractClient client = new ServiceReference1.ContractClient();
IList<ServiceReference1.User> lst = client.getlist();
return lst;
}
}
}
|
7、前端代码
|
1
2
3
4
5
6
7
8
9
10
11
12
13
14
15
16
17
18
19
20
21
22
23
24
25
26
27
28
29
30
31
32
33
34
35
36
37
38
39
40
41
42
43
44
45
46
47
48
49
50
51
52
53
54
55
56
57
58
59
60
61
62
63
64
65
66
67
68
69
70
71
72
73
74
75
76
77
78
79
80
81
82
83
84
85
86
87
88
|
<%@ Page Language="C#" AutoEventWireup="true" CodeBehind="WebForm1.aspx.cs" Inherits="WebAjax.WebForm1" %>
<!DOCTYPE html>
<html xmlns="http://www.w3.org/1999/xhtml">
<head runat="server">
<title></title>
<script src="js/jquery-1.8.3.min.js"></script>
<script>
//1、调用后台方法SayHello
$(function () {
$("#btnOK").click(function () {
$.ajax({
//要用post方式
type: "Post",
//方法所在页面和方法名
url: "WebForm1.aspx/SayHello",
contentType: "application/json; charset=utf-8",
dataType: "json",
success: function (data) {
//返回的数据用data.d获取内容
alert(data.d);
},
error: function (err) {
alert(err);
}
});
//禁用按钮的提交
return false;
});
});
//2、调用后台方法获取数据添加到table后面
$(function () {
$("#BtnGetList").click(function () {
$.ajax({
//要用post方式
type: "Post",
//方法所在页面和方法名
url: "WebForm1.aspx/getlist",
contentType: "application/json; charset=utf-8",
dataType: "json",
success: function (data) {
//返回的数据用data.d获取内容
var html = "";
$.each(data.d, function (index, item) {
var name = item.Name;
var age = item.Age;
html += "<tr><td>" + name + "</td><td>" + age + "</td></tr>";
});
$("table tr:eq(0)").after(html);
},
error: function (err) {
alert(err);
}
});
//禁用按钮的提交
return false;
});
});
</script>
</head>
<body>
<div>
<button id="btnOK">SayHello to backend</button>
<button id="BtnGetList">GetList from backend</button>
<br />
<br />
<table id="mytable">
<tr>
<td>Name</td>
<td>Age</td>
</tr>
<tr>
<td>Name</td>
<td>Age</td>
</tr>
</table>
<br />
<br />
</div>
</body>
</html>
|
8、 源代码
9、参考
WCF 笔记 (2) - 传输泛型 List 对象
webHttpBinding、basicHttpBinding和wsHttpBinding区别
一、学习文章http://www.cnblogs.com/iamlilinfeng/archive/2012/09/25/2700049.html
二、步骤
学习WFC,按照大神的文章一步步学习,不过看似简单的过程,中间还会有各种莫名其妙的bug,自己记录了一下
1、新建空白解决方案 WcfServiceWeb
2、新建WcfService项目,类型为WCF应用程序。删除系统生成的两个文件IService1.cs与Service1.svc。

3、添加新项CalculatorService.svc

4、在自动生成的ICalculatorService.cs中添加契约代码
|
1
2
3
4
5
6
7
8
9
10
11
12
13
14
15
16
17
18
19
|
using System;
using System.Collections.Generic;
using System.Linq;
using System.Runtime.Serialization;
using System.ServiceModel;
using System.Text;
namespace WcfService
{
[ServiceContract]
public interface ICalculatorService
{
[OperationContract]
void DoWork();
[OperationContract]
string ShowName(string Name);
}
}
|
5、在CalculatorService.cs中添加代码
|
1
2
3
4
5
6
7
8
9
10
11
12
13
14
15
16
17
18
19
20
21
22
23
|
using System;
using System.Collections.Generic;
using System.Linq;
using System.Runtime.Serialization;
using System.ServiceModel;
using System.Text;
namespace WcfService
{
public class CalculatorService : ICalculatorService
{
public void DoWork()
{
}
public string ShowName(string Name)
{
return Name;
}
}
}
|
6、此时Web.config配置文件如下,注意红字部分包含命名空间,要写对
|
1
2
3
4
5
6
7
8
9
10
11
12
13
14
15
16
17
18
19
20
21
22
23
24
25
|
<system.serviceModel>
<services>
<service behaviorConfiguration="WcfService.CalculatorServiceBehavior"
name="WcfService.CalculatorService">
<endpoint address="" binding="wsHttpBinding" contract="WcfService.ICalculatorService">
<identity>
<dns value="localhost" />
</identity>
</endpoint>
<endpoint address="mex" binding="mexHttpBinding" contract="IMetadataExchange" />
</service>
</services>
<behaviors>
<serviceBehaviors>
<behavior name="WcfService.Service1Behavior">
<serviceMetadata httpGetEnabled="true" />
<serviceDebug includeExceptionDetailInFaults="false" />
</behavior>
<behavior name="WcfService.CalculatorServiceBehavior">
<serviceMetadata httpGetEnabled="true" />
<serviceDebug includeExceptionDetailInFaults="false" />
</behavior>
</serviceBehaviors>
</behaviors>
</system.serviceModel>
|
7、在文件CalculatorService.svc上右键-在浏览器中查看,如下图:

8、按照后面步骤三(1.3)发布网站,三(1.4)在发布到IIS中,三(1.3)、三(1.4)在后面会讲到
9、客户端测试,添加新项目WebApplication1

10、在WebApplication1--引用--添加服务引用,点击发现会列出服务,确定。

11、 在Default.aspx中添加一个按钮和一个文本框,添加代码如下:
|
1
2
3
4
5
6
7
8
9
10
11
12
13
14
15
16
17
18
19
20
21
22
23
24
|
using System;
using System.Collections.Generic;
using System.Linq;
using System.Web;
using System.Web.UI;
using System.Web.UI.WebControls;
using System.ServiceModel;
namespace WebApplication1
{
public partial class _Default : System.Web.UI.Page
{
protected void Page_Load(object sender, EventArgs e)
{
}
protected void Button1_Click(object sender, EventArgs e)
{
ServiceReference.CalculatorServiceClient client = new ServiceReference.CalculatorServiceClient();
this.TextBox1.Text= client.ShowName("张三");
}
}
}
|
12、点击按钮,测试结果

三、问题点记录
1、如何发布网站
1.1、开启IIS服务
1.2、将IIS注册到VS中
- 开始——运行中输入cmd——进入命令字符界面首先输入cd C:\Windows\Microsoft.NET\Framework\v4.0.30319—然后输入aspnet_regiis.exe -i。
1.3 发布项目,项目-右键-发布,发布到一个地址,如D:\Web发布


1.4 添加网站
计算机右键——管理——服务和应用程序——Internet信息服务(IIS)管理器——网站右键——添加网站,在出现的提示框中输入网站名称,选择物理路径(1.3中的路径),选择IP地址即可。
详细参见http://blog.csdn.net/zwk626542417/article/details/9796259
2、发布时遇到的问题(执行第一步时没注册aspnet_regiis.exe,因为不知道作用)
2.1 问题1
HTTP 错误 404.3 - Not Found
由于扩展配置问题而无法提供您请求的页面。如果该页面是脚本,请添加处理程序。如果应下载文件,请添加 MIME 映射。

原因:系统没有默认为IIS注册WCF服务的svc文件的MIME映射。
解决方法:管理员身份运行C:\Windows\Microsoft.NET\Framework\v3.0\Windows Communication Foundation\ServiceModelReg.exe -i
步骤:以管理员身份打开cmd.exe,cd 进入目录C:\Windows\Microsoft.NET\Framework\v3.0\Windows Communication Foundation
然后输入:ServiceModelReg.exe -i 回车
2.2、问题2
HTTP 错误 500.21 - Internal Server Error
处理程序“svc-Integrated”在其模块列表中有一个错误模块“ManagedPipelineHandler”

原因:没有注册.NET 4.0框架。
解决方法:管理员身份运行C:\Windows\Microsoft.NET\Framework\v4.0.30319\aspnet_regiis.exe -i
详细参见http://blog.csdn.net/mazhaojuan/article/details/7660657
3、试着将类CalculatorService改为Calculator,Calculator.svc--右键--浏览--报错

解决办法:

<%@ ServiceHost Language="C#" Debug="true" Service="WcfService.CalculatorService" CodeBehind="Calculator.svc.cs" %>
改为
<%@ ServiceHost Language="C#" Debug="true" Service="WcfService.Calculator" CodeBehind="Calculator.svc.cs" %>
注意,在修改服务类的时候,要 使用“重构”菜单上的“重命名”命令,可以同时更改代码、svc 和配置文件中的类名“CalculatorService”。
四 源代码下载
一、概述
Windows Communication Foundation(WCF)是由微软发展的一组数据通信的应用程序开发接口,可以翻译为Windows通讯接口,它是.NET框架的一部分。由 .NET Framework 3.0 开始引入。
WCF的最终目标是通过进程或不同的系统、通过本地网络或是通过Internet收发客户和服务之间的消息。
WCF合并了Web服务、.net Remoting、消息队列和Enterprise Services的功能并集成在Visual Studio中。
WCF专门用于面向服务开发。
二、基于Asp.net 的应用程序开发与面向服务开发

在基于Asp.net 的应用程序开发中,我们由客户机的浏览器访问应用程序服务器,然后通过应用程序服务器中的数据库连接去连接数据库服务器,读取或是操作数据,有时候可能会多一个文件服务器。大家可以观察到,基本上所有的应用都放在了一台服务器上,但对于一个,由于业务上的需要(如:与外部系统交互),一台服务器很难支持所有的应用。我们再看下面的图:

客户机使用浏览器访问服务器A,服务器A为了业务需要与其他各种应用部署在服务器B、C、D....再通过WCF技术互相通信,相互访问...然而面向服务的好处不仅仅在此,他还提供了不同语言不同操作系统的可交互性..由于本文不是介绍SOA的文章,感兴趣的同学可以参见:SOA
三、第一个WCF程序
1. 新建立空白解决方案,并在解决方案中新建项目,项目类型为:WCF服务应用程序。建立完成后如下图所示:

2.删除系统生成的两个文件IService1.cs与Service1.svc。
3.添加自定义的WCF【服务文件】User.svc,此时vs2010会自动生成WCF接口文件IUser.cs,我们在IUser中定义WCF方法ShowName,在User.svc.cs对该接口的方法进行实现。
代码如下:
 1 using System.ServiceModel;
 2
 3 namespace WCFService
 4 {
 5     [ServiceContract]
 6     public interface IUser
 7     {
 8         [OperationContract]
 9         string ShowName(string name);
10     }
11 }
12
13
14 namespace WCFService
15 {
16     public class User : IUser
17     {
18         public string ShowName(string name)
19         {
20             string wcfName = string.Format("WCF服务,显示姓名:{0}", name);
21             return wcfName;
22         }
23     }
24 }
大家可以看到,在WCF中的接口与普通接口的区别只在于两个上下文,其他的和我们正常学习的接口一样。定义这个上下文要添加System.ServiceModel的引用。
[ServiceContract],来说明接口是一个WCF的接口,如果不加的话,将不能被外部调用。
[OperationContract],来说明该方法是一个WCF接口的方法,不加的话同上。
此时我们的第一个WCF服务程序就建立好了,将User.svc“设为起始页”,然后F5运行一下试试,如下图所示,VS2010自动调用了WCF的客户端测试工具以便我们测试程序:

我们双击上图中的 ShowName() 方法,出现如下图:

在请求窗口中的值中输入参数“你的姓名”,然后点击“调用”,在响应窗口中会出现返回值“WCF服务,显示姓名:你的姓名”,说明测试成功,点击下面的XML也可以看到XML的数据传输。我们现在建立好了服务的应用程序和业务逻辑,即非常简单的打印姓名的方法,测试也成功了。那么我们怎么用呢?
四、场景
我们设计的场景是在生产中经常应用的场景,把WCF程序寄宿在IIS之上。假设场景如下:A服务器和B服务器。我们把我们刚刚建立的WCF程序“部署”在B服务器上(本教程的A,B服务器都放是我自己的一台机器),我们的目标是在A服务器的应用程序来访问B服务器的WCF程序,实现服务器端的应用程序通讯。
五、将WCF程序寄宿在B服务器的IIS之上
首先我们将WCF应用程序发布一下,然后部署在B服务器的IIS之上,如下图所示:

鼠标右键浏览Uesr.svc,在游览器中出现如下图所示,说明服务部署成功。

上图中的http://localhost/User.svc?wsdl即为我们要引用的服务地址。
六、在客户端[A服务器]创建服务的引用
我们这里以Web应用程序为例,建立地物理地址为本机,但是大家可以想像成B服务器是远程计算机,localhost为一个其他的IP地址。
新建解决方案,并且创建ASP.NET Web应用程序的项目。命名为:WCFClient,如下图所示:

(1)新建Asp.net页面,命名为:WcfTest.aspx。
(2)添加在第五步中部署的服务的引用。如下图所示:

此时弹出添加服务引用的窗体,如下图所示:

我们在地址里写上我们寄宿在IIS上的WCF服务的地址服务路径,此处为:http://localhost/User.svc?wsdl,在名称空间处填写WCFService[此名称空间要在下面的客户端中引用]然后点击“前往”-->“确定”按钮。此时我们完成了对服务的引用。我们再次查看解决方案,里面多了Service References的文件夹,通过资源管理器打开后里面多了些文件,这些文件用于客户端向服务端的调用,现在先不用管他。
七、使用WCF服务端的方法
WcfTest.aspx的代码如下:

 1 <%@ Page Language="C#" AutoEventWireup="true" CodeBehind="WCFTest.aspx.cs" Inherits="WCFClient.WCFTest" %>
 2
 3 <!DOCTYPE html PUBLIC "-//W3C//DTD XHTML 1.0 Transitional//EN" "http://www.w3.org/TR/xhtml1/DTD/xhtml1-transitional.dtd">
 4 <html xmlns="http://www.w3.org/1999/xhtml">
 5 <head runat="server">
 6     <title></title>
 7 </head>
 8 <body>
 9     <form id="form1" runat="server">
10     <asp:TextBox ID="txtName" runat="server"></asp:TextBox><br />
11     <asp:Button ID="btnSubmit" runat="server" Text="测试WCF服务" OnClick="btnClick" />
12     </form>
13 </body>
14 </html>
15
16 using System;
17 using System.Collections.Generic;
18 using System.Linq;
19 using System.Web;
20 using System.Web.UI;
21 using System.Web.UI.WebControls;
22
23 //引用WCF服务的名称空间
24 using WCFClient.WCFService;
25
26 namespace WCFClient
27 {
28     public partial class WCFTest : System.Web.UI.Page
29     {
30         protected void Page_Load(object sender, EventArgs e)
31         {
32
33         }
34
35         protected void btnClick(object sender, EventArgs e)
36         {
37             UserClient user = new UserClient();
38             string result = user.ShowName(this.txtName.Text);
39             Response.Write(result);
40         }
41     }
42 }
上面中的UserClient类是在添加引用的时候生成的服务端User类的客户端代理类,一般客户端代理类名称都会是**Client。我们运行一下看下效果。

通过以上的例子,我们完成了由A服务器的应用向B服务器中WCF提供的方法的调用。这个例子比较简单,对于经常开发B/S结构应用程序的同学们来说比较好理解。
八、说明:因为网上的入门教程比较少,本教程只做入门,后面会继续讲些其他入门的东西,深入的请看园子里:Artech 大哥的文章。
九、代码下载:
10 WCF 教程
十、版权
转载请注明出处:http://www.cnblogs.com/iamlilinfeng
活到老,学到老,练到老...


