
动静分离LNMP
目录

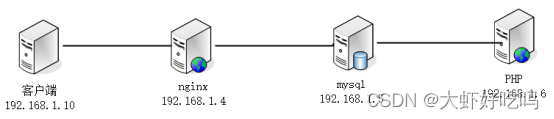
根据需求实现动静分离,当客户端访问nginx网站服务时,静态网页nginx本机反馈,动态网页访问PHP,所以需要在nginx服务器中部署论坛后需要拷贝到PHP服务器中。但是如果有NFS或GFS服务器时可以把nginx和php指定文件服务器。
安装LNMP
- 安装nginx
所需安装包如下:

安装并启动:
[root@nginx ~]# rpm -ivh /media/nginx-rpm/*.rpm --nodeps --force

[root@nginx ~]# systemctl start nginx

[root@nginx ~]# systemctl enable nginx

Created symlink from /etc/systemd/system/multi-user.target.wants/nginx.service to /usr/lib/systemd/system/nginx.service.- 安装php
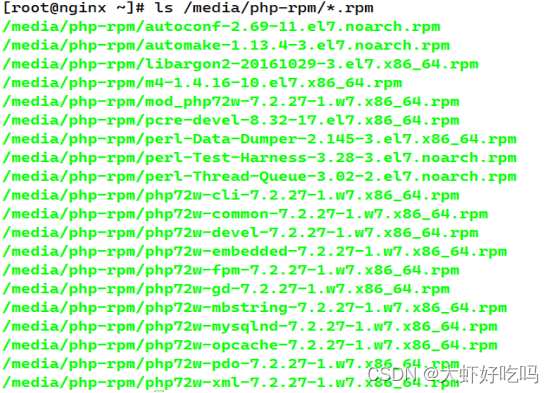
所需安装包如下:
安装并启动:
[root@nginx ~]# rpm -ivh /media/php-rpm/*.rpm --nodeps --force

[root@nginx ~]# systemctl start php-fpm

[root@nginx ~]# systemctl enable php-fpm

Created symlink from /etc/systemd/system/multi-user.target.wants/php-fpm.service to /usr/lib/systemd/system/php-fpm.service.- 安装mysql(mariadb)
所需安装包如下:

安装mysql并启动
[root@nginx ~]# rpm -ivh /media/mysql5.6-rpm/*.rpm --nodeps --force

[root@nginx ~]# systemctl start mysqld

[root@nginx ~]# systemctl enable mysqld

创建mysql密码

[root@nginx ~]# mysqladmin -uroot password

New password: //输入新密码

Confirm new password: //再次输入新密码
应用安装
本次php可以搭建两个应用wordpress和wecenter,两个app搭建一个论坛即可。如搭建两个app需要测试机本地解析域名,通过域名访问虚拟主机。
搭建wordpress
注意:下面操作注意看服务器名称。
1. php服务器下载并解压wordpree包到/下并解压授权。
[root@php ~]# cp -rp /media/wordpress-4.9.4-zh_CN.zip /

[root@php ~]# cd /

[root@php /]# unzip wordpress-4.9.4-zh_CN.zip

[root@php /]# chmod -R 777 /wordpress
2.nginx服务器创建虚拟主机配置文件
[root@nginx /]# vim /etc/nginx/conf.d/blog.conf

server {

        listen 80;

        server_name www.blog.com;

        root /wordpress;

        index index.php index.html;


        location ~ \.php$ {

                        root /wordpress;

                        fastcgi_pass 192.168.1.6:9000; //指定php服务器IP

                        fastcgi_index index.php;

fastcgi_param SCRIPT_FILENAME $document_root$fastcgi_script_name;

                include fastcgi_params;

                }

        }


[root@nginx /]# nginx -t

nginx: the configuration file /etc/nginx/nginx.conf syntax is ok

nginx: configuration file /etc/nginx/nginx.conf test is successful

[root@nginx /]# systemctl restart nginx
3.mysql服务器创建blog数据库和管理用户
[root@mysql ~]# mysql -uroot -p123

//省略部分内容

mysql> create database blog;

Query OK, 1 row affected (0.00 sec)


mysql> grant all on blog.* to lisi@'%' identified by '123456';

Query OK, 0 rows affected (0.00 sec)


mysql> exit

Bye
4.PHP服务器修改配置文件后把PHP服务器中的/wordpress文件复制到nginx服务器中。
[root@php ~]# vim /wordpress/wp-config-sample.php

/** WordPress数据库的名称 */

define('DB_NAME', 'blog');


/** MySQL数据库用户名 */

define('DB_USER', 'lisi');


/** MySQL数据库密码 */

define('DB_PASSWORD', '123456');


/** MySQL主机 */

define('DB_HOST', '192.168.1.5');

[root@php /]# cd /wordpress/

[root@php wordpress]# mv wp-config-sample.php wp-config.php

[root@php wordpress]# scp -rp /wordpress root@192.168.1.4:/

[root@php ~]# vim /etc/php-fpm.d/www.conf  //修改下面两行内容

listen = 192.168.1.6:9000 //PHP服务器IP

listen.allowed_clients = 192.168.1.4 //web服务器IP,表示允许web主机访问php服务器

[root@php ~]# systemctl restart php-fpm
5.通过客户端服务器验证
注意下面使用测试机1.10访问。
因为只搭建了第一个app,所以直接访问IP即可,如多个app需要通过修改本机hosts文件或者搭建DNS访问 。http://192.168.1.4,后台网址为http://192.168.1.4/wp-admin。根据下图点击(现在就开始!)。
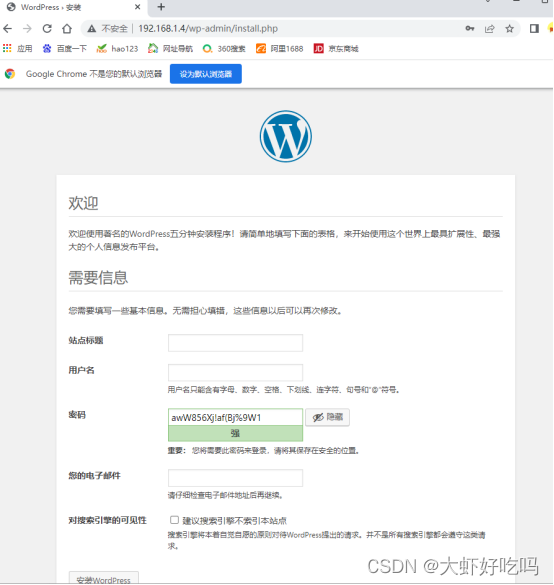
创建站点标题,用户名密码后点击安装。
登录管理用户密码后即进入账户首页,根据自己需求添加或修改即可。

搭建WeCenter
1.安装
[root@php ~]# mkdir /zh

[root@php ~]# cp -rp /media/WeCenter_3-3-4.zip /zh

[root@php ~]# cd /zh

[root@php zh]# unzip WeCenter_3-3-4.zip

[root@php zh]# chmod -R 777 /zh
2.nginx服务器创建虚拟主机配置文件
[root@nginx ~]# vim /etc/nginx/conf.d/zh.conf

server {

        listen 80;

        server_name www.zh.com;

        root /zh;

        index index.php index.html;


        location ~ \.php$ {

                root /zh;                fastcgi_pass 192.168.1.6:9000;

                fastcgi_index index.php;

                fastcgi_param SCRIPT_FILENAME $document_root$fastcgi_script_name;

                include fastcgi_params;

                }

        }

[root@nginx ~]# nginx -t

nginx: the configuration file /etc/nginx/nginx.conf syntax is ok

nginx: configuration file /etc/nginx/nginx.conf test is successful

[root@nginx ~]# systemctl restart nginx
3.mysql服务器创建zh数据库和管理用户
mysql> create database zh;

Query OK, 1 row affected (0.00 sec)


mysql> grant all on zh.* to zh@'%' identified by '123456';

Query OK, 0 rows affected (0.00 sec)

        4.PHP服务器修改配置文件后把PHP服务器中的/zh文件复制到nginx服务器中。

[root@php ~]# cd /zh/system/config/

[root@php config]# mv system.php databaes.php

[root@php config]# vim databaes.php  //添加下面文档


$config['charset'] = 'utf8mb4';^M

$config['prefix'] = 'aws_';^M

$config['driver'] = 'MySQLi';^M

$config['master'] = array (

  'charset' => 'utf8mb4',

  'host' => '192.168.1.5', //数据库主机IP

  'username' => 'zh', //用户名

  'password' => '123456', //用户密码

  'dbname' => 'zh', //数据库名称

);^M

$config['slave'] = false;^M

[root@php config]# systemctl restart php-fpm

[root@php config]# scp -rp /zh root@192.168.1.4:/
5.验证
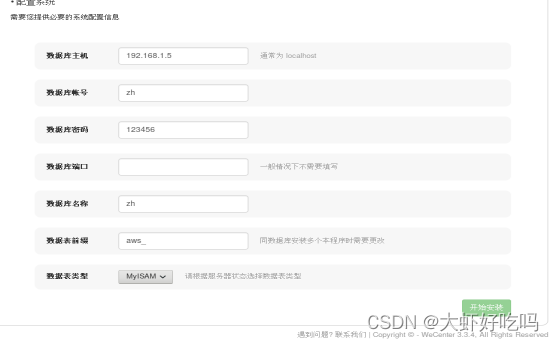
访问http://www.zh.com查看配置无误后点击下一步,输入{数据库主机,账号,密码,名称}后点击开始安装。
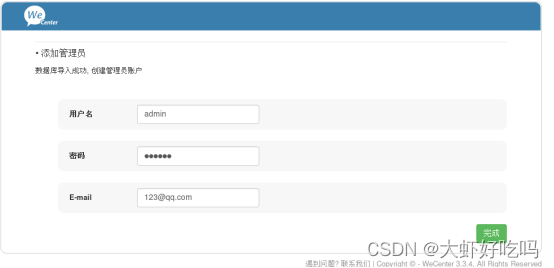
新建管理员用户密码,输入邮箱号后点击完成。
相关文章
- [PHP] Larval 主从读写分离配置
- Mysql主从配置,实现读写分离
- k8s部署nacos集群:3个pod、连接外部mysql读写分离集群
- Atitit 高性能架构法艾提拉著作 目录 1. 前期可以立即使用的技术2 2. 分离法3 2.1. Web db分离3 2.2. 读写分离4 2.3. CDN加速技术4 2.4. 动静分
- ML之FE:在特征工程/数据预处理阶段分离特征与标签/目标变量的三种实现方法之详细攻略
- SpringBoot+Vue处理前后端分离跨域问题
- 仓库管理系统-前后端分离项目(SpringBoot+Vue)
- 程序开发中:什么是前后端分离?你搞清楚了吗?
- 基于Java+SpringBoot+Vue前后端分离学生管理系统设计与实现
- 【语音分离】通过分析信号的FFT,根据音频使用合适的滤波器进行语音信号分离(Matlab代码实现)
- 搭建LNMP实现分离