
Kubelet 如何管理 Kubernetes 集群状态以实现高可用性
How to Manage a Kubernetes cluster state for High Availability

Whether you’ve been using Kubernetes for a while, or you’re still testing it out, it’s more than likely that you’ve come across Kubernetes events before. But what exactly are they and is there a way to manage a Kubernetes Cluster State for high availability?
无论您已经使用 Kubernetes 一段时间,还是仍在测试它,您很可能以前遇到过 Kubernetes 事件。但它们到底是什么?有没有办法管理 Kubernetes 集群状态以实现高可用性?
What are Kubernetes Events?
Have you dealt with any debugging issues when using Kubernetes? It can be incredibly frustrating, but understanding event creation and state change can really help. Kubernetes events provide insight into what is happening inside the cluster. Event is a resource type in Kubernetes and it is automatically created due to state changes which occur in the cluster. So as you can see, events are a super valuable resource when dealing with debugging issues. Read on to learn more about the flow of state/event management and related timers and how this can help you.
您在使用 Kubernetes 时是否处理过任何调试问题?这可能令人难以置信的沮丧,但了解事件创建和状态更改确实会有所帮助。Kubernetes 事件提供了对集群内部正在发生的事情的洞察。Event是 Kubernetes 中的一种资源类型,它是由于集群中发生的状态变化而自动创建的。如您所见,在处理调试问题时,事件是非常有价值的资源。继续阅读以了解有关状态/事件管理流程和相关计时器的更多信息,以及这如何帮助您。
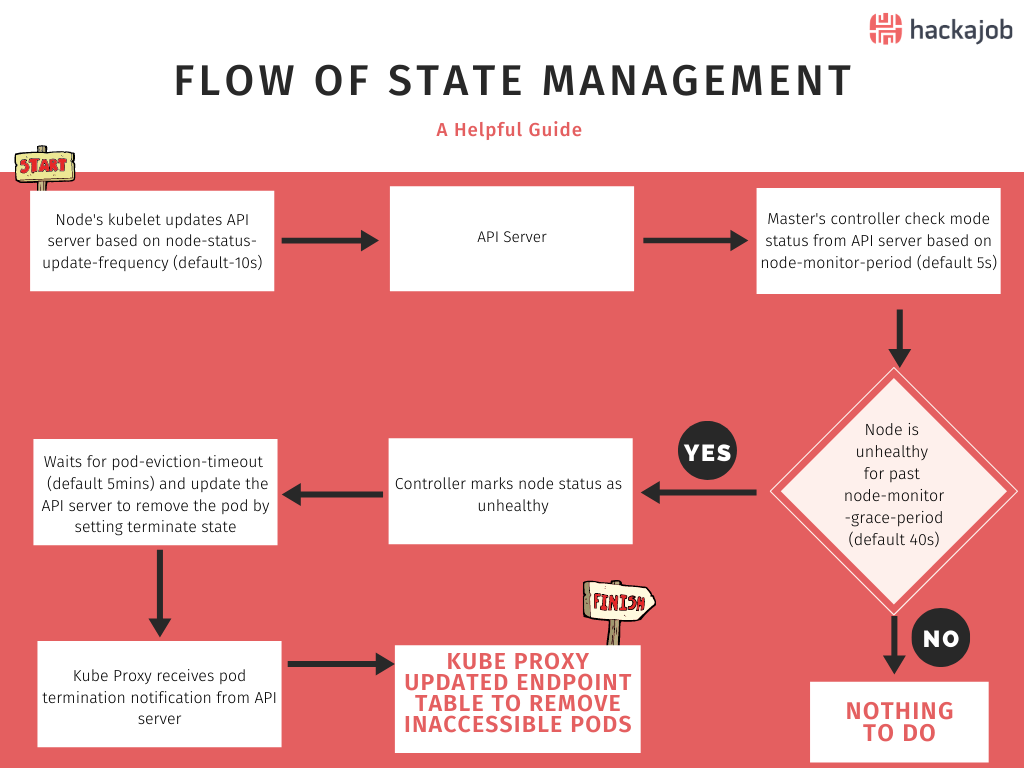
Flow of State Management 状态管理流程
If you understand the flow of state management, it’s easy to understand how some states fail, and how we can prevent this, so let’s dig in:
如果您了解状态管理的流程,就很容易理解某些状态是如何失败的,以及我们如何防止这种情况发生,所以让我们深入研究:
1.The Kubelet in each cluster node updates the API server based on the frequency configured in the node-status-update-frequency parameter. The default value is 10s.
每个集群节点中的 Kubelet 根据node-status-update-frequency参数中配置的频率更新 API 服务器。默认值为 10 秒。
2.Then from time to time, the master’s controller manager checks the node status from the API Server. The frequency is configured in the node-monitor-period parameter and the default value is 5s.
然后不时地,master 的控制器管理器controller manager从 API Server 中检查节点状态。频率在node-monitor-period参数中配置,默认值为 5s。
3.If the master's controller manager notices a node is unhealthy via the node-monitor-grace-period (Default is 40s), then it marks the node as unhealthy via the control manager.
如果 master 的控制器管理器通过node-monitor-grace-period (默认为 40 秒)注意到一个节点不健康,那么它会通过控制管理器将该节点标记为不健康。
4.Then the controller manager waits for pod-eviction-timeout, (default is 5 mins) and updates the API server to remove the pod by setting terminate state.
然后控制器管理器等待pod-eviction-timeout(默认为 5 分钟)并更新 API 服务器以通过设置终止状态来移除 pod。
5.Kube proxy receives pod termination notification from the API Server.
Kube proxy 从 API Server 接收 pod 终止通知。
6.Kube proxy updates the endpoints by removing inaccessible pods.
Kube proxy 代理通过删除不可访问的 pod 来更新端点。
What happens to the cluster when nodes fail is then, based on default timing. In this above example it will take 5 mins and 40 seconds (node-monitor-grace-period + pod-eviction-timeout) to remove inaccessible pods and get back to a steady state. This is not a problem if deployment has multiple pods (more than 1 replica) and the pods on the healthy nodes can handle all transactions without any failures. If deployment has one pod or healthy pods cannot handle the transactions, then 5 mins and 40 seconds is not an acceptable down time, so the best solution is configuring the timing variables in the cluster to react faster for failures. How do you do that, you ask? Well, let’s go through it together:
然后,根据默认时间,当节点发生故障时集群会发生什么。在上面的示例中,需要 5 分 40 秒(node-monitor-grace-period + pod-eviction-timeout) 来移除不可访问的 pod 并恢复到稳定状态。如果部署有多个 pod(超过 1 个副本)并且健康节点上的 pod 可以处理所有事务而不会出现任何故障,则这不是问题。如果部署有一个 pod 或者健康的 pod 无法处理事务,那么 5 分 40 秒是不可接受的停机时间,因此最好的解决方案是在集群中配置时间变量以更快地对故障做出反应。你是怎么做到的,你问?好吧,让我们一起来看看:
Configuration changes to improve the high availability of the cluster
The following steps were tested in Kubernetes v1.18.3
1. Reduce node-status-update-frequency
node-status-update-frequency is a kubelet configuration and the default value is 10 seconds.
Steps to override default value
a) Change the kublet configurations in all nodes (master and workers) by modifying the /var/lib/kubelet/kubeadm-flags.env file
vi /var/lib/kubelet/kubeadm-flags.env
b) Add the “--node-status-update-frequency=5s” option at the end or anywhere on this line.
KUBELET_KUBEADM_ARGS="--cgroup-driver=systemd --network-plugin=cni --pod-infra-container-image=k8s.gcr.io/pause:3.2 --node-status-update-frequency=5s"
c) Save your file.
d) Restart the kubelet.
systemctl restart kubelet
e) Repeat steps (a) to (d) in all nodes.
2. Reduce node-monitor-period and node-monitor-grace-period
node-monitor-period and node-monitor-grace-period are control manager configurations and their default values are 5 seconds and 40 seconds respectively.
node-monitor-period和node-monitor-grace-period是控制管理器配置,它们的默认值分别是 5 秒和 40 秒。
Steps to override default value
a) Change the kube-controller-manager in master nodes.
vi /etc/kubernetes/manifests/kube-controller-manager.yaml
b) Add the following two parameters to the command section in kube-controller-manager.yaml file
- --node-monitor-period=3s
- --node-monitor-grace-period=20s
After adding above two parameters, your command section should look like this:
spec:
containers:
- command:
- kube-controller-manager
. . . [There are more parameters here]
- --use-service-account-credentials=true
- --node-monitor-period=3s
- --node-monitor-grace-period=20s
image: k8s.gcr.io/kube-controller-manager:v1.18.4
imagePullPolicy: IfNotPresent
c) Restart the docker
systemctl restart docker
d) Repeat the steps (a) to (c) in all master nodes.
3. Reduce pod-eviction-timeout
pod-eviction-timeout can be reduced by setting new flags on the API-Server.
Steps to override default value
a) Create a new file called kubeadm-apiserver-update.yaml in /etc/kubernetes/manifests folder in master nodes
cd /etc/kubernetes/manifests/
vi kubeadm-apiserver-update.yaml
b) Add the following content to the kubeadm-apiserver-update.yaml
apiVersion: kubeadm.k8s.io/v1beta2
kind: ClusterConfiguration
kubernetesVersion: v1.18.3
apiServer:
extraArgs:
enable-admission-plugins: DefaultTolerationSeconds
default-not-ready-toleration-seconds: "20"
default-unreachable-toleration-seconds: "20"
[NOTE] Make sure the above kubernetesVersion matches with your Kubernetes version
c) Save the file
d) Run the following command to apply the changes
kubeadm init phase control-plane apiserver --config=kubeadm-apiserver-update.yaml
e) Verify that the change has been applied by checking the kube-apiserver.yaml for default-not-ready-toleration-seconds and default-unreachable-toleration-seconds
cat /etc/kubernetes/manifests/kube-apiserver.yaml
f) Repeat the steps (a) to (e) in all master nodes.
The above steps change the pod-eviction-timeout across the cluster, but there is another way to change the pod eviction timeout. You can do this by adding tolerations to each deployment, so this will affect only the relevant deployment. To configure deployment-based pod eviction time, add the following tolerations to each deployment:
tolerations:
- key: "node.kubernetes.io/unreachable"
operator: "Exists"
effect: "NoExecute"
tolerationSeconds: 20
- key: "node.kubernetes.io/not-ready"
operator: "Exists"
effect: "NoExecute"
tolerationSeconds: 20
[NOTE] If you are working with a managed Kubernetes service, such as Amazon EKS or AKS, you will not be able to update pod eviction timeout across the cluster. You will need to add the tolerations to your deployment in each situation.
And that's it, you've successfully managed Kubernetes events. Well done! hackajob has a wealth of roles where skills like this will come in handy. Interested? Find the right opportunities here.
Like what you've read or want more like this? Let us know! Email us here or DM us: Twitter, LinkedIn, Facebook, we'd love to hear from you.
相关文章
- 进击的 Kubernetes 调度系统(二):支持批任务的 Coscheduling/Gang scheduling
- Kubernetes详解(十七)——Pod存活性探针应用实战
- Kubernetes详解(三)——Kubernetes集群组件
- Kubernetes 应用配置与管理
- Kubernetes 集群安全 - 鉴权 实战rolebinding和clusterrole
- 使用kubectl查看Kubernetes集群里的node节点信息
- kubernetes的架构
- 【云原生 | Kubernetes 系列】Docker 面试题2则--取数据库连接数和docker-compose
- y31.第三章 Kubernetes从入门到精通 -- k8s集群环境搭建(四)
- 【云原生之kubernetes实战】kubernetes集群下的存储持久化
- 【云原生之kubernetes实战】在k8s集群下搭建gitlab
- 【Zabbix实战之部署篇】kubernetes集群搭建Zabbix监控平台
- kubernetes集群中工作节点Noready故障处理
- 正在运行的Kubernetes集群想要调整Pod的网段地址
- Kubernetes集群Configmap配置存储资源(三十六)
- SpringCloud微服务电商系统在Kubernetes集群中上线详细教程
- 基于Kubernetes集群的Jenkins CI/CD版本上线流程部署
- Kubernetes集群Pod资源污点及容忍详解(二十)
- Kubernetes初始化容器
- Kubernetes APIServer安全 审计日志
- Kubernetes 检查YAML文件安全配置:kubesec
- 【云原生 | Kubernetes 系列】--Ceph集群应用
- a32.ansible 生产实战案例 -- 基于kubeadm安装kubernetes v1.22 -- 集群部署(一)
- 【K8S系列】第八讲:Kubernetes 之kubectl 常用命令汇总
- 在 Kubernetes 上运行高可用的 Kafka 集群