
OpenCV入门(二十六)快速学会OpenCV 25 角点检测
2023-09-14 09:12:45 时间
OpenCV入门(二十六)快速学会OpenCV 25 角点检测
作者:Xiou
1.角点检测
角点检测 (Corner Detection) 是图像的重要特征. 角点可以帮助我们实现图像对其, 图像拼接, 目标识别等等重要用途。
·Harris:该算法适用于角点检测。
Harris 角点检测 (Harris Corner Detection) 是最基础也是最重要的一种角点检测算法. 通过计算图像在 x, y 上平移的自相似性 (Self-Similarity) 来判断图像是否为角点。
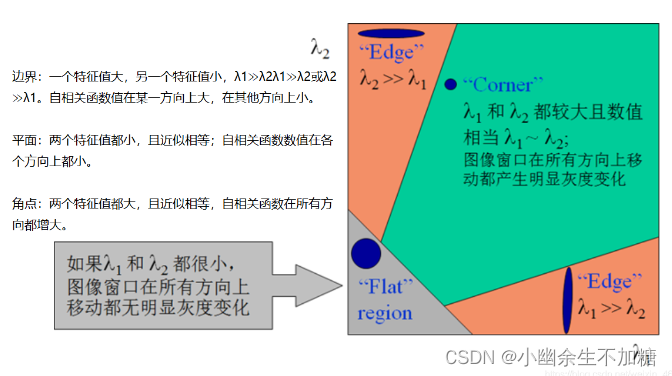
OpenCV有一个名为cv2.cornerHarris的方便函数,用于检测图像中的角点。例如: 某图像的某个位置在 x / y 方向上做微小的滑动, 如果窗口内的灰度值都有较大变换, 那么这个位置就是角点。
cv2.cornerHarris(src, blockSize, ksize, k, dst=None, borderType=None)
参数:
scr: 输入图像;
blockSize: 焦点检测中指定区域的大小;
ksize: Sobel 求导中使用的窗口大小;
ksize: Sobel 孔径参数, 取值范围为 [0.04, 0.06];
2.角点检测代码实例
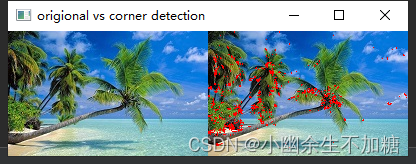
2.1 实例1:
import numpy as np
import cv2

# 读取图片
image = cv2.imread("p1.jpg")
# 转换成灰度图
image_gray = cv2.cvtColor(image, cv2.COLOR_BGR2GRAY)
# harris角点检测
harris = cv2.cornerHarris(image_gray, 2, 3, 0.04)
# 阈值转换原图
image_corner = image.copy()
image_corner[harris > 0.01 * harris.max()] = [0, 0, 255]
# 整合
combine = np.hstack((image, image_corner))

# 图片展示
cv2.imshow("origional vs corner detection", combine)
cv2.waitKey(0)
cv2.destroyAllWindows()

# 保存结果
cv2.imwrite("harris.jpg", combine)
输出结果:
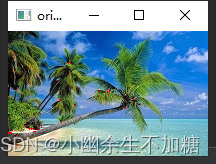
2.2 实例2:
import numpy as np
import cv2

# 读取图片
image = cv2.imread("p1.jpg")
# 转换成灰度图
image_gray = cv2.cvtColor(image, cv2.COLOR_BGR2GRAY)
# harris角点检测
harris = cv2.cornerHarris(image_gray, 2, 3, 0.04)
# 阈值转换原图
image_corner = image.copy()
image_corner[harris > 0.1 * harris.max()] = [0, 0, 255]
# 整合
combine = np.hstack((image, image_corner))
# 图片展示
cv2.imshow("origional vs corner detection", image_corner)
cv2.waitKey(0)
cv2.destroyAllWindows()

# 保存结果
cv2.imwrite("harris.jpg", combine)
输出结果:
相关文章
- OpenCV学习(一):入门介绍
- opencv-----基本数据类型
- Opencv学习笔记 - 关于OpenCV的UMat 类
- Opencv学习笔记 OpenCV源码以及模块的组成结构
- Opencv学习笔记 - 频域手段添加盲水印
- OpenCV入门笔记(一) Linux下的安装
- C++版本的OpenCV 5.x编译生成opencv-python==5.x(GPU版本)接口并进行调用
- opencv otsu二值化
- OpenCV入门(二十九)快速学会OpenCV 28 K均值聚类
- OpenCV入门(二十八)快速学会OpenCV 27 图像匹配
- OpenCV入门(二十五)快速学会OpenCV 24 模板匹配
- OpenCV入门(二十三)快速学会OpenCV 22 直方图
- OpenCV入门(二十一)快速学会OpenCV 20 图像金字塔
- OpenCV入门(十八)快速学会OpenCV 17 直线检测
- OpenCV入门(八)快速学会OpenCV7图像运算
- OpenCV-PyQT项目实战(2)QtDesigner 和 PyUIC 快速入门
- opencv图像处理入门
- Opencv从入门到精通(五):透视图、拼接图片、颜色检测
- 嵌入式linux开发,opencv移植,opencv-3.2.0移植,cmake
- OpenCV 入门