
vscode配置C++
2023-09-14 09:06:47 时间
假设你装完了g++,并且添加到了环境变量
打开vscode
装一下C/C++,C++ intellisense,Code Runner

先打开一个目录,然后新建一个cpp
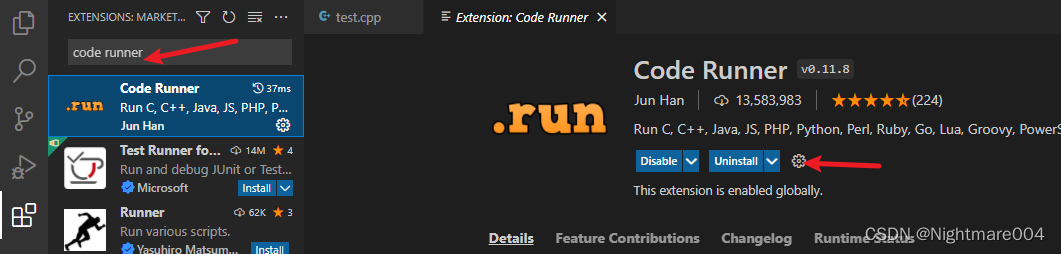
在插件里,搜索coderunner,点那个设置
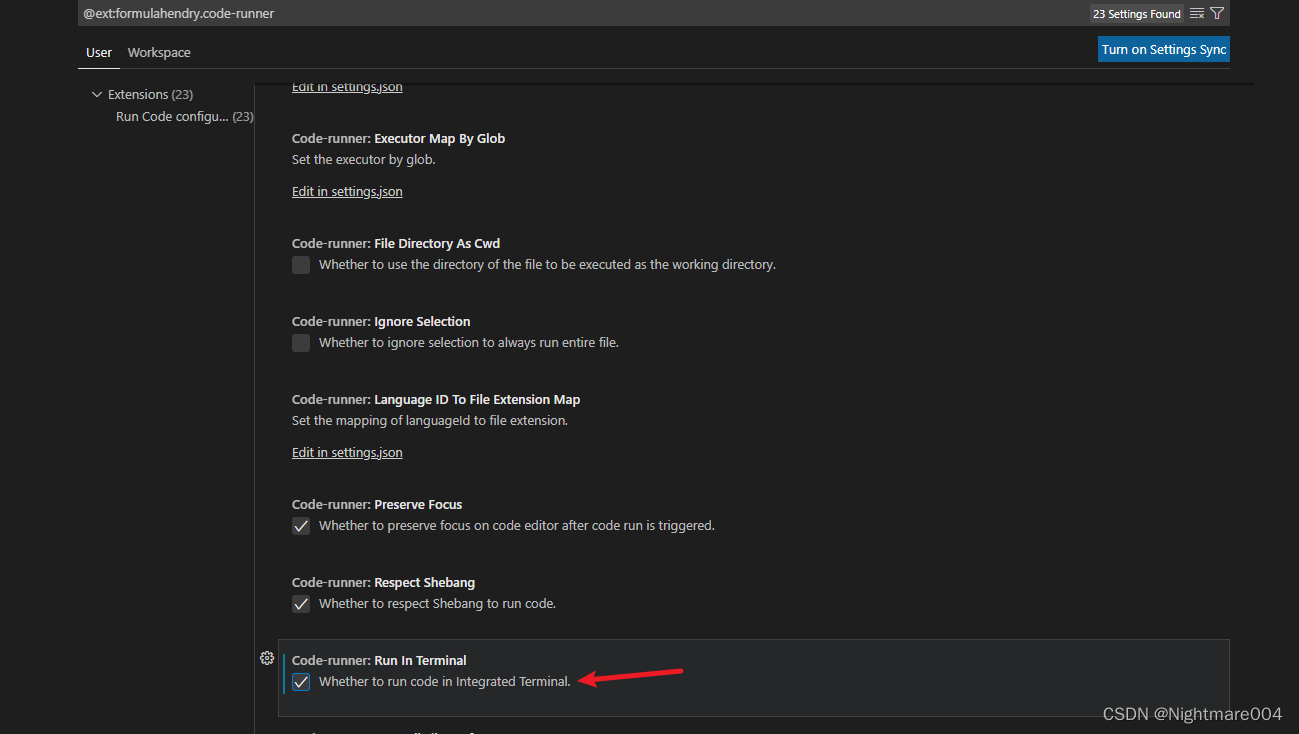
把run in terminal勾上
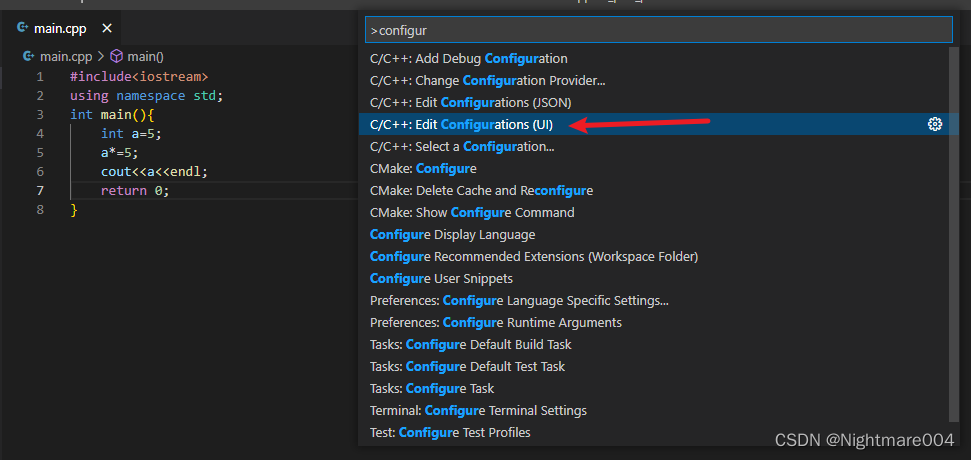
ctrl+shift+p,输入configur
点C/C++:Edit Configurations (UI)
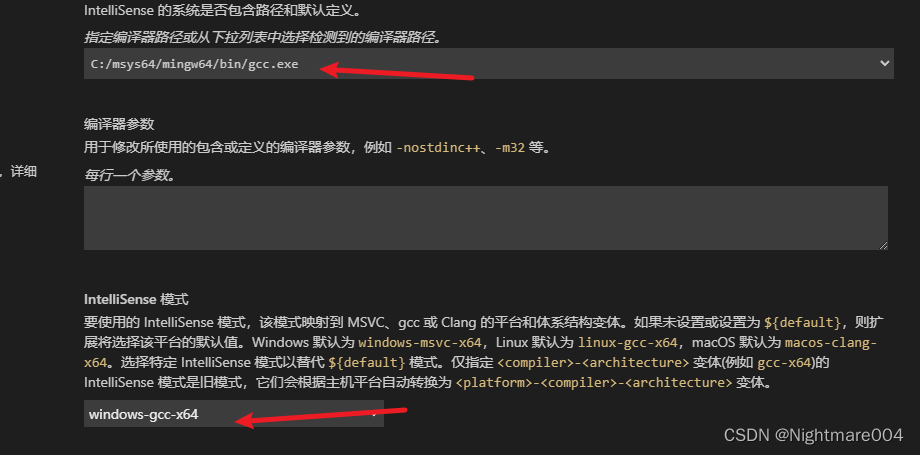
选择gcc
点左边的debug按钮,然后点create a launch.json file(如果你以前配置过,那应该是点击上面的齿轮,进入launch.json

选第一个

 修改中间的configurations
重点检查program
{
    // Use IntelliSense to learn about possible attributes.
    // Hover to view descriptions of existing attributes.
    // For more information, visit: https://go.microsoft.com/fwlink/?linkid=830387
    "version": "0.2.0",
    "configurations": [
        {
            "name": "(gdb) Launch",
            "type": "cppdbg",
            "request": "launch",
            "program": "${workspaceFolder}/${fileBasenameNoExtension}.out",
            "args": [],
            "stopAtEntry": false,
            "cwd": "${fileDirname}",
            "environment": [],
            "externalConsole": false,
            "MIMode": "gdb",
            "setupCommands": [
                {
                    "description": "Enable pretty-printing for gdb",
                    "text": "-enable-pretty-printing",
                    "ignoreFailures": true
                }
            ]
        }
    ]
}
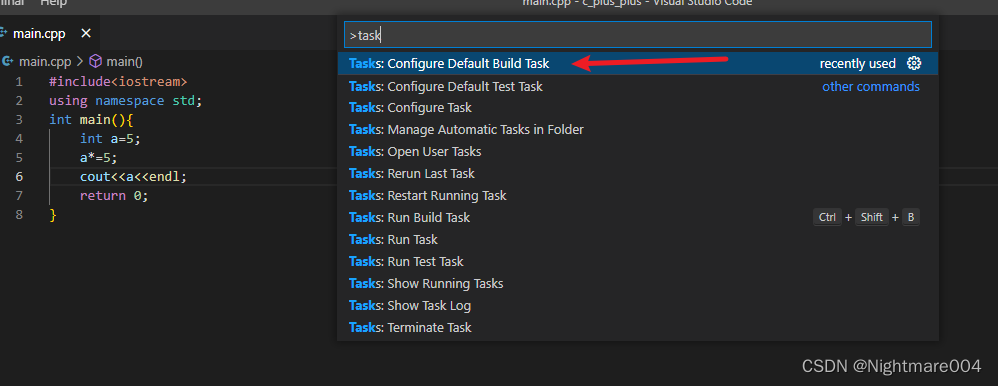
回到那个cpp文件,再次ctrl+shift+p,输入task
选择configure default build task
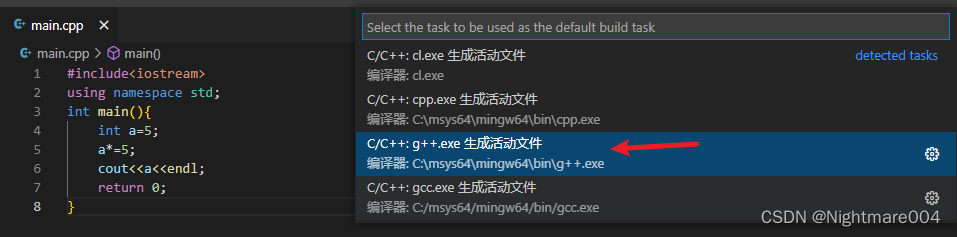
选g++
label是最后你编译的标签,可以自己写
然后command,看你是gcc还是g++
那些参数你可以自己看着改(我相信你应该会编译g++)
因为打oj,所以我的std是98的,你要是leetcode,你也可以搞个17或者20(虽然我觉得你也只会用11的特性)
可以看的出来,我配置了98和11,两个
{
    // See https://go.microsoft.com/fwlink/?LinkId=733558
    // for the documentation about the tasks.json format
    "version": "2.0.0",
    "tasks": [
        {
            "label": "build98",
            "type": "shell",
            "command": "g++",
            "args": [
                "${file}",   // 指定编译源代码文件
                "-o",
                "${workspaceFolder}/${fileBasenameNoExtension}.out", // 指定输出文件名,不加该参数则默认输出a.exe
                "-O0",      // 优化级别
                "-ggdb3",   // 生成和调试有关的信息
                "-Wall",    // 开启额外警告
                "-static-libgcc",   // 静态链接
                "-std=c++98",       // 使用c++98标准
                "-finput-charset=UTF-8",    //输入编译器文本编码 默认为UTF-8
                "-fexec-charset=GB18030",   //输出exe文件的编码
                "-D _USE_MATH_DEFINES"
            ],
            "problemMatcher": {
                "owner": "cpp",
                "fileLocation": [
                    "absolute",
                ],
                "pattern": {
                    "regexp": "^(.*):(\\d+):(\\d+):\\s+(warning|error):\\s+(.*)$",
                    "file": 1,
                    "line": 2,
                    "column": 3,
                    "severity": 4,
                    "message": 5
                }
            },

            "group": {
                "kind": "build",
                "isDefault": true
            },

            "presentation": {
                "echo": true,
                "reveal": "always", // 在“终端”中显示编译信息的策略,可以为always,silent,never
                 "focus": false,
                 "panel": "shared" // 不同的文件的编译信息共享一个终端面板
            },
        },
        {
            "label": "build11",
            "type": "shell",
            "command": "g++",
            "args": [
                "${file}",   // 指定编译源代码文件
                "-o",
                "${workspaceFolder}/${fileBasenameNoExtension}.out", // 指定输出文件名,不加该参数则默认输出a.exe
                "-O0",      // 优化级别
                "-ggdb3",   // 生成和调试有关的信息
                "-Wall",    // 开启额外警告
                "-static-libgcc",   // 静态链接
                "-std=c++11",       // 使用c++11标准
                "-finput-charset=UTF-8",    //输入编译器文本编码 默认为UTF-8
                "-fexec-charset=GB18030",   //输出exe文件的编码
                "-D _USE_MATH_DEFINES"
            ],
            "problemMatcher": {
                "owner": "cpp",
                "fileLocation": [
                    "absolute",
                ],
                "pattern": {
                    "regexp": "^(.*):(\\d+):(\\d+):\\s+(warning|error):\\s+(.*)$",
                    "file": 1,
                    "line": 2,
                    "column": 3,
                    "severity": 4,
                    "message": 5
                }
            },

            "group": {
                "kind": "build",
                "isDefault": true
            },

            "presentation": {
                "echo": true,
                "reveal": "always", // 在“终端”中显示编译信息的策略,可以为always,silent,never
                 "focus": false,
                 "panel": "shared" // 不同的文件的编译信息共享一个终端面板
            },
        }
    ]
}
随便写个代码
然后ctrl+shift+b
可看得出来,由可以看到你配置的label的名称,然后你就选你要的
 效果大概,可看到左边由一个红点,那个是debug用的断点
 然后按f5运行

顺带一提,你可以改改命令用makefile(摸了,回头再说
相关文章
- Qt-在WIN10上实现毛玻璃效果(Aero效果,QML实现的,并不是C++语法)
- c++如何使用全局变量
- C/C++学习----C语言简介
- [C/C++] String Reverse 字符串 反转
- Ubuntu安装C++环境(VsCode 编译器)
- Algorithm:C++语言实现之概率算法相关问题(计算机中的概率事件、C语言中的随机事件、产生二维随机数、圆内均匀取点)
- C++设计模式:观察者模式
- C++数据结构--线性表的顺序存储结构
- c++中string替换字符串中某段字符
- c++ 变量声明
- C/C++开发,关闭vscode中的插件git工具
- 如何在VS C++中高亮用户自定义关键字
- C++逆向分析——继承与封装
- C++ 标识符
- PAT 1150 C++ 版
- 图书管理系统(C++)
- Visual Studio Code (vscode) 配置 C / C++ 环境