
Android中级——动画
动画
视图动画
视图动画不具备交互性,发生动画后,其响应事件还在之前的位置
AlphaAnimation
ImageView iv = findViewById(R.id.iv);
AlphaAnimation aa = new AlphaAnimation(0, 1);
aa.setDuration(3000);
iv.startAnimation(aa);
如上设置3秒从透明到不透明的动画

RotateAnimation
 ImageView iv = findViewById(R.id.iv);
 RotateAnimation ra = new RotateAnimation(0, 360, 100, 100);
 ra.setDuration(3000);
 iv.startAnimation(ra);
如上设置绕(100, 100)从0°旋转到360°

若绕自身中心旋转则为
ImageView iv = findViewById(R.id.iv);
RotateAnimation ra = new RotateAnimation(0, 360,
        Animation.RELATIVE_TO_SELF, 0.5F,
        Animation.RELATIVE_TO_SELF, 0.5F);
ra.setDuration(3000);
iv.startAnimation(ra);
TranslateAnimation
ImageView iv = findViewById(R.id.iv);
TranslateAnimation ta = new TranslateAnimation(0, 200, 0, 300);
ta.setDuration(3000);
iv.startAnimation(ta);
如上设置从(0, 0)平移到(200, 300)
ScaleAnimation
ImageView iv = findViewById(R.id.iv);
ScaleAnimation sa = new ScaleAnimation(0, 2, 0, 2);
sa.setDuration(3000);
iv.startAnimation(sa);
如上设置从0开始放大2倍

AnimationSet
用于混合动画
ImageView iv = findViewById(R.id.iv);
AnimationSet as = new AnimationSet(true);
as.setDuration(3000);
AlphaAnimation aa = new AlphaAnimation(0, 1);
aa.setDuration(3000);
as.addAnimation(aa);

TranslateAnimation ta = new TranslateAnimation(0, 200, 0, 300);
ta.setDuration(3000);
as.addAnimation(ta);
iv.startAnimation(as);
如上边平移边改变透明度
动画监听
对于上面每一个动画,都可获取其开始、结束、重复事件
AlphaAnimation aa = new AlphaAnimation(0, 1);
aa.setAnimationListener(new Animation.AnimationListener() {
    @Override
    public void onAnimationStart(Animation animation) {
    }
    @Override
    public void onAnimationEnd(Animation animation) {
    }
    @Override
    public void onAnimationRepeat(Animation animation) {
    }
});
属性动画
属性动画解决了视图动画的弊端,在发生动画后,其响应事件会跟随移动
ImageView iv = findViewById(R.id.iv);
ObjectAnimator animator = ObjectAnimator.ofFloat(iv, "translationX", 300);
animator.setDuration(3000);
animator.start();
如上实现平移,第二个参数为操作的属性,其必须有get()/set()方法(利用反射调用),可选的属性有
- translationX / translationY:相对于父布局左上角偏移的位置
- rotation / rotationX / rotationY:围绕某点2D或3D旋转
- scaleX / scaleY:围绕某点缩放
- pivotX / pivotY:围绕某点旋转和缩放,默认为View中点
- x / y:最终位置
- alpha:透明度,默认为1(不透明)
若一个属性无get()/set()方法,则可自定义属性类或包装类,间接增加get()/set()方法
private static class WrapperView {
    private View mTarget;
    public WrapperView(View target) {
        mTarget = target;
    }
    public int getWidth() {
        return mTarget.getLayoutParams().width;
    }

    public void setWidth(int width) {
        mTarget.getLayoutParams().width = width;
        mTarget.requestLayout();
    }
}
如上包装了View的width,然后可利用ObjectAnimator调用
ImageView iv = findViewById(R.id.iv);
WrapperView wrapperView = new WrapperView(iv);
ObjectAnimator.ofInt(wrapperView, "width", 500).setDuration(3000).start();
PropertyValuesHolder
用于实现混合动画效果,如下实现平移过程中先缩小后放大
ImageView iv = findViewById(R.id.iv);
PropertyValuesHolder pvh1 = PropertyValuesHolder.ofFloat("translationX", 300f);
PropertyValuesHolder pvh2 = PropertyValuesHolder.ofFloat("scaleX", 1f, 0, 1f);
PropertyValuesHolder pvh3 = PropertyValuesHolder.ofFloat("scaleY", 1f, 0, 1f);
ObjectAnimator.ofPropertyValuesHolder(iv, pvh1, pvh2, pvh3).setDuration(3000).start();
AnimatorSet
也是用于实现混合动画效果,能实现比PropertyValuesHolder更为精细的顺序控制,有before()、after()等方法
ImageView iv = findViewById(R.id.iv);
ObjectAnimator animator1 = ObjectAnimator.ofFloat(iv, "translationX", 300f);
ObjectAnimator animator2 = ObjectAnimator.ofFloat(iv, "scaleX", 1f, 0f, 1f);
ObjectAnimator animator3 = ObjectAnimator.ofFloat(iv, "scaleY", 1f, 0f, 1f);
AnimatorSet set = new AnimatorSet();
set.setDuration(3000);
set.playTogether(animator1, animator2, animator3);
set.start();
ValueAnimator
用于产生具有一定规律的数字,用于表示动画的过程,以实现动画的变换
ImageView iv = findViewById(R.id.iv);
ValueAnimator animator = ValueAnimator.ofFloat(0, 100);
animator.setTarget(iv);
animator.setDuration(3000).start();
animator.addUpdateListener(new ValueAnimator.AnimatorUpdateListener() {
    @Override
    public void onAnimationUpdate(ValueAnimator animation) {
        Float animatedValue = (Float) animation.getAnimatedValue();

    }
});
动画监听
利用AnimatorListener可监听动画Start、Repeat、End、Cancel过程
ImageView iv = findViewById(R.id.iv);
ObjectAnimator animator = ObjectAnimator.ofFloat(iv, "alpha", 0.5f);
animator.addListener(new Animator.AnimatorListener() {
    @Override
    public void onAnimationStart(Animator animation) {

    }
    @Override
    public void onAnimationEnd(Animator animation) {

    }
    @Override
    public void onAnimationCancel(Animator animation) {
    }
    @Override
    public void onAnimationRepeat(Animator animation) {
    }
});
若只需监听其中一个,可利用AnimatorListenerAdapter
ImageView iv = findViewById(R.id.iv);
ObjectAnimator animator = ObjectAnimator.ofFloat(iv, "alpha", 0.5f);
animator.addListener(new AnimatorListenerAdapter() {
    @Override
    public void onAnimationEnd(Animator animation) {
        super.onAnimationEnd(animation);
    }
});
XML中使用
res下新建animator文件夹,新建scalex.xml放置在此处
<?xml version="1.0" encoding="utf-8"?>
<objectAnimator xmlns:android="http://schemas.android.com/apk/res/android"
    android:duration="1000"
    android:propertyName="scaleX"
    android:valueFrom="1.0"
    android:valueTo="2.0"
    android:valueType="floatType">
</objectAnimator>
要引用xml则通过
ImageView iv = findViewById(R.id.iv);
Animator animator = AnimatorInflater.loadAnimator(this, R.animator.scalex);
animator.setTarget(iv);
animator.start();
animate()
可直接使用view中的animate()实现属性动画
ImageView iv = findViewById(R.id.iv);
iv.animate()
        .alpha(0)
        .y(300)
        .setDuration(3000)
        .withStartAction(new Runnable() {
            @Override
            public void run() {
            }
        })
        .withEndAction(new Runnable() {
            @Override
            public void run() {
                runOnUiThread(new Runnable() {
                    @Override
                    public void run() {
                    }
                });
            }
        })
        .start();
布局动画
布局动画作用在ViewGroup上,用于ViewGroup增加View时添加一个动画过渡效果
<LinearLayout xmlns:android="http://schemas.android.com/apk/res/android"
    xmlns:tools="http://schemas.android.com/tools"
    android:id="@+id/root"
    android:layout_width="match_parent"
    android:layout_height="match_parent"
    android:animateLayoutChanges="true"
    android:background="#ffffff"
    android:orientation="vertical">

    <ImageView
        android:id="@+id/iv"
        android:layout_width="wrap_content"
        android:layout_height="wrap_content"
        android:src="@drawable/ic_launcher" />
</LinearLayout>
如上设置animateLayoutChanges="true"打开布局动画
LinearLayout ll = findViewById(R.id.root);
ScaleAnimation sa = new ScaleAnimation(0, 1, 0, 1);
sa.setDuration(3000);
LayoutAnimationController lac = new LayoutAnimationController(sa, 0.5F);
lac.setOrder(LayoutAnimationController.ORDER_NORMAL);
ll.setLayoutAnimation(lac);
如上通过LayoutAnimationController控制子View的过渡效果,第二个参数为子View显示的时间,不为0时可设置子View显示的顺序
- LayoutAnimationController.ORDER_NORMAL——顺序
- LayoutAnimationController.ORDER_RANDOM——随机
- LayoutAnimationController.ORDER_REVERSE——反序
Interpolator
Interpolators用于定义动画变换速率,类似于物理中的加速度,如对于平移动画,使用不同的Interpolators:
- LinearInterpolator:单位时间所移动的距离都是一样的
- AccelerateInterpolator:单位时间所移动的距离将越来越大
- 上面两者速度不同,但最终平移距离是一样的
自定义动画
自定义动画需继承Animation并重写applyTransformation()
- 第一个参数为Interpolator的时间因子,由动画当前完成的百分比和当前时间所对应的插值所计算得来,范围为0-1.0
- 第二个参数为矩阵的封装类,用于获取矩阵
如下缩小图片的纵向,模拟电视机关闭动画
public class MyAnimation extends Animation {

    private int mCenterWidth;
    private int mCenterHeight;

    @Override
    public void initialize(int width, int height, int parentWidth, int parentHeight) {
        super.initialize(width, height, parentWidth, parentHeight);
        mCenterWidth = width / 2;
        mCenterHeight = height / 2;
    }

    @Override
    protected void applyTransformation(float interpolatedTime, Transformation t) {
        Matrix matrix = t.getMatrix();
        matrix.preScale(1, 1 - interpolatedTime, mCenterWidth, mCenterHeight);
    }
}
使用方法和其他动画一样
ImageView iv = findViewById(R.id.iv);
MyAnimation myAnimation = new MyAnimation();
myAnimation.setDuration(3000);
iv.startAnimation(myAnimation);

SVG矢量动画
Scalable Vector Graphics为可伸缩矢量图形
- www标准,用于网络的基于矢量的图形
- 用XML定义
- 放大或改变尺寸不会导致图形质量损失
path
用于设置指令控制画笔,有以下指令
- M = moveto(M X,Y):画笔移动到(x, y),未绘制
- L = lineto(L X,Y):画直线到(x, y)
- H = horizontal lineto( H X):画水平线到X
- V = vertical lineto(V Y ):画垂直线到Y
- C = curveto(C ,X1,Y1,X2,Y2,ENDX,ENDY):三次贝塞尔曲线
- S = smooth curveto(S X2,Y2,ENDX,ENDY):三次贝塞尔曲线
- Q = quadratic Belzier curve(Q X Y,ENDX,ENDY):二次贝塞尔曲线
- T = smooth quadratic Belzier curvrto(T,ENDX,ENDY):映射前面路径的终点
- A = elliptical Are(A RX,RY,XROTATION,FLAG1FLAG2,X,Y):弧线
- Z = closepath():关闭路径
需注意
- 指令大写为绝对定位(全局坐标系),小写为相对定位(父容器坐标系)
- 指令和数据间的空格可以省略
- 同一指令出现多次可以只用一个
vector
用于在XML创建SVG图形,如下在drawable文件夹新增vector.xml
- width / height:实际大小
- viewportWidth / viewportHeight:表示划分比例,将200dp分为100份
- M 25 50 表示移动到(25, 50)坐标,即距离原点x=25 / 100 * 200 = 50dp,y=50 / 100 * 200=100dp的位置
- A指令绘制椭圆,参数12:XY轴长度。参数3:X轴与水平顺时针方向的夹角。参数4:1大角度弧线 / 0小角度弧线。参数5:起点到终点的方向,1顺时针 / 0逆时针。参数67:XY轴终点坐标
<?xml version="1.0" encoding="utf-8"?>
<vector xmlns:android="http://schemas.android.com/apk/res/android"
    android:width="200dp"
    android:height="200dp"
    android:viewportWidth="100"
    android:viewportHeight="100">
    <group
        android:name="svg"
        android:rotation="0">
        <path
            android:fillColor="@android:color/holo_blue_light"
            android:pathData="
            M 25 50
            a 25,25 0,1,0 50,0" />
    </group>
</vector>
通过 background / src 属性引用,效果如下

如果不需要填充,则可改为
android:strokeColor="@android:color/holo_blue_light"
android:strokeWidth="2"

animate-vector
用于给图形添加动画,先在animator文件夹新增anim_path1.xml
- android:propertyName 引用vector.xml中group的属性
- 若为属性为pathData,则需要添加android:valueType=“pathType”
<?xml version="1.0" encoding="utf-8"?>
<objectAnimator xmlns:android="http://schemas.android.com/apk/res/android"
    android:duration="4000"
    android:propertyName="rotation"
    android:valueFrom="0"
    android:valueTo="360" />
然后在drawable文件夹新增vector_animate.xml
- android:drawable 引用上面的vector.xml
- android:name 需要与vector.xml的group名称一样
- android:animation 引用上面anim_path1.xml
<?xml version="1.0" encoding="utf-8"?>
<animated-vector xmlns:android="http://schemas.android.com/apk/res/android"
    android:drawable="@drawable/vector">
    <target
        android:name="svg"
        android:animation="@animator/anim_path1" />
</animated-vector>
使用src属性引用vector_animate.xml
<LinearLayout xmlns:android="http://schemas.android.com/apk/res/android"
    xmlns:tools="http://schemas.android.com/tools"
    android:layout_width="match_parent"
    android:layout_height="match_parent"
    android:background="#ffffff"
    android:orientation="vertical">

    <ImageView
        android:id="@+id/iv"
        android:layout_width="wrap_content"
        android:layout_height="wrap_content"
        android:src="@drawable/vector_animate" />
</LinearLayout>
转为Animatable并开启动画
public class MainActivity extends AppCompatActivity {

    protected void onCreate(Bundle savedInstanceState) {
        super.onCreate(savedInstanceState);
        setContentView(R.layout.activity_main);
        ImageView iv = findViewById(R.id.iv);
        ((Animatable) iv.getDrawable()).start();
    }
}
效果为旋转一圈

实例——线图动画
创建line.xml,绘制两条直线,path1先移动到(20,80),再绘制直线到(50,80)和(80,80),形成3个点(中点用于动画),path2同理
<?xml version="1.0" encoding="utf-8"?>
<vector xmlns:android="http://schemas.android.com/apk/res/android"
    android:width="200dp"
    android:height="200dp"
    android:viewportWidth="100"
    android:viewportHeight="100">
    <group>
        <path
            android:name="path1"
            android:pathData="M 20,80
            L 50,80 80,80"
            android:strokeWidth="5"
            android:strokeColor="@android:color/holo_green_dark"
            android:strokeLineCap="round" />
        <path
            android:name="path2"
            android:pathData="M 20,20
            L 50,20 80,20"
            android:strokeWidth="5"
            android:strokeColor="@android:color/holo_green_dark"
            android:strokeLineCap="round" />
    </group>
</vector>
创建line_animator1.xml用于path1,让动画先移动到(20,80),再绘制直线到(50,50)和(80,80),即让中点变换
<?xml version="1.0" encoding="utf-8"?>
<objectAnimator xmlns:android="http://schemas.android.com/apk/res/android"
    android:duration="5000"
    android:interpolator="@android:anim/bounce_interpolator"
    android:propertyName="pathData"
    android:valueFrom="M 20,80
     L 50,80 80,80"
    android:valueTo="M 20,80
    L 50,50 80,80"
    android:valueType="pathType" />
创建line_animator2.xml用于path2,同理
<?xml version="1.0" encoding="utf-8"?>
<objectAnimator xmlns:android="http://schemas.android.com/apk/res/android"
    android:duration="5000"
    android:interpolator="@android:anim/bounce_interpolator"
    android:propertyName="pathData"
    android:valueFrom="M 20,20
    L 50,20 80,20"
    android:valueTo="M 20,20
    L 50,50 80,20"
    android:valueType="pathType" />
创建line_animate.xml合并动画
<?xml version="1.0" encoding="utf-8"?>
<animated-vector xmlns:android="http://schemas.android.com/apk/res/android"
    android:drawable="@drawable/line">
    <target
        android:name="path1"
        android:animation="@animator/line_animator1" />
    <target
        android:name="path2"
        android:animation="@animator/line_animator2" />
</animated-vector>
布局通过src属性引用
<LinearLayout xmlns:android="http://schemas.android.com/apk/res/android"
    xmlns:tools="http://schemas.android.com/tools"
    android:layout_width="match_parent"
    android:layout_height="match_parent"
    android:background="#ffffff"
    android:orientation="vertical">

    <ImageView
        android:id="@+id/iv"
        android:layout_width="wrap_content"
        android:layout_height="wrap_content"
        android:src="@drawable/line_animate" />
</LinearLayout>
通过点击事件开启动画
public class MainActivity extends AppCompatActivity {

    private ImageView mIv;

    protected void onCreate(Bundle savedInstanceState) {
        super.onCreate(savedInstanceState);
        setContentView(R.layout.activity_main);
        mIv = findViewById(R.id.iv);
        mIv.setOnClickListener(new View.OnClickListener() {
            @Override
            public void onClick(View v) {
                animate();
            }
        });
    }

    private void animate() {
        ((Animatable) mIv.getDrawable()).start();
    }
}
效果为两平行的直线,中点合并为一个X

实例——模拟三球仪
创建sun_earth.xml,绘制静态的三个球,在(60,60)绘制半径为10的sun,在(75,55)绘制半径为5的earth,在(89,55)绘制半径为4的moon
<?xml version="1.0" encoding="utf-8"?>
<vector xmlns:android="http://schemas.android.com/apk/res/android"
    android:width="200dp"
    android:height="200dp"
    android:viewportWidth="100"
    android:viewportHeight="100">
    <group
        android:name="sun"
        android:pivotX="60"
        android:pivotY="50"
        android:rotation="0">
        <path
            android:name="path_sun"
            android:fillColor="@android:color/holo_blue_light"
            android:pathData="M 50,50
            a 10,10 0,1,0 20,0
            a 10,10 0,1,0 -20,0" />
        <group
            android:name="earth"
            android:pivotX="75"
            android:pivotY="50"
            android:rotation="0">
            <path
                android:name="path_earth"
                android:fillColor="@android:color/holo_orange_dark"
                android:pathData="M 70,50
                a 5,5 0,1,0 10,0
                a 5,5 0,1,0 -10,0" />
            <group>
                <path
                    android:fillColor="@android:color/holo_green_dark"
                    android:pathData="M 90,50
                    m -5 0
                    a 4,4 0,1,0 8,0
                    a 4,4 0,1,0 -8,0" />
            </group>
        </group>
    </group>
</vector>
创建sun_earth_animator.xml,为两个group设置旋转动画
<?xml version="1.0" encoding="utf-8"?>
<objectAnimator xmlns:android="http://schemas.android.com/apk/res/android"
    android:duration="4000"
    android:propertyName="rotation"
    android:valueFrom="0"
    android:valueTo="360" />
创建sun_earth_animate.xml设置动画
<?xml version="1.0" encoding="utf-8"?>
<animated-vector xmlns:android="http://schemas.android.com/apk/res/android"
    android:drawable="@drawable/sun_earth">
    <target
        android:name="sun"
        android:animation="@animator/sun_earth_animator" />
    <target
        android:name="earth"
        android:animation="@animator/sun_earth_animator" />
</animated-vector>
使用方法同上,不再赘述,效果为三个球绕其旋转中心旋转

实例——轨迹动画
创建search.xml绘制搜索栏
<?xml version="1.0" encoding="utf-8"?>
<vector xmlns:android="http://schemas.android.com/apk/res/android"
    android:width="160dp"
    android:height="30dp"
    android:viewportWidth="160"
    android:viewportHeight="30">
    <path
        android:name="search"
        android:pathData="M 141,17
        A 9,9 0,1,1 142,16
        L 149,23"
        android:strokeWidth="2"
        android:strokeAlpha="0.8"
        android:strokeColor="#ff3570be"
        android:strokeLineCap="square" />
    <path
        android:name="bar"
        android:pathData="M 0,23
        L 149,23"
        android:strokeWidth="2"
        android:strokeAlpha="0.8"
        android:strokeColor="#ff3570be"
        android:strokeLineCap="square" />
</vector>
创建search_animator.xml,设置android:propertyName=“trimPathStart”,其利用0-1百分比按照轨迹绘制SVG
<?xml version="1.0" encoding="utf-8"?>
<objectAnimator xmlns:android="http://schemas.android.com/apk/res/android"
    android:duration="1000"
    android:interpolator="@android:interpolator/accelerate_decelerate"
    android:propertyName="trimPathStart"
    android:valueFrom="0"
    android:valueTo="1"
    android:valueType="floatType" />
创建search_animate.xml,设置动画
<?xml version="1.0" encoding="utf-8"?>
<animated-vector xmlns:android="http://schemas.android.com/apk/res/android"
    android:drawable="@drawable/search">
    <target
        android:name="search"
        android:animation="@animator/search_animator" />

</animated-vector>
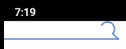
使用方法同上,不再赘述,效果为点击后搜索框会沿着绘制的轨迹消失
动画特效
灵动菜单
如下实现菜单的弹出、聚拢特效,先放置5个图片在同一位置
<RelativeLayout xmlns:android="http://schemas.android.com/apk/res/android"
    xmlns:tools="http://schemas.android.com/tools"
    android:layout_width="match_parent"
    android:layout_height="match_parent"
    android:background="#ffffff">

    <ImageView
        android:id="@+id/iv0"
        android:layout_width="wrap_content"
        android:layout_height="wrap_content"
        android:layout_centerInParent="true"
        android:src="@drawable/ic_launcher" />
    <ImageView
        android:id="@+id/iv1"
        android:layout_width="wrap_content"
        android:layout_height="wrap_content"
        android:layout_centerInParent="true"
        android:src="@drawable/ic_launcher" />
    <ImageView
        android:id="@+id/iv2"
        android:layout_width="wrap_content"
        android:layout_height="wrap_content"
        android:layout_centerInParent="true"
        android:src="@drawable/ic_launcher" />
    <ImageView
        android:id="@+id/iv3"
        android:layout_width="wrap_content"
        android:layout_height="wrap_content"
        android:layout_centerInParent="true"
        android:src="@drawable/ic_launcher" />
    <ImageView
        android:id="@+id/iv4"
        android:layout_width="wrap_content"
        android:layout_height="wrap_content"
        android:layout_centerInParent="true"
        android:src="@drawable/ic_launcher" />
</RelativeLayout>
如下为每个图片设置动画(为什么设置相反的数值不能close回去,而是需要调用getScrollX)
public class MainActivity extends AppCompatActivity {

    private boolean mFlag = true;
    private ImageView iv0;
    private ImageView iv1;
    private ImageView iv2;
    private ImageView iv3;
    private ImageView iv4;

    protected void onCreate(Bundle savedInstanceState) {
        super.onCreate(savedInstanceState);
        setContentView(R.layout.activity_main);
        iv0 = findViewById(R.id.iv0);
        iv1 = findViewById(R.id.iv1);
        iv2 = findViewById(R.id.iv2);
        iv3 = findViewById(R.id.iv3);
        iv4 = findViewById(R.id.iv4);
        iv0.setOnClickListener(new View.OnClickListener() {
            @Override
            public void onClick(View v) {
                if (mFlag) {
                    statAnim();
                } else {
                    closeAnim();
                }
            }
        });
    }

    private void closeAnim() {
        ObjectAnimator animator0 = ObjectAnimator.ofFloat(iv0, "alpha", 0.5F, 1F);
        ObjectAnimator animator1 = ObjectAnimator.ofFloat(iv1, "translationY", -iv1.getScrollY());
        ObjectAnimator animator2 = ObjectAnimator.ofFloat(iv2, "translationX", -iv2.getScrollX());
        ObjectAnimator animator3 = ObjectAnimator.ofFloat(iv3, "translationY", iv3.getScrollY());
        ObjectAnimator animator4 = ObjectAnimator.ofFloat(iv4, "translationX", iv3.getScrollX());
        AnimatorSet set = new AnimatorSet();
        set.setInterpolator(new AccelerateDecelerateInterpolator());
        set.playTogether(animator0, animator1, animator2, animator3, animator4);
        set.start();
        mFlag = true;
    }

    private void statAnim() {
        ObjectAnimator animator0 = ObjectAnimator.ofFloat(iv0, "alpha", 1F, 0.5F);
        ObjectAnimator animator1 = ObjectAnimator.ofFloat(iv1, "translationY", 200F);
        ObjectAnimator animator2 = ObjectAnimator.ofFloat(iv2, "translationX", 200F);
        ObjectAnimator animator3 = ObjectAnimator.ofFloat(iv3, "translationY", -200F);
        ObjectAnimator animator4 = ObjectAnimator.ofFloat(iv4, "translationX", -200F);
        AnimatorSet set = new AnimatorSet();
        set.setInterpolator(new BounceInterpolator());
        set.playTogether(animator0, animator1, animator2, animator3, animator4);
        set.start();
        mFlag = false;
    }
}
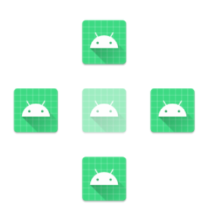
效果如下,点击中间的图片让其他图片弹出或聚拢
计时器动画
<RelativeLayout xmlns:android="http://schemas.android.com/apk/res/android"
    xmlns:tools="http://schemas.android.com/tools"
    android:layout_width="match_parent"
    android:layout_height="match_parent"
    android:background="#ffffff">

    <TextView
        android:id="@+id/tv"
        android:layout_width="wrap_content"
        android:layout_height="wrap_content"
        android:layout_centerInParent="true"
        android:text="Start Timer"
        android:textSize="30sp"
        android:textColor="#000000" />
</RelativeLayout>
public class MainActivity extends AppCompatActivity {

    protected void onCreate(Bundle savedInstanceState) {
        super.onCreate(savedInstanceState);
        setContentView(R.layout.activity_main);
        TextView tv = findViewById(R.id.tv);
        tv.setOnClickListener(new View.OnClickListener() {
            @Override
            public void onClick(View v) {
                tvTimer(v);
            }
        });
    }

    private void tvTimer(final View view) {
        ValueAnimator va = ValueAnimator.ofInt(0, 100);
        va.addUpdateListener(new ValueAnimator.AnimatorUpdateListener() {
            @Override
            public void onAnimationUpdate(ValueAnimator animation) {
                ((TextView) view).setText("$" + animation.getAnimatedValue());
            }
        });
        va.setDuration(3000);
        va.start();
    }
}
点击后,通过onAnimationUpdate()不断设置数值,将在3秒内从0增加到100,如下

下拉展开动画
设置两个LinearLayout,一个常显,一个隐藏
<?xml version="1.0" encoding="utf-8"?>
<LinearLayout xmlns:android="http://schemas.android.com/apk/res/android"
    android:layout_width="match_parent"
    android:layout_height="match_parent"
    android:orientation="vertical">

    <LinearLayout
        android:layout_width="match_parent"
        android:layout_height="wrap_content"
        android:background="@android:color/holo_blue_bright"
        android:gravity="center_vertical"
        android:onClick="llClick"
        android:orientation="horizontal">

        <ImageView
            android:id="@+id/app_icon"
            android:layout_width="wrap_content"
            android:layout_height="wrap_content"
            android:layout_gravity="center"
            android:src="@mipmap/ic_launcher" />

        <TextView
            android:layout_width="wrap_content"
            android:layout_height="wrap_content"
            android:layout_marginLeft="5dp"
            android:gravity="left"
            android:text="Click me"
            android:textSize="30sp" />
    </LinearLayout>

    <LinearLayout
        android:id="@+id/hidden_view"
        android:layout_width="match_parent"
        android:layout_height="40dp"
        android:background="@android:color/holo_orange_light"
        android:orientation="horizontal"
        android:visibility="gone">

        <ImageView
            android:layout_width="wrap_content"
            android:layout_height="wrap_content"
            android:layout_gravity="center"
            android:src="@mipmap/ic_launcher" />

        <TextView
            android:id="@+id/tv_hidden"
            android:layout_width="wrap_content"
            android:layout_height="match_parent"
            android:gravity="center"
            android:text="I Am Hidden"
            android:textSize="20sp" />
    </LinearLayout>
</LinearLayout>
通过ValueAnimator的onAnimationUpdate()方法逐渐增加或减少View的高度,关闭时通过onAnimationEnd()在动画结束时隐藏View
public class MainActivity extends AppCompatActivity {

    private LinearLayout mHiddenView;
    private float mDensity;
    private int mHiddenViewMeasuredHeight;

    protected void onCreate(Bundle savedInstanceState) {
        super.onCreate(savedInstanceState);
        setContentView(R.layout.activity_main);
        mHiddenView = (LinearLayout) findViewById(R.id.hidden_view);
        //获取像素密度
        mDensity = getResources().getDisplayMetrics().density;
        //获取布局的高度
        mHiddenViewMeasuredHeight = (int) (mDensity * 40 + 0.5);
    }

    public void llClick(View view) {
        if (mHiddenView.getVisibility() == View.GONE) {
            animOpen(mHiddenView);
        } else {
            animClose(mHiddenView);
        }
    }

    private void animOpen(final View view) {
        view.setVisibility(View.VISIBLE);
        ValueAnimator va = createDropAnim(view, 0, mHiddenViewMeasuredHeight);
        va.start();
    }

    private void animClose(View view) {
        ValueAnimator va = createDropAnim(view, mHiddenViewMeasuredHeight, 0);
        va.addListener(new AnimatorListenerAdapter() {
            @Override
            public void onAnimationEnd(Animator animation) {
                view.setVisibility(View.GONE);
            }
        });
        va.start();
    }

    private ValueAnimator createDropAnim(final View view, int start, int end) {
        ValueAnimator va = ValueAnimator.ofInt(start, end);
        va.addUpdateListener(new ValueAnimator.AnimatorUpdateListener() {
            @Override
            public void onAnimationUpdate(ValueAnimator animation) {
                int value = (int) animation.getAnimatedValue();
                ViewGroup.LayoutParams layoutParams = view.getLayoutParams();
                layoutParams.height = value;
                view.setLayoutParams(layoutParams);
            }
        });
        return va;
    }
}
效果如下

相关文章
- 微信半屏小程序解除类别限制、特斯拉为自动驾驶系统辩护、央视频推出超仿真主播 | T资讯
- 过渡策略
- 展望2022十大技术发展趋势
- 五秒手机猫片也能重建猫咪3D模型,Meta提出新算法为变形物体建模
- 清华大学软件学院王建民谈工业大数据软件与开源创新在高校的落地 | ApacheCON Asia 2021
- 万万没想到VFP也可以这样硬,调用微信的硬能力,扫码、上报位置、支付都可以
- 公众号回复消息不能超过5秒,大数据处理来不及怎么办?
- 一文教你VFP创建公众号的菜单,接收菜单点击动作
- 外媒预测MWC 2022:网络基础设施将成关注重点
- 加快推进5G、人工智能等技术在老年用品领域的深度应用
- DirectSound的应用
- 元宇宙对网络技术的挑战
- 以 3D 之名,围攻「智能制造」,AI 视觉独角兽们的新战场
- ARM 最可能在纳斯达克上市、三星电子推出年度旗舰新品三星 Galaxy S22 Ultra
- 搞了一年多,英伟达660亿收购ARM最终泡汤,黄老板:都有光明的未来
- 英伟达收购Arm被曝已告吹,赔上12.5亿美元分手费:英美欧盟齐反对
- 英伟达660亿美元收购 Arm 交易失败,软银将通过 IPO 使 Arm 业务独立上市
- 收购告吹:英伟达660亿美元收购Arm交易宣告失败
- Android 编译速度提升黑科技 - RocketX
- 英伟达被曝要放弃收购Arm,这桩400亿美元收购案悬了