
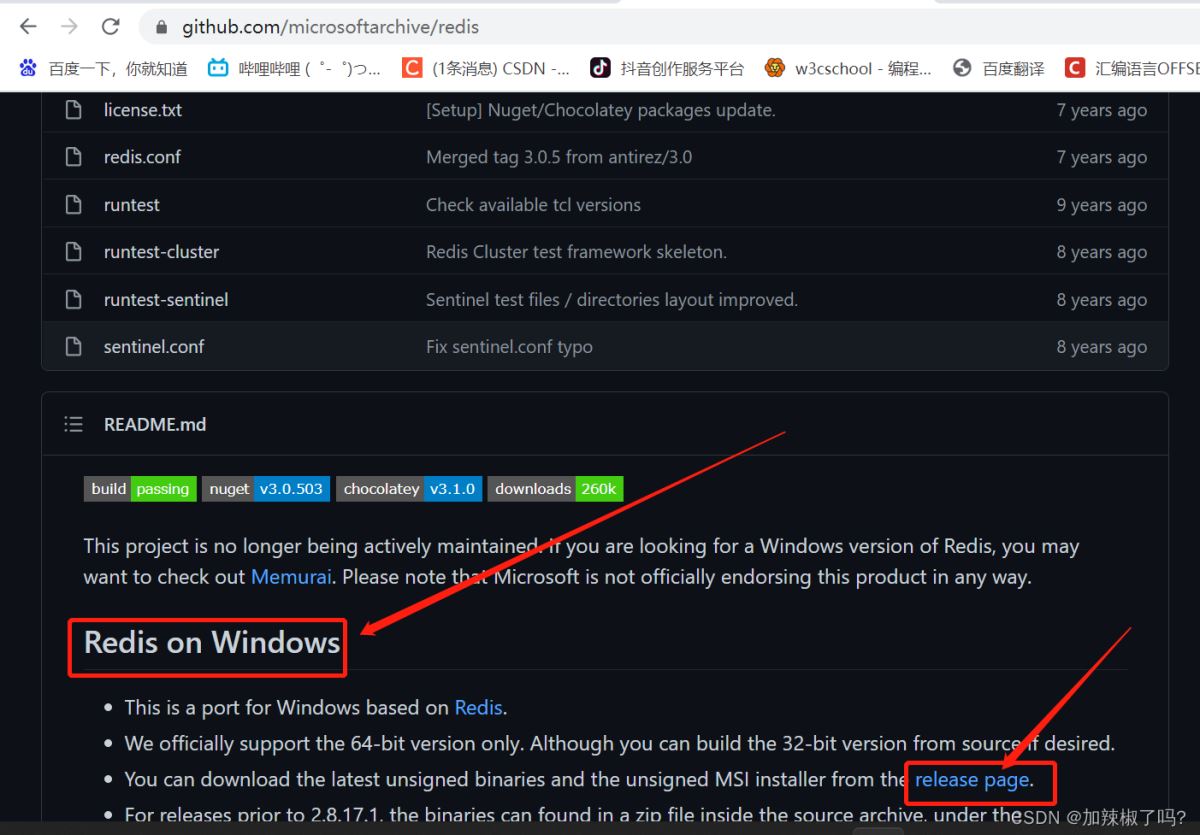
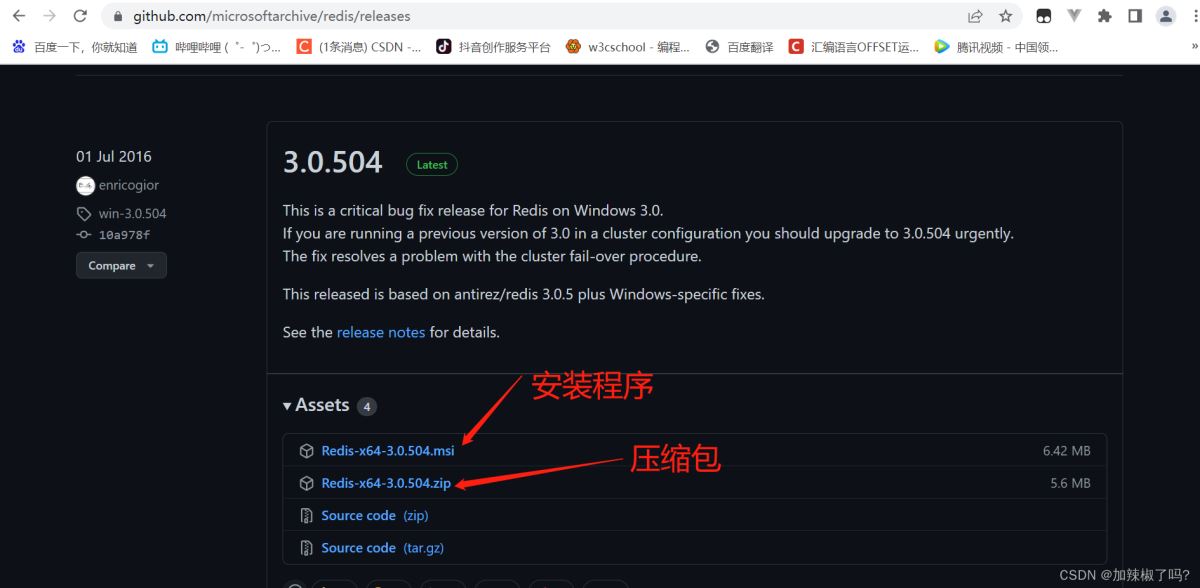
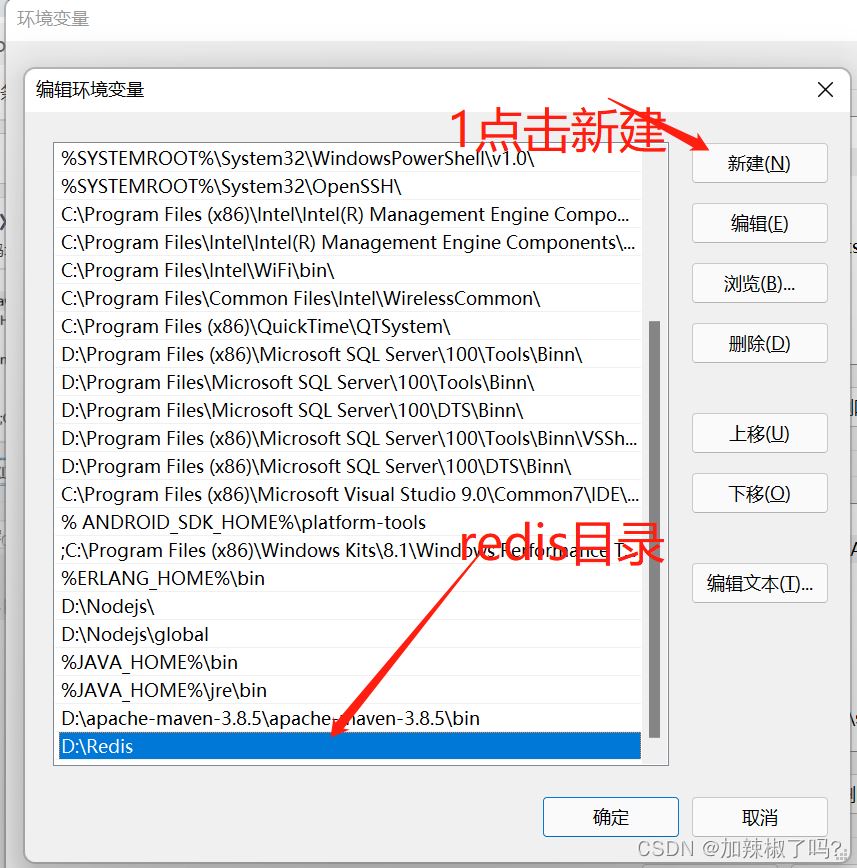
Redis下载部署并加入idea应用的小结


到这里redis部署就完成了!!!下面是redis在idea里面的应用! 三、redis在idea的应用 1.打开pom.xml文件,引入redis架包,代码如下
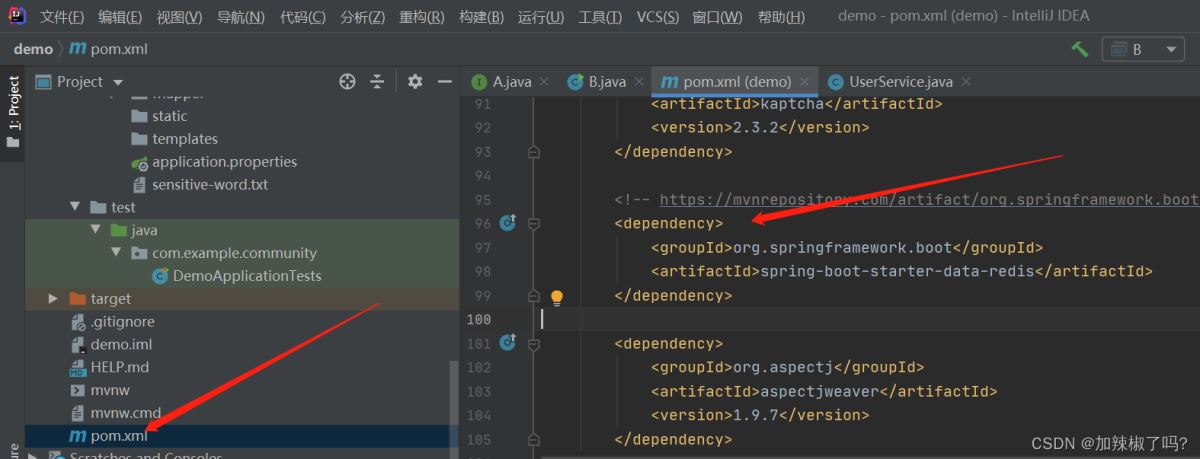
代码如下:
dependencygroupId org.springframework.boot /groupId
artifactId spring-boot-starter-data-redis /artifactId
/dependency
2.打开application.properties配置文件,写入redis的相关配置

代码如下:
# RedisProperties#redis一共有16(0-15)个数据库,随便给一个
spring.redis.database=11
spring.redis.host=localhost
spring.redis.port=6379
3.新建一个配置类redisConfig.java文件,代码如下
package com.example.community.config;import org.springframework.context.annotation.Bean;
import org.springframework.context.annotation.Configuration;
import org.springframework.data.redis.connection.RedisConnectionFactory;
import org.springframework.data.redis.core.RedisTemplate;
import org.springframework.data.redis.serializer.RedisSerializer;
/**
* @ClassName redisConfig
* @Description TODO
* @Author 加辣椒了吗?
* @Date 2022/4/28 2:33
* @Version 1.0
**/
@Configuration
public class redisConfig {
@Bean
public RedisTemplate String,Object redisTemplate(RedisConnectionFactory factory){
// 将redis注入工厂
RedisTemplate String,Object template = new RedisTemplate ();
template.setConnectionFactory(factory);
// 设置key的序列化方式
template.setKeySerializer (RedisSerializer.string());
//设置value的序列化方式
template.setValueSerializer (RedisSerializer.json());
// 设置hash的key的序列化方式
template. setHashKeySerializer (RedisSerializer.string());
// 设置hash的value的序列化方式
template.setHashValueSerializer (RedisSerializer.json());
// 使设置生效
template.afterPropertiesSet();
return template;
}
}
4.测试 在测试类里面添加测试方法,测试通过
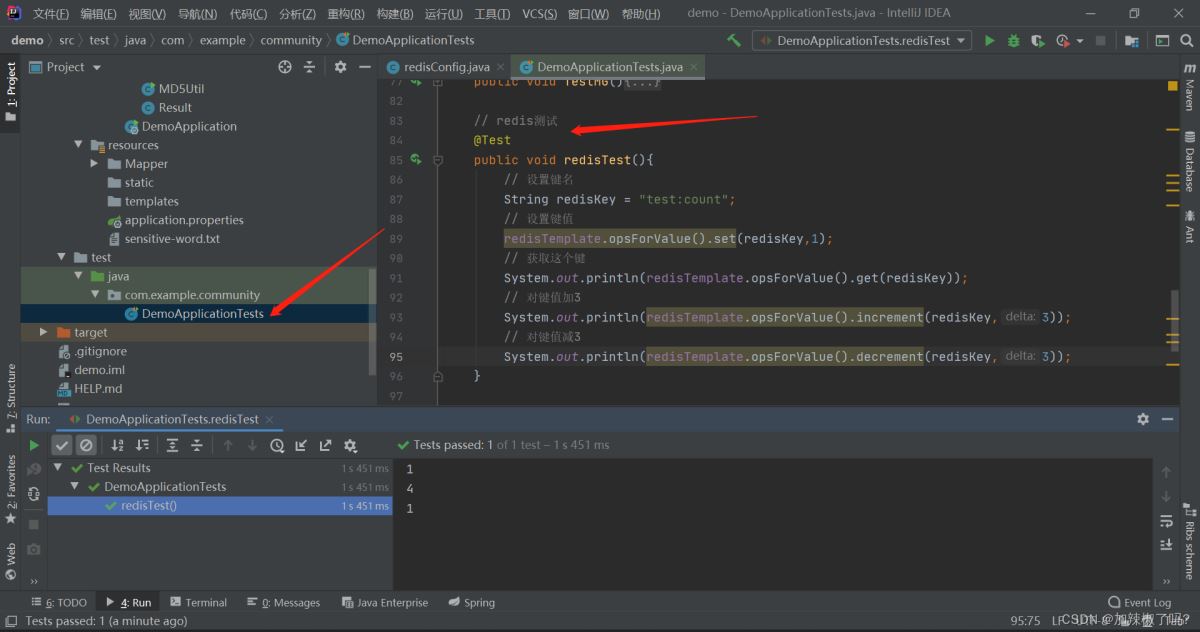
代码如下:
package com.example.community.config;import org.springframework.context.annotation.Bean;
import org.springframework.context.annotation.Configuration;
import org.springframework.data.redis.connection.RedisConnectionFactory;
import org.springframework.data.redis.core.RedisTemplate;
import org.springframework.data.redis.serializer.RedisSerializer;
/**
* @ClassName redisConfig
* @Description TODO
* @Author 加辣椒了吗?
* @Date 2022/4/28 2:33
* @Version 1.0
**/
@Configuration
public class redisConfig {
@Bean
public RedisTemplate String,Object redisTemplate(RedisConnectionFactory factory){
// 将redis注入工厂
RedisTemplate String,Object template = new RedisTemplate ();
template.setConnectionFactory(factory);
// 设置key的序列化方式
template.setKeySerializer (RedisSerializer.string());
//设置value的序列化方式
template.setValueSerializer (RedisSerializer.json());
// 设置hash的key的序列化方式
template. setHashKeySerializer (RedisSerializer.string());
// 设置hash的value的序列化方式
template.setHashValueSerializer (RedisSerializer.json());
// 使设置生效
template.afterPropertiesSet();
return template;
}
}
或者
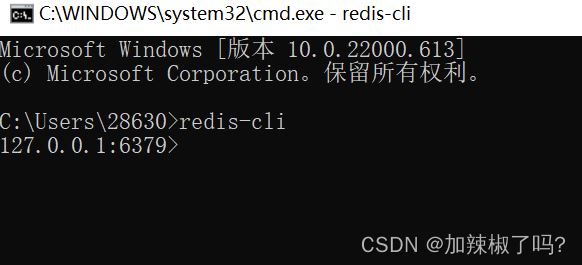
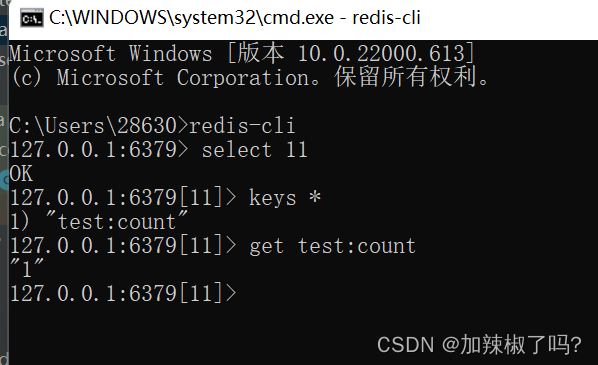
打开redis控制台,输入以下命令,测试通过!
到此这篇关于Redis下载部署并加入idea应用的文章就介绍到这了,更多相关Redis下载部署内容请搜索以前的文章或继续浏览下面的相关文章希望大家以后多多支持!
我想要获取技术服务或软件
服务范围:MySQL、ORACLE、SQLSERVER、MongoDB、PostgreSQL 、程序问题
服务方式:远程服务、电话支持、现场服务,沟通指定方式服务
技术标签:数据恢复、安装配置、数据迁移、集群容灾、异常处理、其它问题
本站部分文章参考或来源于网络,如有侵权请联系站长。
数据库远程运维 Redis下载部署并加入idea应用的小结
相关文章
- 和使用Redis:下载安装与应用(redis的下载安装)
- 的应用探索树莓派与Redis之间的美好组合(树莓派redis)
- 实现项目中高性能的Redis应用(redis应用到项目中)
- 解决高并发问题:Redis的应用(高并发redis)
- Redis技术:极致体验的高效用法(redis的高级应用)
- 基于Redis的应用流量限制策略(用redis实现限流)
- 研究Redis在人工智能中的应用(术语redis 人工智能)
- 提升效率本地Redis快速清除缓存(本地redis清除缓存)
- 优化系统性能新增Redis缓存对象(新增缓存redis对象)
- 构建新一代应用文件缓存与Redis结合(文件缓存和redis)
- 红色不再只代表爱认识Redis(为什么叫redis)
- 文件TP6 应用 Redis 配置文件优化实践(tp6 redis配置)
- TP5使用Redis类应用实现快速缓存(tp5使用redis类)
- 利用Redis开启网络应用的新可能(使用redis有好处)
- Redis在实现频率限制中的应用(redis 频率限制)
- Redis在项目中的应用探索运用Redis的多重价值(redis项目中用途)
- 红色的远程性能低劣Redis远程调用的性能分析(redis远程性能差)
- Redis在进销存系统中的应用(redis进销存中怎么用)
- Redis实现进程间信息交换(redis 进程通信)
- Redis应用过期策略优化指南(redis 过期策略设置)
- Redis订阅与解订阅功能测试综述(redis订阅解订阅测试)
- 问题利用Redis解决分布式锁系统问题(redis 解决分布式锁)
- 红色之火从Redis编程订阅开始(redis编程订阅)