
IPC机制之远程服务
1. Android(本地、可通信的、前台、远程)Service使用全面介绍
2.Android:远程服务Service(含AIDL & IPC讲解)
一. Android:远程服务Service(含AIDL & IPC讲解)
本文将介绍Service其中一种常见用法:远程Service;
1. 远程服务与本地服务的区别
- 远程服务与本地服务最大的区别是:远程Service与调用者不在同一个进程里(即远程Service是运行在另外一个进程);
- 而本地服务则是与调用者运行在同一个进程里
- 二者区别的详细区别如下图:

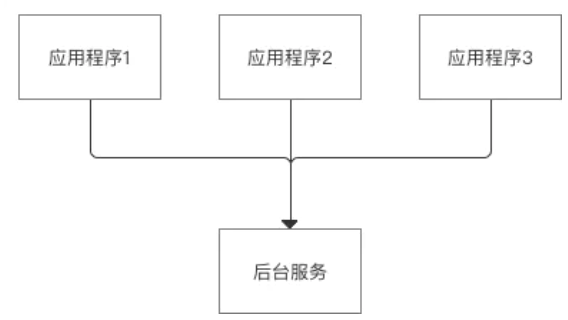
2. 使用场景
多个应用程序共享同一个后台服务(远程服务)
即一个远程Service与多个应用程序的组件(四大组件)进行跨进程通信。使用场景:
3. 具体使用
- 为了让远程Service与多个应用程序的组件(四大组件)进行跨进程通信(IPC),需要使用AIDL
1.IPC:Inter-Process Communication,即跨进程通信
2.AIDL:Android Interface Definition Language,即Android接口定义语言;用于让某个Service与多个应用程序组件之间进行跨进程通信,从而可以实现多个应用程序共享同一个Service的功能。
4. 具体实例
实例描述:客户端远程调用服务器端的远程Service
4.1 服务器端(Service)
新建一个服务器端的工程:Service - server。先下Demo再看,效果会更好:Github_RemoteService_Server
步骤1. 新建一个AIDL文件

步骤2. 在新建AIDL文件里定义Service需要与Activity进行通信的内容(方法),并进行编译(Make Project)
// 在新建的AIDL_Service1.aidl里声明需要与Activity进行通信的方法
package scut.carson_ho.demo_service;
interface AIDL_Service1 {
    void AIDL_Service();
}

步骤3:在Service端
    AIDL_Service1.Stub mBinder = new AIDL_Service1.Stub() {
        @Override
        public void AIDL_Service() {
            System.out.println("客户端通过AIDL与远程后台成功通信");
        }
    };
    @Override
    public void onCreate() {
        super.onCreate();
        System.out.println("执行了onCreat()");
    }
    @Override
    public IBinder onBind(Intent intent) {
        System.out.println("执行了onBind()");
        //在onBind()返回继承自Binder的Stub类型的Binder,非常重要
        return mBinder;
    }
    @Override
    public boolean onUnbind(Intent intent) {
        System.out.println("执行了onUnbind()");
        return super.onUnbind(intent);
    }
}
步骤4:在AndroidMainfest.xml中注册服务& 声明为远程服务
          <service
            android:name=".MyService"
            android:process=":remote"//将本地服务设置成远程服务
            android:exported="true"  //设置可被其他进程调用
            >
            //该Service可以响应带有scut.carson_ho.service_server.AIDL_Service1这个action的Intent。
            //此处Intent的action必须写成“服务器端包名.aidl文件名”
            <intent-filter>
                <action android:name="scut.carson_ho.service_server.AIDL_Service1"/>
            </intent-filter>
        </service>
至此,服务器端(远程Service)已经完成了。
4.2 客户端(Client)
新建一个客户端的工程:Service - Client
先下Demo再看,效果会更好:Github_RemoteService_Client
步骤1:将服务端的AIDL文件所在的包复制到客户端目录下(Project/app/src/main),并进行编译
注:记得要原封不动地复制!!什么都不要改!

步骤2:在主布局文件定义“绑定服务”的按钮
步骤3:在MainActivity.java里
使用Stub.asInterface接口获取服务器的Binder;
通过Intent指定服务端的服务名称和所在包,进行Service绑定; 根据需要调用服务提供的接口方法。
public class MainActivity extends AppCompatActivity {
        private Button bindService;
        //定义aidl接口变量
        private mAIDL_Service;
        private ServiceConnection connection = new ServiceConnection() {
            //重写onServiceConnected()方法和onServiceDisconnected()方法
            //在Activity与Service建立关联和解除关联的时候调用
            @Override
            public void onServiceDisconnected(ComponentName name) {}
            //在Activity与Service建立关联时调用
            @Override
            public void onServiceConnected(ComponentName name, IBinder service) {
                //使用AIDLService1.Stub.asInterface()方法获取服务器端返回的IBinder对象
                //将IBinder对象传换成了mAIDL_Service接口对象
                mAIDL_Service = AIDL_Service1.Stub.asInterface(service);
              //通过该对象调用在MyAIDLService.aidl文件中定义的接口方法,从而实现跨进程通信
                mAIDL_Service.AIDL_Service();
            }
        };
        @Override
        protected void onCreate(Bundle savedInstanceState) {
            super.onCreate(savedInstanceState);//设置绑定服务的按钮
            bindService.setOnClickListener(new View.OnClickListener() {
                @Override
                public void onClick(View v) {
                    //通过Intent指定服务端的服务名称和所在包,与远程Service进行绑定
                    //参数与服务器端的action要一致,即"服务器包名.aidl接口文件名"
                    Intent intent = new Intent("scut.carson_ho.service_server.AIDL_Service1");
                    //Android5.0后无法只通过隐式Intent绑定远程Service,需要通过setPackage()方法指定包名
                    intent.setPackage("scut.carson_ho.service_server");
                    //绑定服务,传入intent和ServiceConnection对象
                    bindService(intent, connection, Context.BIND_AUTO_CREATE);
                }
            });
        }
    }
4.3 测试结果

从上面测试结果可以看出:
- 打印的语句分别运行在不同进程(看语句前面的包名);
- 客户端调用了服务端Service的方法
即客户端和服务端进行了跨进程通信
4.4 Demo地址
客户端:Github_RemoteService_Client
服务端:Github_RemoteService_Server
5. 总结
本文对Android组件Service中的远程Service进行了全面介绍
如果你还想了解关于Service的其他知识,请浏览以下文章:
Android:Service生命周期最全面解析
Android:(本地、可通信的、前台、远程)Service使用全面介绍
Android:远程服务Service(含AIDL & IPC讲解)
Android多线程全面解析:IntentService用法&源码
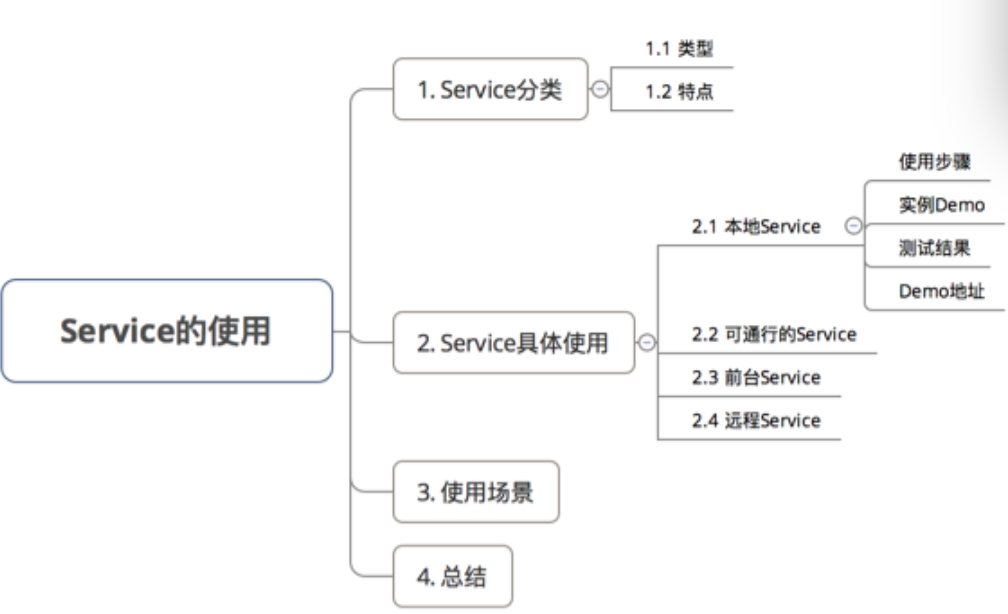
1. Service分类
1.1 Service的类型


2.具体使用解析
2.1 本地Service
这是最普通、最常用的后台服务Service。
2.1.1 使用步骤
- 步骤1:新建子类继承Service类
需重写父类的onCreate()、onStartCommand()、onDestroy()和onBind()方法
- 步骤2:构建用于启动Service的Intent对象
- 步骤3:调用startService()启动Service、调用stopService()停止服务
- 步骤4:在AndroidManifest.xml里注册Service
2.1.2 实例Demo
接下来我将用一个实例Demo进行本地Service说明,建议先下载Demo再进行阅读:(carson.ho的Github地址)Demo_for_Service
- 步骤1:新建子类继承Service类
需重写父类的onCreate()、onStartCommand()、onDestroy()和onBind()
public class MyService extends Service {
//启动Service之后,就可以在onCreate()或onStartCommand()方法里去执行一些具体的逻辑
//由于这里作Demo用,所以只打印一些语句
    @Override
    public void onCreate() {
        super.onCreate();
        System.out.println("执行了onCreat()");
    }
    @Override
    public int onStartCommand(Intent intent, int flags, int startId) {
        System.out.println("执行了onStartCommand()");
        return super.onStartCommand(intent, flags, startId);
    }
    @Override
    public IBinder onBind(Intent intent) {
        return null;
    }
}
步骤2:在主布局文件设置两个Button分别用于启动和停止Service
步骤3:构建Intent对象,并调用startService()启动Service、stopService停止服务
public class MainActivity extends AppCompatActivity implements View.OnClickListener {
    private Button startService;
    private Button stopService;
    @Override
    protected void onCreate(Bundle savedInstanceState) {
        super.onCreate(savedInstanceState);
        setContentView(R.layout.activity_main);
        startService = (Button) findViewById(R.id.startService);
        stopService = (Button) findViewById(R.id.stopService);
        startService.setOnClickListener(this);
        startService.setOnClickListener(this);
    }
    @Override
    public void onClick(View v) {
        switch (v.getId()) {
            //点击启动Service Button
            case R.id.startService:
                //构建启动服务的Intent对象
                Intent startIntent = new Intent(this, MyService.class);
                //调用startService()方法-传入Intent对象,以此启动服务
                startService(startIntent);
            //点击停止Service Button
            case R.id.stopService:
                //构建停止服务的Intent对象
                Intent stopIntent = new Intent(this, MyService.class);
                //调用stopService()方法-传入Intent对象,以此停止服务
                stopService(stopIntent);
        }
    }
}
步骤4:在AndroidManifest.xml里注册Service
<?xml version="1.0" encoding="utf-8"?>
<manifest xmlns:android="http://schemas.android.com/apk/res/android"
    package="scut.carson_ho.demo_service">
    <application
        android:allowBackup="true"
        android:icon="@mipmap/ic_launcher"
        android:label="@string/app_name"
        android:supportsRtl="true"
        android:theme="@style/AppTheme">
        <activity android:name=".MainActivity">
            <intent-filter>
                <action android:name="android.intent.action.MAIN" />
                <category android:name="android.intent.category.LAUNCHER" />
            </intent-filter>
        </activity>
        //注册Service服务
        <service android:name=".MyService">
        </service>
    </application>
</manifest>
Androidmanifest里Service的常见属性说明
| 属性 | 说明 | 备注 |
|---|---|---|
| android:name | Service的类名 | |
| android:label | Service的名字 | 若不设置,默认为Service类名 |
| android:icon | Service的图标 | |
| android:permission | 申明此Service的权限 | 有提供了该权限的应用才能控制或连接此服务 |
| android:process | 表示该服务是否在另一个进程中运行(远程服务) | 不设置默认为本地服务;remote则设置成远程服务 |
| android:enabled | 系统默认启动 | true:Service 将会默认被系统启动;不设置则默认为false |
| android:exported | 该服务是否能够被其他应用程序所控制或连接 | 不设置默认此项为 false |
2.1.3 测试结果

2.1.4 Demo地址
Carson.ho的Github地址:Demo_for_Service
2.2 可通信的服务Service
- 上面介绍的Service是最基础的,但只能单机使用,即无法与Activity通信
- 接下来将在上面的基础用法上,增设“与Activity通信”的功能,即使用绑定Service服务(Binder类、bindService()、onBind()、unbindService()、onUnbind())
2.2.1 实例Demo
接下来我将用一个实例Demo进行可通信的服务Service说明
建议先下载Demo再进行阅读:(carson.ho的Github地址)Demo_for_Service
步骤1:在新建子类继承Service类,并新建一个子类继承自Binder类、写入与Activity关联需要的方法、创建实例
public class MyService extends Service {
    private MyBinder mBinder = new MyBinder();
    @Override
    public void onCreate() {
        super.onCreate();
        System.out.println("执行了onCreat()");
    }
    @Override
    public int onStartCommand(Intent intent, int flags, int startId) {
        System.out.println("执行了onStartCommand()");
        return super.onStartCommand(intent, flags, startId);
    }
    @Override
    public void onDestroy() {
        super.onDestroy();
        System.out.println("执行了onDestory()");
    }
    @Override
    public IBinder onBind(Intent intent) {
        System.out.println("执行了onBind()");
        //返回实例
        return mBinder;
    }
    @Override
    public boolean onUnbind(Intent intent) {
        System.out.println("执行了onUnbind()");
        return super.onUnbind(intent);
    }
    //新建一个子类继承自Binder类
    class MyBinder extends Binder {
        public void service_connect_Activity() {
            System.out.println("Service关联了Activity,并在Activity执行了Service的方法");
        }
    }
}
步骤2:在主布局文件再设置两个Button分别用于绑定和解绑Service
 // 按钮:启动服务
 // 按钮:停止服务
 // 按钮:绑定服务
 // 按钮:解绑服务
步骤3:在Activity通过调用MyBinder类中的public方法来实现Activity与Service的联系
即实现了Activity指挥Service干什么Service就去干什么的功能
public class MainActivity extends AppCompatActivity implements View.OnClickListener {
    private Button startService;
    private Button stopService;
    private Button bindService;
    private Button unbindService;
    private MyService.MyBinder myBinder;
    private ServiceConnection connection = new ServiceConnection() {
        //重写onServiceConnected()方法和onServiceDisconnected()方法
        //在Activity与Service建立关联和解除关联的时候调用
        @Override
        public void onServiceDisconnected(ComponentName name) {
        }
        //在Activity与Service解除关联的时候调用
        @Override
        public void onServiceConnected(ComponentName name, IBinder service) {
            //实例化Service的内部类myBinder
            //通过向下转型得到了MyBinder的实例
            myBinder = (MyService.MyBinder) service;
            //在Activity调用Service类的方法
            myBinder.service_connect_Activity();
        }
    };
    @Override
    protected void onCreate(Bundle savedInstanceState) {
        super.onCreate(savedInstanceState);
        setContentView(R.layout.activity_main);
        startService = (Button) findViewById(R.id.startService);
        stopService = (Button) findViewById(R.id.stopService);
        bindService = (Button) findViewById(R.id.bindService);
        unbindService = (Button) findViewById(R.id.unbindService);
    }
    @Override
    public void onClick(View v) {
        switch (v.getId()) {
            //点击启动Service
            case R.id.startService:
                //构建启动服务的Intent对象
                Intent startIntent = new Intent(this, MyService.class);
                //调用startService()方法-传入Intent对象,以此启动服务
                startService(startIntent);
                break;
            case R.id.stopService:
                //构建停止服务的Intent对象
                Intent stopIntent = new Intent(this, MyService.class);
                //调用stopService()方法-传入Intent对象,以此停止服务
                stopService(stopIntent);
                break;
            case R.id.bindService:
                //构建绑定服务的Intent对象
                Intent bindIntent = new Intent(this, MyService.class);
                //调用bindService()方法,以此停止服务
                bindService(bindIntent,connection,BIND_AUTO_CREATE);
                //参数说明
                //第一个参数:Intent对象
                //第二个参数:上面创建的Serviceconnection实例
                //第三个参数:标志位
                //这里传入BIND_AUTO_CREATE表示在Activity和Service建立关联后自动创建Service
                //这会使得MyService中的onCreate()方法得到执行,但onStartCommand()方法不会执行
                break;
            //点击解绑Service
            case R.id.unbindService:
                //调用unbindService()解绑服务
                //参数是上面创建的Serviceconnection实例
                unbindService(connection);
                break;
                default:
                    break;
        }
    }
}
2.2.2 测试结果

2.2.3 Demo
carson.ho的Github地址:Demo_for_Service
2.3 前台Service
前台Service和后台Service(普通)最大的区别就在于:
- 前台Service在下拉通知栏有显示通知(如下图),但后台Service没有;

- 前台Service优先级较高,不会由于系统内存不足而被回收;后台Service优先级较低,当系统出现内存不足情况时,很有可能会被回收
2.3.1 具体使用
用法很简单,只需要在原有的Service类对onCreate()方法进行稍微修改即可,如下图:
@Override
    public void onCreate() {
        super.onCreate();
        System.out.println("执行了onCreat()");
        //添加下列代码将后台Service变成前台Service
        //构建"点击通知后打开MainActivity"的Intent对象
        Intent notificationIntent = new Intent(this,MainActivity.class);
        PendingIntent pendingIntent = PendingIntent.getActivity(this,0,notificationIntent,0);
        //新建Builer对象
        Notification.Builder builer = new Notification.Builder(this);
        builer.setContentTitle("前台服务通知的标题");//设置通知的标题
        builer.setContentText("前台服务通知的内容");//设置通知的内容
        builer.setSmallIcon(R.mipmap.ic_launcher);//设置通知的图标
        builer.setContentIntent(pendingIntent);//设置点击通知后的操作
        Notification notification = builer.getNotification();//将Builder对象转变成普通的notification
        startForeground(1, notification);//让Service变成前台Service,并在系统的状态栏显示出来
    }
2.3.2 测试结果
运行后,当点击Start Service或Bind Service按钮,Service就会以前台Service的模式启动(通知栏上有通知),如下图
2.4 远程Service
具体请看我写的另外一篇文章:Android:远程服务Service(含AIDL & IPC讲解)
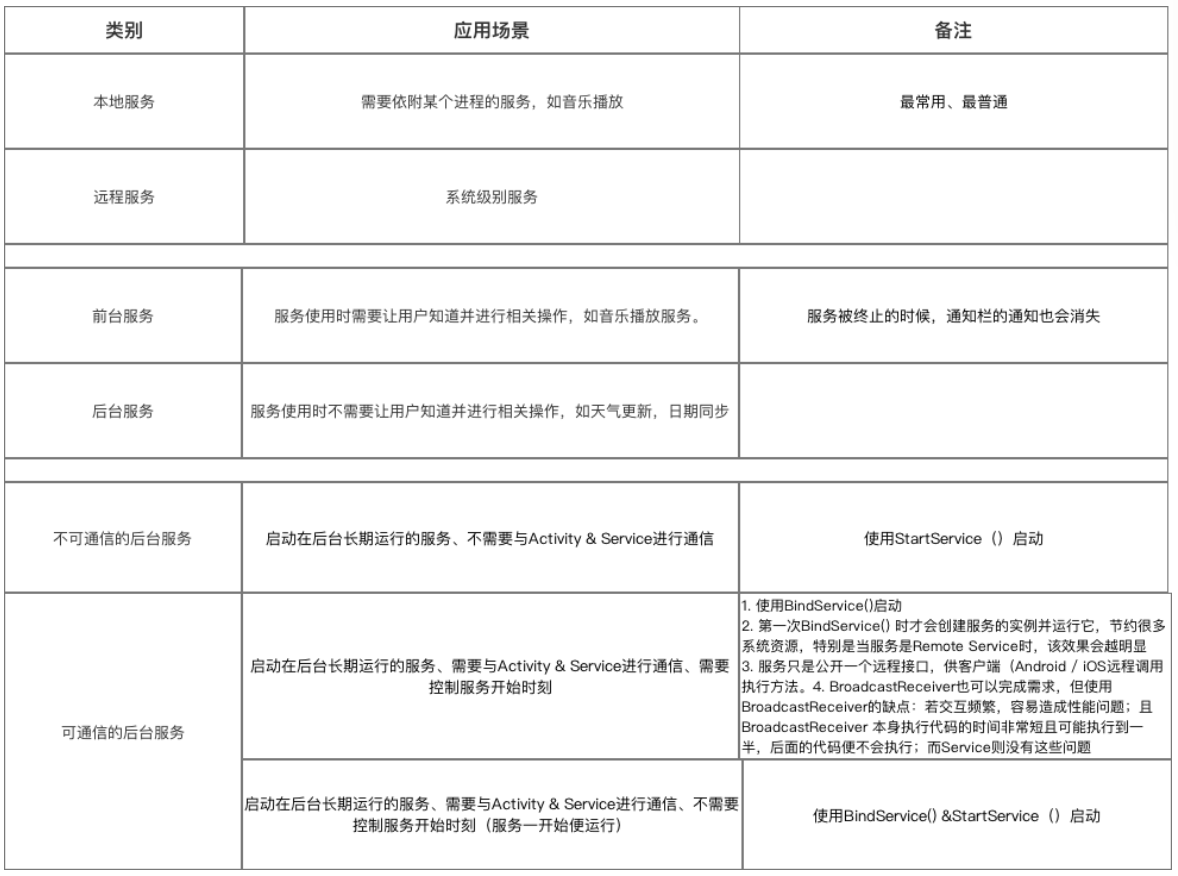
3. 使用场景
- 通过上述描述,你应该对Service类型及其使用非常了解;
- 那么,我们该什么时候用哪种类型的Service呢?
-
各种Service的使用场景请看下图:
4. 总结
- 本文对Service的使用进行了全面解析(本地、可通信、前台和远程Service)
- 如果你还想了解关于Service的其他知识,请浏览以下文章:
Android四大组件:Service史上最全面解析
Android:Service生命周期最全面解析
Android:(本地、可通信的、前台、远程)Service使用全面介绍
Android:远程服务Service(含AIDL & IPC讲解)
Android多线程全面解析:IntentService用法&源码
相关文章
- 国内最强微服务框架,没有之一!
- 微服务间的远程接口调用:OpenFeign 的使用
- 微服务远程调用简单总结
- FTP远程文件传输服务安装与配置
- 【软件】RustDesk自己搭建远程控制服务软件 支持控制手机
- 【Service】bindService:绑定本地服务和远程服务示例[通俗易懂]
- 谷歌云CISO:零信任对保护云计算服务至关重要
- 嘉为蓝鲸IT服务管理中心产品升级之路
- SQLServer 错误 14265 MSSQLServer 服务意外终止。 有关可能的原因,请查看 SQL Server 错误日志以及 Windows 系统和应用程序事件日志。 故障 处理 修复 支持远程
- 检查Oracle服务是否启动(oracle服务是否启动)
- 配置 Linux 下 SFTP 服务器(linuxsftp服务)
- 微服务和容器:需要去防范的 5 个“坑”
- 如何管理 Linux 上的 VPN 服务(linuxvpn管理)
- Linux RSH命令:远程登录服务的快捷方式(linuxrsh命令)
- 飞利浦医疗收购Direct Radiology,加强远程放射学服务能力
- 停止sqlserver数据库服务的正确方法(停sqlserver服务)
- 如何在Linux下顺利重启udev服务(linux重启udev)
- Oracle服务:开启你的数据库之旅(oracle的服务名)
- 轻松搭建远程MongoDB连接服务(远程连接mongodb)
- 微服务架构实现Redis鉴权机制(微服务redis鉴权)
- 远程部署Redis,改变数据库服务存储模式(异地部署redis)
- 命令行重启MySQL服务(cmd 重启 mysql)
- 监控Redis连接状态以确保服务可靠性(监听redis连接状态)
- SSH远程重启Redis服务(ssh重启redis)
- 清空Redis缓存,优化服务性能(删除redis的缓存)
- 调查解决内网网络无法访问Redis服务的原因(内网无法访问redis)
- 在PHP中利用XML技术构造远程服务(上)