
【魔法圣诞树】代码实现详解 --多种实战编程技巧倾情打造
一、前言
本文会基于C# GDI+技术 从零到一 实现一颗 魔法圣诞树!源码和素材在文末全部都有!
二、魔法圣诞树
对于用代码画圣诞树,网上各种编程语言像python、css、java、c/c++我们都有见到过了,那么在绘图方面,还有一位实力强劲的隐藏高手,那就C#语言,它的GDI+技术也可以称的上是笑傲江湖,但网上鲜见C#代码画的圣诞树,所以今天我就使用 C# 代码 来 展示一下 它的独特魅力,挑战的是画一颗带魔法的圣诞树:树会自动成长,树上挂件会不断变换,就像有魔法一样~
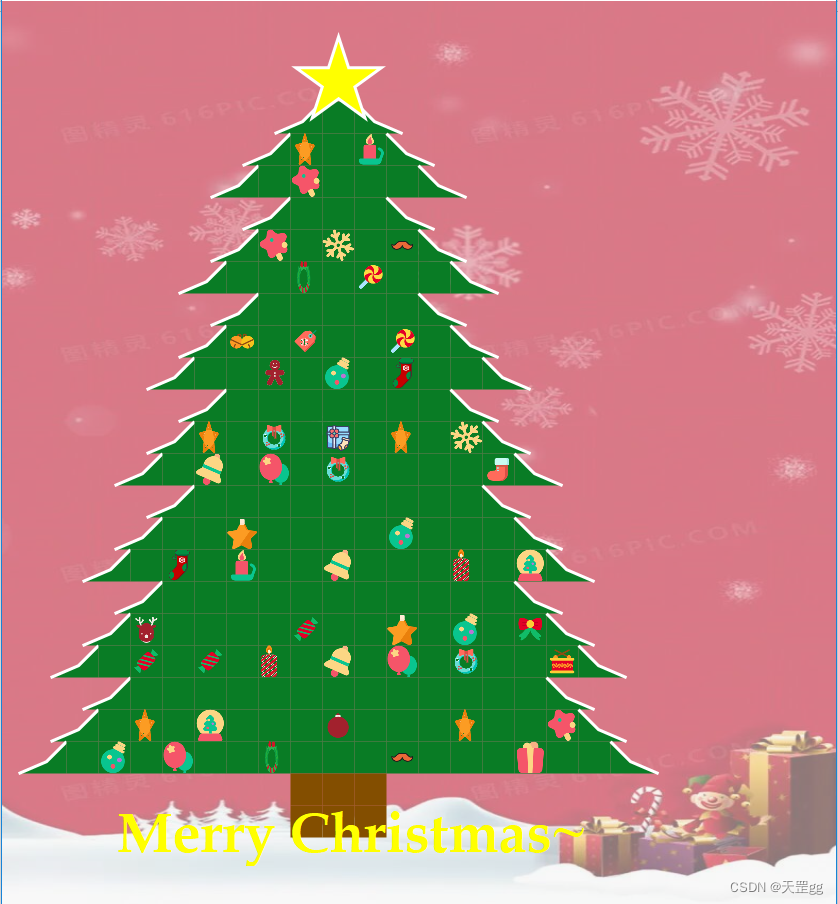
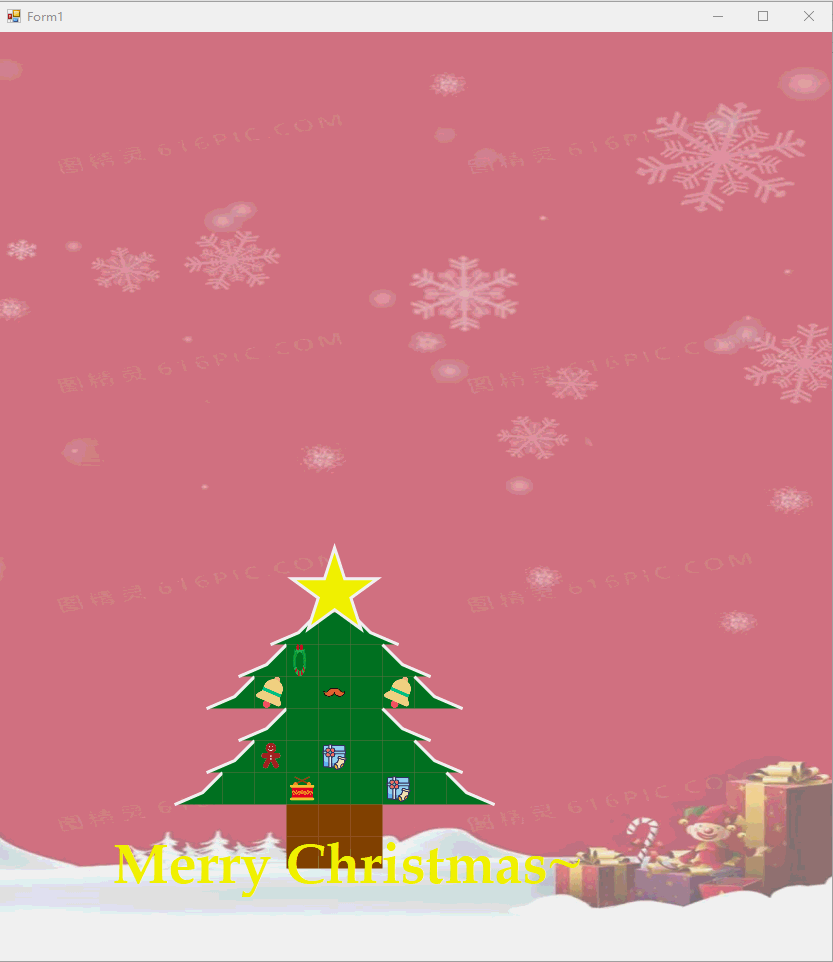
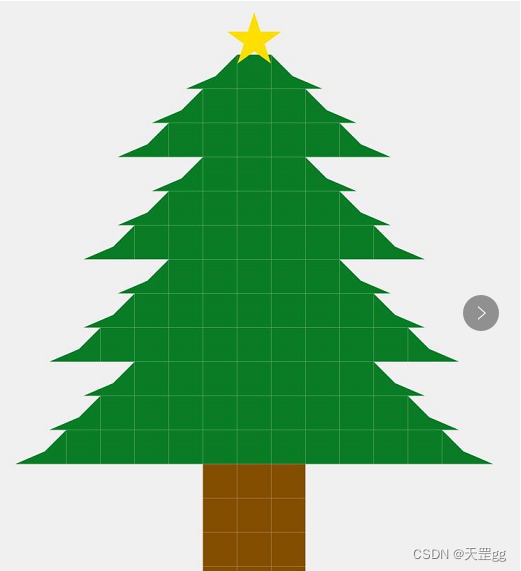
三、效果展示
静态图:
动态图:
四、实现步骤
-
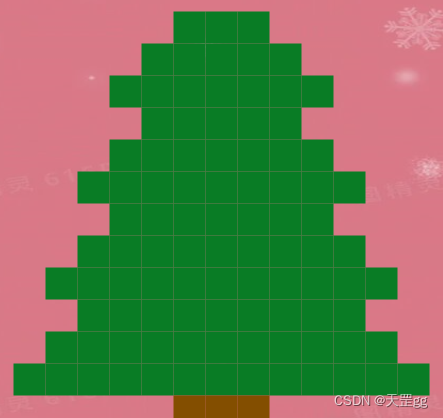
画圣诞树轮廓
- 我们使用小方块来组成树,每个小方块大小可以自定义,就可以实现不同大小的树
- 从树顶画起,以树干为中心,左右对称,采用循环一行一行画方块,先画段,每段的每行从上至少依次递增
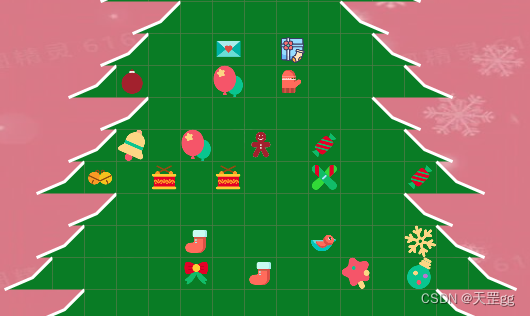
- 画所有段,每段的初始方块也是从上至下依次递增,效果如下:
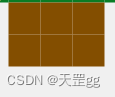
- 画树根:两层for循环画树根的宽和高,想多粗多高都行,例如:2*3
-
画圣诞树的星星
- 大家应该都会手绘星星,那就是知道了路径,所以我们就根据路径(path)画即可,GDI+的画路径方法还是非常强大的.
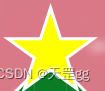
- 大家应该都会手绘星星,那就是知道了路径,所以我们就根据路径(path)画即可,GDI+的画路径方法还是非常强大的.
-
画树左边线和右边线
- 这个开始是采用直角三角形,但看上去会太直了,所以改为边线处理,采用多条折线达到
雪压青松的效果.
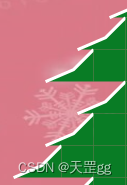
如果不加白边线,是不是差点意思?
- 这个开始是采用直角三角形,但看上去会太直了,所以改为边线处理,采用多条折线达到
-
画树上的小装饰挂件
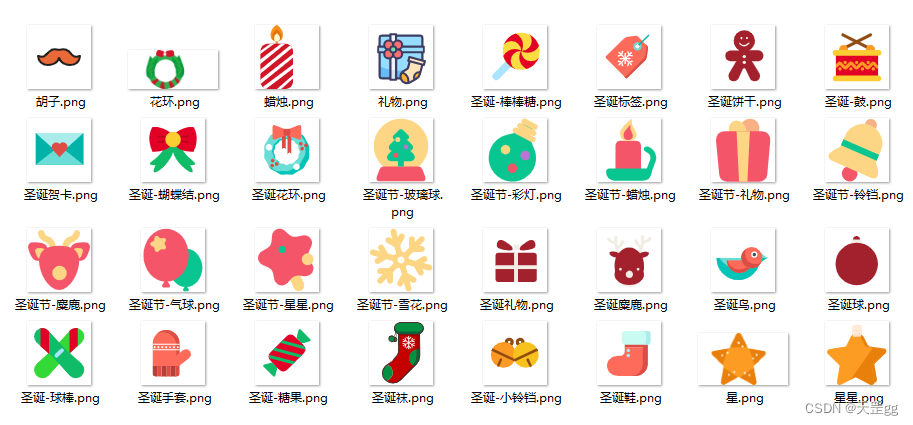
- 这是一个小亮点,树上挂件以现有的圣诞精美图片为准,采用高质量图片透明背景处理,效果非常不错.
- 这是准备的32张图片:
- 这是把图片画上去的效果:
-
画背景图
- 这也是一个
小亮点,背景图做了透明度处理,看起来更突显出重点:树
- 这也是一个
-
施魔法:让圣诞树动态生长,树上挂件不断变换
- 采用定时刷新,通过时间算法计算树的高度实现动态生成,通过不断随机画星星和挂件实现不断变换
五、编码实现
-
打开双缓冲
画图为了界面没有明显的刷新,我们都需要开启双缓冲,在构造函数开启即可:this.DoubleBuffered = true; -
画笔抗锯齿
画图为了线条没有锯齿状,我们都需要设置绘制模式为抗锯齿,在OnPaint中设置:
 Graphics g = e.Graphics;
 g.SmoothingMode = SmoothingMode.AntiAlias;
- 画圣诞树轮廓
DrawTreeLayer:画整颗树的“一段/一截”的方法,一般圣诞树有3/5/7段这样,这里根据start和end控制循环次数,这里采用的画刷就是单色的SolidBrush:
private void DrawTreeLayer(Graphics g, int start, int end, ref int x, ref int y)
{
    using (Brush brush = new SolidBrush(Color.FromArgb(9, 124, 37)))
    {
        int outSize = rectSize + border;
        bool lastFillImage = false;
        for (int i = start; i <= end; i++)
        {
            for (int j = 0; j < (i * 2 - 1); j++)
            {
                if (j == 0)
                {
                    // 画最左边
                    DrawTreeLeft(g, brush, x, y, rectSize, rectSize);
                }
                else if (j == i * 2 - 2)
                {
                    // 画最右边
                    DrawTreeRight(g, brush, x, y, rectSize, rectSize);
                }
                else
                {
                    // 画树上的小装饰挂件
                    g.FillRectangle(brush, x, y, rectSize, rectSize);
                    if (lastFillImage || i == start)
                    {
                        lastFillImage = false;
                    }
                    else
                    {
                        lastFillImage = DrawGift(g, brush, x, y, rectSize, rectSize);
                    }
                }
                x += outSize;
            }
            x = startX - i * outSize;
            y += outSize;
        }
    }
}
实现了画一段,我们再把每一段画出来就是一整颗树,在OnPaint里指定实现,这里的全量变量level代表段数:
int x = startX;
int y = startY;
int outSize = rectSize + border;
for (int i = 4; i < 3 + level; i++)
{
    // 一层比一层低的设置
    int start = 2 + i - 4;
    int end = i;

    x = startX - (start - 1) * (rectSize + border);
    DrawTreeLayer(g, start, end, ref x, ref y);
}
x = startX - (rectSize + border);
DrwaRoot(g, ref x, ref y);
画树根的方法,和画树干的方块的画刷相同SolidBrush:
// 画树根
private void DrwaRoot(Graphics g, ref int x, ref int y)
{
    using (Brush brush = new SolidBrush(Color.FromArgb(131, 78, 0)))
    {
        int outSize = rectSize + border;
        for (int i = 0; i < rootHeight; i++)
        {
            for (int j = 0; j < rootWidth; j++)
            {
                g.FillRectangle(brush, x, y, rectSize, rectSize);
                x += outSize;
            }
            x = startX - outSize;
            y += outSize;
        }
    }
}
- 画圣诞树的星星
大家应该都会手绘星星,那就是知道了路径,所以我们就根据路径(path)画即可,GDI+的画路径方法还是非常强大的.
利用GDI+的路径(GraphicsPath)画出的一颗小星星,这里通过starColors 和 curStarColorIndex 控制颜色每次刷新变换。
这里小细节是:星星不只是填充背景色,还加了白色外边框达到和树边一样的效果,看起来更和谐。为了画出边框,采用了Inflate方法:即先外放大画边框,画完再缩小归位,不影响后续画笔。
// 画星星
Color[] starColors = new Color[] { Color.Yellow, Color.Cyan, ColorTranslator.FromHtml("#FFDF00") };
int curStarColorIndex = 0;
private void DrawStar(Graphics g, Point center, float angle, int radius)
{
    PointF[] points = new PointF[]
    {
        new PointF(center.X, center.Y - radius),
        new PointF((float)(center.X + radius * Math.Sin(72 * Math.PI / 180)), (float)(center.Y - radius * Math.Cos(72 * Math.PI / 180))),
        new PointF((float)(center.X + radius * Math.Sin(36 * Math.PI / 180)), (float)(center.Y + radius * Math.Cos(36* Math.PI / 180))),
        new PointF((float)(center.X - radius * Math.Sin(36 * Math.PI / 180)),(float)( center.Y + radius * Math.Cos(36 * Math.PI / 180))),
        new PointF((float)(center.X - radius * Math.Sin(72 * Math.PI / 180)), (float)(center.Y - radius * Math.Cos(72 * Math.PI / 180))),
    };
    GraphicsPath path = new GraphicsPath(FillMode.Winding);
    path.AddLine(points[0], points[2]);
    path.AddLine(points[2], points[4]);
    path.AddLine(points[4], points[1]);
    path.AddLine(points[1], points[3]);
    path.AddLine(points[3], points[0]);
    path.CloseFigure();

    g.RotateTransform(angle);
    // 画白边框
    using (Pen pen = new Pen(Color.White, 6f))
    {
        path.GetBounds().Inflate(6, 6);
        g.DrawPath(pen, path);
        path.GetBounds().Inflate(-6, -6);
    }
    // 填充色轮换
    using (Brush brush = new SolidBrush(starColors[curStarColorIndex]))
    {
        g.FillPath(brush, path);
    }
    int nextStarColorIndex = (curStarColorIndex == starColors.Length - 1) ? 0 : (curStarColorIndex + 1);
    curStarColorIndex = nextStarColorIndex;
}
-
画树左边线和右边线
这里有个小细节,就是为了看起来更有层次感,所以对左边线和右边线,也做了处理,开始是单纯的画直角三角形,但是太直了,所以改为画多边形效果就好很多,像雪压青松的效果~FillPolygon是填充多边线颜色画白边为什么用DrawLines呢?因为我只画外边,不折合
// 画树左边
private void DrawTreeLeft(Graphics g, Brush brush, int x, int y, int width, int height)
{
    PointF point1 = new PointF(x + width, y);
    PointF point2 = new PointF(x + z12, y + height - z12);
    PointF point3 = new PointF(x - z16, y + height);
    PointF point4 = new PointF(x + width, y + height);
    PointF[] fillPts = { point1, point2, point3, point4 };
    g.FillPolygon(brush, fillPts);
    // 画白边框
    PointF[] borderPts = { point1, point2, point3 };
    using (Pen pen = new Pen(Color.White, 3f))
    {
        g.DrawLines(pen, borderPts);
    }
}

// 画树右边
private void DrawTreeRight(Graphics g, Brush brush, int x, int y, int width, int height)
{
    PointF point1 = new PointF(x, y);
    PointF point2 = new PointF(x, y + height);
    PointF point3 = new PointF(x + width + z16, y + height);
    PointF point4 = new PointF(x + width - z12, y + height - z12);
    PointF[] pntArr = { point1, point2, point3, point4 };
    g.FillPolygon(brush, pntArr);
    // 画白边框
    PointF[] borderPts = { point1, point4, point3 };
    using (Pen pen = new Pen(Color.White, 3f))
    {
        g.DrawLines(pen, borderPts);
    }
}
-
画树上的小装饰挂件
因为树上挂件很多,最开始是想全用GDI+技术来画,画了几个发现效果不多,所以就弄了32张png小图片,直接画图片,但这里也有一个小细节,png背景是白色,如果原样画图片,会很不和谐,所以需要把白色变透明,请看代码:- 加载32张png小图片,你可以把你想加的放到iconfont目录即可:
string[] files = Directory.GetFiles("iconfont\\"); foreach (string file in files) { Image img = Image.FromFile(file); Bitmap bmp = new Bitmap(img.Width, img.Height, System.Drawing.Imaging.PixelFormat.Format32bppArgb); using (Graphics g = Graphics.FromImage(bmp)) { g.DrawImage(img, 0, 0, img.Width, img.Height); } bmp.MakeTransparent(Color.White); bitmapList.Add(bmp); } this.backImage = Image.FromFile("backgroud\\backgroud.jpg");- 画树上的小装饰挂件方法:
这里也有一个小细节:Random 默认会以当前时间为种子,所以在同一时间,循环数字相同,也就没什么效果,看起来都一样,所以我们要变化Random的种子,也就是我每次用Guid生成一个全新的。
DrawImage采用的像素画法.
// 画树上的小装饰挂件 private bool DrawGift(Graphics g, Brush brush, int x, int y, int width, int height) { byte[] buffer = Guid.NewGuid().ToByteArray(); int iSeed = BitConverter.ToInt32(buffer, 0); Random random = new Random(iSeed); int i = random.Next(bitmapList.Count * 2); if (i < bitmapList.Count) { Rectangle destRect = new Rectangle(x, y, width, height); Rectangle srcRect = new Rectangle(0, 0, bitmapList[i].Width, bitmapList[i].Height); g.DrawImage(bitmapList[i], destRect, srcRect, GraphicsUnit.Pixel); return true; } return false; } -
画背景图
那么这么魔法的圣诞树,当然要配上圣诞老人的图片,这里也有一个小细节,如何把背景图片模糊化,这样才好突显树的效果,我这里是做了透明度处理,通过指定DrawImage的ImageAttributes:this.backImage = Image.FromFile("backgroud\\backgroud.jpg"); // 画背景图片带透明度 using (ImageAttributes attributes = GetAlphaImgAttr(50)) { Rectangle destRect = new Rectangle(0, 0, this.Width, this.Height); g.DrawImage(this.backImage, destRect, 0, 0, this.backImage.Width, this.backImage.Height, GraphicsUnit.Pixel, attributes); }关键代码:获取一个带有透明度的ImageAttributes
public ImageAttributes GetAlphaImgAttr(int opcity) { if (opcity < 0 || opcity > 100) { throw new ArgumentOutOfRangeException("opcity 值为 0~100"); } //颜色矩阵 float[][] matrixItems = { new float[]{ 1,0,0,0,0}, new float[]{ 0,1,0,0,0}, new float[]{ 0,0,1,0,0}, new float[]{ 0,0,0,(float)opcity / 100,0}, new float[]{ 0,0,0,0,1} }; ColorMatrix colorMatrix = new ColorMatrix(matrixItems); ImageAttributes imageAtt = new ImageAttributes(); imageAtt.SetColorMatrix(colorMatrix, ColorMatrixFlag.Default, ColorAdjustType.Bitmap); return imageAtt; } -
施魔法:让圣诞树动态生长,树上挂件不断变换
ok, 动态效果是通过timer定时器刷新实现的,1秒一刷新,3秒自动成长,长到8秒停止,就这么简单~// 当前刷新次数 int curRefreshCount = 0; // 成长阀值 int growThreshold = 9; private void timer1_Tick(object sender, EventArgs e) { this.Refresh(); curRefreshCount++; // 刷新次数超过growThreshold长一次高度 if (curRefreshCount >= growThreshold) { curRefreshCount = 0; if (level >= 8) { //level = 3; this.startY = 100 + (8 - level) * 3 * rectSize; } else { this.level++; this.startY -= 3 * rectSize; } } }
全部源代码
打包下载地址:https://download.csdn.net/download/scm_2008/87342631
最后祝大家Merry Christmas~
大家有什么好的建议或想法,欢迎评论区讨论.
创作不易,求关注,点赞,收藏,谢谢~
相关文章
- Windows核心编程 第2 4章 异常处理程序和软件异常
- 多线程编程学习笔记-基础(一)
- verilog编程艺术(提升代码灵活性)
- 2023编程必会的100个代码大全,建议马上收藏
- JAVA--AI编程助手【代码智能补全工具】盘点,让AI提高你的编程效率
- 【Android编程之旅】有奖征集活动开始啦!
- 用Go语言 网络编程之实现多客户端 连接服务器 并且发送消息代码实现 (Golang经典编程案例
- iOS编程(双语版) - 视图 - 手工代码(不使用向导)创建视图
- UNIX网络编程卷2进程间通信读书笔记(二)—管道 (1)
- 《C和C++代码精粹》——第 2 章 指针2.1 容易出错的编程
- 《Python数据可视化编程实战》——1.8 在代码中配置matplotlib参数
- 《JavaScript专家编程》——9.4 度量JavaScript代码质量
- 《JavaScript高效图形编程(修订版)》——第2章 DHTML基础 2.1创建DHTML sprite
- 《趣学Python编程》——第1部分 学习编程 第1章 Python不是大蟒蛇 1.1 关于计算机语言
- SwiftUI 高代码质量编程技巧之 03 使用多行字符串引用
- 泛型编程思想:复合类型的抽象和代码复用
- 函数式编程-数据结构+算法
- 《驯服烂代码:在编程操练中悟道》一第2章 按图索骥地编写代码
- Linux C高级编程——网络编程之以太网(2)
- 编程算法 - 远征队(expedition) 代码(C)
- 编程算法 - 旋转矩阵 代码(C)
- Javascript异步编程深入浅出