
WSGI服务器实践二--实践一个基本功能的WSGI服务器
服务器 一个 -- 实践 基本功能 WSGI
2023-09-27 14:28:45 时间
由于各种PYTHON框架都实现了WSGI接口,所以,通用性很广的。
在调试过程过,有一个字母拼错,搞了一个小时。
看来PYTHON自带的编辑器没有高亮,不爽。
在有提示的编辑器里一看就看了来啦。。:)
webserver.py
import socket

import StringIO

import sys


 # Allow to reuse the same address

 listen_socket.setsockopt(socket.SOL_SOCKET, socket.SO_REUSEADDR, 1)

 # Bind

 listen_socket.bind(server_address)

 # Active

 listen_socket.listen(self.request_queue_size)

 # Get server host name and port

 host, port = self.listen_socket.getsockname()[0:2]

 self.server_name = socket.getfqdn(host)

 self.server_port = port

 # Return headers set by web framework/Web application

 self.headers_set = []

 def set_app(self, application):

 self.application = application


 # New client connection

 self.client_connection, client_address = listen_socket.accept()

 # Handle one request and close the client connection. Then

 # loop over to wait for another client connection

 self.handle_one_request()

 def handle_one_request(self):

 self.request_data = request_data = self.client_connection.recv(1024)

 # Print formatted request data a la curl -v

 print(.join(

  {line} \n.format(line=line)

 for line in request_data.splitlines()

 self.parse_request(request_data)

 # Construct environment dictionary using requst data

 env = self.get_environ()

 # Its time to call our application callable and get

 # back a result that will become HTTP response body

 print self.application: ********************, self.application

 result = self.application(env, self.start_response)


 request_line = request_line.rstrip(\r\n)

 # Break down the request line into components

 (self.request_method, #GET

 self.path, #/hello

 self.request_version # HTTP/1.1

 ) = request_line.split()

 def get_environ(self):

 env = {}

 # The following code snippet does not follow PEP8 conventions

 # but its formatted the way it is for demonstration purposes

 # to emphasize the required variables and their values

 # Required WSGI variables

 env[wsgi.version] = (1, 0)

 env[wsgi.url_scheme] = http

 env[wsgi.input] = StringIO.StringIO(self.request_data)

 env[wsgi.errors] = sys.stderr

 env[wsgi.multithread] = False

 env[wsgi.multiprocess] = False

 env[wsgi.run_once] = False

 # Required CGI variables

 env[REQUEST_METHOD] = self.request_method # GET

 env[PATH_INFO] = self.path # /hello

 env[SERVER_NAME] = self.server_name # localhost

 env[SERVER_PORT] = str(self.server_port) # 8888

 return env

 def start_response(self, status, response_headers, exc_onfo=None):

 # Add necessary server headers

 server_headers = [

 (Date, Tue, 31 Mar 2015 12:54:48 GMT),

 (Server, WSGIServer 02),

 self.headers_set = [status, response_headers + server_headers]

 # To adhere to WSGI specification the start_response must return

 # a write callable. We simplicitys sake well ignore that detail

 # for now.

 # return self.finish_response

 def finish_response(self, result):

 try:

 status, response_headers = self.headers_set

 response = HTTP/1.1 {status}\r\n.format(status=status)

 for header in response_headers:

 response += {0}: {1}\r\n.format(*header)

 response += \r\n

 for data in result:

 response += data

 # Print formatted response data a la curl -v

 print(.join(

  {line}\n.format(line=line)

 for line in response.splitlines()

 self.client_connection.sendall(response)

 finally:

 self.client_connection.close()

SERVER_ADDRESS = (HOST, PORT) = , 8888

def make_server(server_address, application):

 server = WSGIServer(server_address)

 server.set_app(application)

 return server

if __name__ == __main__:

 if len(sys.argv) 2:

 sys.exit(Provide a WSGI application object as module:callable)

 app_path = sys.argv[1]

 module, application = app_path.split(:)

 module = __import__(module)

 application = getattr(module, application)

 httpd = make_server(SERVER_ADDRESS, application)

 httpd.serve_forever()

 print("WSGIServer: Serving HTTP on port {port}...\n".format(port=PORT))
wsgiapp.py
def app(environ, start_response):

 """ A barebones WSGI application.

 This is a starting point for you own Web Framework :)

 status = 200 OK

 response_headers = [(Content-Type, text/plain)]

 start_response(status, response_headers)

 return [Hello world from a simple WSGI application!\n]
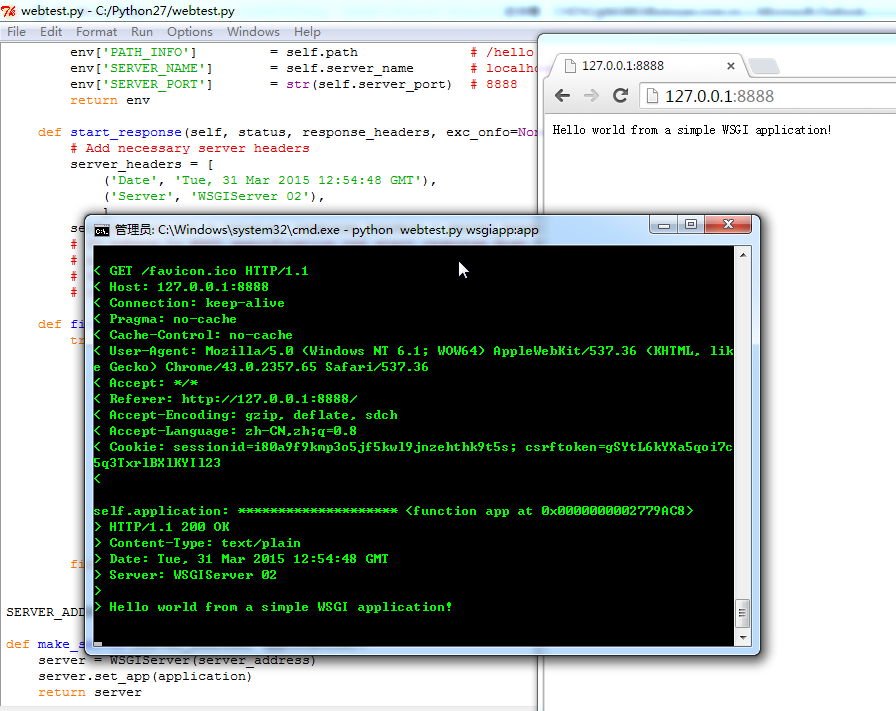
运行命令:
python webserver.py wsgiapp:app
结果:
阿里云高校学生在家实践两周服务器免费体验 云计算与大数据课程学习,领取了阿里云的两周免费试用服务器。领取服务器时以及学习安装部署yum、docker和redis等,遇到的问题和解决方法。
ELK日志监控分析系统的探索与实践(二):利用Metricbeat监控服务器系统指标 在ELK日志监控分析系统的探索与实践(一)中,我们介绍了如何利用ELK+Filebeat监控Springboot项目的日志,本篇则是重点介绍如何利用ELk+Metricbeat监控服务器系统CPU、内存、磁盘等系统指标。
更优雅地远程操作服务器:Paramiko库的实践 测试环境搭建、代码部署、问题定位日志查询这些都离不开操作服务器。我们操作服务的步骤一般是登录服务器,然后切到对应的日志目录下,通过grep/tail方式查询我们想要的日志。当然市面上也提供了很多辅助我们操作服务器的客户端,例如xshell/xftp,但是即使利用客户端,仍然是无法最大化减少我们的手工流水线式的操作。因此本文介绍一个高效的Python库Paramiko,帮助大家开发自己的日志查询工具。
相关文章
- js replace 全局替换 以表单的方式提交参数 判断是否为ie浏览器 将jquery.qqFace.js表情转换成微信的字符码 手机端省市区联动 新字体引用本地运行可以获得,放到服务器上报404 C#提取html中的汉字 MVC几种找不到资源的解决方式 使用Windows服务定时去执行一个方法的三种方式
- 获取DNS服务器的版本信息
- 小白如何搭建Python自带静态Web服务器?
- 利用Py-Socket模块做的一个不登陆windows服务器自动实现替换或者调用自动拨号功能
- 用iLO在惠普服务器安装exsi6.5
- 腾讯云服务器发布静态网页
- 创建一个简单的web服务器(二):使用自定义的类加载器来替换URLClassLoader
- 在 Linux 上配置一个 syslog 服务器
- jenkins学习笔记第十七篇 -Jenkins·将一个 Github 项目打包后上传到远程服务器
- 如期而至的SVN服务器迁移引来一个大瓜XAMPP
- 原生Eclipse下Java服务器调试的一个问题
- 《HTML与CSS入门经典(第8版)》——2.4 在没有Web服务器情况下分发内容
- Swift - 做一个简单的无线U盘(手机端Http服务器搭建)
- 配置服务器SSH PAM防止暴力破解
- Windows共享文件夹无法访问,提示“不允许一个用户使用一个以上用户名与服务器或共享资源的多重连接”
- postgres - 以单用户模式运行一个 PostgreSQL服务器
- mysqld_safe启动服务器总结
- web服务器里面一个http请求就是一个线程吗?
- 【探索数据中心采购决策】之刀片服务器与软件定义网络
- 使用socket编程实现一个简单的文件服务器
- 一个简单的Web服务器
- 使用node.js + express框架 搭建一个微型服务器
- 用C#自制一个网页服务器
- 一个简单好用的http服务器
- 部署python项目到linux服务器
- Leaf - 一个由 Go 语言编写的开发效率和执行效率并重的开源游戏服务器框架
- 每天一个python段子(2):一句话http服务器