
rabbitmq笔记(看完即入门)
该笔记是在逼站学习 编程不良人 老师rabbitmq自己记录的笔记,请大家去支持他的课程、买他的笔记(更全更清晰)
链接
一、基础
1、docker安装rabbitmq,下载管理界面
docker pull rabbitmq
docker run -d --hostname my-rabbit --name rabbit -v /home/rabbitmq/data:/var/lib/rabbitmq -p 15672:15672 -p 5672:5672 rabbitmq
docker ps   // 查看启动容器信息
docker exec -it 镜像ID /bin/bash    //开启进入终端
rabbitmq-plugins enable rabbitmq_management    // 安装管理界面
http://linuxip地址:15672,这里的用户名和密码默认都是guest

2、添加用户、虚拟主机
1、添加虚拟主机
 2、添加用户
 3、点击用户名给用户配置可用虚拟主机

3、各个模型简介、简单尝试
<!-- rabbitmq 依赖-->
<dependency>
   <groupId>com.rabbitmq</groupId>
    <artifactId>amqp-client</artifactId>
    <version>5.9.0</version>
</dependency>
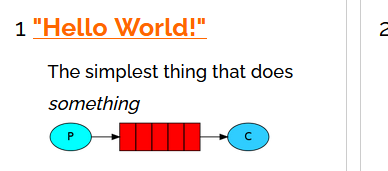
1、helloWord模型(直连)
生产者
public static void main(String[] args) throws IOException, TimeoutException {
		// 创建连接mq的连接工厂
		ConnectionFactory connectionFactory = new ConnectionFactory();
		// 设置连接rabbitmq主机
		connectionFactory.setHost("服务器ip");
		// 设置端口号
		connectionFactory.setPort(5672);
		// 连接连接哪个虚拟主机
		connectionFactory.setVirtualHost("/ems");
		// 设置访问虚拟主机的用户名和密码
		connectionFactory.setUsername("emstest");
		connectionFactory.setPassword("guest");

		// 获取连接对象
		Connection connection = connectionFactory.newConnection();
		// 获取连接通道
		Channel channel = connection.createChannel();
		// 通道绑定对应详细队列
		// 1、对列名称
		// 2、队列是否持久化   (注意点)
		// 3、是否独占队列
		// 4、是否消费完成后自动删除队列    (注意点)
		// 5、额外参数
		channel.queueDeclare("aa",true,false,true,null);
		// 发布消息
		/**
		 * 1、交换机名称  2、对列名称 3、传递参数额外设置(如下面这个  消息持久化 注意:上面是队列持久化、下面是消息持久化) 4、消息的具体内容    (注意点)
		 */
		channel.basicPublish("","aa", MessageProperties.PERSISTENT_TEXT_PLAIN,"hello rabbitmq".getBytes());
		// 关闭消息
		channel.close();
		// 关闭连接
		connection.close();
	}
消费者
// 消费者
// 消费者
public static void main(String[] args) throws IOException, TimeoutException {
// 创建连接工厂
ConnectionFactory connectionFactory = new ConnectionFactory();
connectionFactory.setHost("服务器ip");
connectionFactory.setPort(5672);
connectionFactory.setVirtualHost("/ems");
connectionFactory.setUsername("emstest");
connectionFactory.setPassword("guest");
// 创建连接对象
Connection connection = connectionFactory.newConnection();
// 创建通道
Channel channel = connection.createChannel();
// 绑定对象
channel.queueDeclare("aa",true,false,true,null);
// 消费消息
// 参数1:消费哪个队列消息 队列名称
// 参数2:开启消息的自动确认队列
// 参数3:消费时的回调接口
channel.basicConsume("aa",true,new DefaultConsumer(channel){
@Override // body:消息队列中取出的消息
public void handleDelivery(String consumerTag, Envelope envelope, AMQP.BasicProperties properties, byte[] body) throws IOException {
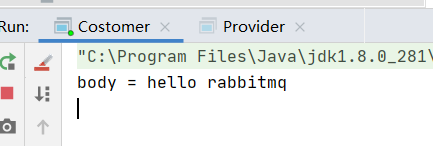
System.out.println("body = " + new String(body));
}
});
}
运行生产者 (消费者收到生产者消息)
2、能者多劳模型(work queues)

1、生产者
channel.queueDeclare("aa",true,false,false,null);
		// 发布消息
		/**
		 * 1、交换机名称  2、对列名称 3、传递参数额外设置(如下面这个  消息持久化 注意:上面是队列持久化、下面是消息持久化) 4、消息的具体内容
		 */
		for (int i = 0; i <20 ; i++) {
			channel.basicPublish("","aa", MessageProperties.PERSISTENT_TEXT_PLAIN,"hello rabbitmq".getBytes());
		}
2、消费者1
		channel.basicQos(1); //每一次只能消费一个消息
		// 绑定对象
		channel.queueDeclare("aa",true,false,false,null);
		// 消费消息
		// 参数1:消费哪个队列消息   队列名称
		// 参数2:开启消息的自动确认队列
		// 参数3:消费时的回调接口
		channel.basicConsume("aa",true,new DefaultConsumer(channel){
			@Override  // body:消息队列中取出的消息
			public void handleDelivery(String consumerTag, Envelope envelope, AMQP.BasicProperties properties, byte[] body) throws IOException {
				try {
					Thread.sleep(2000);
				} catch (InterruptedException e) {
					e.printStackTrace();
				}
				System.out.println("body = " + new String(body));
				// 手动确认  参数1:手动确认消息标识,   参数2:false 每次确认一次
				channel.basicAck(envelope.getDeliveryTag(),false);
			}
		});
3、消费者2 (消费多一点)
		channel.basicQos(1); //每一次只能消费一个消息
		// 绑定对象
		channel.queueDeclare("aa",true,false,false,null);
		// 消费消息
		// 参数1:消费哪个队列消息   队列名称
		// 参数2:开启消息的自动确认队列
		// 参数3:消费时的回调接口
		channel.basicConsume("aa",true,new DefaultConsumer(channel){
			@Override  // body:消息队列中取出的消息
			public void handleDelivery(String consumerTag, Envelope envelope, AMQP.BasicProperties properties, byte[] body) throws IOException {

				System.out.println("body1 = " + new String(body));
				// 手动确认  参数1:手动确认消息标识,   参数2:false 每次确认一次
				channel.basicAck(envelope.getDeliveryTag(),false);
			}
		});
连接工具类
package com.example.rabbitmq.util;

import com.rabbitmq.client.Channel;
import com.rabbitmq.client.Connection;
import com.rabbitmq.client.ConnectionFactory;
import org.springframework.beans.factory.annotation.Autowired;
import org.springframework.boot.context.properties.ConfigurationProperties;

import java.io.IOException;
import java.util.concurrent.TimeoutException;


public class RabbitmqUtils {

	private static ConnectionFactory connectionFactory;
	static {
		// 设置连接rabbitmq主机
		connectionFactory.setHost("服务器ip");
		// 设置端口号
		connectionFactory.setPort(5672);
		// 连接连接哪个虚拟主机
		connectionFactory.setVirtualHost("/ems");
		// 设置访问虚拟主机的用户名和密码
		connectionFactory.setUsername("emstest");
		connectionFactory.setPassword("guest");
	}

	// 定义提供连接对象的方法
	public static Connection getConnection(){
		try {
			// 创建连接mq的连接工厂
			return connectionFactory.newConnection();

		} catch (Exception e) {
			e.printStackTrace();
		}
		return null;
	}

	public static void closeConnectionAndChanel(Channel channel,Connection connection){
		try {
			if (channel!=null) channel.close();
			if (connection!=null) connection.close();
		} catch (IOException e) {
			e.printStackTrace();
		} catch (TimeoutException e) {
			e.printStackTrace();
		}
	}

}
3、fanout(扇出、广播)模型(publish/Subscribe)

广播模型,消息发送流程:
1、可以有多个消费者
2、 每个消费者有自己的queue(队列)
3、生产者发送消息,只能发送到交换机,交换机来决定发给哪个队列,生产者无法决定。
4、交换机把消息发送给绑定过的所有队列
5、队列的消费者都能拿到消息,实现一条消息被多个消费者消费
1、生产者
	public static void main(String[] args) throws IOException {
		// 连接对象
		Connection connection = RabbitmqUtils.getConnection();
		//创建通道
		Channel channel = connection.createChannel();

		// 将通道声名指定的交换机
		// 参数1:交换机名称  参数2:交换机类型   fanout:广播型
		//没有这个交换机会自动创建
		channel.exchangeDeclare("logs", "fanout");

		// 发送消息
		channel.basicPublish("logs", "", null, "fanout type message".getBytes());
		//释放资源
		RabbitmqUtils.closeConnectionAndChanel(channel, connection);
	}
新增了交换机,fanout类型

2、多个消费者
public static void main(String[] args) throws IOException {
		// 获取连接对象
		Connection connection = RabbitmqUtils.getConnection();
		Channel channel = connection.createChannel();

		// 通道绑定交换机
		channel.exchangeDeclare("logs","fanout");

		// 交换机绑定临时队列

		// 生成临时队列
		String queueName = channel.queueDeclare().getQueue();
		// 绑定队列和交换机
		channel.queueBind(queueName,"logs","");
		// 消费消息
		channel.basicConsume(queueName,true,new DefaultConsumer(channel){
			@Override
			public void handleDelivery(String consumerTag, Envelope envelope, AMQP.BasicProperties properties, byte[] body) throws IOException {
				System.out.println("消费者1:"+new String(body));
			}
		});

	}
多个消费者都收到了消息

4、路由模型(Routing)订阅模型-Direct(直连)
1、队列与交换机锁定,不能是任意绑定了,而是要指定一个RoutingKey(路由key)
2、 消息发送方在向Exchange发送消息时,也必须指定消息的RoutingKey。
3、Exchange不再把消息交给每一个绑定的队列,而是根据消息的Routing key 进行判断,只有队列的Routing key 与消息的Routing key 完全一致,才
会接收到消息流程
 图解:
图解:
P: 生产者,向Exchange发送消息,发送消息时,会指定一个routing key.
X: Exchange(交换机),接收生产者的消息,然后把消息递交给与routing key完全匹配的队列
C1: 消费者,其所在队列指定了需要routing key为error的消息
C2: 消费者,其所在队列指定了需要routing key为info、error、warning的消息
1、生产者
发送routingKey 为 info的信息
	public static void main(String[] args) throws IOException {
		// 连接对象
		Connection connection = RabbitmqUtils.getConnection();
		//创建通道
		Channel channel = connection.createChannel();
		// 将通道声名指定的交换机
		// 参数1:交换机名称  参数2:交换机类型   direct:路由模式
		//没有这个交换机会自动创建
		channel.exchangeDeclare("logs_direct", "direct");
		// 发送消息
		String routingKey = "info";   //发送info的信息
		channel.basicPublish("logs_direct",routingKey,null,("基于routingKey:"+routingKey+"的direct模型").getBytes());
		//关闭资源
		RabbitmqUtils.closeConnectionAndChanel(channel,connection);
	}
2、消费者1
只接收 error 信息
public static void main(String[] args) throws IOException {
		// 获取连接对象
		Connection connection = RabbitmqUtils.getConnection();
		Channel channel = connection.createChannel();

		// 通道绑定交换机
		channel.exchangeDeclare("logs_direct","direct");
		// 生成临时队列
		String queueName = channel.queueDeclare().getQueue();
		// 绑定队列和交换机
		// 这个队列只去找error的消息进行消费
		channel.queueBind(queueName,"logs_direct","error");
		// 获取消费消息
		channel.basicConsume(queueName,true,new DefaultConsumer(channel){
			@Override
			public void handleDelivery(String consumerTag, Envelope envelope, AMQP.BasicProperties properties, byte[] body) throws IOException {
				System.out.println("消费者1只拿error:"+new String(body));
			}
		});
	}
3、消费者2
可以接收 info、error、warning信息
public static void main(String[] args) throws IOException {
		// 获取连接对象
		Connection connection = RabbitmqUtils.getConnection();
		Channel channel = connection.createChannel();

		// 通道绑定交换机
		channel.exchangeDeclare("logs_direct","direct");
		// 生成临时队列
		String queueName = channel.queueDeclare().getQueue();
		// 绑定队列和交换机
		channel.queueBind(queueName,"logs_direct","error");
		channel.queueBind(queueName,"logs_direct","info");
		channel.queueBind(queueName,"logs_direct","warning");
		// 获取消费消息
		channel.basicConsume(queueName,true,new DefaultConsumer(channel){
			@Override
			public void handleDelivery(String consumerTag, Envelope envelope, AMQP.BasicProperties properties, byte[] body) throws IOException {
				System.out.println("消费者2都拿:"+new String(body));
			}
		});
	}
运行只有消费者2接收到信息

5、Topic模型
与direct模型相比,多了个可以使用通配符!,这种模型Routingkey一般都是由一个或多个单词组成,多个单词之间以"."分割,例如:item.insert
*号 匹配一个1词 , 例audit.*
#号匹配一个或多个词audit.#

生产者
public static void main(String[] args) throws IOException {
		Connection connection = RabbitmqUtils.getConnection();
		Channel channel = connection.createChannel();
		// 声明交换机类型 topic
		channel.exchangeDeclare("topics","topic");

		// 发布消息
		String routingKey = "user.save";
		channel.basicPublish("topics",routingKey,null,("这是topic动态路由模型,routingKey:"+routingKey).getBytes());

		//关闭资源
		RabbitmqUtils.closeConnectionAndChanel(channel,connection);
	}
消费者1(使用通配符*)
public static void main(String[] args) throws IOException {
// 获取连接
Connection connection = RabbitmqUtils.getConnection();
Channel channel = connection.createChannel();
//声明交换机以及交换机类型
channel.exchangeDeclare("topics","topic");
// 创建一个临时队列
String queue = channel.queueDeclare().getQueue();
// 绑定队列和交换机 动态通配符形式 routingKey
channel.queueBind(queue,"topics","user.*");
// 消费消息
channel.basicConsume(queue,true,new DefaultConsumer(channel){
@Override
public void handleDelivery(String consumerTag, Envelope envelope, AMQP.BasicProperties properties, byte[] body) throws IOException {
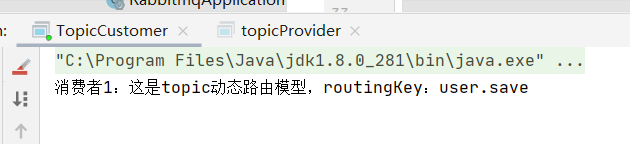
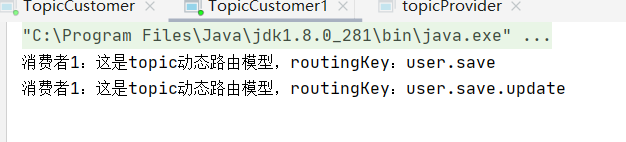
System.out.println("消费者1:"+new String(body));
}
});
}
 也可两边*号

消费者2(使用通配符#)
public static void main(String[] args) throws IOException {
		// 获取连接
		Connection connection = RabbitmqUtils.getConnection();
		Channel channel = connection.createChannel();

		//声明交换机以及交换机类型
		channel.exchangeDeclare("topics","topic");
		// 创建一个临时队列
		String queue = channel.queueDeclare().getQueue();

		// 绑定队列和交换机  动态通配符形式 routingKey
		channel.queueBind(queue,"topics","user.#");

		// 消费消息
		channel.basicConsume(queue,true,new DefaultConsumer(channel){
			@Override
			public void handleDelivery(String consumerTag, Envelope envelope, AMQP.BasicProperties properties, byte[] body) throws IOException {
				System.out.println("消费者1:"+new String(body));
			}
		});
	}
二、整合springboot
      <dependency>
            <groupId>org.springframework.boot</groupId>
            <artifactId>spring-boot-starter-amqp</artifactId>
            <version>2.3.5.RELEASE</version>
        </dependency>
yml配置
spring:
  application:
    name: rabbitmq-springboot

  rabbitmq:
    host: 服务器ip
    port: 5672
    username: emstest
    password: guest
    virtual-host: /ems
队列是在消费者建立,只有生产者没有消费者不会建立
1、hello word
生产者
// 注入rabbitTemplate
	@Autowired
	private RabbitTemplate rabbitTemplate;

	// hell word
	@Test
	public void helloWordTest(){
		rabbitTemplate.convertAndSend("hello","hello word");
	}
消费者
@Component
// 消费监听 ,指定队列名称
@RabbitListener(queuesToDeclare = @Queue("hello"))
public class HelloCustomer {

	@RabbitHandler
	public void receivel(String message){
		System.out.println("message = " + message);
	}
}
默认持久、非独占、不自动删除

2、work模型
生产者
// work
	@Test
	public void workTest(){
		for (int i = 0; i < 10; i++) {
			rabbitTemplate.convertAndSend("work","work 模型");
		}

	}
公平消费
消费者
@Component
// @RabbitListener也作用在方法上
public class WorkCustomer {

	@RabbitListener(queuesToDeclare = @Queue("work"))
	public void receivel1(String message){
		System.out.println("message = " + message);
	}

	@RabbitListener(queuesToDeclare = @Queue("work"))
	public void receivel2(String message){
		System.out.println("message2 = " + message);
	}
}

3、publish/Subscribe(广播)
生产者
// fanout
@Test
public void fanoutTest(){
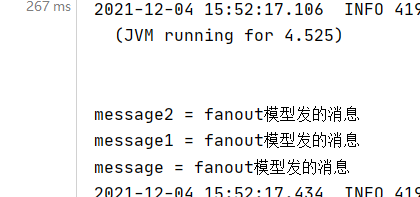
rabbitTemplate.convertAndSend("logList","","fanout模型发的消息");
}
消费者
	@RabbitListener(bindings = {@QueueBinding(value = @Queue,exchange = @Exchange(value = "logList",type = "fanout"))})
	public void reveivel(String message){
		System.out.println("message = " + message);
	}

	@RabbitListener(bindings = {@QueueBinding(value = @Queue,exchange = @Exchange(value = "logList",type = "fanout"))})
	public void reveivel2(String message){
		System.out.println("message1 = " + message);
	}

	@RabbitListener(bindings = {@QueueBinding(value = @Queue,exchange = @Exchange(value = "logList",type = "fanout"))})
	public void reveivel3(String message){
		System.out.println("message2 = " + message);
	}
4、Routing模型
生产者
// 路由模型
@Test
public void routeTest(){
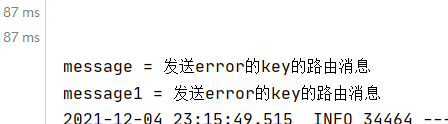
rabbitTemplate.convertAndSend("direstList","info","发送info的key的路由消息");
}
消费者1: 接收info、erroe消息
消费者2:只接收error消息
	@RabbitListener(bindings = {@QueueBinding(value = @Queue,exchange = @Exchange(value = "direstList",type = "direct"),key = {"info","error"})})
	public void receivel(String message){
		System.out.println("message = " + message);
	}

	@RabbitListener(bindings = {@QueueBinding(value = @Queue,exchange = @Exchange(value = "direstList",type = "direct"),key = {"error"})})
	public void receivel1(String message){
		System.out.println("message1 = " + message);
	}
发送info消息
 发送error消息
5、Topic模型
生产者
// topic 动态路由 订阅模式
@Test
public void topicTest(){
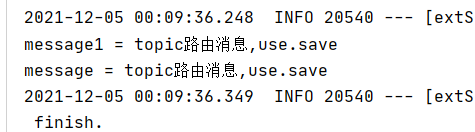
rabbitTemplate.convertAndSend("topicList","user.save","topic路由消息,use.save");
}
消费者1:能消费,user.save , user.*(代表通配符,任意一个字段)
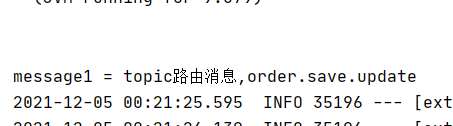
消费者2: 能消费,user. * , order.# (#号代表一个或多个字段)
	@RabbitListener(bindings = {@QueueBinding(value = @Queue,exchange = @Exchange(type = "topic",name = "topicList"),key = {"user.save","user.*"})})
	public void recevicel(String message){
		System.out.println("message = " + message);
	}

	@RabbitListener(bindings = {@QueueBinding(value = @Queue,exchange = @Exchange(type = "topic",name = "topicList"),key = {"order.#","user.*"})})
	public void recevicel1(String message){
		System.out.println("message1 = " + message);
	}
发送 user.save消息
发送order.save.update消息
6、发送对象
 接收对象改为map,如果是实体类要实现Serializable序列化

三、业务场景
1、异步
如: 用户注册发送,注册邮件、注册短信,
传统做法:
1、串行 (先发送邮件、再发短信)。问题:持续时间长

2、并行(将注册信息写入数据库后,同时发送邮件、短信),速度快、但不能满足高吞吐需求。

消息队列做法:

将数据写入数据库、同时发送消息给发送邮件和注册,异步处理
2、应用解耦
如:双十一购物节,用户下单后、订单系统通知库存系统。
传统做法:

订单系统调用库存系统接口。问题:库存接口故障,订单就会失败,而损失大量订单
消息队列做法

订单系统:下单,订单系统完成持久化,将消息写入队列,返回下单成功给用户
库存系统:订阅下单的消息,获取下单消息,进行库操作,就算库存系统故障,消息队列也能保证消息可靠投递,不会导致消息丢失。
3、流量削峰
如:秒杀活动、一般会因为流量过大,导致应用挂掉,一般在应用前端加入消息队列。
作用:1、可以控制活动人数,超过一定阈值,订单直接丢弃
2、可以缓解短时间的高流量压垮应用(应用程序按自己的最大处理能力获取订单)
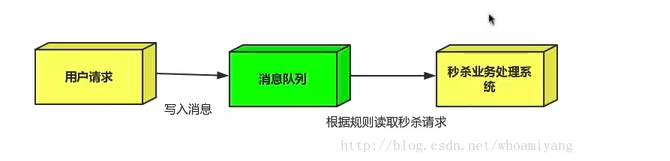
1、用户的请求,服务器收到后,首先写入消息队列,加入消息队列长度最大值,则直接抛弃用户请求或跳转到错误页面
2、秒杀业务根据消息队列中的请求信息,再做后续处理
四、集群
1、普通集群

1、新建三个docker容器
docker run -d --hostname rabbit1 --name myrabbit1  -v /home/rabbitmq/data:/var/lib/rabbitmq -p 15671:15672 -p 5671:5672 rabbitmq

docker run -d --hostname rabbit2 --name myrabbit2  -v /home/rabbitmq/data:/var/lib/rabbitmq -p 15672:15672 -p 5672:5672 --link myrabbit1:rabbit1 rabbitmq

docker run -d --hostname rabbit3 --name myrabbit3  -v /home/rabbitmq/data:/var/lib/rabbitmq -p 15673:15672 -p 5673:5672 --link myrabbit1:rabbit1 --link myrabbit2:rabbit2 rabbitmq
2、三个都进入容器下载可视化工具
 3、进入第一个mq容器重启
docker exec -it ef4a1f0fade7 /bin/bash
rabbitmqctl stop_app
rabbitmqctl reset
rabbitmqctl start_app
exit
4、进入第二个 和 第三个 mq容器执行
docker exec -it e36d94d40008 /bin/bash
rabbitmqctl stop_app
rabbitmqctl reset
rabbitmqctl join_cluster --ram rabbit@rabbit1   //如遇到报错再执行上句、再继续执行
rabbitmqctl start_app
exit
5、进去mq可视化界面,overview面板中的Nodes可查看到节点信息。

6、测试,在mq上新建交换机、其余两个也出现新建的交换机
 此时普通集群以构建完成
1、此种集群主节点down掉后,消费者也无法消费从节点的消息,不能做故障转移,只能当作备份。
2、主节点正常,从节点则可以消费消息
2、镜像集群(高可用)(推荐)
这种集群弥补第一种的缺陷,需在普通集群的基础下搭建(确保第一种集群可用)
镜像队列机制就是将队列在三个节点之间设置主从关系,消息会在三个节点之间进行自动同步,且如果其中一个节点不可用,并不会导致消息丢失或服务不可用的情况,提升mq集群的高可用性。
 1、配置集群架构
 2、进入任意节点配置策略
docker exec -it ef4a1f0fade7 /bin/bash


rabbitmqctl set_policy ha-all "^rabbitmq" '{"ha-mode":"all","ha-sync-mode":"automatic"}'
3、测试,新建一个rabbitmq开头的队列

此时某个节点down掉(包括主节点),其余节点也能消费
将主节点down掉,节点自动切换

4、清除策略
rabbitmqctl clear_policy ha-all
五、与其他mq的区别

相关文章
- 神经网络与机器学习 笔记—复制器(恒等)映射
- HaaS600物联网开发板学习笔记(二)---轻应用方式让LED闪烁起来
- python2 httplib 笔记
- Python 3.6学习笔记(一)
- 计算机网络笔记总结:Part2 物理层
- 《真实的幸福》听书笔记
- CSDN生存笔记之分配比例调整
- <Multi-View Image Classification With Visual, Semantic and View Consistency>笔记
- 外设驱动库开发笔记51:SDP800差压传感器驱动
- Tensorflow入门与实战学习笔记(十一)-预训练网络
- 30天自制操作系统笔记(九十)——源码
- PL/pgSQL学习笔记之七
- [ExtJS5学习笔记]第三十五条 sencha extjs 5 组件查询方法
- Linux学习笔记(3)linux服务管理与启停(开机自启与自定义服务)
- 狂神说笔记——Java SE基础03
- SPP-Net(Spatial Pyramid Pooling Network)论文笔记
- 论文阅读笔记CVPR2020 Semantic Image Manipulation Using Scene Graphs