
JBPM流程部署之流程支持节点扩展
JBPM流程部署之流程支持节点扩展
流程引擎支持的节点类型在很大的程度上决定了流程引擎对现实业务的支持能力,同时也需要能够灵活的扩展节点类型。通过上篇对流程部署环境的初始化,我们大致的了解到JBPM不仅提供能了众多的节点类型,这些节点基本上可以满足大部分的一般业务需求;同时我们也可以灵活的控制是否使用现有节点的某种类型;当然我们也可以灵活的扩展现有的节点类型和自定义节点的类型;那么现在我们来通过代码来体验JBPM流程引擎灵活的扩展性。
屏蔽JBPM流程引擎原有节点类型
如果我们不想使用JBPM本身提供的某种节点类型(例如hql),那么我们可以屏蔽掉它;我们知道JBPM在jbpm.jpdl.bindings.xml中定义了流程支持的节点类型,所以我们只要将相应的元素注释掉就可以了!
< activity binding ="org.jbpm.jpdl.internal.activity.JoinBinding" />
<!-- <activity binding="org.jbpm.jpdl.internal.activity.HqlBinding" /> -->
< activity binding ="org.jbpm.jpdl.internal.activity.SqlBinding" />
< activity binding ="org.jbpm.jpdl.internal.activity.JavaBinding" />
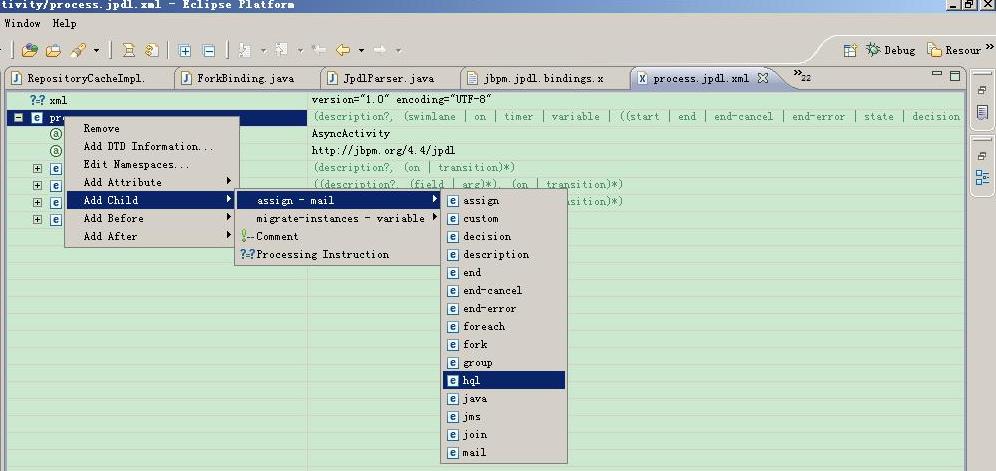
这样我们流程引擎不会解析流程定义中的hql元素,但是现在还存在一个小问题,我们来看看下边的图片
eclipse中手动编写流程定义xml
vs中手动编写流程定义xml
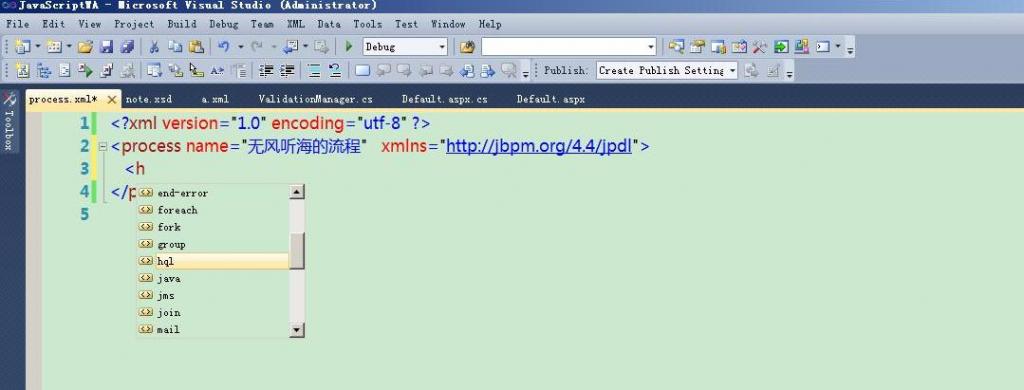
从图中我们可以看到,编写流程定义xml还是有hql的提示,同时含有hql元素的流程定义也是可以发布成功的;在实际的工作流程业务系统中,我们很多时候提供给用户的是bs或者cs的流程设计器,他们基本上不会知道流程定义xml为何物;但是追求完美的我们还是希望避免这种情况,特别是在xml中定义了hql元素时,最好可以在发布流程时给予提示。从两种IDE的图片中,我们可以想到XSD,那么现在XSD就派上用场了(对xsd验证xml不熟悉,可以看我前边的文章),只要我们注释掉XSD中hql的定义就可以了。
<!--mod by 无风听海 -->
<annotation>
<documentation>Performs a Hibernate query.</documentation>
</annotation>
<complexType>
<complexContent>
<extension base="tns:qlType">
<choice minOccurs="0" maxOccurs="unbounded">
<element ref="tns:on" />
<element ref="tns:transition" />
</choice>
<attributeGroup ref="tns:activityAttributes" />
</extension>
</complexContent>
</complexType>
</element> -->
注释掉后vs IDE不在提示hql元素

发布含有hql元素的流程定义抛出错误提示
扩展JBPM流程引擎的现有节点类型
很多的时候我们根据自己的特定业务需求,需要给系统中的某个节点添加属性,并不需要增加新的节点类型;同样我们只需要在XSD中添加相应的属性设置,以便流程发布的时候进行校验;同时我们需要在相应的类中修改一些代码;
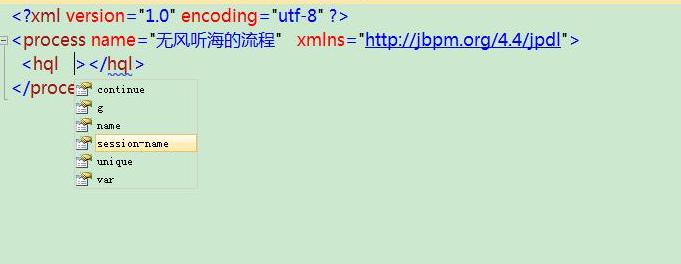
在XSD文件中的hql元素定义下添加属性session-name
< annotation >
< documentation > Performs a Hibernate query. </ documentation >
</ annotation >
< complexType >
< complexContent >
< extension base ="tns:qlType" >
< choice minOccurs ="0" maxOccurs ="unbounded" >
< element ref ="tns:on" />
< element ref ="tns:transition" />
</ choice >
< attributeGroup ref ="tns:activityAttributes" />
//mod by 无风听海
//新增属性session-name
< attribute name ="session-name" type ="string" />
//end
</ extension >
</ complexContent >
</ complexType >
</ element >
修改后我们编写xml是有提示了
我们需要修改HqlActivity,添加属性sessionName来承载xml中设置的名称,然后在执行时选择我们指定名称的session,这样我们就可以根据不同的业务需求在不同的数据库中来执行我们的hql语句。下面只是摘录了修改部分的代码
private static final Log log = Log.getLog(HqlActivity. class .getName());
private static final long serialVersionUID = 1L ;
protected String query;
protected ListDescriptor parametersDescriptor;
protected String resultVariableName;
protected boolean isResultUnique;
// add by 无风听海
// 定义我们自己的自定义属性
protected String sessionName;
// end
public void perform(OpenExecution execution) {
EnvironmentImpl environment = EnvironmentImpl.getCurrent();
if (environment == null ) {
throw new JbpmException( " no environment for jpdl activity " + HqlBinding.TAG);
}
// mod by 无风听海
// 原来是直接获取系统默认的数据库的session
// Session session = environment.get(Session.class);
Session session = null ;
// 可以根据配置的名称,选择在不同的数据库中执行
if (sessionName != null && sessionName != "" )
{
session = (Session)environment.get(sessionName, true );
}
else
{
session = environment.get(Session. class );
}
// end
Query q = createQuery(session);
..................
..................
// 解析xml中的session-name属性时调用
public void setSessionName(String sessionName)
{
this .sessionName = sessionName;
}
接下来我们需要修改HqlBinding,我在这里解析xml中定义的session-name属性,并将其值赋给HqlActivity的相关属性,其部分代码如下
public static final String TAG = " hql " ;
public HqlBinding() {
super (TAG);
}
protected HqlBinding(String tagName) {
super (tagName);
}
public Object parseJpdl(Element element, Parse parse, JpdlParser parser) {
HqlActivity hqlActivity = createHqlActivity();
// add by 无风听海
String sessionName = XmlUtil.attribute(element, " session-name " , parse);
hqlActivity.setSessionName(sessionName);
// end
通过这样简单的修改,我们的hql节点就可以根据设置的session-name,来在不同的数据库(其实应该将session-name解析成表达式,然后执行时执行表达式获取不同的sessionName)中执行。
增加新的自定义节点类型
其实JBPM在xsd中已经为我们提供custom元素,以方便我们最现有节点的扩展;
xsd中定义了custom元素
< element name ="custom" >
< annotation >
< documentation > Calls a user defined, custom implementation of
ActivityBehaviour. </ documentation >
</ annotation >
< complexType >
< complexContent >
< extension base ="tns:wireObjectType" >
< choice minOccurs ="0" maxOccurs ="unbounded" >
< element ref ="tns:on" />
< element name ="transition" >
< complexType >
< complexContent >
< extension base ="tns:transitionType" >
< sequence >
< element ref ="tns:timer" minOccurs ="0" />
</ sequence >
</ extension >
</ complexContent >
</ complexType >
</ element >
</ choice >
< attributeGroup ref ="tns:activityAttributes" />
</ extension >
</ complexContent >
</ complexType >
</ element >
我们可以在流程定义中这样引用我们自定义的节点类
class ="org.jbpm.examples.custom.PrintDots"
g ="96,16,100,52" >
< transition to ="end" />
</ custom >
这样可以根据业务的需要,轻松的实现自定义节点;但是这样的话,我们增加的每种节点类型,在流程设计器中的设置属性都相同,不能根据不同的节点类型实现不同的配置。所以我们需要定义新的节点类型。
xsd新增节点类型
<!-- ~~~ PrintMsg ~~~~~~~~~~~~~~~~~~~~~~~~~~~~~~~~~~~~~~~~~~~~~~~~~~~~~~~~ -->
< element name ="PrintMsg" >
< annotation >
< documentation > print dots. </ documentation >
</ annotation >
< complexType >
< sequence >
< element name ="description" minOccurs ="0" type ="string" />
< choice minOccurs ="0" maxOccurs ="unbounded" >
< element ref ="tns:on" />
< element ref ="tns:transition" />
</ choice >
</ sequence >
< attributeGroup ref ="tns:activityAttributes" />
< attribute name ="msg" type ="string" >
< annotation >
< documentation > the message will print. </ documentation >
</ annotation >
</ attribute >
</ complexType >
</ element >
<!-- end -->
在IDE中编写流程定义xml

编写PrintMsgBinding类,解析我们个性化定制的属性msg
public static final String TAG = " PrintMsg " ;
public HqlBinding() {
super (TAG);
}
protected PrintMsgBinding(String tagName) {
super (tagName);
}
public Object parseJpdl(Element element, Parse parse, JpdlParser parser) {
PrintMsgActivity printMsgActivity = createPrintMsgActivity ();
String sessionName = XmlUtil.attribute(element, " msg " , parse);
printMsgActivity.setMsg(msg);
return printMsgActivity
}
protected PrintMsgActivity createPrintMsgActivity () {
return new PrintMsgActivity ();
}
}
编写PrintMsgActivity类,在流程实例运行到该类型的节点时,打印设置的msg
private static final Log log = Log.getLog(PrintMsgActivity . class .getName());
private static final long serialVersionUID = 1L ;
protected String msg;
public void perform(OpenExecution execution) {
System.out.println(msg);
}
public void setMsg(String msg)
{
this .msg = msg;
}
}
然后我们需要在jbpm.jpdl.bindings.xml中添加我们的PrintMsgBinding,从而使流程加载我们新增的节点类型
这样我们就完成了新的节点类型的添加,这个例子只是为了简单的说明增加新的节点类型的过程,例子中的节点本身没有什么业务意义,同时我们在实际开发中在节点中直接调用ui!