
Android 学习笔记(4)—— ToggleButton 、Switch
2023-09-27 14:28:04 时间
作者:夏至 欢迎转载,也请保留这段申明,谢谢
在UI中呢,开关按钮中呢,我们使用最多是ToggleButton 和 Switch,不过Switch支持4.0以上的SDK,低于4.0的会报错,那么他们两个的性质是一样的,这里我们就同一来实现这些效果.
要实践的效果图:
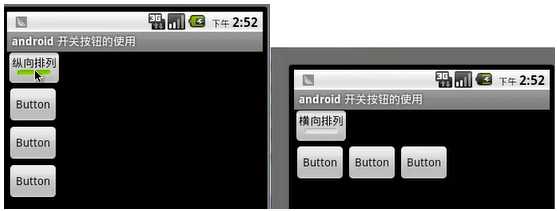
1. ToggleButton(开关按钮)
可供我们设置的属性:
- android:textOff:按钮没有被选中时显示的文字
- android:textOn:按钮被选中时显示的文字
所以,我们对togglebutton的设置如下:
<ToggleButton
    android:id="@+id/togglebutton"
    android:layout_width="wrap_content"
    android:layout_height="wrap_content"
    android:checked="true"
    android:textOn="横向排列"
    android:textOff="纵向排列"
/>
ok, 我们把ToggleButton 设置好了,接下来也添加和它相似的组件即Switch 。
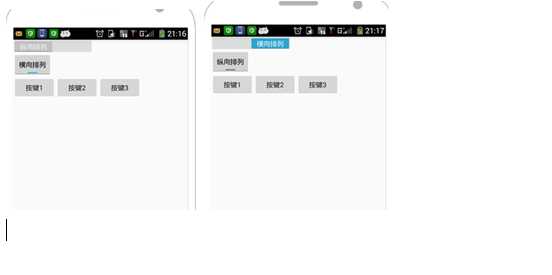
2. Switch
可供我们设置的属性::
android:showText:设置on/off的时候是否显示文字,boolean
android:splitTrack:是否设置一个间隙,让滑块与底部图片分隔,boolean
android:switchMinWidth:设置开关的最小宽度
android:switchPadding:设置滑块内文字的间隔
android:switchTextAppearance:设置开关的文字外观,暂时没发现有 什么用…
android:textOff:按钮没有被选中时显示的文字
android:textOn:按钮被选中时显示的文字
android:textStyle:文字风格,粗体,斜体写划线那些
android:track:底部的图片
android:thumb:滑块的图片
所以,我们对switch的配置如下:
<Switch
    android:id="@+id/swichd"
    android:showText="true"
    android:splitTrack="true"
    android:layout_width="wrap_content"
    android:layout_height="wrap_content"
    android:textOff="纵向排列"
    android:textOn="横向排列">
那么,我们实现上面的横向和竖向的反转,最简单的就是多写一个线性布局,嵌到第一个里面,简单的来说,就是在上面的基础上写下下面这些代码:
<LinearLayout
    xmlns:android="http://schemas.android.com/apk/res/android"
    android:id="@+id/Mylayout"
    android:orientation="vertical"
    android:layout_width="match_parent"
    android:layout_height="wrap_content">
    <Button
    android:id="@+id/button1"
    android:layout_width="wrap_content"
    android:layout_height="wrap_content"
    android:text="按键1"/>
    <Button
        android:id="@+id/button2"
        android:layout_width="wrap_content"
        android:layout_height="wrap_content"
        android:text="按键2"/>
    <Button
        android:id="@+id/button3"
        android:layout_width="wrap_content"
        android:layout_height="wrap_content"
        android:text="按键3"/>
</LinearLayout>
Ok,我们布局已经写好,那么接下来就是对主活动代码书写了。
....
toggleButton = (ToggleButton)findViewById(R.id.togglebutton);
aSwitch = (Switch)findViewById(R.id.swichd);
final LinearLayout linearLayout = (LinearLayout)findViewById(R.id.Mylayout);
aSwitch.setOnCheckedChangeListener(new CompoundButton.OnCheckedChangeListener() {
@Override

// Switch按键状态变换时触发按钮
public void onCheckedChanged(CompoundButton buttonView, boolean isChecked) {
if(buttonView.isChecked()){
    linearLayout.setOrientation(LinearLayout.HORIZONTAL); //竖直
}else{
    linearLayout.setOrientation(LinearLayout.VERTICAL); //竖直
}
    }
});

// ToggleButon 按键状态改变触发按钮
toggleButton.setOnCheckedChangeListener(new CompoundButton.OnCheckedChangeListener() {
@Override
public void onCheckedChanged(CompoundButton buttonView, boolean isChecked) {
if(buttonView.isChecked()){
    linearLayout.setOrientation(LinearLayout.HORIZONTAL); //竖直
}else{
   linearLayout.setOrientation(LinearLayout.VERTICAL); //竖直
}
    }
});
这样就能实现上面的效果了,其中还多了个开关switch哦,快去实践一下吧:
如有错误,欢迎指出,如果喜欢,欢迎收藏!
相关文章
- Android学习笔记四
- Android学习笔记————利用JDBC连接服务器数据库
- Android学习笔记之AutoCompleteTextView自己主动填充功能的案例
- DELPHI XE Android 开发笔记
- 关于使用Delphi XE10 进行android开发的一些总结
- Android 开发艺术探索(笔记)--1. Activity 生命周期
- Android Ant打包笔记
- 《Android系统开发》笔记
- android PreferenceScreen使用笔记
- Android进阶笔记:AIDL内部实现详解 (一)
- [笔记]Android开发环境配置及HelloWorld程序
- Android 经典笔记之八:CountDownTimer解读
- Android实战——Activity超详细学习笔记
- android开发之this.finish()的使用 分类: android 学习笔记 2015-07-18 19:05 30人阅读 评论(0) 收藏
- AndroidManifest.xml中的application中的name属性 分类: android 学习笔记 2015-07-17 16:51 116人阅读 评论(0) 收藏
- 修改android应用包名 分类: android 学习笔记 2015-07-16 22:48 4人阅读 评论(0) 收藏
- android开发之AlertDialog点击按钮之后不消失 分类: android 学习笔记 2015-07-15 18:07 89人阅读 评论(0) 收藏
- Android开发笔记(一百四十五)仿应用宝的垃圾清理动画
- Android开发笔记(十六)秋千摇摆动画SwingAnimation
- Android 学习笔记(8)——AlertDialog
- Android 学习笔记(5)—— ProgressBar
- Android 学习笔记(3)—— ImageView/RadioButton/CheckBox
- Android udp编程笔记 1