
Android学习之RecylerView实习仿支付宝充值界面
今天周末,闲来无事,做了一个仿支付宝充值界面,主要知识点用RecylerView的GridlayoutManager布局管理器,实现不同数据类型,填充不同布局,功能包括单击选中,双击取消,支持可输入金额等。
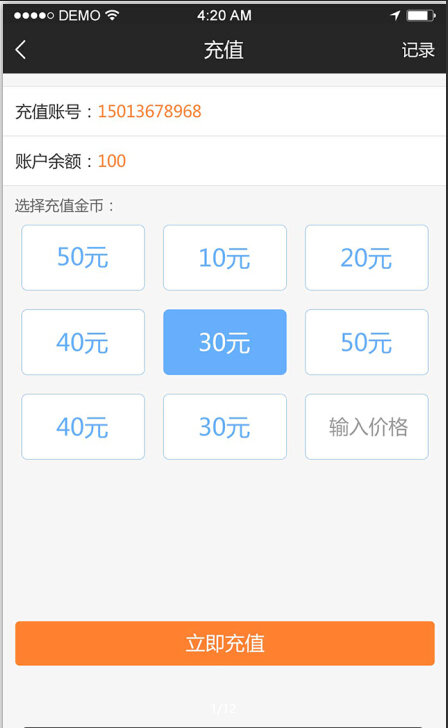
首先来看一下设计图
ok,首先我们来分析一下功能
主体部分实现是由recylerview来实现,因为考虑到扩展性,所以一般都不会用xml来实现主体界面,支持点击选中,再次点击取消选中。
采用RecylerView的GridlayoutManager布局管理器,分三列,这些都类似于GridView,不作解释,难点在于(adapter如何实现两种布局),因为还包含了可输入的EditText。
哈哈,其实RecylerView早就解决了这个问题
分析完毕,下面来看实现方式吧。
添加依赖
  //noinspection GradleCompatible
    compile 'com.android.support:recyclerview-v7:24.0.0-alpha1'
这个根据自己SDK的版本号进行选择。
RecylerView的初始化
  recyclerView.setHasFixedSize(true);
  recyclerView.setLayoutManager(new GridLayoutManager(this, 3));
  recyclerView.setAdapter(adapter = new DemoAdapter());
  adapter.replaceAll(getData());
这里采用GridLayoutManager布局管理器,分三列。
数据填充
    public ArrayList<ItemModel> getData() {
        ArrayList<ItemModel> list = new ArrayList<>();
        for (int i = 0; i < 8; i++) {
            String count = i + "元";
            list.add(new ItemModel(ItemModel.ONE, count));
        }
        list.add(new ItemModel(ItemModel.TWO, null));

        return list;
这里是很有意思的地方,大家可以看出来集合里包含了两种不同类型的数据,ItemModel.ONE,ItemModel.TWO,通过不同的数据类型,我们可以选用不同的布局
   @Override
    public DemoAdapter.BaseViewHolder onCreateViewHolder(ViewGroup parent, int viewType) {
        switch (viewType) {
            case ItemModel.ONE:
                return new OneViewHolder(LayoutInflater.from(parent.getContext()).inflate(R.layout.one, parent, false));
            case ItemModel.TWO:
                return new TWoViewHolder(LayoutInflater.from(parent.getContext()).inflate(R.layout.two, parent, false));
        }
        return null;
    }
这里对不同的viewType,采用不同的ViewHolder,这里是重点,大家揣摩一下。
adapter布局则是一个TextView,跟EditText。
<?xml version="1.0" encoding="utf-8"?>
<LinearLayout xmlns:android="http://schemas.android.com/apk/res/android"
    android:layout_width="match_parent"
    android:layout_height="wrap_content"
    android:orientation="vertical">

    <TextView
        android:id="@+id/tv"
        android:layout_width="match_parent"
        android:layout_height="match_parent"
        android:gravity="center"
        android:layout_margin="8dp"
        android:padding="12dp"
        android:background="@drawable/tv_bg"
        android:textColor="@color/blue_500" />
</LinearLayout>
<?xml version="1.0" encoding="utf-8"?>
<LinearLayout xmlns:android="http://schemas.android.com/apk/res/android"
android:layout_width="match_parent"
android:layout_height="wrap_content"
android:orientation="vertical">
<EditText
android:id="@+id/et"
android:layout_width="match_parent"
android:layout_height="match_parent"
android:layout_margin="8dp"
android:gravity="center"
android:hint="输入价格"
android:inputType="number"
android:background="@drawable/bg_et"
android:padding="12dp"
android:textSize="12sp" />
</LinearLayout>然后如何实现点击选中状态呢?这需要看我们的Selecor啦
<?xml version="1.0" encoding="utf-8"?>
<selector xmlns:android="http://schemas.android.com/apk/res/android">

    <item android:state_selected="true">
        <shape>
            <corners android:radius="4dp" />
            <solid android:color="@color/blue_500" />
            <stroke android:color="@color/blue_500" android:width="1dp"/>
        </shape>
    </item>
    <item android:state_selected="false">
        <shape>
            <corners android:radius="4dp" />
            <solid android:color="@color/white" />
            <stroke android:color="@color/blue_500" android:width="1dp"/>
        </shape>
    </item>
</selector>
这里可以看出,对于不同的select,设置对应的shape,就能轻松实现选中效果。
那么如何实现只能单选的功能呢?因为我们充值只能选择一种金额。
这里我们需要分析一下。我们在点击一种金额,需要取消其他金额的选中状态。该怎么实现呢?
我们需要设置一个过去选中的位置(int),记为lastSelectIndex,暂且设置为-1.
private int lastPressIndex = -1;获取当前选中的位置
int position = getAdapterPosition();当我们再选中时,需要进行判断,当lastPressIndex==position时,就是双击取消选中状态,将lastPressIndex设置为-1.反之,将lastPressIndex==position。
很好理解吧,因为集合从0开始,设置完之后,我们需要
notifyDataSetChanged();没错,这句话很重要,如果不刷新的话,下面的viewholder就不会重新赋值。
 itemView.setOnClickListener(new View.OnClickListener() {
                @Override
                public void onClick(View v) {
                    Log.e("TAG", "OneViewHolder: ");
                    int position = getAdapterPosition();
                    if (lastPressIndex == position) {
                        lastPressIndex = -1;
                    } else {
                        lastPressIndex = position;
                    }
                    notifyDataSetChanged();


                }

            });
根据lastPressIndex改变select的状态。
if (getAdapterPosition() == lastPressIndex) {
                    tv.setSelected(true);
                    tv.setTextColor(ContextCompat.getColor(itemView.getContext(), R.color.white));

                } else {
                    tv.setSelected(false);
                    tv.setTextColor(ContextCompat.getColor(itemView.getContext(), R.color.blue_500));
                }
嗯关键点就这么哆啦。效果图

这里主要解释实现的难点,重点,就不一一贴代码啦。
另外在可能有人会问,当我点击充值的时候如何将选中状态的值从adapter传过来呢?
这里我就分析一下实现方法。
1,用广播的方式,选中的时候就发送广播,在主页面进行接收即可
2,用eventBus来实现传值。详情可以看我的博客
使用EvnetBus进行消息传递解析
就这么多啦,附上代码下载链接
相关文章
- android studio 4.01默认使用gradle版本及其工程本地配置gradle方法
- android. 长图加载
- Didn't find class "android.view.View$OnUnhandledKeyEventListener" on path: DexPathList
- Android Framework学习之跨进程传递大图片
- 2021百度Android岗面试真题收录解析,进阶学习资料!
- 2021最新Android开发者学习路线,震撼来袭免费下载!
- [Android学习笔记4]四大应用组件之一:Service 上
- Animation插值器:解决Android Animation 循环执行的停顿问题
- Android流量统计TrafficStats类
- android学习一些帖子
- Android源代码下载方法具体解释
- android:Gradle sync failed: Sync failed: reason unknown
- 动态字符串%d %s ------android String
- Android系统中设置TextView的行间距
- Android 学习笔记(3)—— ImageView/RadioButton/CheckBox
- Android JSON解析类 - JsonReader
- Android PreferenceActivity 学习笔记
- Android应用程序版本号管理.(官方文档中文版)
- 4.Android-adt安卓打包过程、adb指令学习
- android异步加载图片
- Android eclipse 程序调试