
如何通过vue实现一款简单通用的翻页组件
2023-09-27 14:21:44 时间
先上一波效果图:
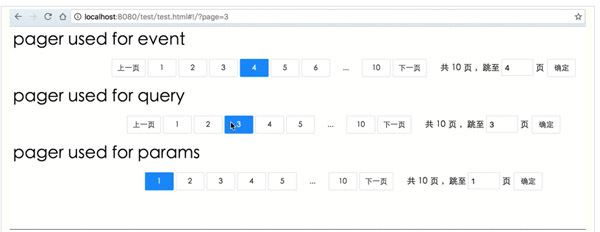
基本元素
首先,翻页组件(以下称“pager组件”)一般拥有的元素有:
中间显示的页码初始化时需要的配置有:
totalPage(总页数) initPage(初始页) showPrev(是否显示上一页) showNext(是否显示下一页) showItems(中间显示几页) showJump(是否显示跳转到第几页)这些可以通过vue的props来接收。
另外,pager组件本身需要有一个记录当前页的currentPage,pages数组用来容纳中间显示的页码,jumpPage绑定输入的跳转页码。
基本实现
对应的代码为:
template div v-if="totalPage 0" div a v-show="currentPage 1 showPrev" @click="go(currentPage - 1)" 上一页 /a a : @click="go(1)" 1 /a strong v-show="pages[0] 2" ... /strong a v-for="page in pages" : @click="go(page)" {{page}} /a strong v-show="pages[pages.length-1] totalPage - 1" ... /strong a v-if="totalPage 1" : @click="go(totalPage)" {{totalPage}} /a a v-show="currentPage totalPage showNext" @click="go(currentPage + 1)" 下一页 /a /div div v-if="showJump" v-show="totalPage 1" span 共 em {{totalPage}} /em 页 ,跳至 /span input type="number" min="1" :max="totalPage" v-model="jumpPage" span 页 /span a @click="go(jumpPage)" 确定 /a /div /div /template script export default { props: { totalPage: { // 总页数 type: Number, default: 1, required: true }, showItems: { // 显示出来的页数,如: 1 ... 34[5]67 ... 10 type: Number, default: 5 }, showPrev: { // 是否显示“上一页” type: Boolean, default: true }, showNext: { // 是否显示“下一页” type: Boolean, default: true }, showJump: { // 是否显示“跳转” type: Boolean, default: true }, initPage: { type: Number, default: 1 } }, data () { return { currentPage: 0, pages: [], jumpPage: 0, } }, created () {// 初始化时currentPage赋值 this.currentPage = this.initPage } methods: { go (page) { if(page 1) { page = 1 } if(page this.totalPage) { page = this.totalPage } if(page === this.currentPage) { return } this.currentPage = parseInt(page,10) this.$emit(go-page,{ page: this.currentPage }) } }, watch: { currentPage (newVal) { this.jumpPage = newVal }, initPage (newVal) { if(this.currentPage !== newVal) { this.currentPage = newVal } } } } /script
接下来就是pages数组的值如何获取到。由于pages始终是跟当前页currentPage以及配置中需要显示的showItems强相关的,那么完全可以将pages改为计算属性:
computed: { pages () { // 根据起始页码和结束页码得到页码数组 let getPages = (start,end) = { if(start = 1 || start end || start = this.totalPage) { start = 2 } if(end = this.totalPage || end start || end = 1) { end = this.totalPage - 1 } let arr = [] for(let i = start; i = end; i++) { arr.push(i) } return arr } let counts = this.showItems if(this.totalPage counts + 2) { return getPages(2,this.totalPage) } else { if(this.currentPage = Math.ceil(counts/2)) { return getPages(2,counts) } else if(this.currentPage = this.totalPage - Math.floor(counts/2)) { return getPages(this.totalPage + 1 - counts,this.totalPage - 1) } else { let half = Math.ceil(counts/2) - 1 let end = this.currentPage + half if(counts % 2 === 0) { end++ } return getPages(this.currentPage - half,end) } } }
功能拓展
到这里一个普通的翻页组件基本上就实现了(样式自己可以去定制)。但是很多时候(特别是一些管理后台),结合vue-router做成SPA,通常会有这样的需求:
翻到某个列表的某一页之后,点击某一项到编辑页,编辑完成后希望能够返回到跳转之前的那一页。
这个需求如果仅仅用上面的pager组件,实现起来就不是很方便。也许有人会说结合vuex可以,但是这样的话需要在state中记录下跳转前的页码。假如有很多个翻页列表,就需要记录多个,这显然并不优雅。
不过因为vue-router实现的优雅,我们要满足上面的需求也很简单:
首先props上增加mode配置,由于当mode为params时,跳转需要知道是在哪一个路由下,所以:
mode: { type: String, default: event // event | query | params routeName: { type: String
然后再在实际跳转的逻辑方法go(page)里面,做点更改:
go (page) { if(page 1) { page = 1 } if(page this.totalPage) { page = this.totalPage } if(page === this.currentPage) { return } this.currentPage = parseInt(page,10) if(this.mode == query) { let query = this.$route.query query.page = this.currentPage this.$router.go({query: query}) } else if(this.mode == params) { let params = this.$route.params params.page = this.currentPage this.$router.go({name: this.routeName,params: params}) } else { this.$emit(go-page,{ page: this.currentPage }) }
这样基本上就完成了一个简单且通用的翻页组件啦,接下里就是发不到仓库里供大家使用了。
本文最终实现的翻页组件已经发布,大家可以看一波源码:
总结
总体上讲的比较浅显,希望能有帮助。
作者:工口会员
来源:51CTO
为什么说 Vue 的响应式更新精确到组件级别?(原理深度解析) 我们都知道 Vue 对于响应式属性的更新,只会精确更新依赖收集的当前组件,而不会递归的去更新子组件,这也是它性能强大的原因之一。
Vue 进阶必学之高阶组件 HOC 高阶组件这个概念在 React 中一度非常流行,但是在 Vue 的社区里讨论的不多,本篇文章就真正的带你来玩一个进阶的骚操作。
相关文章
- vue iview组件表格 render函数的使用
- vue 2 实现自定义组件一到多个v-model双向数据绑定的方法
- 如何用vue实现模态框组件
- Vue 中 watch 不会触发的情况
- vue/cli3.0相对路径打包
- vue.js:使用v-bind通过JSON绑定多个class案例
- vue.js初识组件
- WEBSTORM新建VUE类型文件设置
- Vue 简单实例 地址选配8 - 确认地址 - 设为默认地址
- vue组件更新--(做eChart图表用到)
- vue组件弹出框点击显示隐藏
- Vue 路由组件传参的 8 种方式
- Vue函数式组件 简单实现
- Vue技术19单文件组件
- Vue知识(二)组件化开发
- VUE模块划分
- 基于 Vue.js 的移动端组件库mint-ui实现无限滚动加载更多
- 一个 VUE 组件:实现子元素 scroll 父元素容器不跟随滚动(兼容PC、移动端)
- 场景类:实现vue组件重新加载
- 基于vue/cli的前端脚手架
- vue封装全屏组件【无插件操作】
- vue实现简单表格组件
- 面试官:既然React/Vue可以用Event Bus进行组件通信,你可以实现下吗?
- 深入浅出 - vue之深入响应式原理
- Vue.js面试题整理
- 构建Vue.js组件的10个技巧
- Vue源码阅读 - 文件结构与运行机制
- vue组件间通信、数据传递(父子组件,同级组件)
- Vue 项目里戳中你痛点的问题及解决办法
- VUE组件汇总
- Vue写一个验证码输入组件
- Vue上传图片预览以及删除的vue组件
- Vue 2.0 制作列表组件,实现分页、搜索、批量操作等
- 基于Vue 2和高德地图的地图组件 - vue-amap