
Linux:普通用户的Anaconda【安装conda、初始化conda、创建新虚拟环境、切换虚拟环境、复制虚拟环境、退出当前虚拟环境、删除创建的虚拟环境】【切换国内源】
一、下载安装Anaconda
1、下载
首先下载anaconda3安装文件(Linux版本):https://www.anaconda.com/products/distribution#Downloads
Anaconda3-2022.05-Linux-x86_64.sh
或者在该网站上复制需要的版本的下载链接,然后直接在linux命令行中输入
wget https://repo.anaconda.com/archive/Anaconda3-2022.05-Linux-x86_64.sh
2、安装
在命令行中切换到anaconda文件所在目录,然后输入:
sh Anaconda3-<对应的版本号>-Linux-x86_64.sh
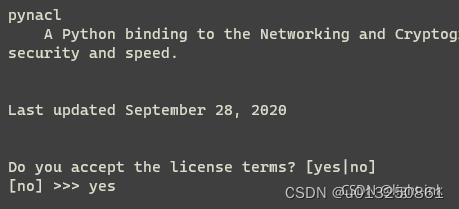
出现如下界面,询问你是否同意 anaconda3 的 license,输入yes,回车即可
之后会出现如下界面,确认安装位置
Do you accept the license terms? [yes|no]
[no] >>> yes

Anaconda3 will now be installed into this location:
/home/ninja/anaconda3

  - Press ENTER to confirm the location
  - Press CTRL-C to abort the installation
  - Or specify a different location below

[/home/ninja/anaconda3] >>>
一般使用默认的安装即可,官方也推荐使用默认的安装路径,默认的安装路径格式如下:/home/用户名/anaconda3 如果是root用户则是:/root/anaconda3
最后,会出现如下界面,请求用户是否希望对Anaconda3进行初始化
installation finished.
Do you wish the installer to initialize Anaconda3
by running conda init? [yes|no]
[no] >>> yes
no change     /home/ninja/anaconda3/condabin/conda
no change     /home/ninja/anaconda3/bin/conda
no change     /home/ninja/anaconda3/bin/conda-env
no change     /home/ninja/anaconda3/bin/activate
no change     /home/ninja/anaconda3/bin/deactivate
no change     /home/ninja/anaconda3/etc/profile.d/conda.sh
no change     /home/ninja/anaconda3/etc/fish/conf.d/conda.fish
no change     /home/ninja/anaconda3/shell/condabin/Conda.psm1
no change     /home/ninja/anaconda3/shell/condabin/conda-hook.ps1
no change     /home/ninja/anaconda3/lib/python3.9/site-packages/xontrib/conda.xsh
no change     /home/ninja/anaconda3/etc/profile.d/conda.csh
modified      /home/ninja/.bashrc

==> For changes to take effect, close and re-open your current shell. <==

If you'd prefer that conda's base environment not be activated on startup,
   set the auto_activate_base parameter to false:

conda config --set auto_activate_base false

Thank you for installing Anaconda3!

===========================================================================

Working with Python and Jupyter is a breeze in DataSpell. It is an IDE
designed for exploratory data analysis and ML. Get better data insights
with DataSpell.

DataSpell for Anaconda is available at: https://www.anaconda.com/dataspell

ninja@ailian-Super-Server:~/install_packages$
如果安装的时候不选择初始化,则在安装完毕后再单独初始化:
ninjia@ailian-G4228-TRT:~$ conda init
3、在.bashrc文件配置环境变量
打开 /home/ninja 用户目录下的 .bashrc,在最后输入如下代码:(注意改成自己的路径)【最新版本的Anaconda3-2022.05在初始化时已经自动配置,如果没配置则手动配置】。
# >>> conda initialize >>>
# !! Contents within this block are managed by 'conda init' !!
__conda_setup="$('/home/ninja/anaconda3/bin/conda' 'shell.bash' 'hook' 2> /dev/null)"
if [ $? -eq 0 ]; then
    eval "$__conda_setup"
else
    if [ -f "/home/ninja/anaconda3/etc/profile.d/conda.sh" ]; then
        . "/home/ninja/anaconda3/etc/profile.d/conda.sh"
    else
        export PATH="/home/ninja/anaconda3/bin:$PATH"
    fi
fi
unset __conda_setup
# <<< conda initialize <<<
保存后输入:source ~/.bashrc,立即生效,用户名前面会出现anaconda当前的环境,默认为 :base。
ninjia@aithu-Super-Server:~$ source ~/.bashrc
(base) ninja@ailian-Super-Server:~$
二、虚拟环境
安装完毕Anaconda之后,默认为base虚拟环境。不同的项目最好使用不同的虚拟环境,来防止库冲突。
1、先创建一个新的虚拟环境
#创建一个名称为my_test
conda create --name my_test
或指定python版本(同时在该虚拟环境中安装python)
conda create -n my_test python=3.9
(base) ninjia@ailian-G4228-TRT:~$ conda create -n paddle python=3.9
Collecting package metadata (current_repodata.json): done
Solving environment: done


==> WARNING: A newer version of conda exists. <==
  current version: 4.10.3
  latest version: 4.13.0

Please update conda by running

    $ conda update -n base -c defaults conda


## Package Plan ##

  environment location: /home/ninjia/anaconda3/envs/paddle

  added / updated specs:
    - python=3.9


The following packages will be downloaded:

    package                    |            build
    ---------------------------|-----------------
    certifi-2022.6.15          |   py39h06a4308_0         153 KB  https://mirrors.tuna.tsinghua.edu.cn/anaconda/pkgs/main
    pip-21.2.4                 |   py39h06a4308_0         1.8 MB  https://mirrors.tuna.tsinghua.edu.cn/anaconda/pkgs/main
    python-3.9.12              |       h12debd9_1        19.2 MB  https://mirrors.tuna.tsinghua.edu.cn/anaconda/pkgs/main
    setuptools-61.2.0          |   py39h06a4308_0        1011 KB  https://mirrors.tuna.tsinghua.edu.cn/anaconda/pkgs/main
    tzdata-2022a               |       hda174b7_0         109 KB  https://mirrors.tuna.tsinghua.edu.cn/anaconda/pkgs/main
    ------------------------------------------------------------
                                           Total:        22.2 MB

The following NEW packages will be INSTALLED:

  _libgcc_mutex      anaconda/pkgs/main/linux-64::_libgcc_mutex-0.1-main
  _openmp_mutex      anaconda/pkgs/main/linux-64::_openmp_mutex-5.1-1_gnu
  ca-certificates    anaconda/pkgs/main/linux-64::ca-certificates-2022.4.26-h06a4308_0
  certifi            anaconda/pkgs/main/linux-64::certifi-2022.6.15-py39h06a4308_0
  ld_impl_linux-64   anaconda/pkgs/main/linux-64::ld_impl_linux-64-2.38-h1181459_1
  libffi             anaconda/pkgs/main/linux-64::libffi-3.3-he6710b0_2
  libgcc-ng          anaconda/pkgs/main/linux-64::libgcc-ng-11.2.0-h1234567_1
  libgomp            anaconda/pkgs/main/linux-64::libgomp-11.2.0-h1234567_1
  libstdcxx-ng       anaconda/pkgs/main/linux-64::libstdcxx-ng-11.2.0-h1234567_1
  ncurses            anaconda/pkgs/main/linux-64::ncurses-6.3-h7f8727e_2
  openssl            anaconda/pkgs/main/linux-64::openssl-1.1.1p-h5eee18b_0
  pip                anaconda/pkgs/main/linux-64::pip-21.2.4-py39h06a4308_0
  python             anaconda/pkgs/main/linux-64::python-3.9.12-h12debd9_1
  readline           anaconda/pkgs/main/linux-64::readline-8.1.2-h7f8727e_1
  setuptools         anaconda/pkgs/main/linux-64::setuptools-61.2.0-py39h06a4308_0
  sqlite             anaconda/pkgs/main/linux-64::sqlite-3.38.5-hc218d9a_0
  tk                 anaconda/pkgs/main/linux-64::tk-8.6.12-h1ccaba5_0
  tzdata             anaconda/pkgs/main/noarch::tzdata-2022a-hda174b7_0
  wheel              anaconda/pkgs/main/noarch::wheel-0.37.1-pyhd3eb1b0_0
  xz                 anaconda/pkgs/main/linux-64::xz-5.2.5-h7f8727e_1
  zlib               anaconda/pkgs/main/linux-64::zlib-1.2.12-h7f8727e_2


Proceed ([y]/n)? y


Downloading and Extracting Packages
python-3.9.12        | 19.2 MB   | ########################################################################################################################## | 100%
pip-21.2.4           | 1.8 MB    | ########################################################################################################################## | 100%
setuptools-61.2.0    | 1011 KB   | ########################################################################################################################## | 100%
certifi-2022.6.15    | 153 KB    | ########################################################################################################################## | 100%
tzdata-2022a         | 109 KB    | ########################################################################################################################## | 100%
Preparing transaction: done
Verifying transaction: done
Executing transaction: done
#
# To activate this environment, use
#
#     $ conda activate paddle
#
# To deactivate an active environment, use
#
#     $ conda deactivate

(base) ninjia@ailian-G4228-TRT:~$
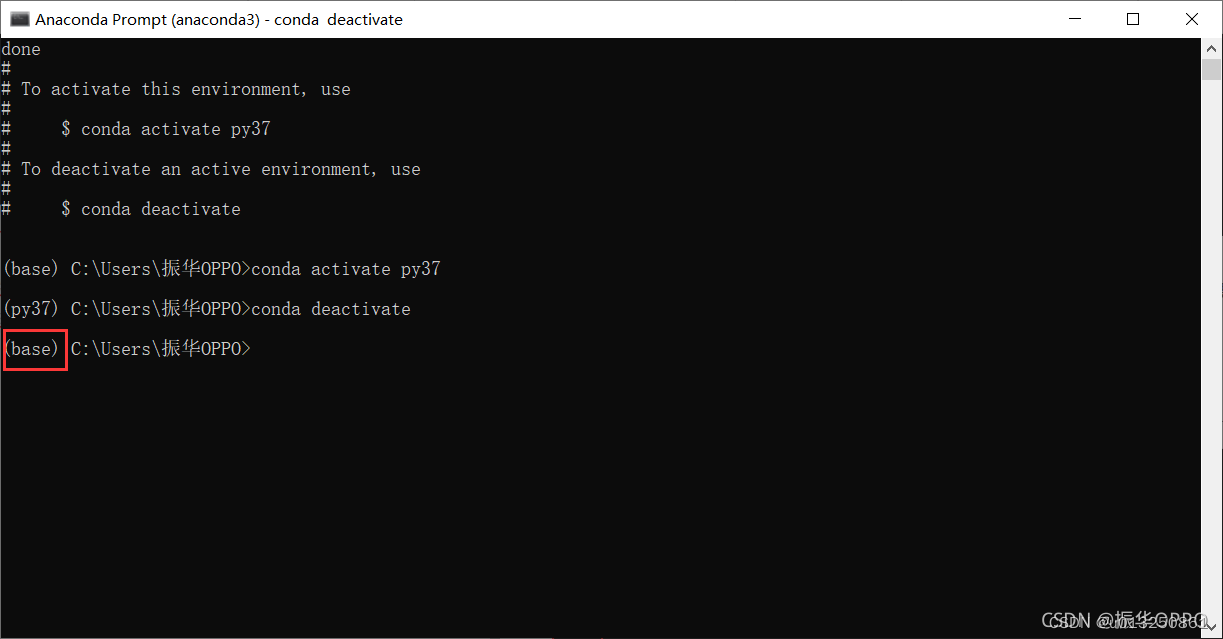
2、激活(进入)虚拟环境
conda activate my_test
3、切换环境
1、查看已有的虚拟环境
conda env list
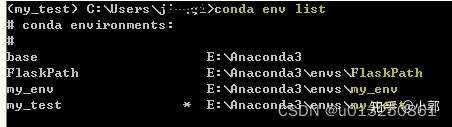
2、切换到想要的虚拟环境,这里我切换到my_test
conda activate my_test
3、在当前环境里安装ipykernel
conda install ipykernel
4、退出环境
conda deactivate
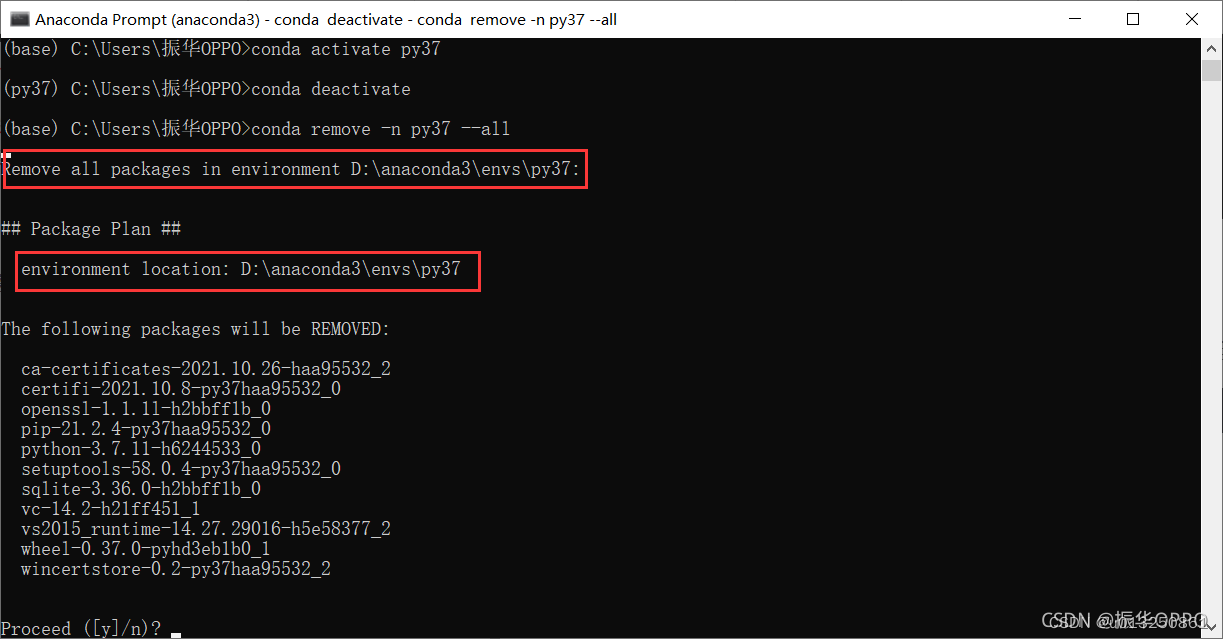
5、删除环境
删除某个环境时,一定不能在该环境下删除,一般都是base环境下删除我们创建过的环境。
conda remove -n whxpy37 --all
6、复制环境
复制Conda的虚拟环境的命令
使用如下Conda命令:
conda create -n conda-env2 --clone conda-env1
conda-env2是新创建的Conda环境
conda-env1是被复制的Conda环境
复制完成后,两个环境的Python配置是完全相同的,可以直接使用
三、切换源
查看anaconda配置镜像:conda config --show channels
(base) ninja@ailia-Super-Server:~/anaconda3/pkgs$ conda config --show channels
channels:
  - defaults
(base) ninja@ailia-Super-Server:~/anaconda3/pkgs$
添加清华源:
conda config --add channels https://mirrors.tuna.tsinghua.edu.cn/anaconda/pkgs/free/
conda config --add channels https://mirrors.tuna.tsinghua.edu.cn/anaconda/pkgs/main/
conda config --add channels https://mirrors.tuna.tsinghua.edu.cn/anaconda/cloud/pytorch/
conda config --add channels https://mirrors.tuna.tsinghua.edu.cn/anaconda/cloud/menpo/
conda config --add channels https://mirrors.tuna.tsinghua.edu.cn/anaconda/cloud/bioconda/
conda config --add channels https://mirrors.tuna.tsinghua.edu.cn/anaconda/cloud/msys2/
conda config --add channels https://mirrors.tuna.tsinghua.edu.cn/anaconda/cloud/conda-forge/
conda config --set show_channel_urls yes
查看当前源:conda config --show channels
(base) ninja@ailia-Super-Server:~/anaconda3/pkgs$ conda config --show channels
channels:
  - https://mirrors.tuna.tsinghua.edu.cn/anaconda/pkgs/main/
  - https://mirrors.tuna.tsinghua.edu.cn/anaconda/pkgs/free/
  - defaults
(base) ninja@ailia-Super-Server:~/anaconda3/pkgs$
相关命令:
conda config --add channels https://mirrors.tuna.tsinghua.edu.cn/anaconda/pkgs/free/
conda config --add channels https://mirrors.tuna.tsinghua.edu.cn/anaconda/pkgs/main/
conda config --set show_channel_urls yes

conda config --show-sources 查看所有源
conda install 包
conda config --remove-key channels 删除全部源

移除指定源:
conda config --remove channels 'https://mirrors.tuna.tsinghua.edu.cn/anaconda/pkgs/free/'

查看anaconda下有多少环境:
 conda info --envs
清除Anaconda缓存后才能生效:
conda clean -i
参考资料:
Linux安装anaconda3-5.3.1
Linux下普通用户anaconda安装与配置
anaconda环境切换
Anaconda查看、创建、切换虚拟环境
相关文章
- Ubuntu 12.04/11.10 用户如何安装最新的 Linux 3.4 内核
- 对 Linux 新手有用的 20 个命令
- 简捷安装Tor浏览器到Ubuntu 14.04和Linux Mint 17中
- linux内核中的__cpu_suspend是在哪里实现的呀?
- linux shell中如何往所有行尾添加内容
- GoDaddy Linux主机支持机房的更换
- Linux安装JDK(rpm)
- linux性能分析工具Memory
- Grep- Linux必学的60个命令
- Linux安装Maven
- Linux红黑树(一)——数据结构
- [置顶] Linux信号相关笔记
- Linux 之 Ubuntu 下安装配置ARM交叉编译器(工具链)的简单整理
- Linux日志清除
- linux下通过命令启动多个终端运行对应的命令和程序
- Linux 安装和配置Redis
- Linux环境下Redis安装和常见问题的解决
- Linux中文件特殊权限suid、sgid、sticky(有图详细讲解)
- Linux安装Apache
- Linux top命令
- Linux Redis安装
- 一行命令实现在Linux中快速部署桌面远程连接和安装多种虚拟机制作操作系统镜像,附使用教程和部署脚本
- 服务器证书安装配置指南(Haproxy for Linux)
- Linux 安装 Composer
- Linux mint 安装踩坑记录