
spring基础---->请求与响应的参数(一)
这里面我们主要介绍一下spring中关于请求和响应参数数据的问题。爱,从来就是一件千回百转的事。不曾被离弃,不曾受伤害,怎懂得爱人?爱,原来是一种经历。
spring中的请求与响应
一、spring中json格式的post请求
客户端发送json格式的数据,例如以下的user对象的信息是我们要插入到数据库中的。
{
    "userId": "huhx1",
    "username": "linux1",
    "passowrd": "pwd11",
    "sex": "0",
    "phoneNumber": "15527100207",
    "address": "wuhan1",
    "birthday": "2017-12-12"
}
我们的controller处理方法中的参数可以用Bean接收,也可以使用Map。如下:
@PostMapping("user3")
public ResponseBean<User> insertUser(@RequestBody User user) {
    logger.info("user = {}", user);
    userMapper.insertUser(user);
    return ResultUtil.success(user);
}

@PostMapping("user4")
public ResponseBean<Map<String, Object>> insertUser(@RequestBody Map<String, Object> user) {
    logger.info("map = {}", user);
    userMapper.insertMapUser(user);
    return ResultUtil.success(user);
}
需要注意的是参数必须要用@RequestBody注解,否则请求的参数是不能正确的注入到参数的类中。关于这个注解和@ResponseBody差不多的功能,就是可以将我们的请求或者响应的数据通过HttpMessageConverters类转换成我们想要的类型(被注解的类型)。官方文档说明如下:
1、@RequestBody annotated parameters for access to the HTTP request body. Parameter values are converted to the declared method argument type using HttpMessageConverters.
2、If the method is annotated with @ResponseBody, the return type is written to the response HTTP body. The return value will be converted to the declared method argument type using HttpMessageConverters.
3、@RestController is a stereotype annotation that combines @ResponseBody and @Controller.
对于json格式的传递参数,使用@RequestParam也无法正确传递参数。例如像下面的这种:
请求的json数据如下:
{
    "type": "file",
    "content": "huhx.txt"
}
下面是我们的java代码
@PostMapping("javasql")
public String generateJavaBean2(@RequestParam String type, @RequestParam String content) {}
而且对于这种有两个参数的话,使用@RequestBoby注解两个参数的话,也会报错的。
Required request body is missing: public java.lang.String
com.linux.huhx.generate.db.MysqlBeanAction.generateJavaBean2(java.lang.String,java.lang.String) throws
java.io.IOException
正确的做法应该如下:
public String generateJavaBean2(@RequestBody Map<String, String> map) throws IOException {
    String type = map.get("type");
    String content = map.get("content");
}
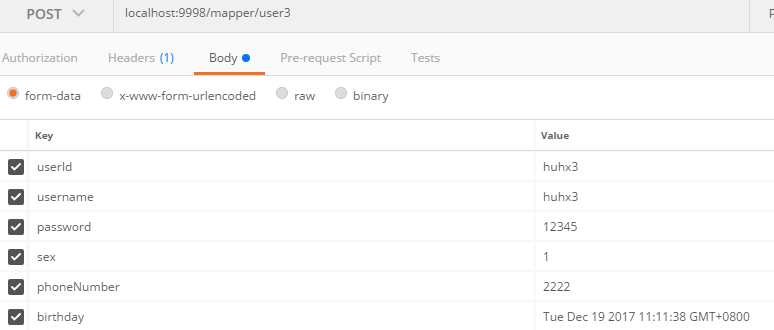
二、spring中表单格式的post请求
如果是表单形式的post请求,那么不需要@RequestBody注解。直接在controller对应方法的参数中注明该类就可以,在postman中如果birthday输入的是2017-12-12。会报string不能转换成date的错,这里面如果一定要支持2018-12-12字符串格式的时间传递,可以使用spring自定义的converter或者formatter接口的实现类。具体可以参考博客:
上述测试的java代码
@PostMapping("user3")
public ResponseBean<User> insertUser(User user) {
    logger.info("user = {}", user);
    userMapper.insertUser(user);
    return ResultUtil.success(user);
}
在使用JSON.toJSONString(this);格式化对象控制台中输出的结果如下:
user = {"birthday":1513653098000,"password":"12345","phoneNumber":"2222","sex":1,"userId":"huhx3","username":"huhx3"}
我们返回的数据都是json格式的,这是因为我们在注解控制器的时候用的是@RestController注解。上述也提到过了,它是@Controller和@ResponseBody的复合注解。可以在它的源码中找到:
@Target(ElementType.TYPE)
@Retention(RetentionPolicy.RUNTIME)
@Documented
@Controller
@ResponseBody
public @interface RestController {
    String value() default "";
}
三、spring中表单的get请求
- get传递参数的方式,我们的java代码如下:
@GetMapping("getRequest1")
public ResponseBean<String> getRequest1(String username) {
    logger.info("username = {}", username);
    return ResultUtil.success(username);
}
我们通过postman发送get请求,url为:localhost:9998/mapper/getRequest1?username=huhx。返回的结果如下:
{
    "returnCode": 0,
    "returnMessage": "成功",
    "response": "huhx"
}
可以看到成功的接收到了get的请求参数,当然也可以使用@RequestParam修改参数的名称。如下:
@GetMapping("getRequest1")
public ResponseBean<String> getRequest1(@RequestParam("username") String name) {
    logger.info("username = {}", name);
    return ResultUtil.success(name);
}
- get请求路径上的参数
@GetMapping("getRequest2/{username}")
public ResponseBean<String> getRequest2(@PathVariable("username") String name) {
    logger.info("username = {}", name);
    return ResultUtil.success(name);
}
如果像上述url参数的那样,省略@PathVariable注解,使用下面的这种方式将会失效得不到传递的参数。
@GetMapping("getRequest2/{username}")
public ResponseBean<String> getRequest2(String username) {
    logger.info("username = {}", username);
    return ResultUtil.success(username);
}
相关文章
- spring使用@Value标签读取*.properties文件的中文乱码问题的解决
- Spring Boot 统一参数校验、统一异常、统一响应,这才是优雅的处理方式!
- Spring Boot + Vue 如此强大!
- [置顶] Spring中DI设置器注入
- spring JMS在接收消息的时候总是报错
- WebService--CXF与Spring的整合(jaxws:endpoint形式配置)以及客户端调用(spring配置文件形式,不需要生成客户端代码)
- 通过IDEA解决spring配置文件
- Spring MVC异常处理SimpleMappingExceptionResolver
- kafka介绍以及结合spring消费topic
- Spring 开发环境搭建(二)
- spring boot rabbitmq集成
- Spring-webflux 响应式编程
- Junit单元测试的简单使用(主要是在spring框架下的项目)