
java中线程启动过程分析及本地方法 start0源代码的追踪学习
java中线程启动过程分析及本地方法 start0源代码的追踪学习
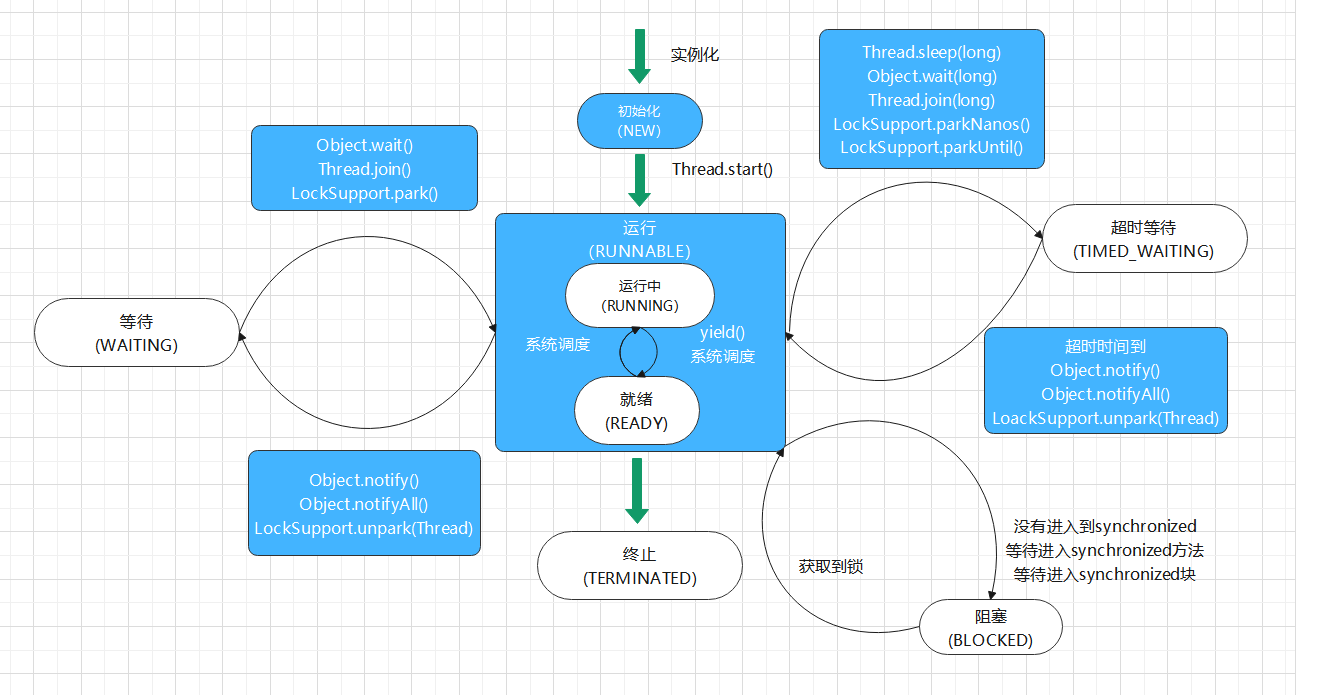
先回顾一下线程的生命周期
流程图:
当我们调用Thread的start方法时(没有放任务,重写了run方法):
public class _0_Thread {
    public static void main(String[] args) {
        System.out.println("主方法的开头");
        MyThread myThread = new MyThread();
        myThread.start();//子程序运行
    }
}
class MyThread extends Thread{
    @Override
    public void run() {
        for (int i = 0; i < 100; i++) {
            System.out.println("MyThread类中的i值为:"+i);
            try {
                Thread.sleep(1000);
            } catch (Exception e) {
                e.printStackTrace();
            }
        }
    }
}
start()方法的调用过程如下:
myThread.start() -> 继承自Thread类的start()方法 -> start0() -> private native void start0() -> cpp底层去找当前线程类的run方法 -> myThread的run方法
在Java中用native关键字修饰的方法表示这是一个本地方法,也就是底层是用cpp写的
当我们往Thread里面丢一个任务,在start时
public static void main(String[] args) {
    Thread thread = new Thread(() -> System.out.println("线程启动"));
    thread.start();
}
new Thread(() -> System.out.println("线程启动"))的调用过程如下:
thread.start() -> Thread类的start0() -> init(null, target, "Thread-" + nextThreadNum(), 0)
    -> init(ThreadGroup g, Runnable target, String name,
                      long stackSize, AccessControlContext acc,
                      boolean inheritThreadLocals)
    -> this.target = target(Thread类有一个target属性)
thread.start()的调用过程如下:
thread.start() -> start0() 注意这里是线程类的start0方法,不是任务类的 -> cpp底层去找当前线程类的run方法
    -> Thread类的run方法
    -> 	@Override
		public void run() {
    		if (target != null) {
        	target.run();
        }
到这里,我们可以看出
start0()这个本地方法的作用,但是我们还是没有办法查看下去。我们可以去openJDK里找到答案首先我们需要知道的是,我们一般用的都是
Oracle JDK,它和openJDK的区别有:
openJDK是对外开放源码的,Oracle JDK则没有(部分开源,大概开源7%作用)
他们之间区别看:比较一下 Oracle JDK与openJDK的区别
openJDK可以在这里下载:openJDK下载 openJDK1.8
start0()底层 c 代码地址:start0()底层c代码
点进去看之后我们可以注意到一个方法:
这个方法主要是建立了方法之间的映射关系,将 start0 映射到 JVM_StartThread方法上
static JNINativeMethod methods[] = {
    {"start0",           "()V",        (void *)&JVM_StartThread},
    {"stop0",            "(" OBJ ")V", (void *)&JVM_StopThread},
    {"isAlive",          "()Z",        (void *)&JVM_IsThreadAlive},
    {"suspend0",         "()V",        (void *)&JVM_SuspendThread},
    {"resume0",          "()V",        (void *)&JVM_ResumeThread},
    {"setPriority0",     "(I)V",       (void *)&JVM_SetThreadPriority},
    {"yield",            "()V",        (void *)&JVM_Yield},
    {"sleep",            "(J)V",       (void *)&JVM_Sleep},
    {"currentThread",    "()" THD,     (void *)&JVM_CurrentThread},
    {"countStackFrames", "()I",        (void *)&JVM_CountStackFrames},
    {"interrupt0",       "()V",        (void *)&JVM_Interrupt},
    {"isInterrupted",    "(Z)Z",       (void *)&JVM_IsInterrupted},
    {"holdsLock",        "(" OBJ ")Z", (void *)&JVM_HoldsLock},
    {"getThreads",        "()[" THD,   (void *)&JVM_GetAllThreads},
    {"dumpThreads",      "([" THD ")[[" STE, (void *)&JVM_DumpThreads},
    {"setNativeName",    "(" STR ")V", (void *)&JVM_SetNativeThreadName},
};
(void *)&JVM_StartThread方法是写在#include "jvm.h"这个库文件中的
接下来我们要查JVM虚拟机底层实现的代码,但是JVM也分很多种类,openJDK使用的是基于hotspot的虚拟机
所以我们可以在这里找到底层源码:hotspot源码 jvm.h源码
这里我们注意:jvm.h文件只是声明了宏,具体实现在,jvm.cpp中,我们点进去搜索一下JVM_StartThread就可以看到下面的代码:
JVM_ENTRY(void, JVM_StartThread(JNIEnv* env, jobject jthread))
  JVMWrapper("JVM_StartThread");
  JavaThread *native_thread = NULL;
这个JVM_ENTRY是一个入口程序,我们来研究下里面的代码:
JVM_ENTRY(void, JVM_StartThread(JNIEnv* env, jobject jthread))
  JVMWrapper("JVM_StartThread");
  JavaThread *native_thread = NULL; //创建一个引用

  // We cannot hold the Threads_lock when we throw an exception,
  // due to rank ordering issues. Example:  we might need to grab the
  // Heap_lock while we construct the exception.
  bool throw_illegal_thread_state = false;

  // We must release the Threads_lock before we can post a jvmti event
  // in Thread::start.
  {
    // Ensure that the C++ Thread and OSThread structures aren't freed before
    // we operate.
    MutexLocker mu(Threads_lock); //加了一把线程锁

    // Since JDK 5 the java.lang.Thread threadStatus is used to prevent
    // re-starting an already started thread, so we should usually find
    // that the JavaThread is null. However for a JNI attached thread
    // there is a small window between the Thread object being created
    // (with its JavaThread set) and the update to its threadStatus, so we
    // have to check for this
    if (java_lang_Thread::thread(JNIHandles::resolve_non_null(jthread)) != NULL) {
      throw_illegal_thread_state = true; //抛异常
    } else {   //下面的是重点
      // We could also check the stillborn flag to see if this thread was already stopped, but
      // for historical reasons we let the thread detect that itself when it starts running
 	  // 计算创建线程所需要的大小
      jlong size =
             java_lang_Thread::stackSize(JNIHandles::resolve_non_null(jthread));
      // Allocate the C++ Thread structure and create the native thread.  The
      // stack size retrieved from java is signed, but the constructor takes
      // size_t (an unsigned type), so avoid passing negative values which would
      // result in really large stacks.
      size_t sz = size > 0 ? (size_t) size : 0;
      //生成一个JavaThread的对象
      native_thread = new JavaThread(&thread_entry, sz);

      // At this point it may be possible that no osthread was created for the
      // JavaThread due to lack of memory. Check for this situation and throw
      // an exception if necessary. Eventually we may want to change this so
      // that we only grab the lock if the thread was created successfully -
      // then we can also do this check and throw the exception in the
      // JavaThread constructor.
      if (native_thread->osthread() != NULL) {
        // Note: the current thread is not being used within "prepare".
        native_thread->prepare(jthread);
      }
    }
  }
这里面至关重要的一句代码就是:
native_thread = new JavaThread(&thread_entry, sz);
这里由生成了一个Java线程,里面的第一个参数是一个函数,我们继续找下这个函数:
static void thread_entry(JavaThread* thread, TRAPS) {
  HandleMark hm(THREAD);
  Handle obj(THREAD, thread->threadObj());
  JavaValue result(T_VOID);
  JavaCalls::call_virtual(&result,
                          obj,
                          KlassHandle(THREAD, SystemDictionary::Thread_klass()),
                          vmSymbols::run_method_name(),
                          vmSymbols::void_method_signature(),
                          THREAD);
}
JavaCalls::call_virtual表示调用了call_virtual这个方法
这里面最重要的代码就是这行:
vmSymbols::run_method_name()
表示调用了一个方法,我们继续查vmSymbols到底调用了什么,这个方法是在这个文件里面的:
#include "classfile/vmSymbols.hpp"
我们可以在这里查到vmSymbols.cpp的源码:vmSymbols.cpp源码
我们可以在318查到:
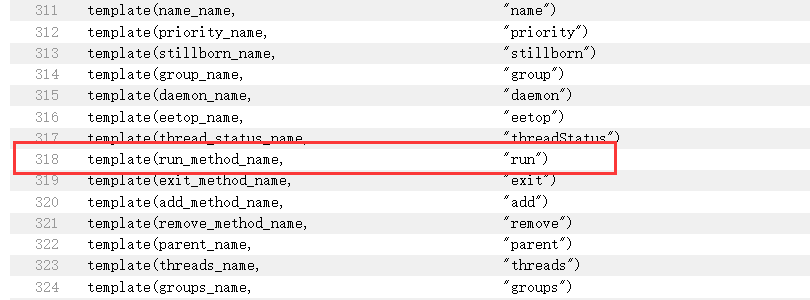
其实vmSymbols::run_method_name()就是调用了run方法
这样我们就可以得出结论:
start0()调用的是当前线程类的run方法例如在上面的栗子中:
MyThread类没有传任务类进去,调用的就是
MyThread类的run方法Thread类里传入一个任务类,然后
start0()调用的是Thread类的run方法,然后就会执行这一行代码:@Override public void run() { if (target != null) { target.run(); }所以最终调用的是任务类的run方法!
相关文章
- java实现基于IO流存取信息的【学生成绩管理系统】
- Mac OS设置JAVA_HOME环境变量
- 【转】浅谈Java中的hashcode方法
- 【转】Java ConcurrentModificationException异常原因和解决方法
- 系统学习JAVA第七天(流程控制语句、方法、冒泡排序、二分查找)
- java 8 处理字符拼接有null问题
- java 数组声明方法
- Java Arrays类方法
- java获取小程序openid
- 《Java程序员面试秘笈》—— 面试题5 用自己的语言描述Java中的类和对象
- java获取当前路径的几种方法
- Android 通过 JNI 访问 Java 字段和方法调用
- Java学习-050-AES256 之 java.security.InvalidKeyException: Illegal key size or default parameters 解决方法
- JMeter学习-027-JMeter参数文件(脚本分发)路径问题:jmeter.threads.JMeterThread: Test failed! java.lang.IllegalArgumentException: File distributed.csv must exist and be readable解决方法
- Java学习-026-类名或方法名应用之二 -- 统计分析基础
- Java学习-024-获取当前类名或方法名二三文
- Java 8新特性——default方法(defender方法)介绍
- JAVA项目中关于字典学习,和缓存搭配使用的方法
- Java多线程之sleep方法阻塞线程-模拟时钟
- Java之可变参数方法使用说明
- Java面向对象基础(二)——详解
- java虚拟机性能监控工具介绍
- java线:辛格尔顿隐藏ThreadLocal实现线程数据共享
- Java并发问题--乐观锁与悲观锁以及乐观锁的一种实现方式-CAS
- Java hashCode 的正确求值方法