
OpenCV4 Android 颜色空间转换
图像色彩模式
位图模式
位图模式是色彩模式中占有空间最小,包含信息量最小的一种模式。它只有黑白两种色素,因此也叫做黑白图。
从彩色图转为位图的过程被称为 “二值化”。彩色图不能直接转为位图,需要先将其转为灰度模式,然后才能转为位图。
灰度模式
灰度模式是采用单一色调来表示图像。1个像素点占1字节,即 8 bit,每个像素使用 0~255 来表示亮度,0为黑色,128为灰色,255为白色。
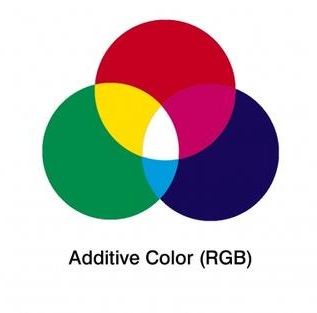
RGB模式
RGB模式是我们最常用到的,也被称为真色彩。RGB模式的图像有3个颜色通道,分别是 红(Red),绿(Green)和 蓝(Blue),每个通道占用 8 bit,值范围为 0~255
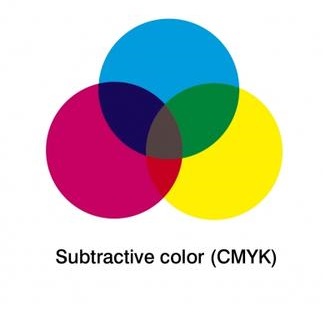
CMYK模式
CMYK也称作印刷色彩模式。它和RGB相比最大不同是,RGB模式是发光的色彩模式,你在一间黑暗的房间内仍然可以看见萤幕上的内容。
CMYK是一种依靠反光的色彩模式,我们能阅读报纸的内容是为什么呢?是因阳光或灯光照射到报纸上,再把内容反射到我们的眼中。CMYK是需要有外界光源的情况下才可以看到的。所以在黑暗房间内是无法阅读的。
从理论上讲,只需要CMY三种油墨就足够,把CMY加在一起就应该得到黑色。但是高纯度的油墨暂时还不能实现,CMY相加的结果是暗红色。因此,为了确保黑色的输出,还需要加入一种专门的黑墨来调和。
HSB 模式
在 HSB 模式中,H(Hues)表示色相(0 ~ 360),S(Saturation)表示饱和度(0 ~ 100%),B(brightness)表示亮度(0 ~ 100%)。
HSB模式对应的媒介是人眼。
HSB模式中S和B呈现的数值越高,饱和度明度越高,页面色彩强烈艳丽,对视觉刺激是迅速的,醒目的效果,但不益于长时间的观看。

YUV格式
YUV开始主要用于电视系统以及模拟视频领域,后面手机相机也延用了这一格式,因此大部分摄像头输出的图片格式都是 YUV 格式(安卓是NV12,YUV的一种)。YUV 中的 “Y” 表示亮度(Luminance 或 Luma)也就是灰度值,“U” 和 “V” 表示的则是色度(Chrominance或Chroma),作用是描述影像色彩及饱和度,用于指定像素的颜色。如果只用 “Y” 而不用 “UV” 也可也进行呈像,只不过是黑白的,这样就能很好的解决了黑白电视与彩色电视的兼容问题。此外,与RGB相比,YUV具有占用带宽更少的优势。
重要函数及类型
Mat
Mat本质上是由两个数据部分组成的类: (包含信息有矩阵的大小,用于存储的方法,矩阵存储的地址等) 的矩阵头和一个指针,指向包含了像素值的矩阵(可根据选择用于存储的方法采用任何维度存储数据)。矩阵头部的大小是恒定的。然而,矩阵本身的大小因图像的不同而不同,通常是较大的数量级。
注意到一点,Mat 对于无法保存透明度通道,PNG 中透明的像素点会将其转为黑色
Mat 是初始化和释放
Mat 是一个 C/C++ 的指针类型,因此它需要通过手动分配空间和释放空间,对应的函数为 new Mat() 和 mat.release()
bitmap 转 map
/**
 * Short form of the bitmapToMat(bmp, mat, unPremultiplyAlpha=false).
 * @param bmp is a valid input Bitmap object of the type 'ARGB_8888' or 'RGB_565'.
 * @param mat is a valid output Mat object, it will be reallocated if needed, so Mat may be empty.
 */
public static void bitmapToMat(Bitmap bmp, Mat mat) {
    bitmapToMat(bmp, mat, false);
}
map 转回 bitmap
/**
 * Converts OpenCV Mat to Android Bitmap.
 * <p>
 * <br>This function converts an image in the OpenCV Mat representation to the Android Bitmap.
 * <br>The input Mat object has to be of the types 'CV_8UC1' (gray-scale), 'CV_8UC3' (RGB) or 'CV_8UC4' (RGBA).
 * <br>The output Bitmap object has to be of the same size as the input Mat and of the types 'ARGB_8888' or 'RGB_565'.
 * <br>This function throws an exception if the conversion fails.
 *
 * @param mat is a valid input Mat object of types 'CV_8UC1', 'CV_8UC3' or 'CV_8UC4'.
 * @param bmp is a valid Bitmap object of the same size as the Mat and of type 'ARGB_8888' or 'RGB_565'.
 * @param premultiplyAlpha is a flag, that determines, whether the Mat needs to be converted to alpha premultiplied format (like Android keeps 'ARGB_8888' bitmaps); the flag is ignored for 'RGB_565' bitmaps.
 */
public static void matToBitmap(Mat mat, Bitmap bmp, boolean premultiplyAlpha) {
    if (mat == null)
        throw new IllegalArgumentException("mat == null");
    if (bmp == null)
        throw new IllegalArgumentException("bmp == null");
    nMatToBitmap2(mat.nativeObj, bmp, premultiplyAlpha);
}
cvtColor
但在图像的处理过程中却很少使用 YUV 格式,一般都需要转成 RGB 格式 或者灰度图格式进行转换。
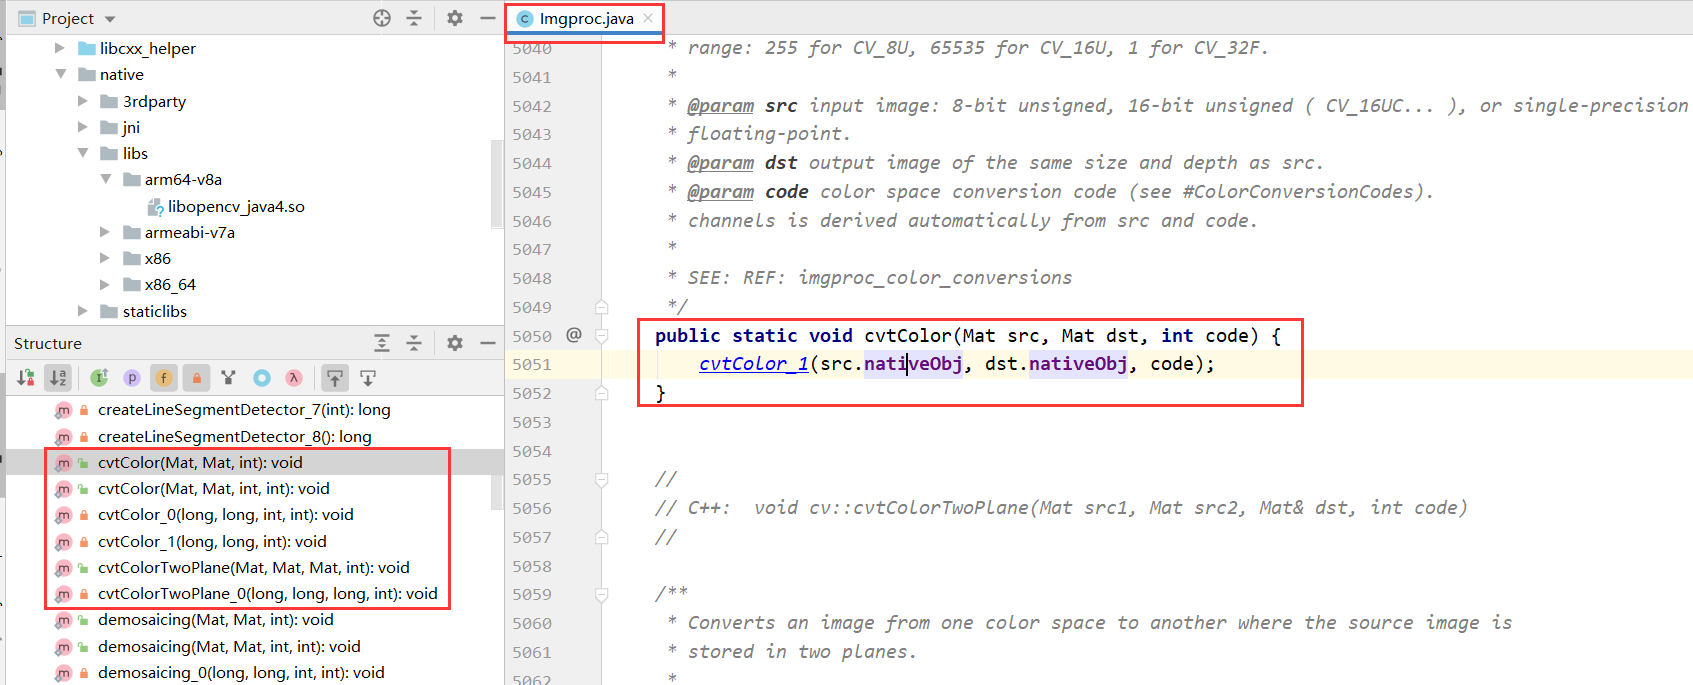
opencv 提供了 cvtColor 函数,用于在图像的不同色彩空间进行转换。
函数被定义在 Imgproc.java 中,
public static void cvtColor(Mat src, Mat dst, int code) { …… }
- src 原始图像
- dst 输出图像
- code 由某种格式转为另一个格式的枚举
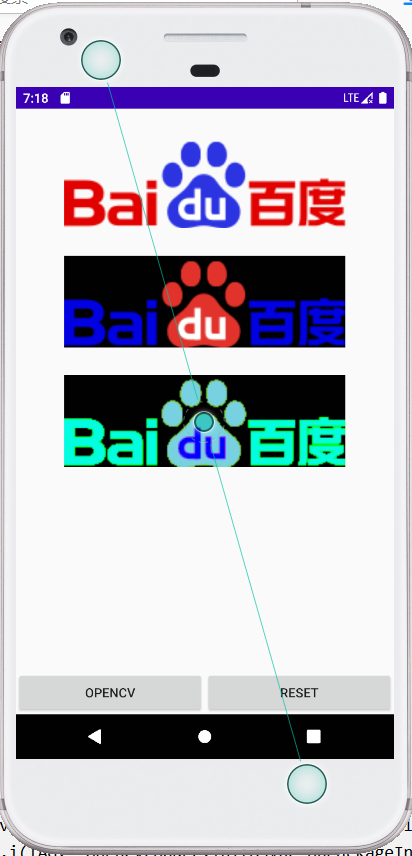
代码示例
下面的代码从网络上加载一幅图片,然后使用 opencv 的颜色空间转换函数 cvtColor,将其由 “彩色” 转为 “灰度图”
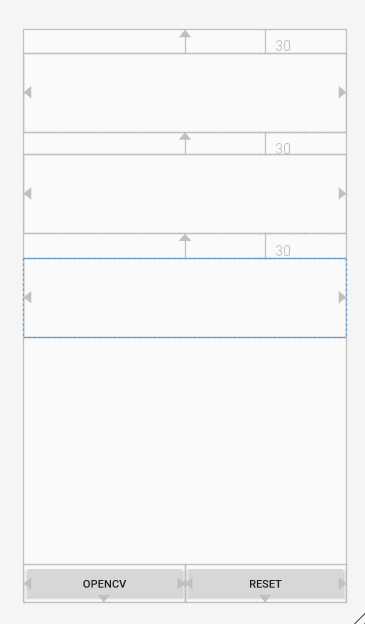
布局文件
<?xml version="1.0" encoding="utf-8"?>
<androidx.constraintlayout.widget.ConstraintLayout xmlns:android="http://schemas.android.com/apk/res/android"
    xmlns:app="http://schemas.android.com/apk/res-auto"
    android:layout_width="match_parent"
    android:layout_height="match_parent">

    <Button
        android:id="@+id/opencvBtn"
        android:layout_width="0dp"
        android:layout_height="wrap_content"
        android:text="OpenCV"
        app:layout_constraintBottom_toBottomOf="parent"
        app:layout_constraintEnd_toStartOf="@+id/resetBtn"
        app:layout_constraintStart_toStartOf="parent" />

    <Button
        android:id="@+id/resetBtn"
        android:layout_width="0dp"
        android:layout_height="wrap_content"
        android:text="Reset"
        app:layout_constraintBottom_toBottomOf="parent"
        app:layout_constraintEnd_toEndOf="parent"
        app:layout_constraintStart_toEndOf="@+id/opencvBtn" />

    <ImageView
        android:id="@+id/imageView1"
        android:layout_width="match_parent"
        android:layout_height="100dp"
        android:layout_marginTop="30dp"
        app:layout_constraintEnd_toEndOf="parent"
        app:layout_constraintStart_toStartOf="parent"
        app:layout_constraintTop_toTopOf="parent" />

    <ImageView
        android:id="@+id/imageView2"
        android:layout_width="match_parent"
        android:layout_height="100dp"
        android:layout_marginTop="30dp"
        app:layout_constraintEnd_toEndOf="parent"
        app:layout_constraintStart_toStartOf="parent"
        app:layout_constraintTop_toBottomOf="@id/imageView1" />

    <ImageView
        android:id="@+id/imageView3"
        android:layout_width="match_parent"
        android:layout_height="100dp"
        android:layout_marginTop="30dp"
        app:layout_constraintEnd_toEndOf="parent"
        app:layout_constraintStart_toStartOf="parent"
        app:layout_constraintTop_toBottomOf="@id/imageView2" />
</androidx.constraintlayout.widget.ConstraintLayout>
完整代码如下
public class MainActivity extends AppCompatActivity {
    private String TAG = "CvtColor";
    private String imgUrl = "https://www.baidu.com/img/flexible/logo/pc/result.png";

    private ImageView imageView1;
    private ImageView imageView2;
    private ImageView imageView3;
    private Button opencvBtn;
    private Button resetBtn;
    private Bitmap bitmap;

    @Override
    protected void onCreate(Bundle savedInstanceState) {
        super.onCreate(savedInstanceState);
        setContentView(R.layout.activity_gray);
        initView();
        resetImg();

		// OpenCVLoader.initDebug 是用来加载 OpenCV 的 so 库的,so库如果全部加载成功,则返回 true
        if (OpenCVLoader.initDebug()) {
			opencvBtn.setOnClickListener(v -> {
            	convert2Grey();
        	});
        	resetBtn.setOnClickListener(v -> {
            	resetImg();
        	});
        } else {
            Log.i(TAG, "OpenCVLoader.initDebug fail");
        }
    }

    private void initView() {
        imageView1 = findViewById(R.id.imageView1);
        imageView2 = findViewById(R.id.imageView2);
        imageView3 = findViewById(R.id.imageView3);
        opencvBtn = findViewById(R.id.opencvBtn);
        resetBtn = findViewById(R.id.resetBtn);
    }

    private void convert2Grey() {
        if(bitmap == null) return;

        // Mat是OpenCV的一种图像格式
        Mat src = new Mat();
        Mat dst1 = new Mat();
        Mat dst2 = new Mat();

		// 将 bitmap 进行深拷贝,格式为 ARGB,包含透明度通道
        Bitmap bitmap1 = bitmap.copy(Bitmap.Config.ARGB_8888, true),
        bitmap2 = bitmap.copy(Bitmap.Config.ARGB_8888, true),
        bitmap3 = bitmap.copy(Bitmap.Config.ARGB_8888, true);

		// 利用 OpenCV 的工具类,将 bitmap 转为 OpenCV 的 Mat 类
        Utils.bitmapToMat(bitmap1, src);
        // 使用 OpenCV 的 cvtColor 进行颜色空间转换,将 "红"、"蓝" 通道互换
        Imgproc.cvtColor(src, dst1, Imgproc.COLOR_RGBA2BGR);
        // 使用 OpenCV 的cvtColor 进行颜色空间转换,将 RGB 图转为灰度图
        Imgproc.cvtColor(src, dst2, Imgproc.COLOR_RGB2HSV);

		// 利用 OpenCV 的工具类,将 Mat 转为 bitmap
        Utils.matToBitmap(dst1, bitmap2);
        imageView2.setImageBitmap(bitmap2);
        Utils.matToBitmap(dst2, bitmap3);
        imageView3.setImageBitmap(bitmap3);

        src.release();
        dst1.release();
        dst2.release();
    }

	// 从网络中加载 bitmap 图像
    public void resetImg() {
        new Thread(() -> {
            HttpURLConnection httpURLConnection = null;
            try {
                URL url = new URL(imgUrl);
                httpURLConnection = ((HttpURLConnection)url.openConnection());
                int responseCode = httpURLConnection.getResponseCode();
                if (responseCode != 200) {
                    throw new IOException("图片文件不存在或路径错误,错误代码:" + responseCode);
                }
                bitmap = BitmapFactory.decodeStream(url.openStream());
                runOnUiThread(()-> {
                    imageView1.setImageBitmap(bitmap);
                    imageView2.setImageBitmap(null);
                    imageView3.setImageBitmap(null);
                });
            } catch (IOException e) {
                e.printStackTrace();
            }
            if(httpURLConnection != null) httpURLConnection.disconnect();
        }).start();
    }
}
相关文章
- Word处理控件Aspose.Words功能演示:使用 Android 库将 Word 文档转换为 PDF
- Android 判断手机是32位CPU还是64位CPU android.os.Build类字段含义
- Android RecyclerView(五)封装Holder与Adapter(Android 5.0 新特性)
- Android之 ImageView android:src和tools:src的区别是什么?
- Android USB转串口开发(hoho.android.usbserial串口库)
- Android Studio常用快捷键
- Android Bitmap 缩放 旋转 水印 裁剪操作
- Android-ImageView的属性android:scaleType作用
- 从零开始学android开发-字符如何转换整形 string 转化为int
- Android studio的错误:radle sync failed: Cause: failed to find target android-21 :
- 【AGC】如何指定应用发布到特定的Android系统版本
- JAVA字符串格式化-String.format()的使用 及 Android 中 string.xml 中 字符串格式转化
- Android: 分页浏览的利器 android View Pager
- Android View 事件分发机制 源码解析 (上)
- 浅谈Android系统进程间通信(IPC)机制Binder中的Server和Client获得Service Manager接口之路
- Android权限设置android.permission完整列表
- android开发:Android 中自定义View的应用
- Android图形显示系统——上层显示1:界面绘制大纲---android的GUI系统
- Android xml资源文件中@、@android:type、@*、?、@+含义和区别
- Android编程 EditView 中如何设置最多可以输入的字符数量 属性 android:ems 与 android:maxLength 的区别
- 解决Android SDK Manager下载问题和android studio每次启动都要在fetching Android sdk compoment information
- Android 串口通信基于licheedev和android-serialport两种方案实现附Demo
- android 处理图片之--bitmap处理
- Android操作系统服务(Context.getSystemService() )
- Android Intent传递对象摘要
- android_我的第一个Android程序
- Android系统时间制式的获取(24小时制式/12小时制式)及UTC与本地时间的转换
- Android 将ARGB图片转换为灰度图
- Android Studio Error:Could not find com.android.tools.build:gradle