
Vue 实例实战之 Vue webpack 仿去哪儿网App页面开发(应用中的几个页面简单实现)
Vue 实例实战之 Vue webpack 仿去哪儿网App页面开发(应用中的几个页面简单实现)
目录
Vue 实例实战之 Vue webpack 仿去哪儿网App页面开发(应用中的几个页面简单实现)
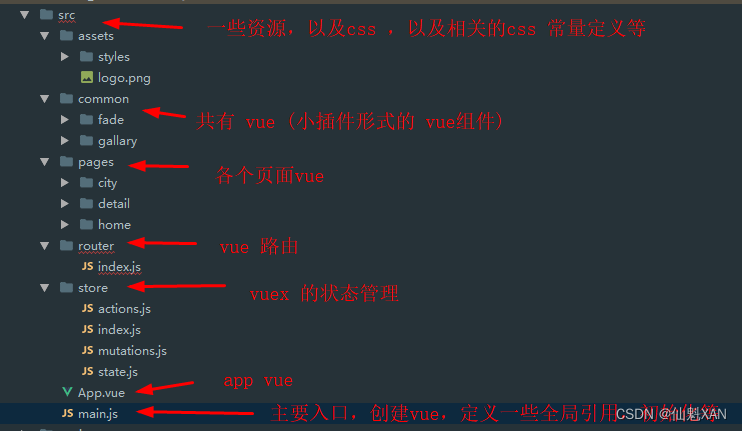
七、router路由管理, store vuex 状态管理 说明
十一、src/assets/styles 存放css 样式、常用的变量样式参数等
一、简单介绍
Vue 开发的一些知识整理,方便后期遇到类似的问题,能够及时查阅使用。
本节介绍,Vue 开发的实例实战,模仿开发去哪儿网的几个页面 ,体验 Vue 在实战中应用,欢迎指出,或者你有更好的方法,欢迎留言。
二、环境
1、vue 2.5.2
2、vue-router 3.0.1
3、vuex 3.0.1
三、效果预览
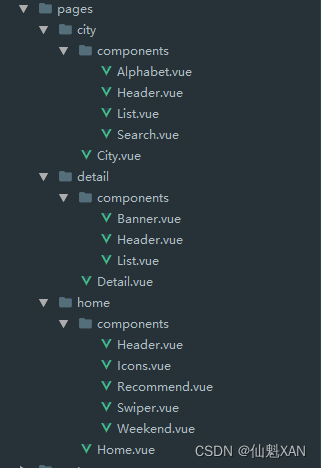
四、项目的页面结构

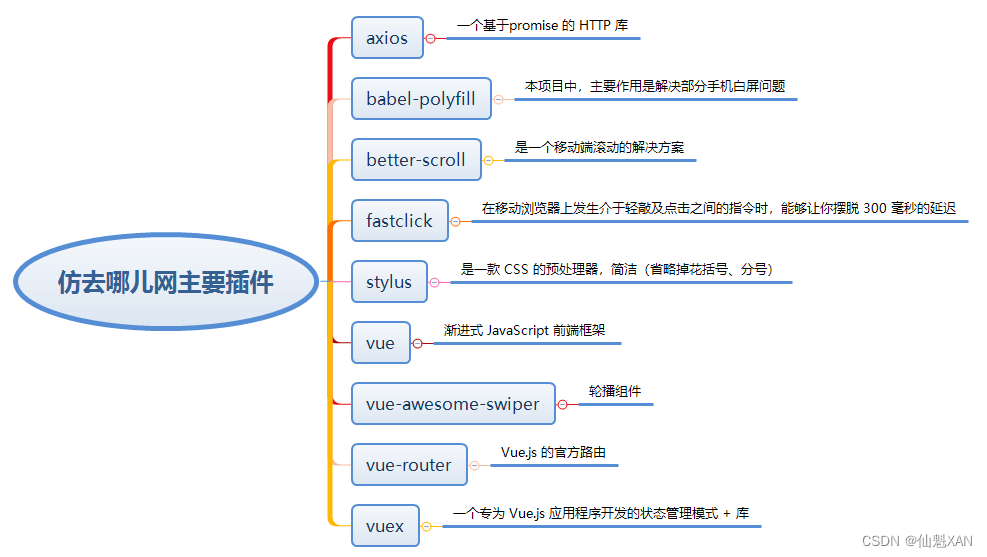
五、项目主要插件
六、项目实现过程
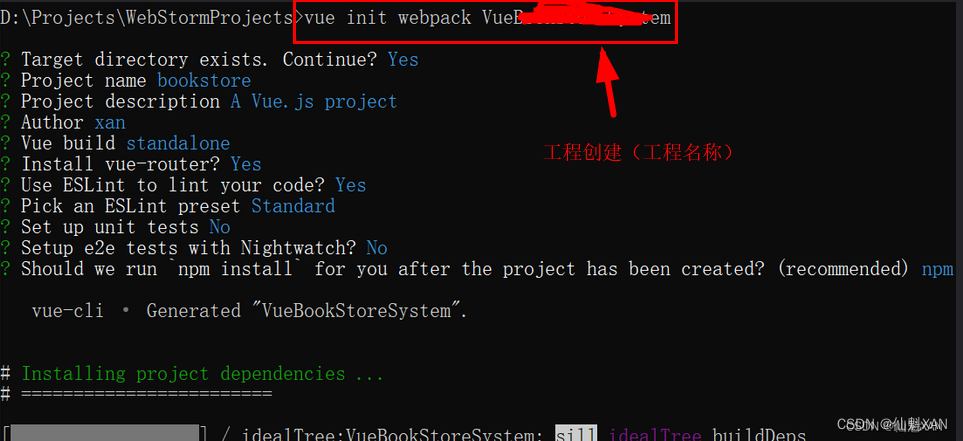
1、环境构建,并且 vue init webpack xxx_工程名,根据提示创建工程
具体环境搭建过程:Web 前端 之 Vue webpack 环境的搭建及工程创建简单整理_仙魁XAN的博客-CSDN博客
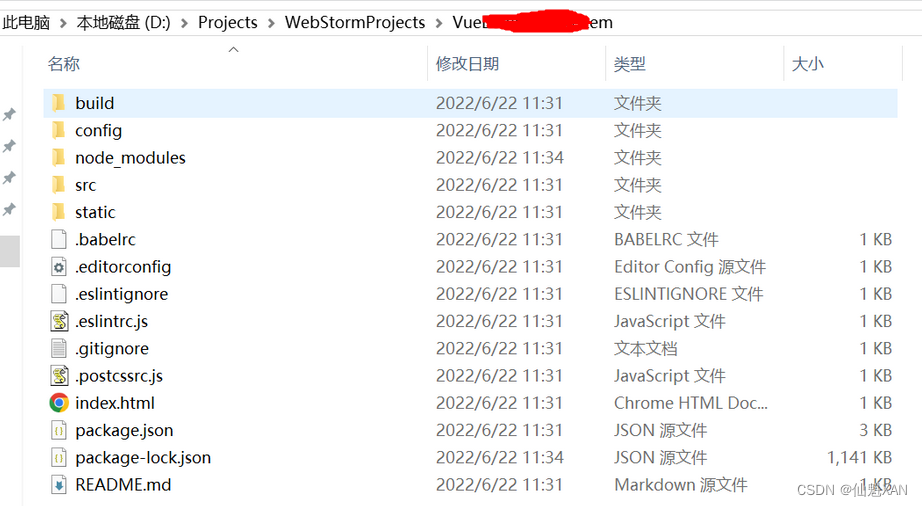
2、工程文件目录结构如下
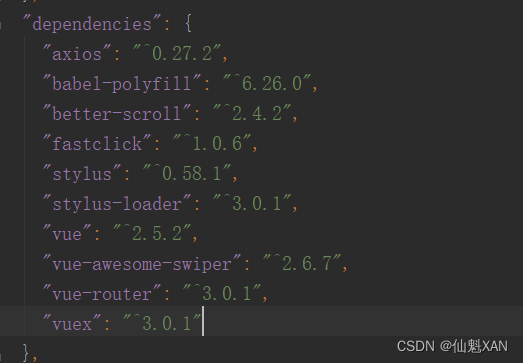
3、安装依赖,如果下面的一些依赖没有安装,可以对应使用 npm install 插件名@版本号 --save 先安装插件包
4、src 开发文件结构说明
5、在 main.js 中引入 reset.css 用作重置浏览器标签的样式表,统一样式,border.css 移动端1像素边框,fastclick 解决移动端click事件延迟300ms和点击穿透问题,vue-awesome-swiper 全局轮播组件设置,babel-polyfill 解决部分手机白屏问题
// The Vue build version to load with the `import` command
// (runtime-only or standalone) has been set in webpack.base.conf with an alias.
import Vue from 'vue'
import App from './App'
import router from './router'
/*
//reset.css是重置浏览器标签的样式表,其作用就是重新定义标签样式,覆盖浏览器的CSS默认属性,也就是指把浏览器提供的默认样式覆盖掉。
//
//在HTML标签在浏览器里有默认的样式,例如 p 标签有上下边距,strong标签有字体加粗样式,em标签有字体倾斜样式。不同浏览器的默认样式之间也会有差别,例如ul默认带有缩进的样式,在IE下,它的缩进是通过margin实现的,而Firefox下,它的缩进是由padding实现的。在切换页面的时候,浏览器的默认样式往往会给我们带来麻烦,影响开发效率。
//
//所以解决的方法就是一开始就将浏览器的默认样式全部去掉,更准确说就是通过重新定义标签样式。“覆盖”浏览器的CSS默认属性。最最简单的说法就是把浏览器提供的默认样式覆盖掉!这就是CSS reset。
*/
import 'styles/reset.css'
import 'styles/iconfont.css'

/*
//该css样式用于解决移动端1像素边框问题。问题分析:有些手机的屏幕分辨率较高,是2-3倍屏幕。css样式中border:1px solid red;在2倍屏下,显示的并不是1个物理像素,而是2个物理像素。为了解决这个问题,引入border.css是非常有必要的。
*/
import 'styles/border.css'

// fastclick 解决移动端click事件延迟300ms和点击穿透问题
import fastClick from 'fastclick'
// 轮播图插件
import VueAwesomeSwiper from 'vue-awesome-swiper'
import 'swiper/dist/css/swiper.css'

import store from './store/index'

// 解决部分手机白屏问题
import "babel-polyfill"

fastClick.attach(document.body)
Vue.config.productionTip = false
// 全局使用轮播图插件
Vue.use(VueAwesomeSwiper)

/* eslint-disable no-new */
new Vue({
  el: '#app',
  router,
  store,
  components: { App },
  template: '<App/>'
})
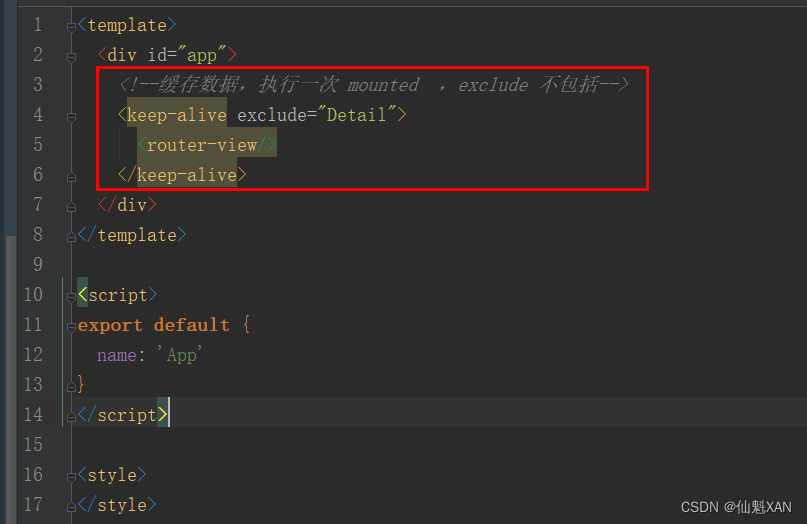
6、App.vue 中的 <router-view/> 用于显示路由切换的界面,<keep-alive exclude="Detail"> 标签,作用是缓存 vue ,执行一次 mounted ,exclude 的 vue 则不做缓存
<template>
  <div id="app">
    <!--缓存数据,执行一次 mounted  ,exclude 不包括-->
    <keep-alive exclude="Detail">
      <router-view/>
    </keep-alive>
  </div>
</template>

<script>
export default {
  name: 'App'
}
</script>

<style>
</style>
7、pages 是三个路由界面,以及路由界面里面的拆分页面,拆分的目的也是把复杂的界面简单化
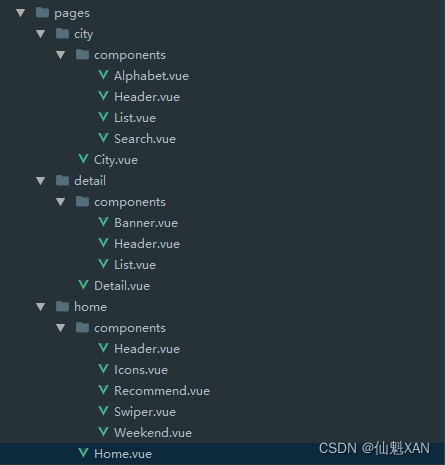
8、 Home 界面,包含 5 个拆分页面,Home.vue 主要功能是,从 store 中获取 城市信息,然后axios.get 获取数据,把数据传递给各个子页面,
<template>
    <div>
      <!--:city='city' 数据向子组件传递-->
     <home-header></home-header>
     <home-swiper :list="swiperList"></home-swiper>
      <home-icons :list="iconsList"></home-icons>
      <home-recommend :list="recommendsList"></home-recommend>
      <home-weekend :list="weekendsList"></home-weekend>
    </div>
</template>

<script>
import HomeHeader from './components/Header'
import HomeSwiper from './components/Swiper.vue'
import HomeIcons from './components/Icons.vue'
import HomeRecommend from './components/Recommend.vue'
import HomeWeekend from './components/Weekend.vue'

// 获取网络数据
import axios from 'axios'
import {mapState} from 'vuex'

export default {
  name: 'Home',
  components: {
    HomeHeader,
    HomeSwiper,
    HomeIcons,
    HomeRecommend,
    HomeWeekend
  },
  data (){
  return{
    swiperList:[],
    iconsList:[],
    recommendsList:[],
    weekendsList:[],
    lastCity:'',
  }

  },
computed:{
...mapState(['city'])
},
  methods:{
    getHomeInfo(){
      axios.get('/api/index.json?city='+this.city).then(this.getHomeInfoSucc)
    },
    getHomeInfoSucc(res){
      console.log(res)
      const result = res.data.ret
      if(result && res.data.data){
        const data = res.data.data
        this.swiperList = data.swiperList
        this.iconsList = data.iconsList
        this.recommendsList = data.recommendsList
        this.weekendsList = data.weekendsList

      }
    },
  },

  mounted(){
    this.lastCity = this.city
    this.getHomeInfo()
  },
  activated(){
    if(this.lastCity !== this.city){
      this.lastCity = this.city
      this.getHomeInfo()
    }
  },
}
</script>

<!-- Add "scoped" attribute to limit CSS to this component only -->
<style>
    * {
        margin: 0px;
        padding: 0px;
    }
</style>
9、Home 界面中的 Header ,包含输入框,显示当前城市,点击城市可以跳转到城市选择界面
<template>
<div class="header">
<div class="header-left">
<div class="iconfont back-icon"></div>
</div>
<div class="header-input">
<span class="iconfont"></span>
输入城市/景点/游玩主题</div>
<router-link to="/city">
<div class="header-right">{{this.city}}
<span class="iconfont arrow-icon"></span>
</div>
</router-link>
</div>
</template>
<script>
// 映射属性
import {mapState} from 'vuex'
export default {
name: 'HomeHeader',
// 接收父组件的数据
props:{
},
computed :{
...mapState(['city'])
},
data: function(){
return {}
}
}
</script>
<!-- Add "scoped" attribute to limit CSS to this component only -->
<style lang="stylus" scoped>
@import "~styles/varibles.styl";
.header{
display: flex;
line-height: $headerHeight;
background: $bgColor;
color: #ffffff;
}
.header .header-left{
width: 0.64rem;
float: left;
}
.header .header-left .back-icon {
text-align: center;
font-size: 0.4rem;
}
.header .header-input{
flex: 1;
background: #fff;
border-radius: 0.1rem;
margin-top: 0.12rem;
margin-left: 0.2rem;
padding-left: 0.2rem;
height: 0.64rem;
line-height: 0.64rem;
color: #ccc;
}
.header .header-right{
min-width: 1.04rem;
padding: 0 .1rem;
float: right;
text-align: center;
color:white;
}
.header .header-right .arrow-icon{
margin-left: -0.04rem;
font-size: 0.24rem;
}
</style>
10、Home 界面中的 Swiper 是一个轮播组件,轮播图片
<template>
    <div class="wrapper">
      <swiper :options="swiperOption" v-if="showSwiper">
        <swiper-slide v-for="item of list" :key="item.id">
          <img class="swiper-img" :src="item.url">
        </swiper-slide>
        <div class="swiper-pagination" slot="pagination"></div>
      </swiper>
    </div>
</template>

<script>
export default {
  name: 'HomeSwiper',
  props:{
    list:Array
  },
  data: function () {
    return {
      swiperOption: {
        // 下面的圆点
        pagination:'.swiper-pagination',
        // 循环轮播
        loop:true
      },
    }
  },
  computed:{
    showSwiper(){
      return this.list.length
    }
  }
}
</script>

<!-- Add "scoped" attribute to limit CSS to this component only -->
<style lang="stylus" scoped>
  // >>> (scoped 阻挡后 >>>穿透 )
  .wrapper >>> .swiper-pagination-bullet{
    background: #fff;
  }
  .wrapper{
    width: 100%;
    height: 0;
    padding-bottom: 30.45%;
    background: #eee;
  }
    .swiper-img{
      width: 100%;
    }
</style>
11、Home 界面中的 Icons ,显示icon图标组
<template>
    <div class="icons">
      <swiper :options="swiperOption">
        <swiper-slide v-for="(page, indexPage) of pages" :key="indexPage">
      <div class="icon" v-for="item of page" :key="item.id">
        <div class="icon-img">
          <img class="icon-img-content" :src="item.imgUrl">
        </div>
        <p class="icon-desc">{{item.desc}}</p>
      </div>
        </swiper-slide>
        </swiper>
    </div>

</template>

<script>
    export default {
        name: 'HomeIcons',
      props:{
        list:Array
      },
        data: function () {
            return {
              swiperOption:{
                autoplay:false
              }
            }
        },

  computed:{
    pages (){
      const pages = []
      this.list.forEach((item, index) =>{
      const page = Math.floor(index/8)
      if(pages[page]==null){
        pages[page]=[]
      }
      pages[page].push(item)
      })
      return pages
      }
    }
  }
</script>

<!-- Add "scoped" attribute to limit CSS to this component only -->
<style lang="stylus" scoped>
  @import "~styles/varibles.styl";
  @import "~styles/mixins.styl";
  .icons >>> .swiper-wrapper{
    height: 0;
    padding-bottom: 50%;
  }
  .icons{
    margin-top: 0.2rem;
  }
  .icons .icon{
    position: relative;
    overflow: hidden;
    float: left;
    width: 25%;
    padding-bottom: 25%;
  }
  .icons .icon .icon-img{
    position: absolute;
    top: 0;
    left: 0;
    right: 0;
    bottom: .44rem;
  }
  .icons .icon .icon-img .icon-img-content{
    height: 90%;
    display: block;
    margin: 0 auto;
  }
  .icons .icon .icon-desc{
    position: absolute;
    left: 0;
    right: 0;
    bottom: 0;
    height: .44rem;
    line-height: .44rem;
    color: $darkTextColor;
    text-align: center;
    font-size: 0.2rem;
    /*文字过多,则 ... 显示*/
    ellipsis()

  }
</style>
12、Home 界面中的 Recommend,热门推荐,点击可以跳转到热门推荐的详情界面
<template>
    <div>
      <div class="title">热门推荐</div>
      <ul class="item-wrapper">
        <!--border-bottom 每个下面有线-->
        <router-link tag="li" class="item border-bottom"
            v-for="item of list"
            :key="item.id"
            :to="/detail/ + item.id"
          >
          <img class="item-img" :src="item.imgUrl">
          <div class="item-info">
            <p class="item-title">{{item.title}}</p>
            <p class="item-desc">{{item.desc}}</p>
            <button class="item-button">查看详情</button>
          </div>
        </router-link>
      </ul>
    </div>
</template>

<script>
    export default {
        name: 'HomeRecommend',
      props:{
        list:Array
      },
        data: function () {
            return {

            }
        }
    }
</script>

<!-- Add "scoped" attribute to limit CSS to this component only -->
<style lang="stylus" scoped>
  @import "~styles/mixins.styl";
  .title{
    margin-top: 0.2rem;
    line-height: 0.8rem;
    background: #eee;
    text-indent: 0.2rem;
  }
  .item-wrapper{
    padding: 0.15rem;
  }
  .item{
    overflow: hidden;
    display: flex;
    height: 1.9rem;
  }
  .item .item-info{
    flex:1;
    padding: 0.1rem;
    /*让 ellipsis() 生效*/
    min-width: 0;
  }
  .item .item-img {
    width: 1.7rem;
    height: 1.7rem;
    padding: 0.1rem;
  }
  .item .item-info .item-title{
    line-height: 0.54rem;
    font-size: .32rem;
    ellipsis()
  }
  .item .item-info .item-desc{
    line-height: 0.4rem;
    color: #ccc;
    ellipsis()
  }
  .item .item-info .item-button{
    line-height: .44rem;
    margin-top: 0.2rem;
    background: #ff9300;
    padding: 0 0.2rem;
    border-radius: 0.06rem;
    color: #fff;
  }
</style>
13、Home 界面中的 Weekend,周末去哪页面
<template>
    <div>
      <div class="title">周末去哪儿</div>
      <ul class="item-wrapper">
        <!--border-bottom 每个下面有线-->
        <li class="item border-bottom" v-for="item of list" :key="item.id">
          <img class="item-img" :src="item.imgUrl">
          <div class="item-info">
            <p class="item-title">{{item.title}}</p>
            <p class="item-desc">{{item.desc}}</p>
          </div>
        </li>
      </ul>
    </div>
</template>

<script>
    export default {
        name: 'HomeWeekend',
      props:{
      list:Array
    },
        data: function () {
            return {}
        }
    }
</script>

<!-- Add "scoped" attribute to limit CSS to this component only -->
<style lang="stylus" scoped>
  @import "~styles/mixins.styl";
  .title{
    line-height: 0.8rem;
    background: #eee;
    text-indent: 0.2rem;
  }
  .item-wrapper{
    padding: 0.15rem;
  }
  .item {
    overflow: hidden;
    height: 0;
    padding-bottom: 47%;
  }
  .item .item-img {
    width: 100%;
  }
  .item .item-info .item-title{
    line-height: 0.54rem;
    font-size: .32rem;
    ellipsis()
  }
  .item .item-info .item-desc{
    line-height: 0.4rem;
    font-size: 0.2rem;
    color: #ccc;
    ellipsis()
  }
</style>
14、 City 界面,包含 4 个拆分页面,City.vue 主要功能是,axios.get 获取数据,以及获取 Alphabet传递的数据,对应把数据传递给各个子页面
<template>
  <div>
    <city-header></city-header>
    <city-search :cities="cities"></city-search>
    <city-list :cities="cities" :hot="hotCities" :letter="letter"></city-list>
    <city-alphabet :cities="cities" @change="handleAlphabetEvent"></city-alphabet>
  </div>
</template>

<script>
  import CityHeader from './components/Header.vue'
  import CitySearch from './components/Search.vue'
  import CityList from './components/List.vue'
  import CityAlphabet from './components/Alphabet.vue'
  import axios from 'axios'
  export default {
    name: 'City',
    components:{
      CityHeader,
      CitySearch,
      CityList,
      CityAlphabet,
    },
    data: function () {
      return {
        cities:{},
        hotCities:[],
        letter:''
      }
    },

    methods:{
      getCityInfo(){
        axios.get('/api/city.json').then(this.getCityInfoSucc)
      },

      getCityInfoSucc(res){
        res = res.data
        if(res.ret && res.data){
          const data = res.data
          this.cities = data.cities
          this.hotCities = data.hotCities
          console.log(res)
        }
      },

      handleAlphabetEvent(alpha){
        this.letter = alpha
      }
    },
  mounted(){
    this.getCityInfo()
  }
  }
</script>

<!-- Add "scoped" attribute to limit CSS to this component only -->
<style>

</style>
15、City 界面中的 Header,包含标题,以及返回键,点击回到 Home 界面
<template>
<div class="header">
城市选择
<router-link to="/">
<div class="iconfont back-icon"></div>
</router-link>
</div>
</template>
<script>
export default {
name: 'CityHeader',
data: function () {
return {
msg: 'Welcome to Your Vue.js App'
}
}
}
</script>
<!-- Add "scoped" attribute to limit CSS to this component only -->
<style lang="stylus" scoped>
@import "~styles/varibles.styl";
.header{
position: relative;
overflow: hidden;
height: $headerHeight;
line-height: $headerHeight;
background: $bgColor;
color: #ffffff;
text-align: center;
font-size: 0.4rem;
}
.header .back-icon{
position: absolute;
top:0;
left: 0;
width: 0.64rem;
text-align: center;
font-size: 0.4rem;
color: white;
}
</style>
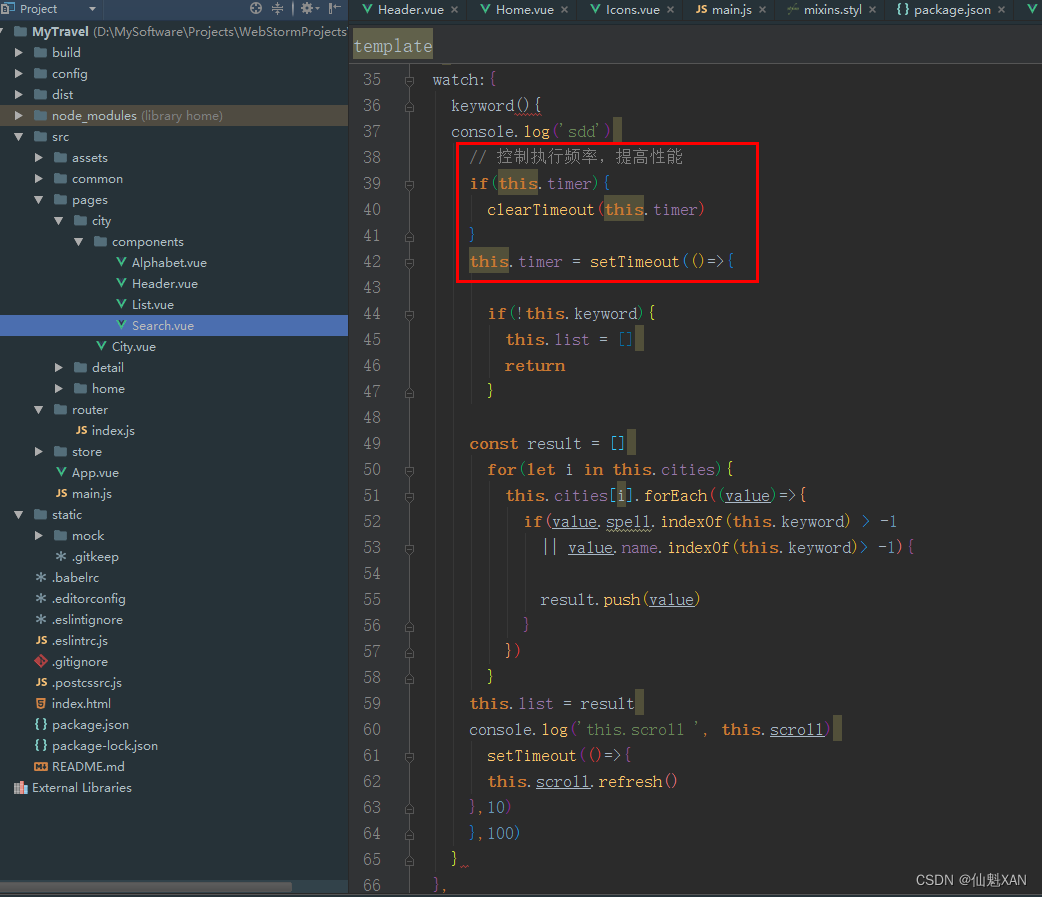
16、City 界面中的 Search,包含输入框,以及搜索出城市的列表,和没有匹配数据的提示;其中搜索功能是在watch 中监听输入的变化,进行在城市名字和拼音中是否包含,添加到结果中去,从而实现搜索功能
<template>
  <div>
    <div class="search">
      <input v-model="keyword" class="search-input" placeholder="输入城市">
    </div>
    <div v-show="keyword" class="search-content" ref="search">
      <ul>
        <li class="search-item border-bottom"
            v-for="item of list"
            :ket="item.id"
            @click="handleClickCity(item.name)"
          >
          {{item.name}}</li>
        <li class="search-item border-bottom" v-show="hasNoData">没有匹配数据</li>
      </ul>
    </div>
  </div>
</template>

<script>
  import BScroll from 'better-scroll'
  import {mapActions} from 'vuex'
export default {
  name: 'CitySearch',
  props:{
    cities:Object
  },
  data: function () {
    return {
      keyword:'',
      list:[],
      timer:null
    }
  },
  watch:{
    keyword(){
    console.log('sdd')
      // 控制执行频率,提高性能
      if(this.timer){
        clearTimeout(this.timer)
      }
      this.timer = setTimeout(()=>{

        if(!this.keyword){
          this.list = []
          return
        }

      const result = []
        for(let i in this.cities){
          this.cities[i].forEach((value)=>{
            if(value.spell.indexOf(this.keyword) > -1
              || value.name.indexOf(this.keyword)> -1){

              result.push(value)
            }
          })
        }
      this.list = result
      console.log('this.scroll ', this.scroll)
        setTimeout(()=>{
        this.scroll.refresh()
      },10)
      },100)
    }
  },
  computed:{
    hasNoData(){

      return this.list.length==0
    }
  },
  methods:{
    handleClickCity(city){
      this.changeCity(city)
      this.$router.push('/')
    },
  ...mapActions(['changeCity'])
  },
  mounted(){
    this.scroll = new BScroll(this.$refs.search,{click:true})
  }
}
</script>

<!-- Add "scoped" attribute to limit CSS to this component only -->
<style lang="stylus" scoped>
  @import "~styles/varibles.styl";
  .search{
    height: 0.72rem;
    padding: 0 0.1rem;
    background: $bgColor;
  }

  .search .search-input{
    box-sizing: border-box;
    padding: 0 0.1rem;
    width: 100%;
    height: 0.62rem;
    line-height: 0.62rem;
    border-radius: 0.06rem;
    text-align: center;
    color: #777;
  }
  .search-content{
    z-index: 1;
    position: absolute;
    overflow: hidden;
    top:1.58rem;
    bottom: 0;
    right: 0;
    left: 0;
    background: #eee;
  }

  .search-content .search-item{
    line-height: 0.62rem;
    padding-left: 0.2rem;
    background: #fff;
  }


</style>
17、City 界面中的 List,包含当前城市,热门城市,以及以首字母排列的城市列表,点击热门城市,以及城市列表的城市,都会跳转到对应城市的 Home 界面
<template>
    <div class="list" ref="wrapper">
      <div>
        <div class="area">
          <div class="title border-topbottom">当前城市</div>
          <div class="button-list">
            <div class="button-wrapper">
              <div class="button">{{this.currentCity}}</div>
            </div>
          </div>
        </div>
        <div class="area">
          <div class="title border-topbottom">热门城市</div>
          <div class="button-list">
            <div class="button-wrapper"
                 v-for="item of hot"
                 :key="item.id"
                 v-on:click="handleClickCity(item.name)"
              >
              <div class="button">{{item.name}}</div>
            </div>
          </div>
        </div>
        <div class="area" v-for="(items,key) of cities" :key="key" :ref="key">
          <div class="title border-topbottom">{{key}}</div>
          <div class="item-list">
            <div class="item border-bottom"
                 v-for="item of items"
                 :key="item.id"
                 v-on:click="handleClickCity(item.name)"
              >
              {{item.name}}</div>
          </div>
        </div>
      </div>
    </div>
</template>

<script>
  import BScroll from 'better-scroll'
  import {mapState, mapActions} from 'vuex'
export default {
  name: 'CityList',
  props:{
    hot:Array,
    cities:Object,
    letter:String
  },
  data: function () {
    return {
    }
  },
  computed:{
    ...mapState({
    currentCity:'city'
  })
  },
  watch:{
    letter(){
      if(!this.letter.isEmpty){
        // 监听字母点击,跳转
        console.log(this.letter)
        const element = this.$refs[this.letter][0]
        console.log(element)
        this.scroll.scrollToElement(element)
      }
    }
  },

  methods:{
    handleClickCity(city){
      this.changeCity(city)
      this.$router.push('/')
    },
    ...mapActions(['changeCity'])
  },
  mounted(){
    // 城市数据先创建,然后在 scroll 不能可能 scroll 在没有数据的时候构建,从而使得scroll无法滚动
    setTimeout(()=>{
      this.scroll = new BScroll(this.$refs.wrapper,{click:true})
      console.log(' this.scroll ',this.scroll)
    },100)

  },
}
</script>

<!-- Add "scoped" attribute to limit CSS to this component only -->
<style lang="stylus" scoped>
  @import "~styles/varibles.styl";

  .list{
    overflow: hidden;
    position: absolute;
    top:1.58rem;
    bottom:0;
    left:0;
    right:0;
  }
  .border-topbottom::before{
    border-color: #ccc;
  }
  .border-topbottom::after{
    border-color: #ccc;
  }
  .border-bottom::before{
    border-color: #ccc;
  }
.title{
  padding-left: 0.2rem;
  background: #eee;
  color: #666;
  line-height: 0.44rem;
  font-size: 0.24rem;
}
  .button-list{
    overflow: hidden;
    padding: 0.1rem 0.6rem 0.1rem 0.1rem;
  }
  .button-list .button-wrapper{
    width: 33.33%;
    float: left;
  }
  .button-list .button-wrapper .button{
    margin: 0.1rem;
    padding: 0.1rem 0;
    border: 0.02rem solid #ccc;
    text-align: center;
    border-radius: 0.06rem;
  }
  .item-list .item{
    line-height: 0.76rem;
    padding-left: 0.2rem;
  }

</style>
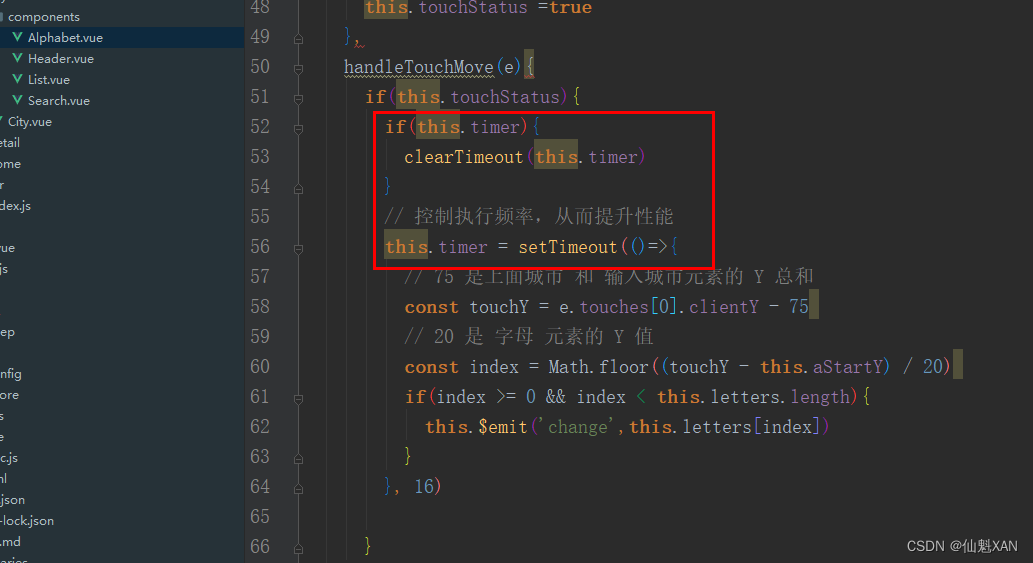
18、City 界面中的 Alphabet,包含所有城市列表的首字母组成的列表,其中通过touch的位置计算出当前选择的哪个字母,传递给 City,City 在传递给 List ,显示对应首字母城市列表
<template>
    <div class="alphabet">
      <ul>
        <li class="item"
            v-for="item of letters"
            @click="handleOnClick"
            @touchstart.prevent="handleTouchStart"
            @touchmove="handleTouchMove"
            @touchend="handleTouchEnd"
            :ref="item"
          >{{item}}</li>
      </ul>
    </div>
</template>

<script>
export default {
  name: 'CityAlphabet',
  props:{
    cities:Object
  },
  data: function () {
    return {
      touchStatus:false,
      aStartY:0,
      // 性能优化
      timer:null
    }
  },
  computed:{
    letters(){
      const letters =[]
      for(let i in this.cities){
        letters.push(i)
      }
      return letters
    }
  },
  updated(){
    this.aStartY = this.$refs['A'][0].offsetTop
  },

  methods:{
    handleOnClick(e){
      this.$emit('change', e.target.innerText)
    },
    handleTouchStart(){
      this.touchStatus =true
    },
    handleTouchMove(e){
      if(this.touchStatus){
        if(this.timer){
          clearTimeout(this.timer)
        }
        // 控制执行频率,从而提升性能
        this.timer = setTimeout(()=>{
          // 75 是上面城市 和 输入城市元素的 Y 总和
          const touchY = e.touches[0].clientY - 75
          // 20 是 字母 元素的 Y 值
          const index = Math.floor((touchY - this.aStartY) / 20)
          if(index >= 0 && index < this.letters.length){
            this.$emit('change',this.letters[index])
          }
        }, 16)

      }
    },
    handleTouchEnd(){
      this.touchStatus =false
    },

  }
}
</script>

<!-- Add "scoped" attribute to limit CSS to this component only -->
<style lang="stylus" scoped>
  @import "~styles/varibles.styl";

.alphabet{
  position: absolute;
  top: 1.58rem;
  right: 0;
  bottom: 0;
  width: 0.4rem;
  display: flex;
  flex-direction: column;
  justify-content: center;
}
  .alphabet .item{
    color: $bgColor;
    text-align: center;
    line-height: 0.4rem;
  }

</style>
19、 Detail界面,包含 3 个拆分页面,Detail.vue 主要功能是,axios.get 获取数据,对应把数据传递给各个子页面
<template>
  <div class="detail">
    <detail-banner
      :sightName="sightName"
      :bannerImg="bannerImg"
      :gallaryImgs="gallaryImgs"
      ></detail-banner>
    <detail-header></detail-header>
    <div class="content">
      <detail-list :list="list"></detail-list>
    </div>
  </div>
</template>

<script>
  import DetailBanner from './components/Banner.vue'
  import DetailHeader from './components/Header.vue'
  import DetailList from './components/List.vue'
  import axios from 'axios'
  export default {
    name: 'Detail',
    components:{
      DetailBanner,
      DetailHeader,
      DetailList,
    },
    data: function () {
      return {
        sightName:'',
        bannerImg:'',
        gallaryImgs:[],
        list: []
      }
    },
    methods:{
      getDetailInfo() {
//        axios.get('/api/detail.json?id='+this.$route.params.id)
        axios.get('/api/detail.json',{
          params:{
            id: this.$route.params.id
          }
        }).then(this.handleGetDataSucc)

      },
       handleGetDataSucc(res){
        res = res.data
        if(res.ret && res.data){
          const data = res.data
          this.sightName = data.sightName
          this.bannerImg = data.bannerImg
          this.gallaryImgs = data.gallaryImgs
          this.list = data.categoryList
        }
      }
    },

    mounted(){
      this.getDetailInfo()
    }
  }
</script>

<!-- Add "scoped" attribute to limit CSS to this component only -->
<style lang="stylus" scoped>
  .content{
    height: 20rem;
  }
</style>
20、Detail 界面中的 Banner ,包含一个图片展示,以及一个图片集轮播组件(默认隐藏);其中点击图片,就会显示图片集轮播
<template>
<div>
<div class="banner" @click="onClickBanner">
<img class="banner-img" :src="bannerImg"/>
<div class="banner-info">
<div class="banner-title">{{this.sightName}}</div>
<div class="banner-number"><span class="iconfont banner-icon"></span>78</div>
</div>
</div>
<fade-animation>
<common-gallary
:imgs="gallaryImgs"
@close="handleGallaryClose"
v-show="isShowGallary"
></common-gallary>
</fade-animation>
</div>
</template>
<script>
import CommonGallary from 'common/gallary/Gallary'
import FadeAnimation from 'common/fade/FadeAnimation'
export default {
name: 'DetailBanner',
props:{
sightName:String,
bannerImg:String,
gallaryImgs:Array,
},
components:{
CommonGallary,
FadeAnimation,
},
data: function () {
return {
isShowGallary: false,
}
},
methods:{
onClickBanner(){
this.isShowGallary = true
},
handleGallaryClose(){
this.isShowGallary = false
},
},
}
</script>
<!-- Add "scoped" attribute to limit CSS to this component only -->
<style lang="stylus" scoped>
.banner{
position: relative;
overflow: hidden;
height: 0;
padding-bottom: 50%;
background: green;
}
.banner .banner-img{
width: 100%;
}
.banner .banner-info{
display: flex;
position: absolute;
left: 0;
right: 0;
bottom: 0;
line-height: 0.6rem;
color: #fff;
background-image: linear-gradient(top,rgba(0,0,0,0),rgba(0,0,0,0.8));
}
.banner .banner-info .banner-title{
flex: 1;
font-size: 0.32rem;
padding: 0 0.2rem;
}
.banner .banner-info .banner-number{
height: 0.32rem;
line-height: 0.32rem;
padding: 0 0.4rem;
margin-top: 0.14rem;
border-radius: 0.2rem;
background: rgba(0,0,0,0.8);
font-size: 0.24rem;
}
.banner .banner-info .banner-number .banner-icon{
font-size: 0.24rem;
padding: 0.1rem;
}
</style>
21、Detail 界面中的 Header,包含绝对位置的返回按钮,以及一个固定位置的返回按钮标题;根据当前页面的滚动情况,动态切换不同位置的按钮显隐
<template>
<div class="header">
<router-link tag="div" to='/' class="header-abs" v-show="showAbs">
<div class="iconfont back-abs-icon"></div>
</router-link>
<router-link tag="div" to='/' class="header-fixed" v-show="!showAbs"
:style="styleOpacity"
>
<div class="iconfont back-fixed-icon"></div>
景点详情
</router-link>
</div>
</template>
<script>
export default {
name: 'DetailHeader',
data: function () {
return {
showAbs:true,
styleOpacity:{
opacity:0
}
}
},
methods:{
handleScroll()
{
console.log('handleScroll')
const top = document.documentElement.scrollTop
console.warn('top ', top)
if (top > 60) {
this.showAbs = false
const opacity = top/140 > 1? 1: top/140
this.styleOpacity = {
opacity,
}
} else {
this.showAbs = true
this.styleOpacity = {
opacity:0,
}
}
},
},
mounted(){
window.addEventListener('scroll',this.handleScroll)
},
unmounted(){
window.removeEventListener('scroll',this.handleScroll)
},
}
</script>
<!-- Add "scoped" attribute to limit CSS to this component only -->
<style lang="stylus" scoped>
@import "~styles/varibles.styl";
.header-abs{
position: absolute;
left:0.2rem;
top:0.2rem;
width: 0.8rem;
height: 0.8rem;
line-height: 0.8rem;
text-align: center;
border-radius: 0.4rem;
background: rgba(0,0,0,0.8);
}
.header-abs .back-abs-icon{
color: #fff;
font-size: 0.4rem;
}
.header-fixed{
position: fixed;
z-index: 2;
top:0;
left:0;
right:0;
overflow: hidden;
height: $headerHeight;
line-height: $headerHeight;
background: $bgColor;
color: #ffffff;
text-align: center;
font-size: 0.4rem;
}
.header-fixed .back-fixed-icon{
position: absolute;
top:0;
left: 0;
width: 0.64rem;
text-align: center;
font-size: 0.4rem;
color: white;
}
</style>
22、Detail 界面中的 List,一个简单的列表信息展示
<template>
  <div class="list">
    <div class="item" v-for="(item,id) of list" :key="id">
      <div class="item-title border-bottom">
        <span class="item-title-icon"></span>
        {{item.title}}</div>
      <div v-if="item.children" class="item-children">
        <detail-list :list="item.children"></detail-list>
      </div>
    </div>

  </div>
</template>

<script>
  export default {
    name: 'DetailList',
    props:{
      list:Array
    },
    data: function () {
      return {
        msg: 'Welcome to Your Vue.js App'
      }
    }
  }
</script>

<!-- Add "scoped" attribute to limit CSS to this component only -->
<style lang="stylus" scoped>

  .item-title-icon{
    position: relative;
    left: .06rem;
    top: .06rem;
    display: inline-block;
    width: .36rem;
    height: .36rem;
    background: url(http://s.qunarzz.com/piao/image/touch/sight/detail.png) 0 -.45rem no-repeat;
    margin-right: .1rem;
    background-size: .4rem 3rem;
  }
  .item-title{
    line-height: 0.8rem;
    font-size: 0.32rem;
    padding: 0 0.2rem;
  }
  .item-children{
    padding: 0 0.4rem;
  }
</style>
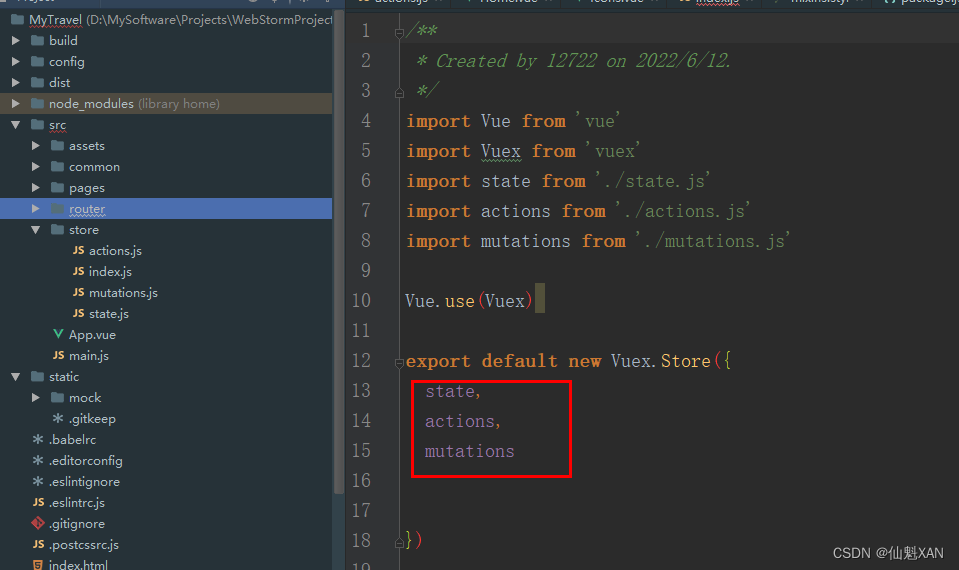
七、router路由管理, store vuex 状态管理 说明
1、router路由管理,三个路由 path(/ 、/city、/detail/id),并且添加路由地址切换回 scroll 都置于顶部处理
import Vue from 'vue'
import Router from 'vue-router'
import Home from '@/pages/home/Home'
import City from '@/pages/city/City'
import Detail from '@/pages/detail/Detail'

Vue.use(Router)

/**
 * 路由
 */
export default new Router({
  routes: [
    {
      path: '/',
      name: 'Home',
      //component: Home
      // 异步加载组件,避免大量的代码堆积到 app.js 中,()=> import( '@/pages/city/City') 可以拆分代码到其他的projectX.js中
      component: ()=> import( '@/pages/home/Home')
    },
    {
      path: '/city',
      name: 'City',
      //component: City
      component: ()=>import('@/pages/city/City')
    },
    {
      //动态路由
      path: '/detail/:id',
      name: 'Detail',
      //component: Detail
      component: ()=>import('@/pages/detail/Detail')
    },
  ],

  //添加路由切换的时候,scroll ,都回到顶部处理
  scrollBehavior(to, from, savedPosition) {
    // 回到顶部
    return { x: 0, y:0 }
  },


})
2、store 添加对某个全局参数的管理
state.js

/**
 * Created by 12722 on 2022/6/13.
 */
let defaultCity = '桂林'
try{
  if (localStorage.city){
    defaultCity = localStorage.city
  }
}
catch(e){}

export default{
  city:defaultCity
}


action.js
/**
 * Created by 12722 on 2022/6/13.
 */
export default {
  changeCity(context,city){
    context.commit('changeCity',city)
  }
}


mutations.js
/**
 * Created by 12722 on 2022/6/13.
 */
export default {
  changeCity(state, city){
    state.city = city
    try{ // 本地化保存
      localStorage.city = city}
    catch(e){}

  }
}
八、几个性能优化点说明
1、App.vue 中的 <keep-alive exclude="Detail"></keep-alive>
keep-alive 会缓存一些数据,在界面切换后,也不销毁,例如mounted函数中 axios.get数据,从而避免 axios.get 频繁访问
2、setTimeout 函数的使用,例如在 City 界面中 Search.vue 进行输入搜索时,可以控制搜索频率,间接提高性能;以及类似在 City 界面中 Alphabet.vue 进行 Touch 选中 字母的时候,也可控制搜索频率,间接提高性能
九、axios 获取服务端数据说明
1、例如 Home.vue 中 mounted 使用 axios.get 获取服务端数据时
使用 axios.get('/api/index.json?city='+this.city).then(this.getHomeInfoSucc) 中的
/api/index.json?city='+this.city 在浏览器中获取不到数据,为什么 axios.get 可以获得呢

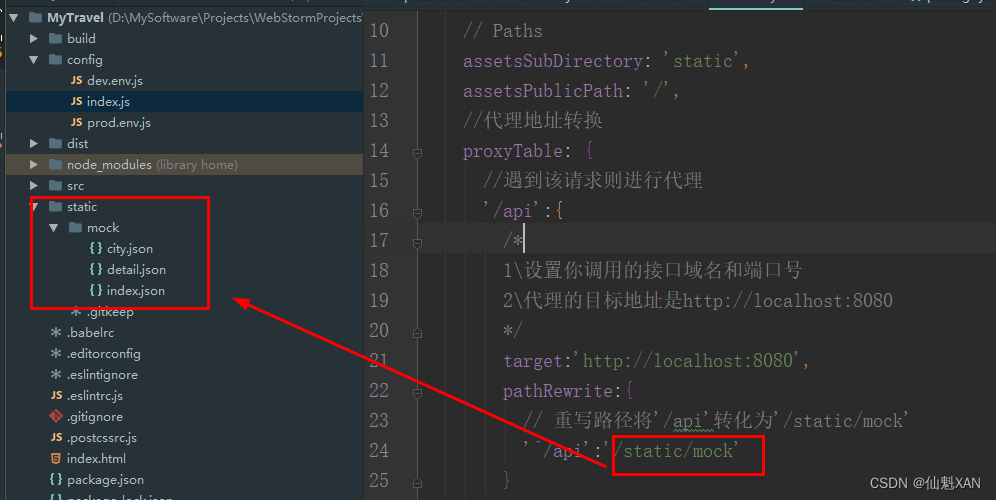
2、其实,在 config/index.js 做代理配置,当遇到 /api 就会进行对应转换,从而使得 axios.get 获取到对应的数据
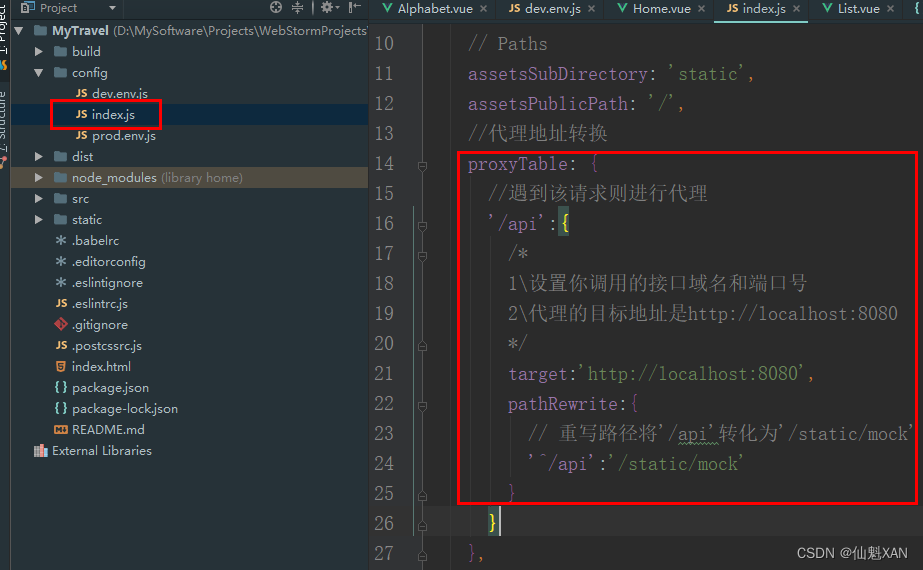
3、axios.get 获取的数据 static/mock 文件夹下的数据
十、src/common 的共有 vue
1、Gallary.vue 全屏大图滑动轮播图片
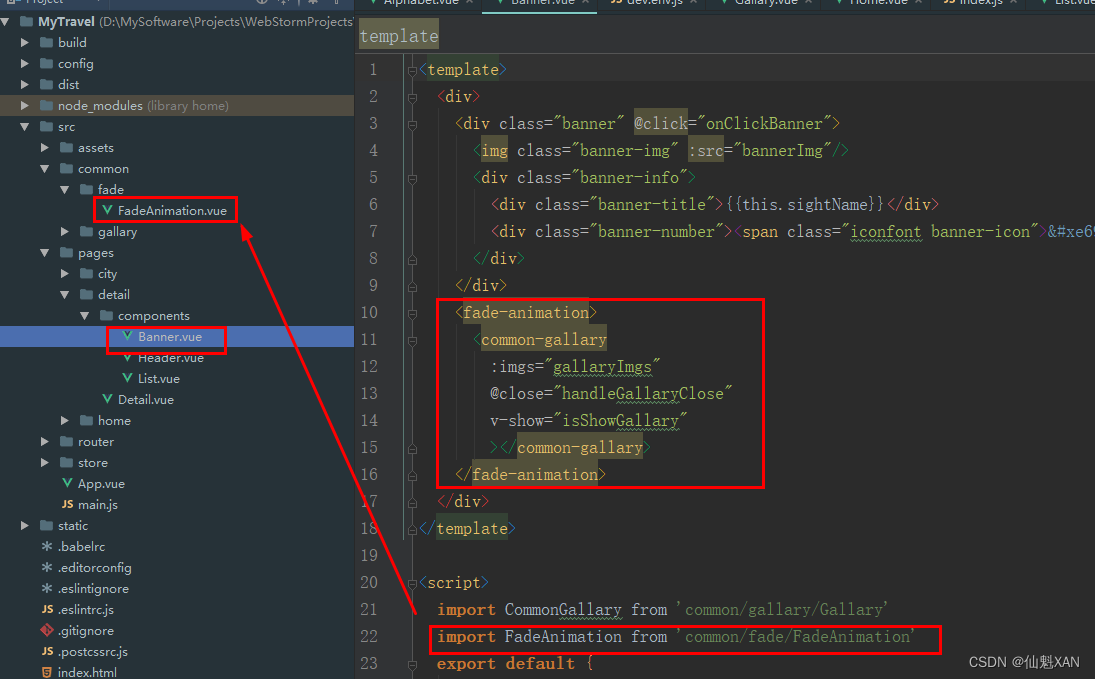
只要引入Gallary.vue,对应的添加传输图片列表数据,并且添加对应关闭事件,就可以轻易实现全屏大图滑动轮播图片

参考引用 detail/components/Banner.vue :

2、FadeAnimation.vue 渐隐渐现动画效果
只要引入FadeAnimation.vue 包裹需要渐隐渐现的元素即可
参考引用 detail/components/Banner.vue :
十一、src/assets/styles 存放css 样式、常用的变量样式参数等
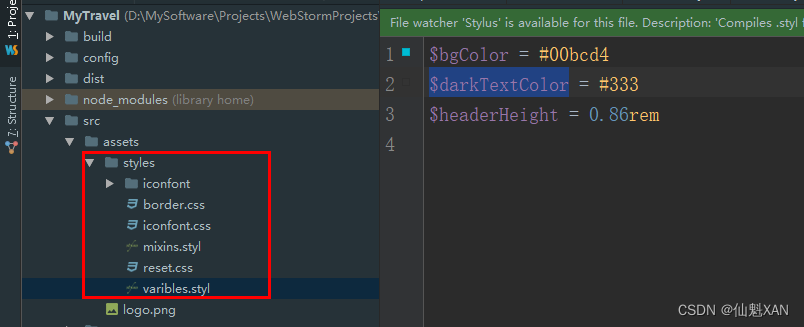
1、mixins.styl 功能是:字显示超出范围,则用三个点... 表示,例如 ‘字太多了...’

十二、该房去哪儿网的演示项目源码下载
仅供学习参考使用:
代码运行(最好的运行端口为 8080):
1、npm install
2、npm run start
相关文章
- 用vue开发一个猫眼电影web app
- 在vue中创建多个ueditor实例
- 关于个人开源项目(vue app)的一些总结
- vue.js语法
- vue-cli3.0 脚手架搭建项目的过程详解
- [Vue] Get up and running with vue-router
- [Vue] Get up and running with vue-router
- html、vue、uni-app微信小程序的区别
- vue-router路由的安装、配置、具体用法和Vue-router学习笔记
- 前端必备技能知识:vue.js操作excel表格,实现导入导出功能
- Vue CLI 4.x安装成功,但是无法运行vue-V等指令。报错vue -V 不是内部或外部命令,也不是可运行的程序或批处理文件解决方案!!!
- vue:export default 和 export 区别(difference between Vue 'export default' and 'new Vue')
- iOS app store无法提交以供审核 App隐私
- uni-app与Vue的区别
- 计算机毕设 SSM Vue的疫情防控物业管理系统
- 前端MVC Vue2学习总结(二)——Vue的实例、生命周期与Vue脚手架(vue-cli)
- vue项目更改端口号
- 157:vue+openlayers 地图上添加Echarts饼图
- 053:vue+openlayers使用setPosition来定位弹窗(示例代码)