
使用Junit对Android应用进行单元测试
在本文中,你将会学习到如何在Eclipse中创建Android JUnit的单元测试工程以及在不同的条件下创建及运行自动测试用例。
准备工作
本文假设读者已经有一定的Android基础知识,并且已经安装了Eclipse和Android SDK等开发工具。本文将指导读者如何将Android Junit框架应用到Android应用中去。本文还特别重点展示了如何测试Android中的Activity和如何识别程序中的错误。
本文的示例代码可以在http://code.google.com/p/simple-calc-unit-testing/中下载
步骤1 被测试的应用SimpleCalc概况
在本文中,将以一个写好了的应用SimpleCalc简单计算器为例子进行讲解。这个简单计算器有两个功能,允许用户输入两个数并将它们相加或相乘,最后显示结果,如下图所示:
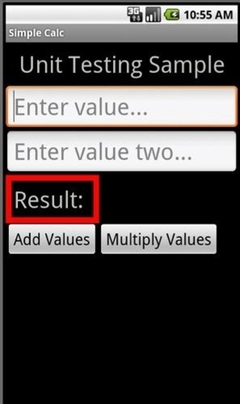
步骤2 SimpleCalc的的界面设计
由于应用比较简单,只占一屏,所以我们在/res/layout/main.xml中设计如下代码所示:
linearlayout p="" ="" xmlns:android="http://schemas.android.com/apk/res/android"
android:orientation="vertical" android:layout_width="fill_parent"
android:layout_height="fill_parent"
textview p="" ="" android:layout_width="fill_parent"
android:layout_height="wrap_content" android:text="@string/hello"
android:gravity="center_horizontal" android:textSize="48px"
android:padding="12px" /
edittext p="" ="android:id="@+id/value1" android:layout_height="wrap_content"
android:hint="@string/hint1" android:inputType="numberDecimal"
android:layout_width="fill_parent" android:textSize="48px"
edittext p="" ="android:id="@+id/value2" android:layout_height="wrap_content"
android:hint="@string/hint2" android:inputType="numberDecimal"
android:layout_width="fill_parent" android:textSize="48px"
framelayout p="" ="android:id="@+id/FrameLayout01"
android:layout_width="wrap_content" android:layout_height="wrap_content"
android:padding="12px" android:background="#ff0000"
linearlayout p="" ="" android:id="@+id/LinearLayout02"
android:layout_width="wrap_content" android:layout_height="wrap_content"
android:orientation="horizontal" android:background="#000000"
android:padding="4px"
textview p="" ="" android:layout_width="wrap_content"
android:layout_height="wrap_content" android:text="@string/resultLabel"
android:textSize="48px" android:id="@+id/resultLabel"
textview p="" ="" android:layout_width="wrap_content"
android:layout_height="wrap_content" android:id="@+id/result"
android:textSize="48px" android:text
android:layout_marginLeft="16px"
linearlayout p="" ="" android:id="@+id/LinearLayout03"
android:layout_height="wrap_content" android:layout_width="fill_parent"
button p=" android:id="@+id/addValues" android:layout_height="wrap_content"
android:text="@string/add" android:textSize="32px"
android:layout_width="wrap_content"
button p="" =" android:id="@+id/multiplyValues" android:layout_height="wrap_content"
android:text="@string/multiply" android:textSize="32px"
android:layout_width="wrap_content"
简单解析一下这个界面设计,我们使用了LinearLayout,以使得控件能在垂直方向竖向排列。界面中包括了显示标题“Unit Testing Sample”的textview,两个输入数字的edittext控件,一个FrameLayout控件中包含了一个水平的LinearLayout,在这个LinearLayout包含了一个显示结果的textview以及其提示文字“Result”,注意的是FrameLayout的背景颜色设置为红色,而LinearLayou设置成了黑色背景。
最新内容请见作者的GitHub页:http://qaseven.github.io/
前面一章介绍了JUnit的一些基本用法,本章来介绍关于JUnit更高级的用法,这些功能我们可能并不一定会用到,但是了解它,对JUnit会有更深刻的认识。 5.1 Test runners 大家刚开始使用JUnit的时候,可能会跟我一样有一个疑问,JUnit没有main()方法,那它是怎么开始执行的呢?众所周知,不管是什么程序,都必须有一个程序执行入口,而这个入口通常是main()方法。
JUnit是java开发人员的一个主要的测试工具,做Android开发同样是离不开java的,所以Android单元测试依然可以基于JUnit来写测试。但是JUnit只能运行在纯java环境上,前面我们介绍过MVP架构下,可以将View层隔离开来,单独针对Presenter层、Model层来测试。
相关文章
- [Android]中文API(三)android.account包下的那些类
- [android]uiautomator中文输入解决方案
- [Android]calabash-android再深入
- [Android Pro] 完美解决 No toolchains found in the NDK toolchains folder for ABI with prefix: mips64el-linux-android
- [Android Pro] android 4.4 Android原生权限管理:AppOps
- [Android] 深入浅出Android App耗电量统计
- Android Studio打包apk遇到的问题
- Android开发之旅:android架构
- Android API之android.provider.ContactsContract.RawContacts
- 【Android 疑难杂症1】android.content.ActivityNotFoundException: Unable to find explicit activity class
- 41、Android中当数据库需要更新时我们该怎么办?
- android常用工具类
- Android OpenGL ES(十)绘制三角形Triangle .
- EasyPlayer RTSP安卓Android播放器架构简析
- android分区大小的修改说明
- Android的报错提示:Failed to resolve: com.android.support.test.espresso:espresso-core:3.0.2
- android 11.0 12.0开机连接指定wifi
- android Kotlin 匿名函数和内联函数
- Android系统的硬件驱动程序开发流程 通过 proc文件系统, devfs文件系统, C可执行程序验证驱动程序正确性
- 【Android 逆向】Android 权限 ( Android 逆向中使用的 android.permission 权限 | Android 系统中的 Linux 用户权限 )
- 【Android布局】在程序中设置android:gravity 和 android:layout_Gravity属性
- Please ensure that adb is correctly located at 'D:Androidandroid-sdkplatform-toolsadb.exe' and
- Android12之Android.bp禁用odex(一百一十一)
- Android抽屉(SlidingDrawer --类似android通知栏下拉效果)
- 腾讯技术团队最新出品,Android Framework系统框架底层原理解密
- android 完全退出应用程序
- Android 9.0/P(android p指安卓9.0版本) okhttp3网络请求出错
- (Android)java虚拟机和Dalvik虚拟机的区别