
vue后台(三)
一,在品牌展示页,点击修改按钮跳转到添加属性值的页,可以修改属性名称和属性值,
 <el-table-column prop="prop" label="操作" width="150">
            <template slot-scope="{row,$index}">
              <HintButton icon="el-icon-edit" type="warning" size="mini" title="修改属性"  @click="showUpdateDiv(row)"></HintButton>
              <HintButton icon="el-icon-delete" type="danger" size="mini" title="删除属性"></HintButton>
            </template>
showUpdateDiv(attr){
      this.form = attr
      this.isShowList=false

    }
此时有个bug,将attr赋值给form对象后,他们是一个对象地址,修改属性值后,没有保存,返回到商品列表页,却发现数据已经修改了,此时需要对传过来的attr对象深拷贝下,让他们数据
毫不关联,需要引入lodash
import cloneDeep from "lodash/cloneDeep";
showUpdateDiv(attr){
      // this.form = attr
      //浅拷贝 能搞定对象内部基本数据类型的属性值,但是搞不定对象当中还是对象的数据类型属性(因为是地址,拷贝过去还是地址)
      //深拷贝 基本数据类型的属性和对象数据类型的属性 都能搞定   碰见对象的数据类型属性会重新创建新的对象去拷贝数据(新的内存空间)
      //浅拷贝
      // this.form = {...attr}
      //深拷贝
      this.form = cloneDeep(attr);
      this.isShowList = false;

    }
2.给添加的属性值添加编辑模式,给修改的属性值添加查看模式
响应式对象数据属性的添加和删除

    对象当中的属性数据更改会导致页面更改,响应式数据

    添加:
        错的:如果对象当中没有对应的属性数据: 直接添加一个属性,这个属性不是响应式的
            因为vue只是在开始对对象当中的所有属性添加getter和setter,后期直接添加的没有

        对的:我们需要使用Vue.set方法  这样的添加属性就是响应式的   必须对响应式对象添加属性

    删除:
        错的: 直接delete删除对象当中的属性,不会导致页面更改
            因为响应式属性只是在检测属性值的改变而不是检测属性的删除

        对的:我们需要使用Vue.delete方法  除了删除,还添加了更新界面的操作
2.1,点击添加属性值按钮,新增一个 isEdit: true,属性,是可编辑的
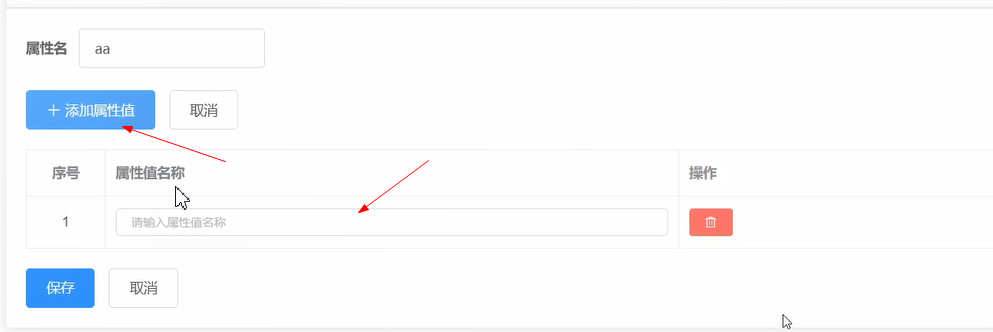
 addAttrValue() {
      //点击添加属性值,需要给attrForm当中的attrValueList数组中塞一条数据,数据要参考接口文档
      //点击添加的这个属性值对象仅仅是为了让上面能出现一个输入框,此时这个属性值对象内部属性值都是空串和undefined

      // {
      // "attrId": 0,
      // "id": 0,
      // "valueName": "string"
      // }
      this.form.attrValueList.push({
        attrId: this.form.id, //添加属性可以添加属性值,但是添加属性的时候,这个新属性没有id
                                  //修改属性也可以添加属性值,那么修改的属性是有id的
        valueName: "",
        isEdit: true, //添加一个新的属性值,在内部多一个数据,用来标识这个数据是可编辑模式 也就是显示输入框
      });
    },
2.2,在品牌展示页,点击修改按钮,响应式添加this.$set(item, "isEdit", false);, 查看模式


  showUpdateDiv(attr){
      // this.form = attr
      //浅拷贝 能搞定对象内部基本数据类型的属性值,但是搞不定对象当中还是对象的数据类型属性(因为是地址,拷贝过去还是地址)
      //深拷贝 基本数据类型的属性和对象数据类型的属性 都能搞定   碰见对象的数据类型属性会重新创建新的对象去拷贝数据(新的内存空间)
      //浅拷贝
      // this.form = {...attr}
      //深拷贝
      this.form = cloneDeep(attr);
      this.isShowList = false;
      //给修改的每个属性里面的每个属性值,添加编辑和查看的标识数据
      this.form.attrValueList.forEach((item) => {
        // item.isEdit = false //这里有问题的,因为后添加的isEdit不是响应式属性,后期会导致页面不会更新
        //对
        this.$set(item, "isEdit", false);
      });

    }
 <el-table-column
            prop="prop"
            label="属性值名称"
            width="width">
          <template slot-scope="{row,$index}">
              <el-input v-model="row.valueName" placeholder="请输入属性值名称" size="mini" v-if="row.isEdit"></el-input>
              <span  v-else>{{row.valueName}}</span>
            </template>

          </el-table-column>
3.从品牌展示页,点击修改按钮,属性值是查看模式,我们需要点击属性值时,变成编辑模式
<el-table-column
            prop="prop"
            label="属性值名称"
            width="width">
          <template slot-scope="{row,$index}">
              <el-input v-model="row.valueName" placeholder="请输入属性值名称" size="mini" v-if="row.isEdit"></el-input>
              <span  v-else  @click="toEdit(row,$index)">{{row.valueName}}</span>
            </template>

          </el-table-column>
//点击某个属性值对应的span变为编辑模式
    toEdit(attrValue, index) {
      attrValue.isEdit = true;

      //让对应的input自动获取到焦点,必须在nextTick当中去做,原因因为页面可能还没有更新完成
      this.$nextTick(() => {
        this.$refs[index].focus();
      });
    },
4.在添加属性值页面,当时编辑模式时(input状态),当失去焦点时,或者键盘enter事件时,编辑模式要变成查看模式
当新增输入的属性值和原有的属性值相同时,需要判断下,或者没有输入属性值
<el-table-column
            prop="prop"
            label="属性值名称"
            width="width">
          <template slot-scope="{row,$index}">
              <el-input v-model="row.valueName" placeholder="请输入属性值名称" size="mini" v-if="row.isEdit"
                 @blur="toLook(row)"
                @keyup.enter.native="toLook(row)"
              ></el-input>
              <span  v-else  @click="toEdit(row,$index)">{{row.valueName}}</span>
            </template>

          </el-table-column>
 //input失去焦点或者按下回车切换为查看模式
    toLook(attrValue) {
      //首先得看输入的值有没有,没有不能变为查看
      if (!attrValue.valueName) return;
      //输入的数据是否已经在属性值列表当中存在(除去自身) 存在需要提示,不能切换查看模式
      //some   every
      // 循环遍历 每一个项都要去执行一次回调函数,
      // 返回一个布尔值
      // 只要有一个返回的是true,则最终结果就是true  (every 每一项都要返回是true,最终结果才是true)
      let isRepeat = this.form.attrValueList.some((item) => {
        //排除自身
        if (item !== attrValue) {
          return item.valueName === attrValue.valueName;
        }
      });

      if (isRepeat) {
        this.$message.warning("已经存在这个属性值");
        return;
      }

      //如果上面的所有条件都符合,那么更改为查看模式
      attrValue.isEdit = false;
    },
5,添加的input和点击span切换input自动获取焦点
5.1,点击span切换input自动获取焦点,此时需要给input添加一个标识,是哪个input, 添加ref属性
<template slot-scope="{row,$index}">
              <el-input v-model="row.valueName" placeholder="请输入属性值名称" size="mini" v-if="row.isEdit"
                 @blur="toLook(row)"
                @keyup.enter.native="toLook(row)"
                 :ref="$index"
              ></el-input>
              <span  v-else  @click="toEdit(row,$index)">{{row.valueName}}</span>
            </template>

          </el-table-column>
此时当span切换到input编辑模式时,input标签元素还没有渲染完成,此时会获取不到input节点,会报错,我们必须等到页面渲染完成后,才可以拿到input节点,需要用到
 //点击某个属性值对应的span变为编辑模式
    toEdit(attrValue, index) {
      attrValue.isEdit = true;
      // this.refs[index].focus()

      // 让对应的input自动获取到焦点,必须在nextTick当中去做,原因因为页面可能还没有更新完成
      this.$nextTick(() => {
        this.$refs[index].focus();
      });
    },
5.2,点击添加属性值按钮,属性值时,我们也需要让input自动获取焦点,此时的input节点是属性数组对象中的最后一个
   addAttrValue() {
      //点击添加属性值,需要给attrForm当中的attrValueList数组中塞一条数据,数据要参考接口文档
      //点击添加的这个属性值对象仅仅是为了让上面能出现一个输入框,此时这个属性值对象内部属性值都是空串和undefined

      // {
      // "attrId": 0,
      // "id": 0,
      // "valueName": "string"
      // }
      this.form.attrValueList.push({
        attrId: this.form.id, //添加属性可以添加属性值,但是添加属性的时候,这个新属性没有id
                                  //修改属性也可以添加属性值,那么修改的属性是有id的
        valueName: "",
        isEdit: true, //添加一个新的属性值,在内部多一个数据,用来标识这个数据是可编辑模式 也就是显示输入框
      });

       //让对应的input自动获取到焦点 ,其实就是新添加的那一个属性值对应的input,永远在列表的最后
      this.$nextTick(() => {
        this.$refs[this.form.attrValueList.length - 1].focus();
      });


    },
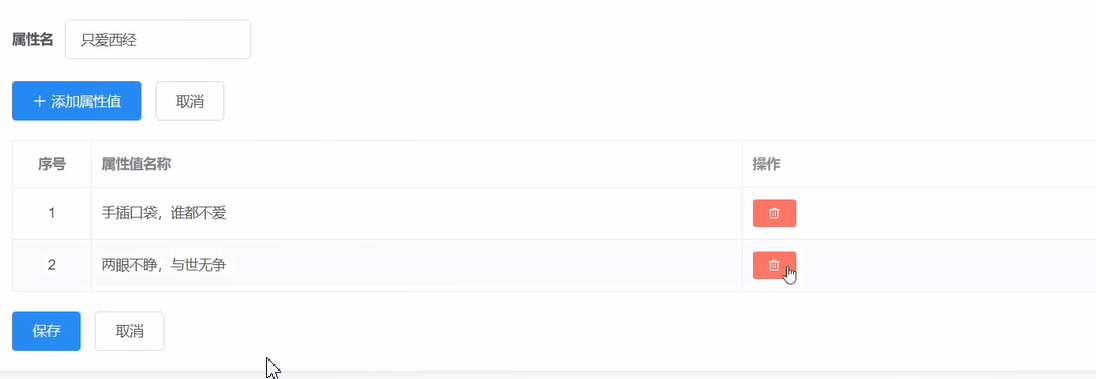
6,添加属性值页,点击删除按钮,删除一条属性值数据
删除属性值,使用带气泡的确认框去做
    参考官方
    template必须要slot-scope
    需要添加事件
el-popconfirm组件, 确认弹框,@onConfirm确认后的触发事件
 <el-table-column
            label="操作"
            width="width">
            <template  slot-scope="{row,$index}">
               <el-popconfirm
                :title="`你确定要删除${row.valueName}吗?`"
                @onConfirm="form.attrValueList.splice($index,1)"
              >

                 <el-button slot="reference"  icon="el-icon-delete" type="danger" size="mini" title="删除"></el-button>

              </el-popconfirm>
            </template>
          </el-table-column>
7.在品牌展示页面,删除一条属性数据,需要发送请求
 <el-table-column prop="prop" label="属性值列表" width="width">
            <template slot-scope="{row,$index}">
              <el-tag
                type="success"
                v-for="(attrValue, index) in row.attrValueList"
                :key="attrValue.id"
              >{{attrValue.valueName}}</el-tag>
            </template>
          </el-table-column>
          <el-table-column prop="prop" label="操作" width="150">
            <template slot-scope="{row,$index}">
              <HintButton icon="el-icon-edit" type="warning" size="mini" title="修改属性"  @click="showUpdateDiv(row)"  ></HintButton>
              <HintButton icon="el-icon-delete" type="danger" size="mini" title="删除属性"  @click="deleteAttr(row)"></HintButton>
            </template>
          </el-table-column>
 // 删除属性
    deleteAttr(attr) {
      this.$API.attr
        .delete(attr.id)
        .then((result) => {
          //提示删除成功
          if (result.code === 200) {
            this.$message.success("删除属性成功");
            this.getAttrList();
          } else {
            this.$message.error("删除属性失败");
          }
        })
        .catch((error) => {
          this.$message.error("请求失败");
        });
    },

8,在span中点击,区域太小的bug,需要让他的可点击的区域变大

 <el-table-column
            prop="prop"
            label="属性值名称"
            width="width">
          <template slot-scope="{row,$index}">
              <el-input v-model="row.valueName" placeholder="请输入属性值名称" size="mini" v-if="row.isEdit"
                 @blur="toLook(row)"
                @keyup.enter.native="toLook(row)"
                 :ref="$index"
              ></el-input>
              <span   style="display:inline-block; width:100%; height:100%"   v-else  @click="toEdit(row,$index)">{{row.valueName}}</span>
            </template>

          </el-table-column>
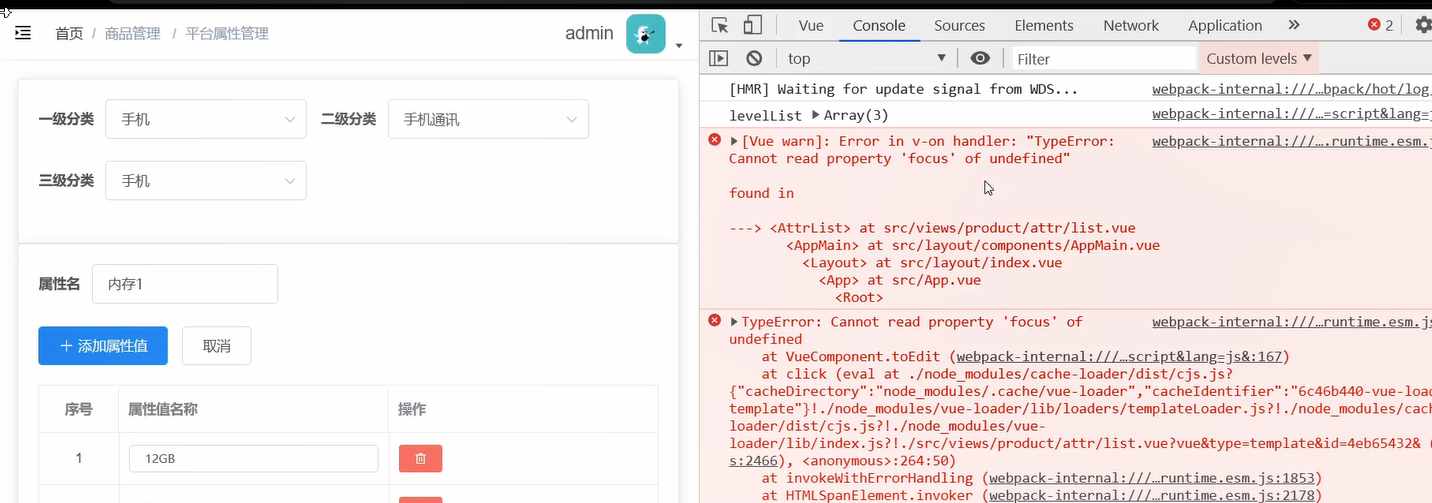
9,三级分类可操作性逻辑处理
categoryselected子组件是三级分类,用form表单展示的,此时form表单有个disabled,是否禁用该表单内的所有组件。若设置为 true,则表单内组件上的 disabled 属性不再生效
此时需求是,在品牌展示页面,三级分类展示,在品牌添加属性值页,三级列表禁用,在attr父组件中有个isShowList属性,来控制页面切换的,此时父组件attr可以将isShowList
属性传给子组件categoryselected,即而控制三级列表是否禁用


<div>
    <el-card>
      <CategorySelector @changeCategory="changeCategory"  :isShowList="isShowList"></CategorySelector>
    </el-card>
props:['isShowList'],
<template>
  <el-form :inline="true" :model="form" class="demo-form-inline" :disabled="!isShowList">
    <el-form-item label="一级分类">
10,在添加属性值页,当没有一个属性值时,保存按钮是置灰的
<el-button type="primary"  :disabled="form.attrValueList.length ===0">保存</el-button>
        <el-button @click="isShowList = true">取消</el-button>

11,点击保存按钮逻辑处理,需要发送请求,
先判断属性值是否有,没有,即可return,如果有数据,还要判断是否是空窜,此时需要整理参数,还要去掉多余的属性,如isEdit属性,
发送请求成功后,要切换到品牌展示页
<el-button type="primary"  :disabled="form.attrValueList.length ===0"
        @click="saveAttr"
        >保存</el-button>
        <el-button @click="isShowList = true">取消</el-button>
//保存属性
    async saveAttr() {
      //拿到参数数据
      let attr = this.form;
      //整理参数数据
      // 1、如果属性当中属性值列表没有属性值对象 不发请求
      if (attr.attrValueList.length === 0) return;
      // 2、如果属性值没有值 那就是空串,过滤掉这个属性值对象
      // 3、去除参数中多余的参数,比如自己加的isEdit

      // filter 过滤数组 筛选
      // 暗含循环遍历 拿每一项去和最后的条件进行运算  如果最终返回的是true,则把这一项拿出去放到新的数组当中

      attr.attrValueList = attr.attrValueList.filter(item => {
        if(item.valueName.trim() !== ''){
          delete item.isEdit
          return true
        }
      })

      //发请求
      const result = await this.$API.attr.addOrUpdate(attr)


      if(result.code === 200){
        //成功做什么,重新发送请求,获取新的数据
        this.getAttrList()
        //切换到属性列表页
        this.isShowList = true
        this.$message.success('保存属性成功')
      }else{
        //失败做什么
        this.$message.error('保存属性失败')
      }


    },
12. spu和sku的接口请求函数
12.1. 在api中新建spu.sku,写接口请求函数
spu的接口函数
/*
包含所有SPU管理的接口请求函数
*/
import request from '@/utils/request'

export default {
  /*
  获取所有销售属性列表
  GET /admin/product/baseSaleAttrList
  [
    {
      "id": 0,
      "name": "string"
    }
  ]
  */
  getSaleList () {
    return request.get('/admin/product/baseSaleAttrList')
  },

  /*
  删除指定id的SPU
  DELETE /admin/product/deleteSpu/{spuId}
  */
  remove (id) {
    return request.delete(`/admin/product/deleteSpu/${id}`)
  },

  /*
  获取指定id的SPU信息
  GET /admin/product/getSpuById/{spuId}
  */
  get (id) {
    return request.get(`/admin/product/getSpuById/${id}`)
  },

  /*
  保存(添加/更新)SPU
  POST /admin/product/saveSpuInfo
  POST /admin/product/updateSpuInfo
  */
  addUpdate (spuInfo) {
    return request.post(`/admin/product/${spuInfo.id ? 'update' : 'save'}SpuInfo`, spuInfo)
  },

  /*
  获取指定分类的SPU分页列表
  GET /admin/product/{page}/{limit}
  */
  getList (page, limit, category3Id) {
    return request.get(`/admin/product/${page}/${limit}`, {params: {category3Id}})
  }
}
sku的接口请求函数
/*
包含所有sku管理的接口请求函数
*/
import request from '@/utils/request'

export default {
  /*
  下架SKU
  GET /admin/product/cancelSale/{skuId}
  */
  cancelSale (skuId) {
    return request.get(`/admin/product/cancelSale/${skuId}`)
  },

  /*
  上架SKU
  GET /admin/product/onSale/{skuId}
  */
  onSale (skuId) {
    return request.get(`/admin/product/onSale/${skuId}`)
  },

  /*
  删除指定id的sku
  DELETE /admin/product/deleteSku/{skuId}
  */
  remove (skuId) {
    return request.delete(`/admin/product/deleteSku/${skuId}`)
  },

  /*
  根据指定的SPU的id查询所有对应的SKU的列表
  GET /admin/product/findBySpuId/{spuId}
  */
  getListBySpuId (spuId) {
    return request.get(`/admin/product/findBySpuId/${spuId}`)
  },

  /*
  根据SKU的id查询SKU的详细信息
  GET /admin/product/getSkuById/{skuId}
  */
  get (skuId) {
    return request.get(`/admin/product/getSkuById/${skuId}`)
  },

  /*
  获取SKU的分页列表
  GET /admin/product/list/{page}/{limit}
  */
  getList (page, limit) {
    return request.get(`/admin/product/list/${page}/${limit}`)
  },

  /*
  保存SKU
  POST /admin/product/saveSkuInfo
  POST /admin/product/updateSkuInfo
  */
  addUpdate (skuInfo) {
    return request.post(`/admin/product/${skuInfo.id ? 'update' : 'save'}SkuInfo`, skuInfo)
  },

  /*
  获取指定SPU的id对应的图片列表
  GET /admin/product/spuImageList/{spuId}
  */
  getSpuImageList (spuId) {
    return request.get(`/admin/product/spuImageList/${spuId}`)
  },

  /*
  获取指定SPU的id对应的销售属性列表
  GET /admin/product/spuSaleAttrList/{spuId}
  */
  getSpuSaleAttrList (spuId) {
    return request.get(`/admin/product/spuSaleAttrList/${spuId}`)
  }
}
在接口总文件index.js中引入,并暴露
export {default as login} from './acl/login'
export {default as user} from './acl/user'
export {default as role} from './acl/role'
export {default as permission} from './acl/permission'
export {default as category} from './category'
export {default as clientUser} from './clientUser'
export {default as order} from './order'
export {default as trademark} from './trademark' //先把trademark的默认暴露引入进来
export {default as attr} from './attr'
export {default as spu} from './spu'
export {default as sku} from './sku'
拿公共组件CategorySelector,属性方法全部在spu中定义
<el-card>
      <CategorySelector @handlerCategory="handlerCategory"  :isShowList="isShowList"></CategorySelector>
  </el-card>
   // 接收子组件的数据
    handlerCategory({ categoryId, level }) {
      // 判断
      if (level === 1) {
        // 用户重新选中,需要清空二,三级的id
        (this.category2Id = ""), (this.category3Id = ""), (this.attrList = []);

        this.category1Id = categoryId;
      } else if (level === 2) {
        // 用户重新选中,需要清空三级的id

        (this.category3Id = ""), (this.attrList = []);
        this.category2Id = categoryId;
      } else {
        this.category3Id = categoryId;

        // 此时三个id已收集到了,需要发送请求
        this.getSpuList();
      }
    },

    // 发送请求,获取spu数据
    async  getSpuList(){
      let result =await this.$API.spu.getList (this.page, this.limit, this.category3Id)
      if(result.code ===200){
        let {records,total} =result.data
        this.spuList = records
        this.total = total
      }else{
        this.$message.error('请求失败')
      }
    }
获取数据
  data(){
    return {
      isShowList: true,
      category1Id: "",
      category2Id: "",
      category3Id: "",
      spuList: [],
      page:1,
      limit:3,
      total:0
    }
  },
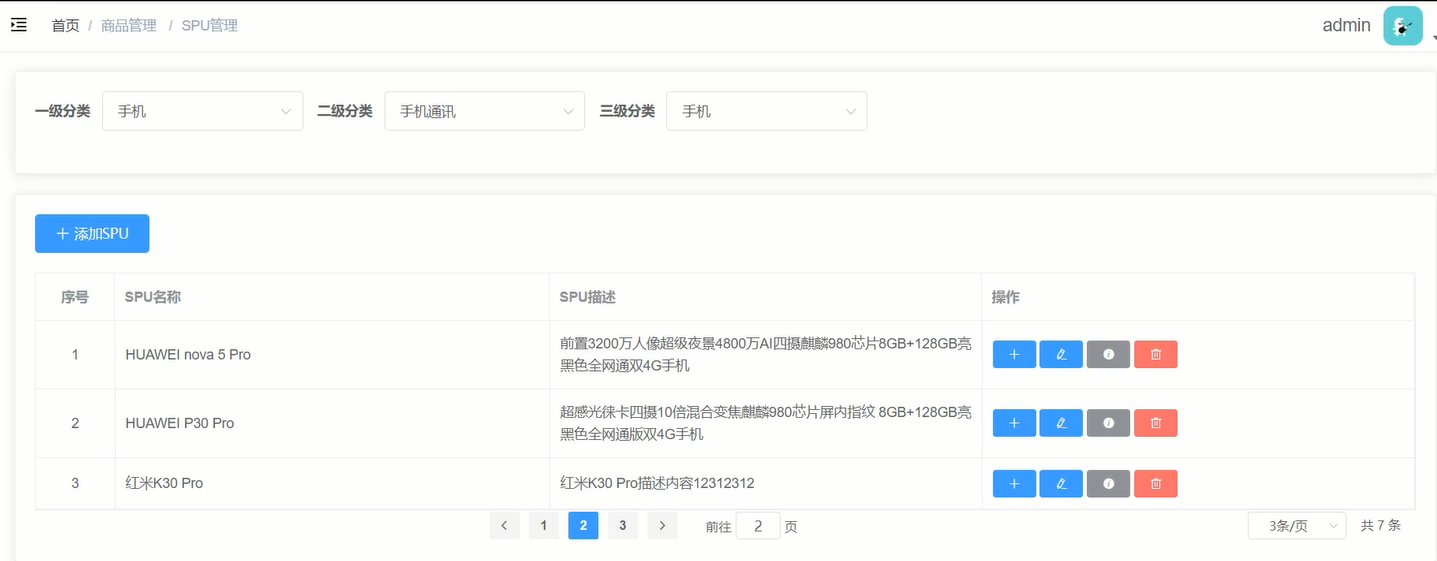
14.用数据去渲染静态页面
<el-card style="margin-top:20px">
      <el-button
        type="primary"
        icon="el-icon-plus"
        :disabled="!category3Id"

        >添加spu</el-button
      >

      <el-table :data="spuList" border stripe style="margin-top:20px">
        <el-table-column type="index" align="center" label="序号" width="80">
        </el-table-column>
        <el-table-column prop="spuName" label="spu名称" width="width">
        </el-table-column>
        <el-table-column label="spu描述" width="width" prop="description">

        </el-table-column>
        <el-table-column label="操作" width="width">
          <template slot-scope="{ row, $index }">
            <el-button type="primary" icon="el-icon-plus" size="mini" title="添加sku" ></el-button>
              <el-button type="primary" icon="el-icon-edit" size="mini" title="修改spu" ></el-button>
              <el-button type="info" icon="el-icon-info" size="mini" title="查看所有的sku"></el-button>
              <el-button type="danger" icon="el-icon-delete" size="mini" title="删除spu"></el-button>
          </template>
        </el-table-column>
      </el-table>

      <el-pagination
      style="text-align:center"
      :current-page="page"
      :page-sizes="[3, 5, 10]"
      :page-size="limit"
      layout=" prev, pager, next, jumper,->, sizes,total"
      :total="total"
      @current-change="getSpuList"

      background
    >
      >
    </el-pagination>
    </el-card>
// 发送请求,获取spu数据
    async getSpuList(page = 1) {
      this.page = page;
      let result = await this.$API.spu.getList(
        this.page,
        this.limit,
        this.category3Id
      );
      if (result.code === 200) {
        let { records, total } = result.data;
        this.spuList = records;
        this.total = total;
      } else {
        this.$message.error("请求失败");
      }
    }
15.在spu商品列表页,点击添加spu按钮需要切换页面,点击添加sku按钮也要切换页面,点击修改spu按钮也要切换页面,
此时,可以在product文件夹中新建compoents,各自新建skuform spuform组件,作为切换的子组件,需要用到标志来v-show切换
// 引入子组件
import skuForm from "../compoents/skuForm";
import spuForm from "../compoents/spuForm";
 components: {
    skuForm,
    spuForm
  },
  data() {
    return {
      isShowSkuForm:false,
      isShowSpuForm:false,
      isShowList: true,
      category1Id: "",
      category2Id: "",
      category3Id: "",
      spuList: [],
      page: 1,
      limit: 3,
      total: 0
    };
  },
<skuForm v-show="isShowSkuForm"></skuForm>
      <spuForm  v-show="isShowSpuForm"></spuForm>
 <el-card style="margin-top:20px">
      <div v-show=" !isShowSkuForm  && !isShowSpuForm">
        <el-button type="primary" icon="el-icon-plus" :disabled="!category3Id" @click="showAddSpuForm"
          >添加spu</el-button
        >
 <el-button type="primary" icon="el-icon-plus" :disabled="!category3Id" @click="showAddSpuForm"
          >添加spu</el-button
        >
// 点击添加spu按钮
    showAddSpuForm(){
      this.isShowSpuForm =true
    },
<el-table-column label="操作" width="width">
            <template slot-scope="{ row, $index }">
              <el-button
                type="primary"
                icon="el-icon-plus"
                size="mini"
                title="添加sku"
                @click="showAddSkuForm"
              ></el-button>
// 点击添加sku按钮
    showAddSkuForm(){
      this.isShowSkuForm =true
    },
  <el-button
                type="primary"
                icon="el-icon-edit"
                size="mini"
                title="修改spu"
                @click="showUpdateSpuForm"
              ></el-button>
// 点击修改spu按钮
    showUpdateSpuForm(){
      this.isShowSpuForm =true
    },
16.spuForm静态页面搭建实现以及用.sycn实现影藏
页面
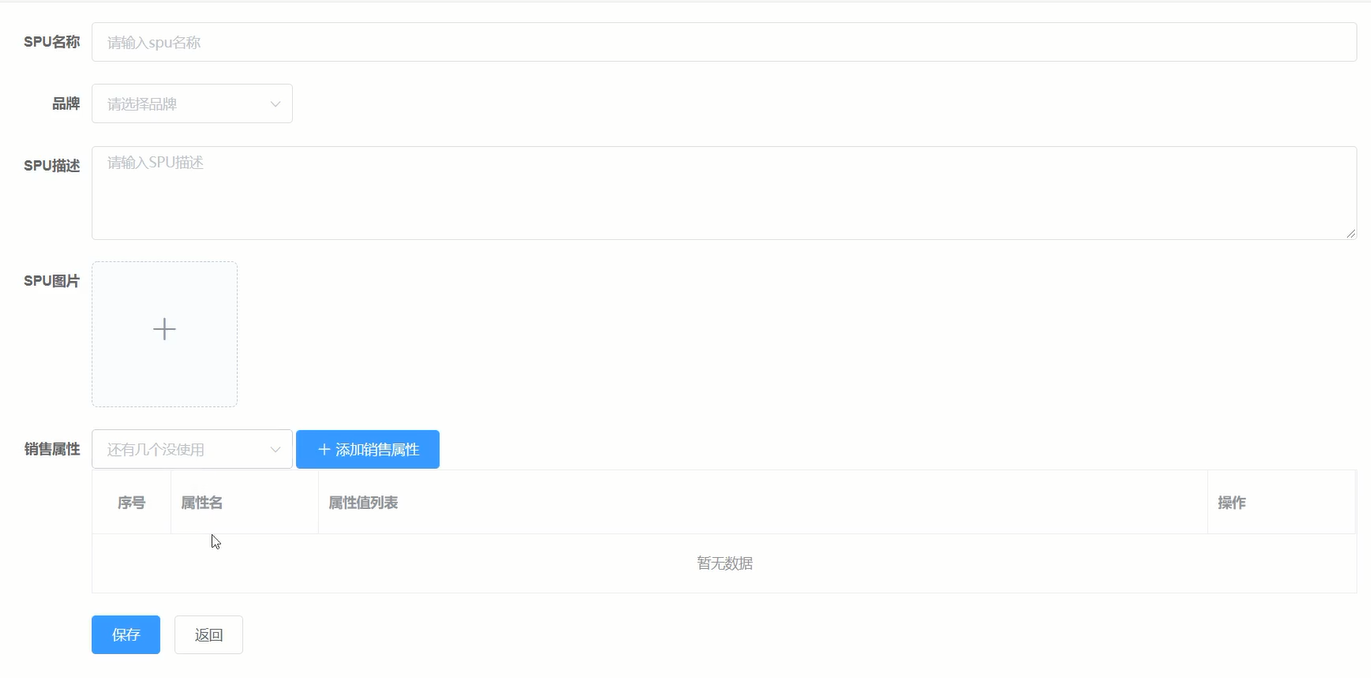
spuForm子组件静态页面搭建
<template>
    <div>
      <el-form  label-width="100px" :inline="false" size="normal">
          <el-form-item label="SPU名称">
              <el-input placeholder="请输入spu名称"></el-input>
          </el-form-item>
          <el-form-item label="品牌">
              <el-select   placeholder="请选择品牌" >
                  <el-option >选项
                  </el-option>
              </el-select>

          </el-form-item>
          <el-form-item label="SPU描述">
              <el-input placeholder="请输入spu描述" type="textarea" rows="4"></el-input>
          </el-form-item>
          <el-form-item label="SPU描述">
            <el-upload
                action="https://jsonplaceholder.typicode.com/posts/"
                list-type="picture-card"
                :on-preview="handlePictureCardPreview"
                :on-remove="handleRemove">
                <i class="el-icon-plus"></i>
                </el-upload>
                <el-dialog :visible.sync="dialogVisible">
                <img width="100%" :src="dialogImageUrl" alt="">
            </el-dialog>
          </el-form-item>
           <el-form-item label="销售属性">
               <el-select  placeholder="还有几个没使用" >
                   <el-option >选项
                   </el-option>
               </el-select>
               <el-button type="primary" icon="el-icon-plus">添加销售属性</el-button>
                <el-table
                    border
                    style="width: 100%; margin-top:20px">
                    <el-table-column
                        align="center"
                        type="index"
                        label="序号"
                        width="80">
                    </el-table-column>
                    <el-table-column
                        prop="prop"
                        label="属性名"
                        width="150">
                    </el-table-column>
                    <el-table-column
                        prop="prop"
                        label="属性值列表"
                        width="width">
                    </el-table-column>
                    <el-table-column
                        prop="prop"
                        label="操作"
                        width="150">
                    </el-table-column>
                </el-table>


          </el-form-item>
          <el-form-item>
            <el-button type="primary">保存</el-button>
            <el-button>返回</el-button>
        </el-form-item>
      </el-form>

    </div>
</template>

<script>
export default {
    data() {
        return {
            dialogImageUrl: '',
            dialogVisible: false
        };
    },

     methods: {
      handleRemove(file, fileList) {
        console.log(file, fileList);
      },
      handlePictureCardPreview(file) {
        this.dialogImageUrl = file.url;
        this.dialogVisible = true;
      }
    }

};
</script>

<style scoped lang="less">

</style>
spuForm子组件点击返回按钮,返回到spu商品列表页,只需将isShowSpuForm的状态false传给父组件spu组件,利用自定义事件,子向父传递数据
<el-form-item>
            <el-button type="primary">保存</el-button>
            <el-button  @click="$emit('visible', false)">返回</el-button>
        </el-form-item>
spu父组件,可以不用定义函数,直接在组件上写逻辑,$event为子组件传递过来的数据
      <skuForm v-show="isShowSkuForm" ></skuForm>
      <spuForm  v-show="isShowSpuForm" @visible="isShowSpuForm =$event"></spuForm>
    </el-card>
相关文章
- 技术分享 | 测试平台开发-前端开发之Vue.js 框架(一)
- vue.js+koa2项目实战(六)数据库建表
- vue里面引用echarts制作攻击防御地图可视化视图
- Vue vue-awesome-swiper 的坑
- 【面试Vue全家桶】vue前端交互模式-es7的语法结构?async/await
- Vue.prototype详解
- vue中使用Base64和md5和rsa
- vue 请求后台数据 (copy)
- 基于NodeJS+Vue+MySQL实现一个在线编程笔试平台【100010629】
- VUE项目实现页面跳转
- Vue form-create的基本使用
- vue实战入门后台篇九:springboot+mybatis实现网站后台-代码整合及重构优化
- vue实战入门进阶篇八:vue+elementui实现网站后台-内容配置界面实现
- vue实战入门进阶篇一:vue+elementui实现网站后台-系统功能规划
- vue文档摘录九:Vue Router
- Vue 安装“npm install -g @vue/cli”发生npm WARN deprecated request@2.88.2: request has been deprecated,的错误解决方法
- 浅析Vue数据更新了但页面不更新的7种情况及vue异步更新带来的数据响应的误解
- vue项目构建实战基础知识:SPA理解/RESTful接口介绍/static目录配置/axios封装/打包时map文件去除
- springboot+vue新生宿舍管理系统(源码+说明文档),一款优秀的毕业设计
- vue后台(一)
- Vue 之 vue-seamless-scroll 实现简单自动无缝滚动,且添加对应点击事件的简单整理
- Web 前端 之 Vue vue cli 环境的搭建简单整理(简单的一些注意事项)
- vue学习:使用v-for向select组件绑定数据
- Vue学习第17天——netTick()的原理及使用
- vue-Prop
- vue @click.native
- 浅谈vue中插件的使用方法Vue.use(xxx),原理及实现
- Can‘t resolve ‘vue-virtual-scroll-list‘ in ‘xxxx‘