
[js高手之路]深入浅出webpack教程系列5-插件使用之html-webpack-plugin配置(中)
2023-09-11 14:19:51 时间
[js高手之路]深入浅出webpack教程系列索引目录:
- [js高手之路]深入浅出webpack教程系列1-安装与基本打包用法和命令参数
- [js高手之路]深入浅出webpack教程系列2-配置文件webpack.config.js详解(上)
- [js高手之路]深入浅出webpack教程系列3-配置文件webpack.config.js详解(下)
- [js高手之路]深入浅出webpack教程系列4-插件使用之html-webpack-plugin配置(上)
- [js高手之路]深入浅出webpack教程系列5-插件使用之html-webpack-plugin配置(中)
- [js高手之路]深入浅出webpack教程系列6-插件使用之html-webpack-plugin配置(下)
- [js高手之路]深入浅出webpack教程系列7-( babel-loader,css-loader,style-loader)的用法
- [js高手之路]深入浅出webpack教程系列8-(postcss-loader,autoprefixer,html-loader,less-loader,ejs-loader)用法
- [js高手之路]深入浅出webpack教程系列9-打包图片(file-loader)用法
上文我们讲到了options的配置和获取数据的方式,本文,我们继续深入options的配置
一、html-webpack-plugin插件中的options除了自己定义了一些基本配置外,我们是可以任意的添加自定义的数据
webpack.dev.config.js文件:
 1 var HtmlWebpackPlugin = require('html-webpack-plugin');
 2 module.exports = {
 3     entry : {
 4         main : './src/js/main.js',
 5         calc : './src/js/calc.js'
 6     },
 7     output : {
 8         //__dirname,就是当前webpack.config.js文件所在的绝对路径
 9         path : __dirname + '/dist', //输出路径,要用绝对路径
10         filename : 'js/[name]-[hash].bundle.js' //打包之后输出的文件名
11     },
12     plugins: [
13         new HtmlWebpackPlugin({
14             template : './index.html',
15             title : 'ghostwu教你学webpack',
16             inject : true,
17             date : new Date(),
18             userName : 'ghostwu',
19             age : 22
20         })
21     ]
22 };
我们在webpack.dev.config.js中新增了3个自定义数据( date,userName, age),我们在demo2目录下面的index.html模板中可以这样读取
1 <h3><%= htmlWebpackPlugin.options.date %></h3>
2 <h3><%= htmlWebpackPlugin.options.userName %></h3>
3 <h3><%= htmlWebpackPlugin.options.age %></h3>
同样设置好了之后,记得( npm run d )重新打包生成.
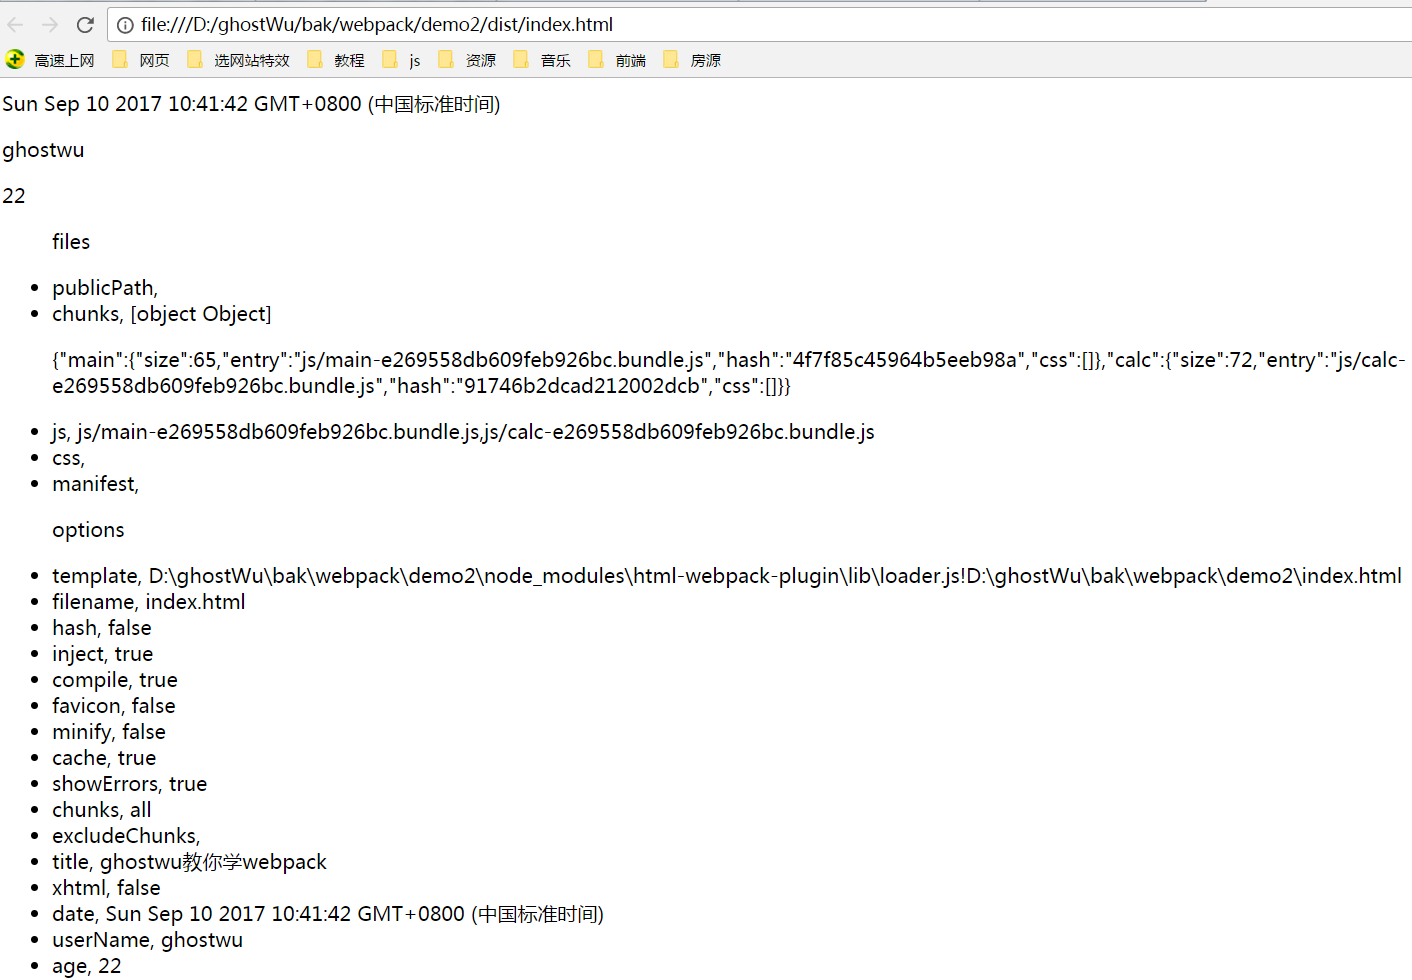
二、完整的把htmlWebpackPlugin这个实例在模板中遍历出来
demo2下面的index.html文件:
 1 <!DOCTYPE html>
 2 <html lang="en">
 3 <head>
 4     <meta charset="UTF-8">
 5     <meta name="viewport" content="width=device-width, initial-scale=1.0">
 6     <meta http-equiv="X-UA-Compatible" content="ie=edge">
 7     <title><%= htmlWebpackPlugin.options.title %></title>
 8 <body>
 9     <h3><%= htmlWebpackPlugin.options.date %></h3>
10     <h3><%= htmlWebpackPlugin.options.userName %></h3>
11     <h3><%= htmlWebpackPlugin.options.age %></h3>
12     <ul>
13         <% for ( var key in htmlWebpackPlugin ){ %>
14             <% if ( key == 'files' ) { %>
15                 <h3>files</h3>
16                 <% for( var f in htmlWebpackPlugin[key] ){ %>
17                     <li> <%= f %>, <%= htmlWebpackPlugin[key][f] %> </li>
18                     <% if ( f == 'chunks') { %>
19                         <p><%= JSON.stringify( htmlWebpackPlugin[key][f] ) %></p>
20                     <% } %>
21                 <% } %>
22             <% } else { %>
23                 <h3>options</h3>
24                 <% for( var f in htmlWebpackPlugin[key] ){ %>
25                     <li> <%= f %>, <%= htmlWebpackPlugin[key][f] %> </li>
26                 <% } %>
27             <% } %>
28         <% } %>
29     </ul>
30 </body>
31 </html>
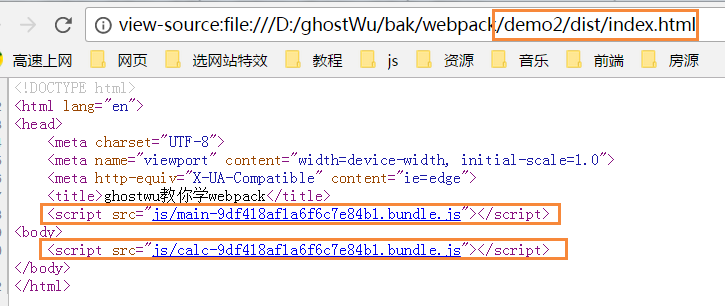
三,通过上面打印的数据,我们可以自己手动指定js文件的引入,不需要自动inject
webpack.dev.config.js文件
 1 var HtmlWebpackPlugin = require('html-webpack-plugin');
 2 module.exports = {
 3     entry : {
 4         main : './src/js/main.js',
 5         calc : './src/js/calc.js'
 6     },
 7     output : {
 8         //__dirname,就是当前webpack.config.js文件所在的绝对路径
 9         path : __dirname + '/dist', //输出路径,要用绝对路径
10         filename : 'js/[name]-[hash].bundle.js' //打包之后输出的文件名
11     },
12     plugins: [
13         new HtmlWebpackPlugin({
14             template : './index.html',
15             title : 'ghostwu教你学webpack',
16             inject : false
17         })
18     ]
19 };
inject设置为false, js不会自动注入到打包之后的文件dist/index.html,所以我们就要自动指定加载的js文件.
demo2/index.html文件代码:
 1 <!DOCTYPE html>
 2 <html lang="en">
 3 <head>
 4     <meta charset="UTF-8">
 5     <meta name="viewport" content="width=device-width, initial-scale=1.0">
 6     <meta http-equiv="X-UA-Compatible" content="ie=edge">
 7     <title><%= htmlWebpackPlugin.options.title %></title>
 8     <script src="<%= htmlWebpackPlugin.files.chunks.main.entry %>"></script>
 9 <body>
10     <script src="<%= htmlWebpackPlugin.files.chunks.calc.entry %>"></script>
11 </body>
12 </html>
执行打包命令( npm run d ),在dist目录下生成的index.html文件,源代码就变成我们手动注入的js文件了
四、minify选项,压缩html文件
他可以配置很多的值,官方参考地址:https://github.com/kangax/html-minifier#options-quick-reference
 1 var HtmlWebpackPlugin = require('html-webpack-plugin');
 2 module.exports = {
 3     entry : {
 4         main : './src/js/main.js',
 5         calc : './src/js/calc.js'
 6     },
 7     output : {
 8         //__dirname,就是当前webpack.config.js文件所在的绝对路径
 9         path : __dirname + '/dist', //输出路径,要用绝对路径
10         filename : 'js/[name]-[hash].bundle.js', //打包之后输出的文件名
11     },
12     plugins: [
13         new HtmlWebpackPlugin({
14             template : './index.html',
15             title : 'ghostwu教你学webpack',
16             inject : false,
17             minify : {
18                 removeComments : true, //去掉注释
19                 collapseWhitespace : true, //去掉空行
20             }
21         })
22     ]
23 };
这里,我们配置了两种常用的压缩选项( 去掉注释,去掉空行),那么打包生成的index.html文件,就会变成压缩版(比如你看到的jquery.min.js这样的文件,都是经过压缩处理的)
相关文章
- js 生成4位随机数及Js知识汇总
- JS 逆向 --- 过无限debugge、hook、js混淆还原、控制流混淆
- Html Table用JS导出excel格式问题 导出EXCEL后单元格里的000412341234会变成412341234 7-14 会变成 2018-7-14(7月14) 自定义格式 web利用table表格生成excel格式问题 js导出excel增加表头、mso-number-format定义数据格式 数字输出格式转换 mso-number-format:"@"
- Ext JS学习第十六天 事件机制event(一) DotNet进阶系列(持续更新) 第一节:.Net版基于WebSocket的聊天室样例 第十五节:深入理解async和await的作用及各种适用场景和用法 第十五节:深入理解async和await的作用及各种适用场景和用法 前端自动化准备和详细配置(NVM、NPM/CNPM、NodeJs、NRM、WebPack、Gulp/Grunt、G
- 【小程序】通过App.js等文件配置小程序系统环境
- 在 Ubuntu 14.04/15.04 上配置 Node JS v4.0.0
- JS 禁用背景页面滚动
- 【HarmonyOS】【JS】 鸿蒙js开发使用div自带的scroll,滑动条拉不到最下面?
- vue 3.0 项目搭建移动端 (八) vue.config.js 配置
- js给对象添加属性
- JS教程之Electron.js设计强大的多平台桌面应用程序的好工具
- 有趣的HTML实例(十二) 早安、晚安动画(css+js)
- JS: javascript 点击事件执行两次js问题 ,解决jquery绑定click事件出现点击一次执行两次问题
- [js高手之路]深入浅出webpack教程系列6-插件使用之html-webpack-plugin配置(下)
- [js高手之路]深入浅出webpack教程系列4-插件使用之html-webpack-plugin配置(上)
- js把预定义的html字符串转换为 HTML 实体 htmlspecialchars 输出html实体内容包括标签,而不自动转义标签,只显示内容,类似php的htmlspecialchars
- 浅析JS处理时间时区问题、将时间戳或时间对象转成字符串格式
- 一文搞懂JS-Web-API——DOM
- 在Nuxt.js如何使用Vuex最新教程
- Windows系统完全卸载删除 Node.js
- 配置 node.js 环境
- Vue.js 入门指南之“前传”(含sublime text 3 配置)