
android源码学习- APP启动流程(android12源码)
前言:
百度一搜能找到很多讲APP启动流程的,但是往往要么就是太老旧(还是基于android6去分析的),要么就是不全(往往只讲了整个流程的一小部分)。所以我结合网上现有的文章,以及源码的阅读和调试,耗费了3整天的时间,力求写出一篇最完整,最详细,最通俗易懂的文章,来讲清楚在android上,APP是如何启动的。
该文属于安卓源码探究专栏中的文章,专栏中很多类似源码分析的文章,欢迎大家阅读。
链接如下:
一、APP启动流程概览
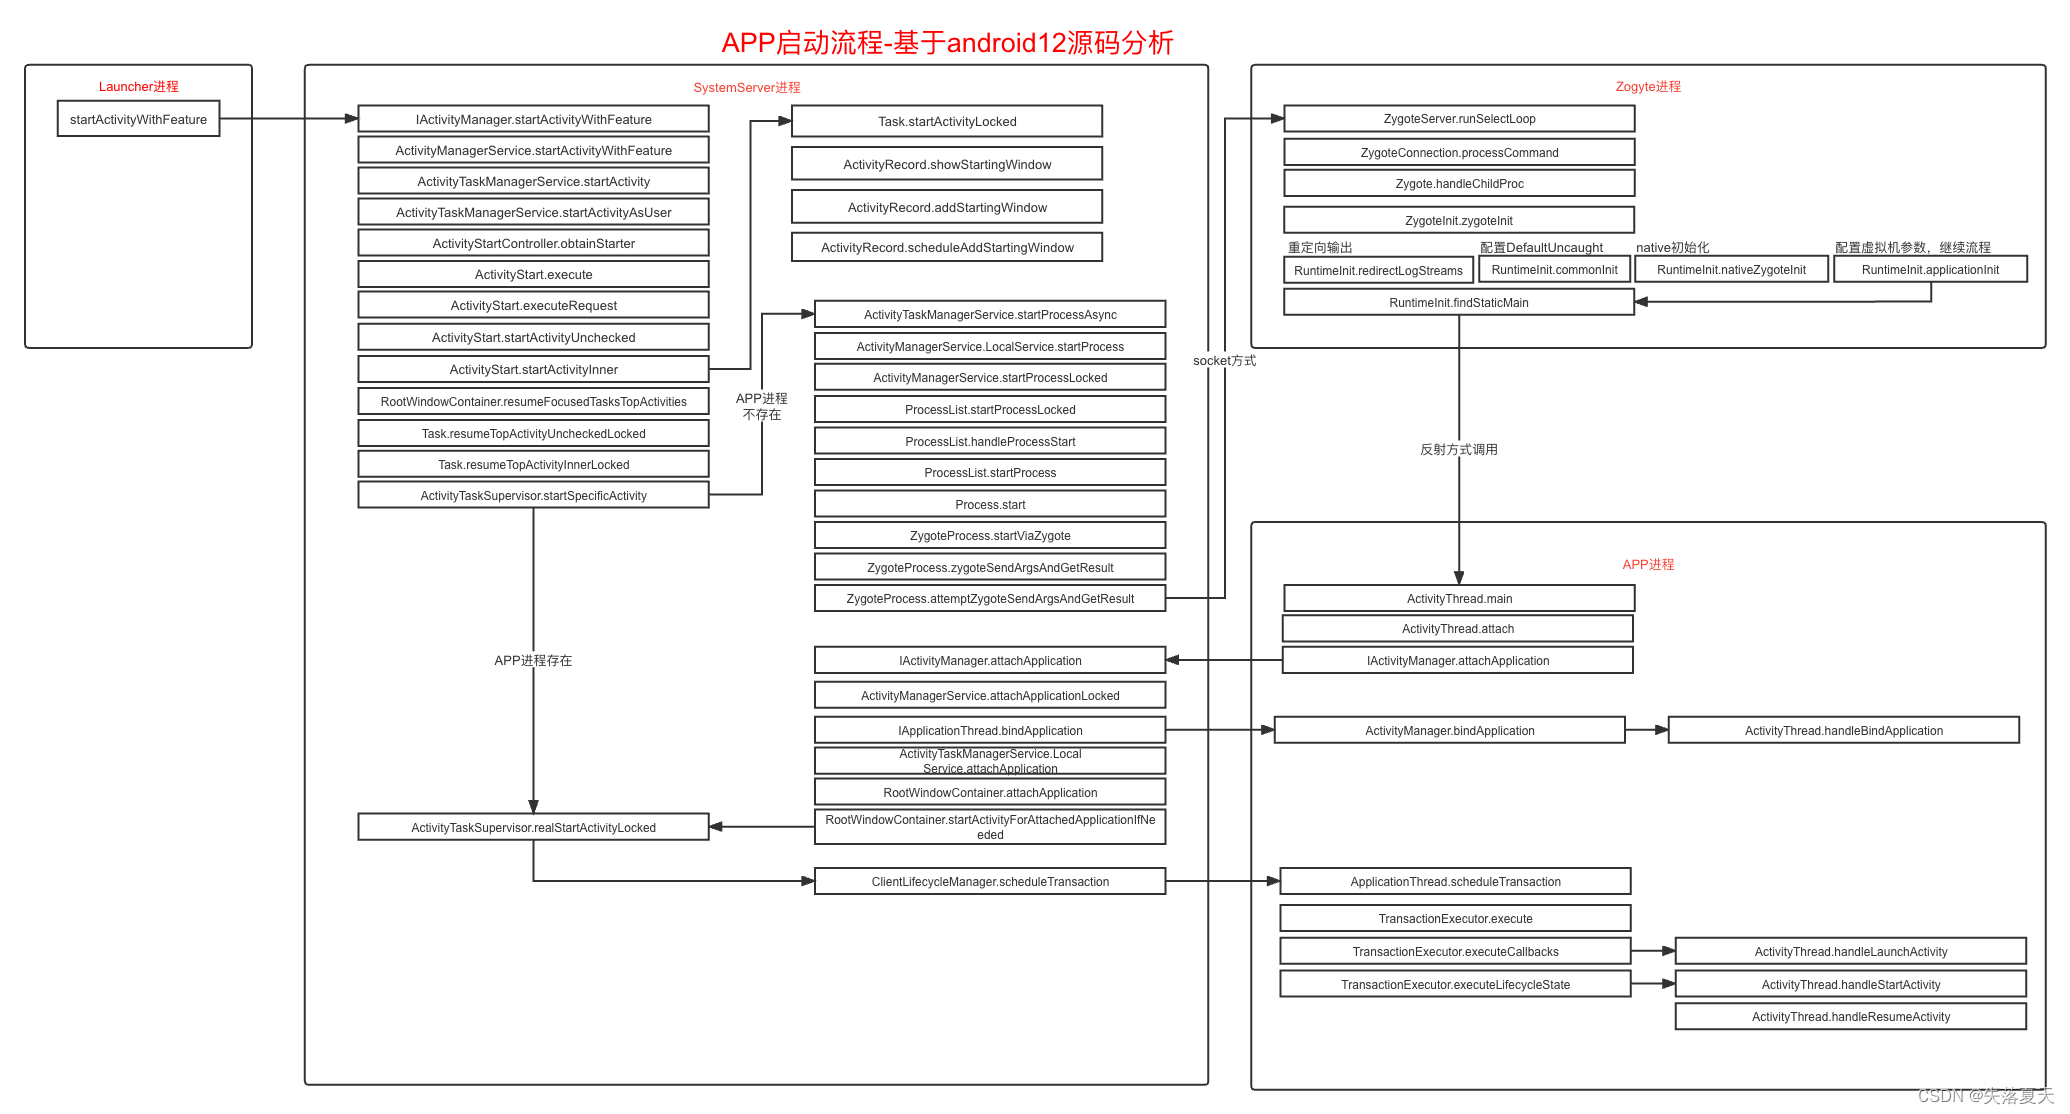
涉及到四个进程之间的通信,分别是Laucher进程(桌面APP),SystemServer进程(AMS所属进程),Zygote进程(系统和所有APP的创建进程),APP进程。
APP简要的启动流程是这样的:
1.Laucher进程会通过binder的方式通知SystemServer进程。
2.然后SystemServer进程中的AMS会查询对应的Activity栈信息,如果对应APP进程不存在则会加载占位图。然后通过socket的方式通知Zygote去创建APP进程。
3.APP进程创建后会执行main方法,然后通知AMS
4.AMS收到信息后会继续通知APP去创建Application,并且接下来会通知APP进程取拉起Activity。
5.APP进程依次收到通知后,会依次完成加载APK,初始化Application,执行Activtiy生命周期等操作。最终会把首屏展示出来。
流程图如下,建议双击放大后观看:
接下来的几章,会按照上面的流程逐一拆解分析:
二、Launcher通知AMS启动APP
Launcher进程其实和普通APP是一样的,甚至我们可以把自己的APP设置为桌面APP。
2.1 Launcher获取到AMS的binder
而Launcher通知AMS的流程和正常APP也是一样的,通过ServiceManager获取到AMS的binder引用。这里提到了ServiceManager,其实ServiceManagerService也是单独的一个进程,其存储了所有APP所需要的binder引用。而且其地址是固定的,所以获取ServiceManager可以直接获取。
2.2 通知ActivityManagerService
Launcher通过上述获取到的binder通知到AMS,调用的方式是startActivityWithFeature。
而由于AMS实现了IActivityManager.Stub的实现,所以其startActivityWithFeature方法会收到launcher发过来的通知。
2.3 系统进程加载占位图
AMS中,会交由ActivityTaskManagerService去进行对应启动任务的处理。最终会交给ActivityStart进行处理。
ActivityStart中,首先会进行一个逻辑判断,如果进程不存在,则首先会加载APP中MainActivity的主题作为背景图,显示到屏幕上。这一步操作是发生在SystemServer进程的,APP进程还未创建。
android11开始支持启动动画,逻辑也是在这里处理的。
2.4 AMS进行启动操作
一个进程中会有多个任务栈,栈对应的是Task类。
一个任务栈中会有多个Activity对象,这个Activity对象在AMS中使用ActivityRecord记录。
这一块的具体逻辑,我会单独写一篇Activity的启动逻辑来进行描述。
这里暂时先简单描述下,如果AMS发现进程不存在,会去通知Zygote的进行进程fork就好,对应的fork逻辑在下一章。
三、Zygote创建APP进程
3.1 AMS中内部逻辑执行
ActivityTaskManagerService调用startProcessAsync方法会去负责创建APP进程,这是异步的,通过handler转发后最终会调用到LocalService.startProcess()方法。
然后会通知到ProcessList.startProcessLocked方法,这个方法中,会构造一个对象ProcessRecord对象,然后把各种信息添加到这个对象中。
接下来会调用到ProcessList.startProcessLocked这个方法,这个方法主要是负责把各种信息转换为runtimeFlags标记位,连同上面构造的ProcessRecord继续传入下一层。
最终通知到Process.start方法,然后交由ZygoteProcess.start方法,最终传递到startViaZygote方法。
3.2 请求参数拼接成字符串发送给Zygote
startViaZygote这个方法中,会把各种配置参数拼接为字符串。
最终在ZygoteProcess.attemptUsapSendArgsAndGetResult方法中,通过LocalSocket的方式把上面拼接的字符串内容传递给Zygote进程。并且从socket中读取返回值,返回值的PID>0则证明进程创建成功。
3.3 Zygote进程逻辑
在了解Zygote进程如何解析AMS发送过来的请求之前,我们先简单了解下Zygote进程创建后的一些基本逻辑。如下图:

一。Zygote进程创建后,最开始的入口是在C层,app_main.cpp文件的main方法(该进程由Init进程启动,这里就不扩展了),在main方法中会配置一些JVM的参数,这个和JAVA的虚拟机参数配置类似。最终会调用到AndroidRuntime.cpp中的start函数,去启动JVM虚拟机。
 if (startVm(&mJavaVM, &env, zygote, primary_zygote) != 0) {
        return;
    }
二。虚拟机创建之后,会通过native层反射找到main函数,并调用ZygoteInit类的main函数。
AndroidRumtime.cpp的start方法中:
if (startClass == NULL) {
        ALOGE("JavaVM unable to locate class '%s'\n", slashClassName);
        /* keep going */
    } else {
        jmethodID startMeth = env->GetStaticMethodID(startClass, "main",
            "([Ljava/lang/String;)V");
        if (startMeth == NULL) {
            ALOGE("JavaVM unable to find main() in '%s'\n", className);
            /* keep going */
        } else {
            env->CallStaticVoidMethod(startClass, startMeth, strArray);

#if 0
            if (env->ExceptionCheck())
                threadExitUncaughtException(env);
#endif
        }
    }
三。ZygoteInit类的main方法中,会做如下几件事:
第一步,把自身的进程ID设置为0,并且没有parent进程。
第二步,会进行一系列的初始化操作,比如加载native环境,加载JVM环境,加载系统类,加载系统资源等等。都在其preload方法中。
第三步,如果是首次执行,则会创建SystemServer进程。这也是Zygote进程的大儿子。AMS,WMS都属于SystemServer进程。
第四步,会创建zygoteServer对象,并且调用其runSelectLoop方法。监听socket不断的接传递过来的信息
第五步,Zygote进程的fork,其实是复制一个原原本本的自己。runSelectLoop方法中其实会去执行fork操作,这个后面会讲,我们这里只需要知道,执行到caller.run();这一句的时候,已经处于APP进程状态了。
public static void main(String[] argv) {
        ZygoteServer zygoteServer = null;

        // Mark zygote start. This ensures that thread creation will throw
        // an error.
        ZygoteHooks.startZygoteNoThreadCreation();

        // Zygote goes into its own process group.
        try {
            Os.setpgid(0, 0);
        } catch (ErrnoException ex) {
            throw new RuntimeException("Failed to setpgid(0,0)", ex);
        }


        ...

            if (!enableLazyPreload) {
                bootTimingsTraceLog.traceBegin("ZygotePreload");
                EventLog.writeEvent(LOG_BOOT_PROGRESS_PRELOAD_START,
                        SystemClock.uptimeMillis());
                //2.初始化操作
                preload(bootTimingsTraceLog);
                EventLog.writeEvent(LOG_BOOT_PROGRESS_PRELOAD_END,
                        SystemClock.uptimeMillis());
                bootTimingsTraceLog.traceEnd(); // ZygotePreload
            }

            // Do an initial gc to clean up after startup
            bootTimingsTraceLog.traceBegin("PostZygoteInitGC");
            gcAndFinalize();
            bootTimingsTraceLog.traceEnd(); // PostZygoteInitGC

            bootTimingsTraceLog.traceEnd(); // ZygoteInit

            Zygote.initNativeState(isPrimaryZygote);

            ZygoteHooks.stopZygoteNoThreadCreation();

            zygoteServer = new ZygoteServer(isPrimaryZygote);

            if (startSystemServer) {
                //3.首次启动时,会启动系统进程
                Runnable r = forkSystemServer(abiList, zygoteSocketName, zygoteServer);

                // {@code r == null} in the parent (zygote) process, and {@code r != null} in the
                // child (system_server) process.
                if (r != null) {
                    r.run();
                    return;
                }
            }

             //4.启动无限循环监听socket
            caller = zygoteServer.runSelectLoop(abiList);
        } catch (Throwable ex) {
            Log.e(TAG, "System zygote died with fatal exception", ex);
            throw ex;
        } finally {
            if (zygoteServer != null) {
                zygoteServer.closeServerSocket();
            }
        }

        // We're in the child process and have exited the select loop. Proceed to execute the
        // command.
        if (caller != null) {
            //5.这里的调用已经是在APP进程了,zygote进程永远不会执行到这里
            caller.run();
        }
    }
3.4 收到通知后去fork产生APP进程
runSelectLoop方法中,会开启一个无限循环。如果收到了消息
如果收到了消息,则会调用ZygoteConnection.processCommand去处理。
Runnable runSelectLoop (String abiList){
//        ...

            while (true) {
//            ...
                try {
                    ZygoteConnection connection = peers.get(pollIndex);
                    boolean multipleForksOK = !isUsapPoolEnabled()
                            && ZygoteHooks.isIndefiniteThreadSuspensionSafe();
                    //收到消息,处理消息并且返回runnable。
                    final Runnable command =
                            connection.processCommand(this, multipleForksOK);

                    // TODO (chriswailes): Is this extra check necessary?
                    if (mIsForkChild) {
                        if (command == null) {
                            throw new IllegalStateException("command == null");
                        }
                         //子进程执行,子进程的mIsForkChild会被设置为true,则返回command
                        return command;
                    } else {
                         //Zygote进程执行,则继续执行循环
                        //       ...
                    }
                }
            }
        }
而在processCommand中,会解析收到的参数,最终调用Zygote.forkAndSpecialize去fork一个新进程。这个方法虽然只会调用一次,返回因为进程是拷贝的,所以实际上会有两次返回,返回两个pid。pid为0时为子进程,设置标记为子进程。反之仍就还是Zygote进程。
 pid = Zygote.forkAndSpecialize(parsedArgs.mUid, parsedArgs.mGid,
                            parsedArgs.mGids, parsedArgs.mRuntimeFlags, rlimits,
                            parsedArgs.mMountExternal, parsedArgs.mSeInfo, parsedArgs.mNiceName,
                            fdsToClose, fdsToIgnore, parsedArgs.mStartChildZygote,
                            parsedArgs.mInstructionSet, parsedArgs.mAppDataDir,
                            parsedArgs.mIsTopApp, parsedArgs.mPkgDataInfoList,
                            parsedArgs.mAllowlistedDataInfoList, parsedArgs.mBindMountAppDataDirs,
                            parsedArgs.mBindMountAppStorageDirs);

                    try {
                        if (pid == 0) {
                            // in child
                            zygoteServer.setForkChild();

                            zygoteServer.closeServerSocket();
                            IoUtils.closeQuietly(serverPipeFd);
                            serverPipeFd = null;

                            return handleChildProc(parsedArgs, childPipeFd,
                                    parsedArgs.mStartChildZygote);
                        } else {
                            // In the parent. A pid < 0 indicates a failure and will be handled in
                            // handleParentProc.
                            IoUtils.closeQuietly(childPipeFd);
                            childPipeFd = null;
                            handleParentProc(pid, serverPipeFd);
                            return null;
                        }
                    } finally {
                        IoUtils.closeQuietly(childPipeFd);
                        IoUtils.closeQuietly(serverPipeFd);
                    }
3.5 调用ActivityThread.main方法
调用到handleChildProc方法时,已经处于APP进程的状态。
该方法掉调用到ZygoteInit.zygoteInit()方法,相关代码如下:
    public static Runnable zygoteInit(int targetSdkVersion, long[] disabledCompatChanges,
            String[] argv, ClassLoader classLoader) {
        ...
        RuntimeInit.redirectLogStreams();
        RuntimeInit.commonInit();
        ZygoteInit.nativeZygoteInit();
        return RuntimeInit.applicationInit(targetSdkVersion, disabledCompatChanges, argv,
                classLoader);
    }
第一步,把System.out的输出重定向到Logcat中;
第二步,在commonInit方法中,设置Thread的UncaughtExceptionPreHandler和DefaultUncaughtExceptionHandler。用于应用发生异常时的处理,这里稍微扩展下,DefaultUncaughtExceptionHandler设置的是RuntimeInit.KillApplicationHandler,所以所有最终未处理的异常都会走到这个类中。
第三步,native中进行相关的初始化。
最后一步,做VM虚拟机的一些配置,然后就会调用findStaticMain方法。
接下来,我们看下findStaticMain方法:
protected static Runnable findStaticMain(String className, String[] argv,
            ClassLoader classLoader) {
        Class<?> cl;

        try {
            cl = Class.forName(className, true, classLoader);
        } catch (ClassNotFoundException ex) {
            throw new RuntimeException(
                    "Missing class when invoking static main " + className,
                    ex);
        }

        Method m;
        try {
            m = cl.getMethod("main", new Class[] { String[].class });
        } catch (NoSuchMethodException ex) {
            throw new RuntimeException(
                    "Missing static main on " + className, ex);
        } catch (SecurityException ex) {
            throw new RuntimeException(
                    "Problem getting static main on " + className, ex);
        }

        int modifiers = m.getModifiers();
        if (! (Modifier.isStatic(modifiers) && Modifier.isPublic(modifiers))) {
            throw new RuntimeException(
                    "Main method is not public and static on " + className);
        }

        /*
         * This throw gets caught in ZygoteInit.main(), which responds
         * by invoking the exception's run() method. This arrangement
         * clears up all the stack frames that were required in setting
         * up the process.
         */
        return new MethodAndArgsCaller(m, argv);
    }
这里只看到出现了main方法,并没有看到ActivityThread类的声明。所以,是如何最终选择启动类类中的main方法呢?其实原理很简单,这个方法中有一个className参数,这个其实就是ActivityThread类,它是通过socket传递过来的一个参数,其定义在ProcessList的startProcessLocked方法中
所以最后返回的其实是一个runnable接口实现类,而这个runnable中实现了调用ActivityThread中main方法的逻辑。
还记得3.3中Zygote创建后的逻辑吗?最后一句是调用 caller.run();
是的,这个caller就是最后返回的runnable接口实现类,去完成调用main方法的操作。
四、APP进程创建初始化操作
app进程初始化的操作比较简单,主要做了两件事,初始化looper,以及通知AMS。(注意,这里只是APP进程创建了,但是还没有加载APK中的任何类)
4.1 初始化MainLooper
调用main方法的线程,会被设置为主线程,Looper此时会开启无限循环。
main(){
    //looper绑定主线程
    Looper.prepareMainLooper();

    //通知AMS
    ActivityThread thread = new ActivityThread();
    thread.attach(false, startSeq);

    //looper开启无限循环读取消息
    Looper.loop();
}
4.2 通知AMS
ActivityThread.attach方法中,实现逻辑也是比较简单的,直接通过binder通知AMS,并且把自身的binder(ApplicationThread)也传递给AMS。
            final IActivityManager mgr = ActivityManager.getService();
            try {
                mgr.attachApplication(mAppThread, startSeq);
            } catch (RemoteException ex) {
                throw ex.rethrowFromSystemServer();
            }
这里AMS的binder是直接通过ServierManager的方式获取的。ServierManager存储了所有的binder引用,注册的形式,AMS在启动的时候去注册。
五、AMS通知APP进程进行各种生命周期操作
5.1 唤起APP初始化并拉起APP首屏
ActivityManagerService的attachApplication方法会收到APP传递过来的消息,然后交由attachApplicationLocked处理。
attachApplicationLocked中主要负责两件事:
1.通知APP进程进行初始化操作;
2.进行一些列操作,最终通知APP拉起指定的MainActivity。
说到这,问一个问题1,为什么明明是串行通知APP去执行的,而APP那边不会出现先加载Activity,再去初始化应用的情况呢?答案在下一小节。
 @GuardedBy("this")
    private boolean attachApplicationLocked(@NonNull IApplicationThread thread,
            int pid, int callingUid, long startSeq) {
        ...
            if (app.getIsolatedEntryPoint() != null) {
                ...
            } else if (instr2 != null) {
                //1通知APP进行初始化操作
                thread.bindApplication(processName, appInfo, providerList,
                        instr2.mClass,
                        profilerInfo, instr2.mArguments,
                        instr2.mWatcher,
                        instr2.mUiAutomationConnection, testMode,
                        mBinderTransactionTrackingEnabled, enableTrackAllocation,
                        isRestrictedBackupMode || !normalMode, app.isPersistent(),
                        new Configuration(app.getWindowProcessController().getConfiguration()),
                        app.getCompat(), getCommonServicesLocked(app.isolated),
                        mCoreSettingsObserver.getCoreSettingsLocked(),
                        buildSerial, autofillOptions, contentCaptureOptions,
                        app.getDisabledCompatChanges(), serializedSystemFontMap);
            } else {
                ...
                同上
            }
        ...
        // See if the top visible activity is waiting to run in this process...
        if (normalMode) {
            try {
                //拉起
                didSomething = mAtmInternal.attachApplication(app.getWindowProcessController());
            } catch (Exception e) {
                Slog.wtf(TAG, "Exception thrown launching activities in " + app, e);
                badApp = true;
            }
        }
        ...
        return true;
    }
5.2 APP进行初始化操作
ActivityThread中ApplicationThread的bindApplication会收到通知,通过handler交给主线程去处理。所以我们也就知道上面问题1的答案了,无论是初始化APP,还是拉起Activity,都是最终交给Handler切换到主线程处理的。所以哪怕初始化APP是耗时操作,拉起Activity的任务也得排队等到前面任务执行完了才能执行。
最终通过handler是交给handleBindApplciation去完成APP的初始化逻辑的。主要包含下面几个操作:
1.使用classLoader去加载APK中的DEX文件。
2.加载APK中的资源。
3.反射生成Application类,并调用其attachBaseApplication方法。
4.调用Application的onCreate方法。
@UnsupportedAppUsage
    private void handleBindApplication(AppBindData data) {
        //1.classLoader加载APK中的dex,并且加载APK的资源
        final ContextImpl appContext = ContextImpl.createAppContext(this, data.info);

        // Continue loading instrumentation.
        //2.生成代理类
        mInstrumentation = new Instrumentation();
        mInstrumentation.basicInit(this);
        // Allow disk access during application and provider setup. This could
        // block processing ordered broadcasts, but later processing would
        // probably end up doing the same disk access.
        Application app;
        //3.声明application
        app = data.info.makeApplication(data.restrictedBackupMode, null);
            ...
        //4.调用Application的onCreate
        mInstrumentation.onCreate(data.instrumentationArgs);

    }
onCreate创建完成后并不会通知AMS,因为activity的拉起操作和初始化Application在AMS中是串行的。
5.3 AMS中处理Activity启动逻辑
5.1中讲到attachApplicationLocked会最终通知APP去拉起Activity,那么整个流程是怎样的呢?
会执行下面这样的调用顺序。
ActivityManagerService.attachApplicationLocked->
ActivityTaskManagerService.LocalService.attachApplication->
RootWindowContainer.attachApplication->
RootWindowContainer.startActivityForAttachedApplicationIfNeeded->
ActivityTaskSupervisor.realStartActivityLocked
到了realStartActivityLocked这一步,正好对应2.4所讲的。APP进程存在的也会调用这个方法,而不存在则先创建进程,最终也会执行到这一步。
realStartActivityLocked中创建Activity的生命周期事务,最终通过ClientLifecycleManager.scheduleTransaction通过binder发送到APP进程的ApplicationThread.scheduleTransaction方法中,则AMS流程就完成了。
5.4 APP完成Activity的启动
生命周期事务是安卓8.0之后出现的,简单来说就是之前的模式是:
AMS发一个协商好消息,APP收到后,根据消息内存来决定自己去做操作;
而事务模式下,AMS发送一系列事务到APP进程,APP收到后,直接去执行这一系列的事务。而这些事务就是activity的生命周期调用。
相关文章
- 安卓 android studio 报错 Unknown host 'jcenter.bintray.com'. You may need to adjust the proxy settings in Gradle.
- [Android Pro] Android学习——在线查看android源代码的3种方式
- Android 左滑or右滑抽屉菜单
- Android自定义View 画弧形,文字,并增加动画效果
- Android API之android.provider.ContactsContract.RawContacts
- Android App内部自动更新Library的使用(转载)
- 二、Android应用的界面编程(六)ProgressBar及其子类[SeekBar、RatingBar]er
- 《android开发艺术探索》读书笔记(十五)--Android性能优化
- 《Android源码设计模式》--单例模式
- Attempt to write to field 'android.support.v4.app.FragmentManagerImpl android.support.v4.app.Fragment.mFragmentManager' on a null object reference
- Android Framework层——App启动过程浅析
- 【备战2022】Android中高级面试题答案解析:一线大厂(腾讯、字节、OPPO、网易、小米)面经总结
- 【Android源码解析】一篇就够“路由、网络层、UI层、通信层....百大框架”源码解析,阿里P8神级之作
- 熬夜再战Android-那第一次运行APP的悸动
- Android【报错】. lang。android.app ClassCastException。SharedPreferencesImpl不能被强制转换为android.content.Shared
- Android 12.0 系统设置 app详情页默认关闭流量数据的开关
- Android 10.0 Launcher3 电话和短信app图标显示未读短信和未接来电的条数
- Android 10.0关闭selinux权限
- Android-Volley网络通信框架(二次封装数据请求和图片请求(包含处理请求队列和图片缓存))
- 【Android 逆向】整体加固脱壳 ( DexClassLoader 加载 dex 流程分析 | DexPathList 构造函数分析 | makeDexElements 函数分析 )
- 【Android 逆向】Android 进程代码注入原理 ( 注入本质 | 静态注入和动态注入 | 静态注入两种方式 | 修改动态库重打包 | 修改 /data/app/xx/libs 动态库 )
- Please ensure that adb is correctly located at 'D:Androidandroid-sdkplatform-toolsadb.exe' and
- Android: app不被系统kill掉
- Android之gdbserver/gdb调试(一百零四)
- 快速定位 Android APP 当前页面的三种方法(Activity / Fragment)
- 《Android进阶指北》强势来袭,堪称2022保姆级学习路线
- android电池充电动画,Android 开机充电图标和充电动画效果
- Execution failed for task ‘:app:processDebugResources‘. > com.android.ide.common.process.ProcessExce