
nestjs微信小程序登录授权
2023-09-11 14:17:27 时间
前言
nestjs官方文档是英文,太难搞了,摸索了两天 ,把经验记下来。 以后备用
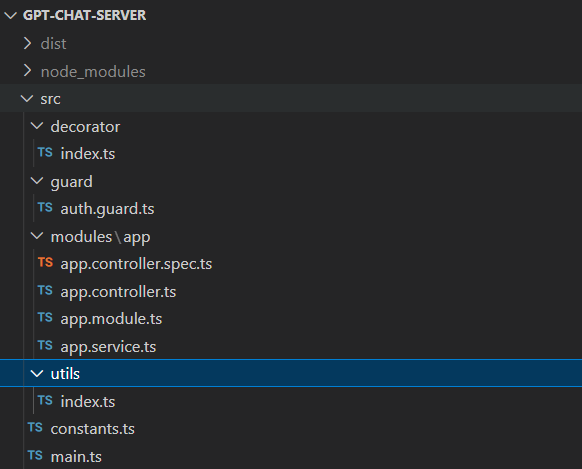
目录结构
|--src  //项目根目录
  |--modules // 模块 比如用户模块,商品模块
    |--app //入口模块
  |--utils //一些工具类,比如生成token
  |--decorator //自定义注解
  |--guard // 自定义守卫
  |--constants.ts //常量
  |--main.ts //启动入口
登录
小程序前端传入js_code,后端拿这个请求微信服务端,获得用户信息(openid, session_key)
小程序登录页面的js
async onLogin() {
    const { code } = await wx.login();
    const url = 'http://localhost:3000/login';
    const {data} = await request({method:"POST", url, data:{code} });
    // 登录成功之后 将token存入全局 并重定向到首页
    wx.setStorageSync('token', data.token);
    wx.redirectTo({url: '/pages/index/index'})
}
后端controller 登录成功之后 将token返回给前端 让其存储起来 以后每次请求都要携带 作为身份识别
  @Post('login')
  async onLogin(@Body('code') js_code: string): Promise<any> {
    const token = await this.utils.genToken(js_code);
    return { token };
  }
后端 utils.ts 里genToken代码
import { JwtService } from '@nestjs/jwt';
import { HttpService } from '@nestjs/axios';
import { firstValueFrom, map } from 'rxjs';
import { HttpException, HttpStatus, Injectable } from '@nestjs/common';

@Injectable()
export default class Utils {
  constructor(
    private readonly httpService: HttpService,
    private readonly jwtService: JwtService,
  ) {}
  async genToken(js_code: string) {
    // openid是用户在同一个小程序下的唯一表示,
    // 即同一个用户在不同的小程序下的openid是不同的
    // 所以当你的appid变化之后,用户的openid就会发生变化,只变AppSecret时 openid是不会变的。
    const params: any = {
      appid: 'xxxxxx', // 管理员在微信公众平台获取
      secret: 'xxxxxx', // 管理员在微信公众平台获取
      grant_type: 'authorization_code', // 写死
      js_code,
    };
    // 请求微信服务端接口 返回session_key和openid
    const res = await firstValueFrom(
      this.httpService
        .get('https://api.weixin.qq.com/sns/jscode2session', { params })
        .pipe(map((response) => response.data)),
    );

    const { openid, session_key, errcode } = res;

    // 如果微信服务端抛出错误,则将错误直接返回给前端
    if (errcode) {
      // https://betheme.net/news/txtlist_i90049v.html?action=onClick
      throw new HttpException({ ...res }, HttpStatus.INTERNAL_SERVER_ERROR);
    } else {
      // 根据session_key和openid 组合成一个用户登录唯一标识token 并维护其生命周期(比如会话变更  就需要重新让其登录)
      // 之后的小程序端的每一个请求都需要携带此token 让我鉴权
      return this.jwtService.sign({ openid, session_key });
    }
  }
}
获取用户信息
接上步, 如果小程序登录成功 应该跳转到首页。 首页一般都会调用一些接口 比如获取用户信息啥的 这里举例获得用户的openid
后端controller
  @Post('userinfo')
  userInfo(@AuthUser() user) {
    console.log(user);
    return { data: {} };
  }
@AuthUser 是自定义的一个注解,用来获取请求参数中的user的,在decorator/index.ts里
当然你也可以不用注解 而通过接受@Request 里获取,只是麻烦些而已。
import { createParamDecorator, ExecutionContext } from '@nestjs/common';

export const AuthUser = createParamDecorator(
    (data: unknown, ctx: ExecutionContext) => {
      const request = ctx.switchToHttp().getRequest();
      return request.user;
    },
  );
为啥请求参数里有个user呢 这是因为 我将user注入到全局所有的request里了 通过守卫guard/auth.guard.ts。
接下来讲讲这个守卫是干什么。
守卫,相当于拦截器,比拦截器写起来体验更好。
用来鉴权的,定义那些接口需要token 哪些不需要token 一般处理登录登出接口 其它都需要
并在这里边 将token解码 将解码后的内容塞入request 以便后续的controller 们使用
import {
  Injectable,
  Inject,
  CanActivate,
  HttpException,
  HttpStatus,
  ExecutionContext,
  UnauthorizedException,
} from '@nestjs/common';
import { JwtService } from '@nestjs/jwt';

@Injectable()
export class AuthGuard implements CanActivate {
  @Inject()
  private readonly jwtService: JwtService;

  // context 请求的(Response/Request)的引用
  async canActivate(context: ExecutionContext): Promise<boolean> {
    // console.log('进入全局权限守卫...');
    // 获取请求对象
    const request = context.switchToHttp().getRequest();
    // 获取请求头中的token字段
    const token = context.switchToRpc().getData().headers.token;
    // 如果白名单内的路由就不拦截直接通过
    if (this.hasUrl(this.urlList, request.url)) {
      return true;
    }
    // 验证token的合理性以及根据token做出相应的操作
    if (token) {
      try {
        // 这里可以添加验证逻辑
        const payload = this.jwtService.verify(token);
        request.user = payload; // 注入到请求中 这样每个控制器直接拿到用户信息 不用每个都需要去解码了
        return true;
      } catch (e) {
        throw new HttpException(
          '没有授权访问,请先登录',
          HttpStatus.UNAUTHORIZED,
        );
      }
    } else {
      throw new HttpException('没有授权访问,请先登录', HttpStatus.UNAUTHORIZED);
    }
  }

  // 白名单数组
  private urlList: string[] = ['/login'];

  // 验证该次请求是否为白名单内的路由
  private hasUrl(urlList: string[], url: string): boolean {
    let flag: boolean = false;
    if (urlList.indexOf(url) >= 0) {
      flag = true;
    }
    return flag;
  }
}
最后注意语法
app.module.ts 里需要提前注入这些依赖 方可在上遍中 使用一些服务和工具
import { HttpModule } from '@nestjs/axios';
import { Module } from '@nestjs/common';
import { AppController } from './app.controller';
import { AppService } from './app.service';
import { JwtModule } from '@nestjs/jwt';
import Utils from '../../utils';
import { APP_GUARD } from '@nestjs/core';
import { AuthGuard } from 'src/guard/auth.guard';

@Module({
  imports: [
    HttpModule,
    JwtModule.register({ // 注入jwt模块
      secret: 'dsh',
      signOptions: { expiresIn: '60s' },
    }),
  ],
  controllers: [AppController],
  providers: [
    AppService,
    Utils,
    {  // 注将自定义守卫入全局
      provide: APP_GUARD,
      useClass: AuthGuard,
    },
  ],
})
export class AppModule {}
相关文章
- 【玩转微信公众平台之十】 图文消息回复解说
- 【微信小程序】-- 自定义组件总结 (四十)
- 【微信小程序】-- 页面配置(十八)
- 【微信小程序】-- 其它常用组件介绍 -- button & image(八)
- 微信小程序 开发环境配置
- 微信小程序 - 获取汉字拼音首字母(汉字英文首字母)
- 微信小程序 - requestSubscribeMessage:fail can only be invoked by user TAP gesture.
- 微信小程序 - [警告] Setting data field “xxxx“ to undefined is invalid. 解决方案
- uniapp微信小程序授权登录流程(代码直接复制可用)
- 微信小程序缓存(本地缓存,同步缓存,异步缓存)
- 前端微信小程序生鲜类仿爱鲜蜂微信小程序
- 解决微信小程序使用wxcharts在屏幕不固定问题-开发工具里也显示好了布局,为啥到真机就是乱的
- uniapp实战(三) -- 小程序微信登录
- 微信 小程序组件 加入购物车全套 one wxss
- 前端工程师如何快速的开发一个微信JSSDK应用
- 微信小程序-通知滚动小提示
- 微信小程序Tab选项卡切换大集合
- 微信小程序弹窗组件
- 微信小程序登录JAVA后台
- 微信小程序之循环<block></block>
- uniapp/微信小程序 登录以及用户信息获取功能相关问题 uni.login() uni.getUserinfo()
- 微信小程序springboot在线考试系统小程序+后台管理系统 | 计算机毕业设计
- 微信公众号开发之access_token的获取
- 微信小程序 位置定位position详解,相对定位relative,绝对定位absolute相关问题
- 微信分享时,标题、内容、图标不显示问题(时序问题)
- 微信小程序生成指定页面小程序码海报图片分享思路总结
- 微信支付
- 微信小程序下拉刷新/上拉加载更多
- 微信小程序 <!--视屏帖片广告,不显示 <video unit-id=“adunit-XXXX“></video> -->
- (1.4)zabbix3.4 实现邮件/微信报警
- 微信小程序学习资料
- 微信小程序中短信验证码登录全流程及代码
- 微信开放平台和公众平台的区别