
Nginx+lua实现灰度发布
Nginx 实现 发布 lua 灰度
2023-09-11 14:16:49 时间
之前简单写过缓存预热加上二级缓存,感觉还挺好玩的,在b站看到nginx的视频,也调用lua的模块,做了灰度发布,自己做了几个小时,结果最后失败了,可能是虚拟机的原因,nginx那台经常登不上,下面就是它的主要流程。
Nginx调用Lua指令
Nginx调用Lua模块指令, Nginx的可插拔模块加载执行, 共11个处理阶段
| 语法 | |
|---|---|
| set_by_lua set_by_lua_file | 设置Nginx变量,可以实现负载的赋值逻辑 |
| access_by_lua access_by_lua_file | 请求访问阶段处理, 用于访问控制 |
| content_by_lua content_by_lua_file | 内容处理器, 接受请求处理并输出响应 |
| 变量 | |
|---|---|
| ngx.var | nginx变量 |
| ngx.req.get_headers | 获取请求头 |
| ngx.req.get_uri_args | 获取url请求参数 |
| ngx.redirect | 重定向 |
| ngx.print | 输出响应内容体 |
| ngx.say | 输出响应内容体,最后输出一个换行符 |
| ngx.header | 输出响应头 |
Nginx+Lua实现代码灰度发布
使用Nginx结合lua实现代码灰度发布
按照一定的关系区别,分不分的代码进行上线,使代码的发布能平滑过渡上线
1.用户的信息cookie等信息区别
2.根据用户的ip地址, 颗粒度更广
实践架构图
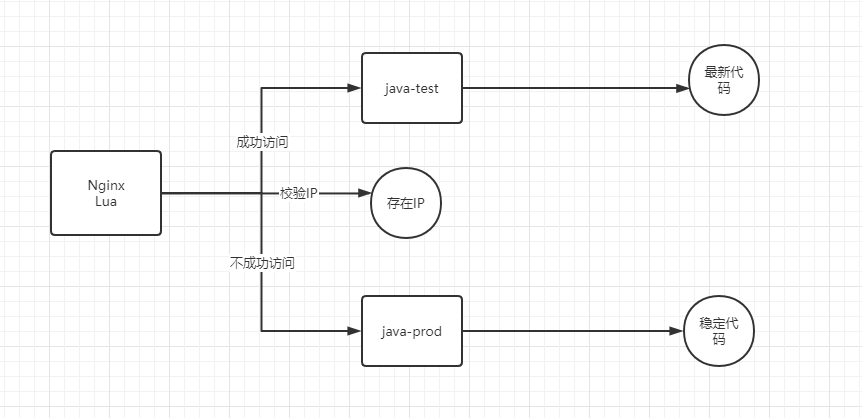
执行过程:
- 1.用户请求到达前端代理Nginx, 内嵌的lua模块会解析Nginx配置文件中Lua脚本
- 2.Lua脚本会获取客户端IP地址,查看Memcached缓存中是否存在该键值
- 3.如果存在则执行@java_test,否则执行@java_prod
- 4.如果是@java_test, 那么location会将请求转发至新版代码的集群组
- 5.如果是@java_prod, 那么location会将请求转发至原始版代码集群组
- 6.最后整个过程执行后结束
实践环境准备:
| 系统 | 服务 | 地址 |
|---|---|---|
| CentOS7 | Nginx+Lua+Memached | 192.168.1.109 |
| CentOS7 | Tomcat集群8080_Prod | 192.168.1.145 |
| CentOS7 | Tomcat集群9090_Test | 192.168.1.144 |
1.安装两台服务器Tomcat,分别启动8080和9090端口
[root@tomcat-node1-20 ~]# yum install java -y
[root@tomcat-node1-20 ~]# mkdir /soft/src -p
[root@tomcat-node1-20 ~]# cd /soft/src
[root@nginx ~]# wget http://mirrors.tuna.tsinghua.edu.cn/apache/tomcat/tomcat-9/v9.0.7/bin/apache-tomcat-9.0.7.tar.gz
[root@tomcat-node1-20 src]# tar xf apache-tomcat-9.0.7.tar.gz  -C /soft
[root@tomcat-node1-20 soft]# cp -r apache-tomcat-9.0.7/ tomcat-8080
[root@tomcat-node1-20 bin]# /soft/tomcat-8080/bin/startup.sh
//注意tomcat默认监听在8080端口, 如果需要启动9090端口需要修改server.xml配置文件
2.配置Memcached并让其支持Lua调用
//安装memcached服务
[root@Nginx-Lua ~]# yum install memcached -y

//配置memcached支持lua
[root@Nginx-Lua ~]# cd /soft/src
[root@Nginx-Lua ~]# wget https://github.com/agentzh/lua-resty-memcached/archive/v0.11.tar.gz
[root@Nginx-Lua ~]# tar xf v0.11.tar.gz
[root@Nginx-Lua ~]# cp -r lua-resty-memcached-0.11/lib/resty/memcached.lua /etc/nginx/lua/

//启动memcached
[root@Nginx-Lua ~]# systemctl start memcached
[root@Nginx-Lua ~]# systemctl enable memcached
3.配置负载均衡调度
#必须在http层
lua_package_path "/etc/nginx/lua/memcached.lua";
upstream java_prod {
        server 192.168.1.145:8080;
}

upstream java_test {
        server 192.168.1.144:9090;
}

server {
        listen 80;
        server_name 192.168.1.109;


        location /hello {
                default_type 'text/plain';
                content_by_lua 'ngx.say("hello ,lua scripts")';
        }

        location /myip {
                default_type 'text/plain';
                content_by_lua '
                        clientIP = ngx.req.get_headers()["x_forwarded_for"]
                        ngx.say("Forwarded_IP:",clientIP)
                        if clientIP == nli then
                                clientIP = ngx.var.remote_addr
                                ngx.say("Remote_IP:",clientIP)
                        end
                        ';
        }
        location / {
                default_type 'text/plain';
                content_by_lua_file /etc/nginx/lua/dep.lua;
        }
       location @java_prod {
                proxy_pass http://java_prod;
                include proxy_params;
        }

        location @java_test {
                proxy_pass http://java_test;
                include proxy_params;
        }
}


//nginx反向代理tomcat,必须配置头部信息否则返回400错误
[root@nginx-lua conf.d]# cat ../proxy_params
proxy_redirect default;
proxy_set_header Host $http_host;
proxy_set_header X-Real-IP $remote_addr;
proxy_set_header X-Forwarded-For $proxy_add_x_forwarded_for;

proxy_connect_timeout 30;
proxy_send_timeout 60;
proxy_read_timeout 60;

proxy_buffer_size 32k;
proxy_buffering on;
proxy_buffers 4 128k;
proxy_busy_buffers_size 256k;
proxy_max_temp_file_size 256k;
4.编写Nginx调用灰度发布Lua脚本
[root@nginx ~]# cat /etc/nginx/lua/dep.lua
--获取x-real-ip
clientIP = ngx.req.get_headers()["X-Real-IP"]

--如果IP为空-取x_forwarded_for
if clientIP == nil then
    clientIP = ngx.req.get_headers()["x_forwarded_for"]
end

--如果IP为空-取remote_addr
if clientIP == nil then
     clientIP = ngx.var.remote_addr
end

--定义本地,加载memcached
    local memcached = require "resty.memcached"
--实例化对象
    local memc, err = memcached:new()
--判断连接是否存在错误
    if not memc then
        ngx.say("failed to instantiate memc: ", err)
        return
    end
--建立memcache连接
    local ok, err = memc:connect("127.0.0.1", 11211)
--无法连接往前端抛出错误信息
    if not ok then
        ngx.say("failed to connect: ", err)
        return
    end
--获取对象中的ip-存在值赋给res
    local res, flags, err = memc:get(clientIP)
--
 --ngx.say("value key: ",res,clientIP)
    if err then
        ngx.say("failed to get clientIP ", err)
        return
    end
--如果值为1则调用local-@java_test
    if res == "1" then
        ngx.exec("@java_test")
        return
    end
--否则调用local-@java_prod
        ngx.exec("@java_prod")
        return
5.使用Memcache set IP, 测试灰度发布
//telnet传入值
[root@nginx conf.d]# telnet 127.0.0.1 11211
# set对应IP
set 211.161.160.201 0 0 1
# 输入1
1
相关文章
- Nginx配置http2
- Nginx负载均衡详解
- 使用nginx实现反向代理
- Nginx配置文件nginx.conf中文详解
- OpenResty(Nginx)+Lua+GraphicsMagick实现缩略图功能
- golang 实现一个简单的类似于nginx的web http server
- 使用nginx反向代理实现多版本api
- mysql php nginx 源码包下载地址
- Django线上部署实战教程之Nginx+Gunicorn+Django篇
- nginx利用lua实现nginx反向代理proxy_store缓存文件自删除
- Nginx 413 Request Entity Too Large错误解决
- Nginx http_secure_link_module 实现下载防盗链
- Nginx http_split_client_module 实现AB测试
- Nginx upstream_ip_hash_module 基于Hash算法实现负载均衡
- nginx: [alert] kill(10155, 15) failed (3: No such process)
- 理论+实践,教你如何使用Nginx实现限流
- Docker安装Nginx
- 【Nginx】面试官:给我讲讲Nginx如何实现四层负载均衡?
- 【Nginx】图片显示过慢,文件下载不完全,竟然是Nginx的锅!!
- nginx静态资源跨域请求 解决方法——筑梦之路
- Nginx报 No input file specified. 的问题解决之路 转
- nginx限流方案的实现(三种方式)
- Shell脚本一键安装-----Nginx服务
- Nginx七层负载均衡
- nginx通过四层代理实现端口转发