
C#【自动化测试】对Windows桌面应用程序进行UI自动化测试
1、文章一:
题记
本文简述如何利用appium对Windows桌面应用程序进行UI自动化测试。
UI自动化测试
所谓UI自动化测试,就是模拟一个用户,对应用程序的UI进行操作,以完成特定场景的功能性集成测试。
要对Windows桌面应用程序进行UI自动化测试,目前可选的技术主要是两种:
VS自带的CodedUI Test和Appium+WinAppDriver。
但是,微软已经宣布VS2019将是带有CodedUI Test的最后一个版本,且在面对某些复杂场景的时候有点力不从心。
而Appium作为移动应用主流的UI测试工具,已经被业界广泛采用,且相关的接口是标准化的,因此微软对其进行了扩展(即WinAppDriver),让Appium可以支持包括Universal Windows Platform (UWP), Windows Forms (WinForms), Windows Presentation Foundation (WPF), and Classic Windows (Win32)之内的Windows桌面应用。所以采用Appium来作为Windows桌面应用程序UI自动化测试的工具是最佳选择。
要完成UI自动化测试的大致步骤如下(你首先需要一台Windows 10的PC):
-
准备好待测试的Windows桌面应用程序。
-
到 https://github.com/Microsoft/WinAppDriver/releases 下载WinAppDriver的安装包,进行安装。并启用Windows 10的开发者模式。从安装目录(比如:C:\Program Files (x86)\Windows Application Driver)来启动WinAppDriver。
-
用你喜欢的测试框架创建UnitTest项目,在项目中引用Appium.WebDriver这个Nuget包。
-
编写测试用例,执行测试。
整个用例的编写也相对简单:
-
使用DesiredCapabilities来设定要测试的目标应用。
-
使用WindowsDriver来声明测试的会话。
-
通过测试会话查找对应的UI元素,对UI元素进行SendKeys(模拟填写内容)和Click(模拟点击)等操作,或者获取UI元素的相关Property和Attribute来进行验证。
-
编写测试最挑战的地方就是在于如何查找到UI元素,我们可以借用Windows SDK里面的inspect.exe这个工具来辅助我们查找。
工具的位置在C:\Program Files (x86)\Windows Kits\10\bin里面的特定版文件夹中。用法是先启动应用程序并导航到待测试的界面,启动这个工具就会获得桌面上所有窗口的UI元素层级关系,并通过焦点等方式导航到要查找的UI元素上。查看相应的信息,并采用适合的查找方式。具体的查找方式可见:https://github.com/Microsoft/WinAppDriver#supported-locators-to-find-ui-elements。
选择适合的查找方式有时候需要多尝试几种,有些UI元素只能用特定的方式来查找,比如html的input button只用FindElementByName ,而html的button就可以用FindElementByAccessibilityId 。
测试用例的编写可以参考WinAppDriver源代码自带的Sample,也可以参照我的示例:https://github.com/heavenwing/WindowsAppUITestSample。
在我的这个示例当中,目标应用采用的是Hybrid方式运行(即通过WebBrowser来嵌入html,并用C#进行行为操作),考虑到这种应用程序可能是多个函数库组装在一起,所以测试项目理应也是多个项目组合的(即功能函数库对应一个测试项目),并且其他测试项目可以复用公共的测试步骤(比如:列表页面复用登录的测试步骤)。
参考
https://www.cnblogs.com/redmoon/p/11401030.html
2、文章二:
参考:https://blog.csdn.net/The_Eyes/article/details/73432716
最近研究自动化测试,看了一下UI Automation的微软例子,表示太老了,遇到各种问题,
UI Spy 好像已经被放弃了,可以用inspect.exe来代替,win10 的路径为:“C:\Program Files (x86)\Windows Kits\8.1\bin\x64\inspect.exe”
这个用来查询automationId,
官网是以计算器例子,下面是在win10 修改后能运行版本:
using System;
using System.Diagnostics;
using System.Threading;
using System.Windows.Automation;

namespace ConsoleApp1
{

    class CalcAutomationClient
    {

        AutomationElement calWindow = null;//计算器窗口主窗口元素


        string resultTextAutoID = "CalculatorResults";
        string btn5AutoID = "num5Button";
        string btn3AutoID = "num3Button";
        string btn2AutoID = "num2Button";
        string btnPlusAutoID = "plusButton";
        string btnSubAutoId = "94";
        string btnEqualAutoID = "equalButton";
        static void Main(string[] args)
        {
            CalcAutomationClient autoClient = new CalcAutomationClient();
            AutomationEventHandler eventHandler = new AutomationEventHandler(autoClient.OnWindowOpenOrClose);
            Automation.AddAutomationEventHandler(WindowPattern.WindowOpenedEvent, AutomationElement.RootElement, TreeScope.Children, eventHandler);
            Process.Start("calc.exe");
            Console.ReadLine();
        }

        private void OnWindowOpenOrClose(object sender, AutomationEventArgs e)
        {
            if (calWindow != null)
                return;
            if (e.EventId != WindowPattern.WindowOpenedEvent)
            {
                return;
            }
            if (sender == null)
            {
                Console.WriteLine("sender is null");
                return;
            }
            Thread.Sleep(1000);//此处必须等待一下,应该是计算器的等待计算器完全加载,不然控件 找不到
            AutomationElement sourceElement = null;
            sourceElement = sender as AutomationElement;
            Console.WriteLine(sourceElement.Current.Name);
            try
            {
                sourceElement = sender as AutomationElement;
                Console.WriteLine(sourceElement.Current.Name);
                if (sourceElement.Current.Name == "计算器")
                {
                    calWindow = sourceElement;
                }
            }
            catch (Exception ex)
            {
                Console.WriteLine("ex:" + ex.Message);
                return;
            }
            if (calWindow == null)
            {
                return;
            }
            ExcuteTest();
        }
        private void ExcuteTest()
        {
            ExcuteButtonInvoke(btn2AutoID);
            ExcuteButtonInvoke(btnPlusAutoID);
            ExcuteButtonInvoke(btn3AutoID);
            ExcuteButtonInvoke(btnEqualAutoID);
            string rs = GetCurrentResult();
            Console.WriteLine(rs);
        }
        private void ExcuteButtonInvoke(string automationId)
        {
            Condition conditions = new AndCondition(
                new PropertyCondition(AutomationElement.AutomationIdProperty, automationId),
                new PropertyCondition(AutomationElement.ControlTypeProperty, ControlType.Button));
            if (calWindow == null)
                return;
            AutomationElementCollection collection = calWindow.FindAll(TreeScope.Descendants, conditions);
            if (collection == null || collection.Count == 0)
                return;
            AutomationElement btn = collection[0];
            if (btn != null)
            {
                InvokePattern invokeptn = (InvokePattern)btn.GetCurrentPattern(InvokePattern.Pattern);
                invokeptn.Invoke();
            }
            Thread.Sleep(1000);
        }
        private string GetCurrentResult()
        {
            Condition conditions = new AndCondition(
                new PropertyCondition(AutomationElement.AutomationIdProperty, resultTextAutoID),
                new PropertyCondition(AutomationElement.ControlTypeProperty, ControlType.Text));
            AutomationElement text = calWindow.FindAll(TreeScope.Descendants, conditions)[0];
            return text.Current.Name;
        }
    }
}
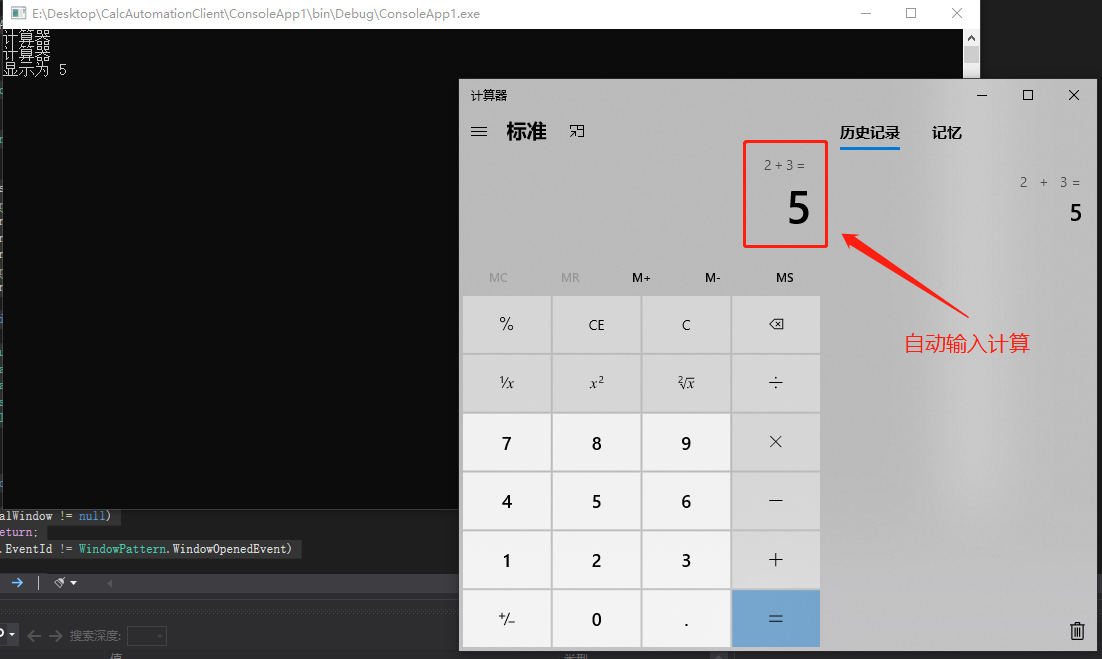
运行结果:
3、重要资源【实例】:
1)已验证可用【非常好的例子,便于理解】
C#自动化测试工具编写(借助API) :https://download.csdn.net/download/luminji/2796362
关键代码
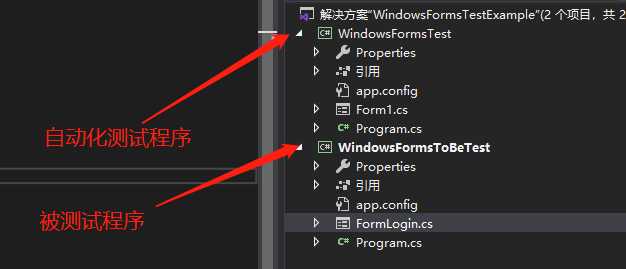
1)自动化测试程序

using System;
using System.Collections.Generic;
using System.Runtime.InteropServices;
using System.Text;
using System.Windows.Forms;

namespace WindowsFormsTest
{
    public partial class Form1 : Form
    {
        public Form1()
        {
            InitializeComponent();
        }

        private void button1_Click(object sender, EventArgs e)
        {
            //获取被测试程序的窗口句柄
            IntPtr mainWnd = FindWindow(null, "FormLogin");
            List<IntPtr> listWnd = new List<IntPtr>();
            //获取窗体上按钮的句柄,按钮上的文字为OK
            IntPtr hwnd_button = FindWindowEx(mainWnd, new IntPtr(0), null, "OK");
            //获取窗体上全部的子控件句柄
            EnumChildWindows(mainWnd, new CallBack(delegate(IntPtr hwnd, int lParam)
            {
                listWnd.Add(hwnd);
                return true;
            }), 0);
            foreach (IntPtr item in listWnd)
            {
                if (item != hwnd_button)
                {
                    char[] UserChar = "StarStar".ToCharArray();
                    foreach (char ch in UserChar)
                    {
                        SendChar(item, ch, 100);
                    }
                }
            }
            SendMessage(hwnd_button, WM_CLICK, mainWnd, "0");
        }

        public void SendChar(IntPtr hand, char ch, int SleepTime)
        {
            PostMessage(hand, WM_CHAR, ch, 0);
            System.Threading.Thread.Sleep(SleepTime);
        }

        public static int WM_CHAR = 0x102;
        public static int WM_CLICK = 0x00F5;

        [DllImport("User32.dll", EntryPoint = "SendMessage")]
        public static extern int SendMessage(IntPtr hWnd, int Msg, IntPtr wParam, string lParam);

        [DllImport("user32.dll")]
        public static extern IntPtr FindWindowEx(IntPtr hwndParent, IntPtr hwndChildAfter,
            string lpszClass, string lpszWindow);

        [DllImport("user32.dll", SetLastError = true)]
        public static extern IntPtr FindWindow(string lpClassName, string lpWindowName);

        [DllImport("user32.dll")]
        public static extern int AnyPopup();

        [DllImport("user32.dll", CharSet = CharSet.Auto, SetLastError = true)]
        public static extern int GetWindowText(IntPtr hWnd, StringBuilder lpString, int nMaxCount);

        [DllImport("user32.dll")]
        public static extern int EnumThreadWindows(IntPtr dwThreadId, CallBack lpfn, int lParam);

        [DllImport("user32.dll")]
        public static extern int EnumChildWindows(IntPtr hWndParent, CallBack lpfn, int lParam);

        [DllImport("user32.dll", CharSet = CharSet.Ansi)]
        public static extern IntPtr PostMessage(IntPtr hwnd, int wMsg, int wParam, int lParam);

        [DllImport("user32.dll", CharSet = CharSet.Ansi)]
        public static extern IntPtr SendMessage(IntPtr hwnd, int wMsg, IntPtr wParam, IntPtr lParam);

        [DllImport("user32.dll", CharSet = CharSet.Unicode)]
        public static extern IntPtr SendMessageA(IntPtr hwnd, int wMsg, int wParam, int lParam);

        [DllImport("user32.dll", CharSet = CharSet.Auto)]
        static extern int GetClassName(IntPtr hWnd, StringBuilder lpClassName, int nMaxCount);

        [DllImport("user32.dll", SetLastError = true, CharSet = CharSet.Auto)]
        public static extern int GetWindowTextLength(IntPtr hWnd);

        [DllImport("user32.dll", CharSet = CharSet.Auto, SetLastError = false)]
        public static extern IntPtr GetParent(IntPtr hWnd);

        public delegate bool CallBack(IntPtr hwnd, int lParam);
    }
}
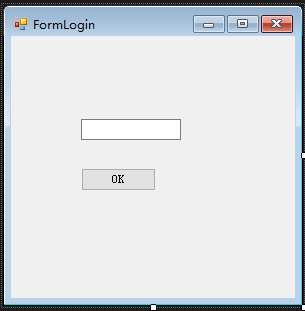
2)被测试程序
using System;
using System.Windows.Forms;

namespace WindowsFormsToBeTest
{
    public partial class FormLogin : Form
    {
        public FormLogin()
        {
            InitializeComponent();
        }

        private void button1_Click(object sender, EventArgs e)
        {
            MessageBox.Show(textBox1.Text.Trim());
        }
    }
}
运行结果:

2)未验证
C#借助Code UI Automation实现黑盒自动化测试工具: https://download.csdn.net/download/luminji/2839416
和上边的好像一样:

相关文章
- C# HttpWebRequest请求超时解决办法
- 【c#】我们为什么要用 yield return
- TestNG like unit testing framework in C# (C sharp)
- Extension Methods (C# Programming Guide)
- C#不用union,而是有更好的方式实现 .net自定义错误页面实现 .net自定义错误页面实现升级篇 .net捕捉全局未处理异常的3种方式 一款很不错的FLASH时种插件 关于c#中委托使用小结 WEB网站常见受攻击方式及解决办法 判断URL是否存在 提升高并发量服务器性能解决思路
- C#字符串数组排序 C#排序算法大全 C#字符串比较方法 一个.NET通用JSON解析/构建类的实现(c#) C#处理Json文件 asp.net使用Jquery+iframe传值问题
- C#使用oledb连接excel运行Insert Into语句出现“操作必须使用一个可更新的查询”的解决的方法
- (C++C#类型互转工具)使用Signature Tool自动生成P/Invoke调用Windows API的C#函数声明
- C#,入门教程(28)——文件夹(目录)、文件读(Read)与写(Write)的基础知识
- C#,格式化json数据的源代码
- C#工作线程创建窗体及绘制星图实例
- c#使用PortableDeviceApiLib读取便携式设备(WPD:Windows Portable Devices)信息
- windows Redis绑定ip无效,Redis设置密码无效,Windows Redis 配置不生效, Windows Redis requirepass不生效
- 关于 windows 卸载 入门 Get Started 应用 Windows功能体验包
- C#Windows服务程序安装常见问题解决方法
- C#捕获windows关机事件,在系统关机前做一些自己想做的事
- Redis for Windows(C#缓存)安装和使用
- C# 之 数据集SQL Dataset
- java/php/c#版rsa签名以及java验签实现--转
- C# Windows异步I/O操作
- C#-WebApi 路由机制剖析
- C#计算一段程序运行时间的三种方法
- C# VS 调试 动态加载的 DLL