
【Vue和Vue3+vite】通过脚手架配置代理实现axios跨域与第三方后台数据传递(图文+代码示例)
2023-09-11 14:14:57 时间
一、脚手架环境安装xios
命令:npm i axios
 二、在组件中引入axios
import axios from 'axios'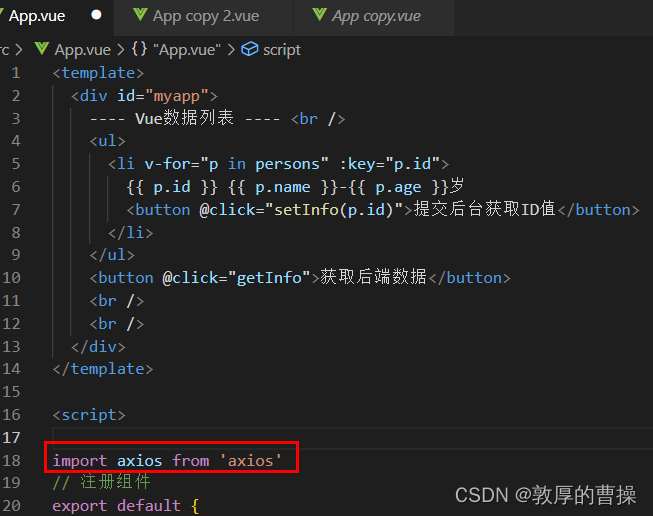
三、设置代理服务器
打开vue.config.js文件,添加以下代码(注意:端口号是第三方的端口号):
方式一:单个端口(不推荐使用)
  // 开启代理服务器
  devServer: {
    proxy: 'http://localhost:22911'
  }
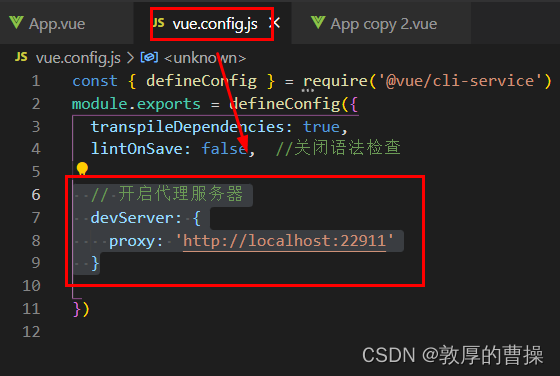
方式二:多个端口(推荐使用)vue.config.js
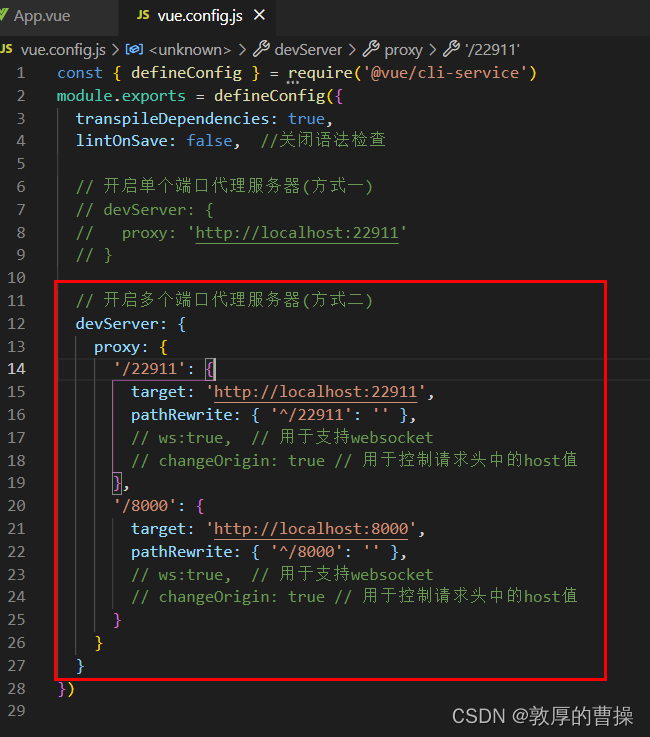
const { defineConfig } = require('@vue/cli-service')
module.exports = defineConfig({
  transpileDependencies: true,
  lintOnSave: false,  //关闭语法检查

  // 开启单个端口代理服务器(方式一)
  // devServer: {
  //   proxy: 'http://localhost:22911'
  // }

  // 开启多个端口代理服务器(方式二)
  devServer: {
    proxy: {
      '/22911': {
        target: 'http://localhost:22911',
        pathRewrite: { '^/22911': '' },
        // ws:true,  // 用于支持websocket
        // changeOrigin: true // 用于控制请求头中的host值
      },
      '/8000': {
        target: 'http://localhost:8000',
        pathRewrite: { '^/8000': '' },
        // ws:true,  // 用于支持websocket
        // changeOrigin: true // 用于控制请求头中的host值
      }
    }
  }
})
第三方域名写法
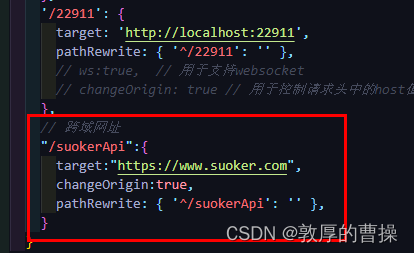
        // 跨域网址
        "/suokerApi":{
          target:"https://www.suoker.com",
          changeOrigin:true,
          pathRewrite: { '^/suokerApi': '' },
        }
前端写法
  methods: {
    loginClick() {
      axios
        // .post("http://localhost:8080/10010/handle/apipost.ashx?id=888", {
        .post("http://localhost:8080/suokerApi/handle/apipost.ashx?id=888", {
          username:this.loginForm.username,
          password: this.loginForm.password,
          message: "终于解决了!",
        })
        .then((response) => {
          alert(response.data);
          console.log(response.data);
        })
        .catch(function (error) {
          console.log(error);
        });
    },
  },
四、重新启动脚手架
先按ctrl+C退出,再npm run serve运行

五、App.vue组件
注意:使用方式二(多个端口)
代码中的8080端口不变,需要在后面增加一个/22911,就是你在vue.config.js文件中

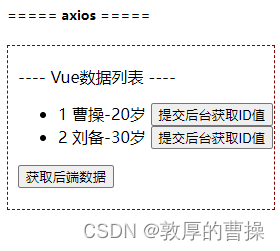
<template>
  <div id="myapp">
    ---- Vue数据列表 ---- <br />
    <ul>
      <li v-for="p in persons" :key="p.id">
        {{ p.id }} {{ p.name }}-{{ p.age }}岁
        <button @click="setInfo(p.id)">提交后台获取ID值</button>
      </li>
    </ul>
    <button @click="getInfo">获取后端数据</button>
    <br />
    <br />
  </div>
</template>

<script>
import axios from "axios";
// 注册组件
export default {
  name: "App",
  data() {
    return {
      persons: [
        {
          id: "1",
          name: "张飞",
          age: 20,
        },
        {
          id: "2",
          name: "刘备",
          age: 30,
        },
        {
          id: "3",
          name: "吕布",
          age: 22,
        },
      ],
    };
  },
  methods: {
    // 获取后端数据
    getInfo() {
      axios
        // .get("http://localhost:8080/Home/ListJson")  // 方式一:单个端口
        .get("http://localhost:8080/22911/Home/ListJson")  // 方式二:多个端口
        .then((response) => (this.persons = response.data))
        .catch(function (error) {
          // 请求失败处理
          console.log(error);
        });
    },
    // 发送后端数据
    setInfo(a) {
      alert("把当前记录ID:[" + a + "]提交给后台.");
      axios
        // .post("http://localhost:8080/Home/SubmitJson",  // 方式一:单个端口
        .post("http://localhost:8080/22911/Home/SubmitJson", // 方式二:多个端口
        {
          paramA: a,
        })
        .then((response) => alert(response.data))
        .catch(function (error) {
          // 请求失败处理
          console.log(error);
        });
    },
  },
};
</script>

<style scoped>
#myapp {
  border: 1px rgb(134, 0, 0) dashed;
  /* height: 400px; */
  padding-top: 20px;
  padding-left: 10px;
  /* background-color: aqua; */
}
</style>
六、关于后台接收的完整实例,请参考以下链接:
【Vue】通过axios实现跨域与asp.net后台数据get/post传递(图文+代码示例)_敦厚的曹操的博客-CSDN博客_asp.net axios注意前提:需要在同一个C#项目(asp.net)中,否则会出现跨域问题。Home.html代码<!DOCTYPE html><html lang="en"><head> <meta charset="UTF-8"> <meta http-equiv="X-UA-Compatible" content="IE=edge"> <meta name="viewport" content="width=https://blog.csdn.net/dxnn520/article/details/124625224【有坑请注意】:axios默认传参是json对象,不是字符串,解决方案可以参考上面的asp.net完整的前后端实例,也可以参考以下链接:
七、Vue3+Vite的axios跨域终极解决方案
1、用vite最新创建项目文件
npm init vite@latest 安装最新版本vite

输入项目名称,选择vue,再选择js或ts
2、vite.config.js配置

import { defineConfig } from 'vite'
import vue from '@vitejs/plugin-vue'

// https://vitejs.dev/config/
export default defineConfig({
  plugins: [vue()],

  server: {
    open:false,
    port:4000,
    https:false,
    hotOnly:false,
    proxy: {
      '/suoker': {
        target: 'http://www.suoker.com',
        rewrite: (path) => path.replace(/^\/suoker/, ''),
        changeOrigin: true,             //是否跨域
        // ws: true,                       //是否代理 websockets
        // secure: true,                   //是否https接口
  // ws:true,  // 用于支持websocket
        // changeOrigin: true // 用于控制请求头中的host值
      }
    }
  }


})
3、app.vue
<script>
import HelloWorld from './components/HelloWorld.vue'
import axios from "axios";
import { reactive, ref, onMounted } from "vue";

export default {
  name: 'App',

  setup() {

    function postApi() {

      axios
        .get("suoker/handle/ApiPost.ashx?id=888").then((res) => {
          console.log(res);
        }).catch((res) => {
          console.log(res);
        });
    }


    // ================================ 【onMounted - 载入事件】
    onMounted(() => {
      postApi();
    });

  }
}

</script>

<template>
  <div>
    <a href="https://vitejs.dev" target="_blank">
      <img src="/vite.svg" class="logo" alt="Vite logo" />
    </a>
    <a href="https://vuejs.org/" target="_blank">
      <img src="./assets/vue.svg" class="logo vue" alt="Vue logo" />
    </a>
  </div>
  <HelloWorld msg="Vite + Vue" />
</template>


<style scoped>
.logo {
  height: 6em;
  padding: 1.5em;
  will-change: filter;
}
.logo:hover {
  filter: drop-shadow(0 0 2em #646cffaa);
}
.logo.vue:hover {
  filter: drop-shadow(0 0 2em #42b883aa);
}
</style>
八、说明:如果是vue脚手架,发布后的静态项目,直接联后台的asp.net中的webAPI项目,直接改web.config文件。
    <httpProtocol>
      <customHeaders>
        <add name="Access-Control-Allow-Methods" value="GET,POST,PUT,DELETE,OPTIONS" />
        <add name="Access-Control-Allow-Headers" value="*" />
        <add name="Access-Control-Allow-Origin" value="*" />
      </customHeaders>
    </httpProtocol>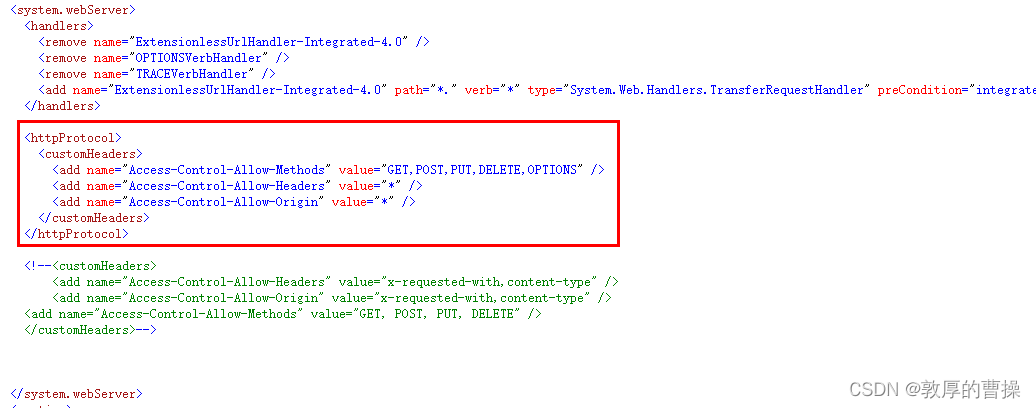
相关文章
- Vue笔记:vue项目引入bootstrap、elementUI、echarts
- Vue_(Router路由)-vue-router路由的基本用法
- [Vue @Component] Define Props on a Vue Class with vue-property-decorator
- vue3: 动态修改favicon(网站的ico 图标)(vue@3.2.26)
- vue3:子组件向父组件发送数据(vue@3.2.26)
- [Vue @Component] Define Props on a Vue Class with vue-property-decorator
- [Vue] Get up and running with vue-router
- vue3:子组件向父组件发送数据(vue@3.2.26)
- 【收藏】vue3+vite+ts 封装axios踩坑记录
- 一个典型的Vue应用的App.vue
- vue3面试题:2022 最新前端 Vue 3.0 面试题及答案(持续更新中……)
- vue2和vue3有哪些区别和不同2
- 用Vue3构建企业级前端应用,TS能让你更轻松点
- 如何在vue3获取 DOM 元素
- vue3 报错解决:找不到模块‘xxx.vue’或其相应的类型声明。(Vue 3 can not find module)
- Vue3学习笔记(六)—— 作业
- Vue(八)vue 脚手架、脚手架创建项目示例
- 从0搭建Vue3组件库(五): 如何使用Vite打包组件库
- 感受Vue3的魔法力量
- vue3 中的响应式设计原理
- 【前端面试题——vue3篇】
- Vue:第一个vue-cli项目
- Vue学习笔记——vue-router