
linux服务篇-SSH服务
SSH协议:安全外壳协议,SSH 为 Secure Shell 的缩写,SSH 为建立在应用层和传输层基础上的安全协议。SSH 是目前较可靠,专为远程登录会话和其他网络服务提供安全性的协议。
SSH作用
SSH 是目前较可靠,专为远程登录会话和其他网络服务提供安全性的协议。
利用 SSH 协议可以有效防止远程管理过程中的信息泄露问题。SSH最初是UNIX系统上的一个程序,后来又迅速扩展到其他操作平台。SSH在正确使用时可弥补网络中的漏洞。SSH客户端适用于多种平台。几乎所有UNIX平台—包括HP-UX、Linux、AIX、Solaris、Digital UNIX、Irix,以及其他平台,都可运行SSH。
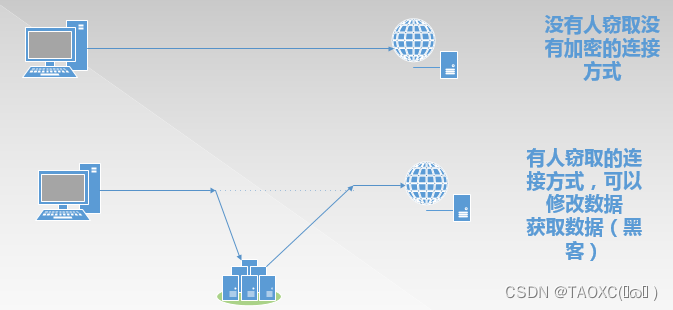
远程控制比较
传统的网络服务程序(FTP、Telnet、PoP)本质上都是不安全的,因为它们在网络上用明文传送口令和数据,别有用心的人非常容易就可以截获这些口令和数据,非常容易窃取,这些服务程序的安全验证方式也是有其弱点的, 就是很容易受到“中间人”(man-in-the-middle)这种方式的攻击。所谓“中间人”的攻击方式, 就是“中间人”冒充真正的服务器接收你传给服务器的数据,然后再冒充你把数据传给真正的服务器。服务器和你之间的数据传送被“中间人”一转手做了手脚之后,就会出现很严重的问题。通过使用SSH,你可以把所有传输的数据进行加密,这样"中间人"这种攻击方式就不可能实现了,而且也能够防止DNS欺骗和IP欺骗。使用SSH,还有一个额外的好处就是传输的数据是经过压缩的,所以可以加快传输的速度。SSH有很多功能,它既可以代替Telnet,又可以为FTP、PoP、甚至为PPP提供一个安全的"通道"。
基于密码认证原理
只要你知道自己帐号和口令,就可以登录到远程主机。所有传输的数据都会被加密,但是不能保证你正在连接的服务器就是你想连接的服务器。这个过程如下:
(1)远程主机收到用户的登录请求,把自己的公钥发给用户。
(2)用户使用这个公钥,将登录密码加密后,发送回来。
(3)远程主机用自己的私钥,解密登录密码,如果密码正确,就同意用户登录。这种方式可能会有别的服务器在冒充真正的服务器,将公钥发送给客户端,客户端就会将密码加密后发送给冒充的服务器,冒充的服务器就可以拿自己的私钥获取到密码,也就是受到“中间人”这种方式的攻击。
值得一说的是当第一次链接远程主机时,会提示您当前主机的”公钥指纹”,询问您是否继续,如果选择继续后就可以输入密码进行登录了,当远程的主机接受以后,该台服务器的公钥就会保存到~/.ssh/known_hosts文件中。
基于密钥认证原理
需要依靠密匙,也就是你必须为自己创建一对密匙,并把公用密匙放在需要访问的服务器上。如果你要连接到SSH服务器上,客户端软件就会向服务器发出请求,请求用你的密匙进行安全验证。服务器收到请求之后,先在该服务器上你的主目录下寻找你的公用密匙,然后把它和你发送过来的公用密匙进行比较。如果两个密匙一致,服务器就用公用密匙加密“质询”并把它发送给客户端软件。客户端软件收到“质询”之后就可以用你的私人密匙解密再把它发送给服务器。用这种方式,你必须知道自己密匙的口令。但是,与第一种级别相比,第二种级别不需要在网络上传送口令。第二种级别不仅加密所有传送的数据,而且“中间人”这种攻击方式也是不可能的(因为他没有你的私人密匙)。但是整个登录的过程可能需要10秒,但是相比输入密码的方式来说10秒也不长。
客户端生成公私钥,将公钥拷贝到服务器的~/.ssh/authorized_keys文件中就可以了!
Openssh服务软件包
Openssh软件包提供了后台程序和客户端工具,用来加密远程控制件和文件传输过程中的数据,并由此来替代原来类似的服务,OpenSSH是SSH的开源实现,因此用户可以免费使用到这种安全服务。
还有一个看着比较近似的词:OpenSSL。这个是SSL的开源实现,所谓SSL就是安全套接字层。具体含义笔者不再解释了,总之跟OpenSSH不是一码事。
OpenSSH是使用SSH透过计算机网络加密通讯的实现。它是取代由SSH Communications Security所提供的商用版本的开放源代码方案。目前OpenSSH是OpenBSD的子计划。
Openssh服务软件包
Openssh软件包提供了后台程序和客户端工具,用来加密远程控制件和文件传输过程中的数据,并由此来替代原来类似的服务,OpenSSH是SSH的开源实现,因此用户可以免费使用到这种安全服务。
还有一个看着比较近似的词:OpenSSL。这个是SSL的开源实现,所谓SSL就是安全套接字层。具体含义笔者不再解释了,总之跟OpenSSH不是一码事。
OpenSSH是使用SSH透过计算机网络加密通讯的实现。它是取代由SSH Communications Security所提供的商用版本的开放源代码方案。目前OpenSSH是OpenBSD的子计划。
[root@taijitao63 ~]# rpm -ivh /media/Packages/openssh-
openssh-5.3p1-94.el6.x86_64.rpm #服务器和客户端需要的核心文件
openssh-askpass-5.3p1-94.el6.x86_64.rpm #用于图形界面下输入口令的,一般不装
openssh-clients-5.3p1-94.el6.x86_64.rpm #客户端软件包
openssh-server-5.3p1-94.el6.x86_64.rpm #服务端软件包
[root@taijitao63 Packages]# rpm -pqi openssh-server-5.3p1-94.el6.x86_64.rpm //查看软件包信息
warning: openssh-server-5.3p1-94.el6.x86_64.rpm: Header V3 RSA/SHA256 Signature, key ID fd431d51: NOKEY
Name : openssh-server Relocations: (not relocatable)
Version : 5.3p1 Vendor: Red Hat, Inc.
Release : 94.el6 Build Date: Mon 30 Sep 2013 03:08:20 PM CST
Install Date: (not installed) Build Host: x86-022.build.eng.bos.redhat.com
Group : System Environment/Daemons Source RPM: openssh-5.3p1-94.el6.src.rpm
Size : 689757 License: BSD
Signature : RSA/8, Mon 28 Oct 2013 03:12:04 PM CST, Key ID 199e2f91fd431d51
Packager : Red Hat, Inc. <http://bugzilla.redhat.com/bugzilla>
URL : http://www.openssh.com/portable.html
Summary : An open source SSH server daemon
Description :
OpenSSH is a free version of SSH (Secure SHell), a program for logging into and executing commands on a remote machine. This package contains the secure shell daemon (sshd). The sshd daemon allows SSH clients to securely connect to your SSH server.
[root@taijitao63 ~]# yum info openssh //第二种查看方式
Loaded plugins: product-id, refresh-packagekit, security, subscription-manager
This system is not registered to Red Hat Subscription Management. You can use subscription-manager to register.
Installed Packages
Name : openssh
Arch : x86_64
Version : 5.3p1
Release : 94.el6
Size : 722 k
Repo : installed
From repo : anaconda-RedHatEnterpriseLinux-201311111358.x86_64
Summary : An open source implementation of SSH protocol versions 1 and 2
URL : http://www.openssh.com/portable.html
License : BSD
Description : SSH (Secure SHell) is a program for logging into and executing
: commands on a remote machine. SSH is intended to replace rlogin
: and rsh, and to provide secure encrypted communications between
: two untrusted hosts over an insecure network. X11 connections and
: arbitrary TCP/IP ports can also be forwarded over the secure
: channel.
:
: OpenSSH is OpenBSD's version of the last free version of SSH,
: bringing it up to date in terms of security and features.
:
: This package includes the core files necessary for both the
: OpenSSH client and server. To make this package useful, you should
: also install openssh-clients, openssh-server, or both.
Openssh服务启动
[root@taijitao63 ~]# systemctl restart|stop|start|status sshd
[root@taijitao63 ~]# systemctl enable sshd
[root@taijitao63 ~]# systemctl is-enabled sshd
[root@taijitao63 ~]# systemctl disable sshd
修改配置文件注意事项
Notes:修改配置文件之前一定要先做一个备份,实验中你可以不做,恢复快照即可,实际生产环境没那么方便,我们创建个备份以防万一(留一手在实际运维中是经常用到的),配置文件修改的时候我们尽量不要去动配置文件的原有行,如果需要改动,复制一行去改动,将以前的有效行注释掉,或者将复制的注释行启用,如果某一行你改忘记内容,这样你就有参考!
SSH远程登录
命令格式:
#ssh [远程主机用户名]@[远程主机IP或主机名]
[root@taijitao63 ~]# ssh taijitao64 //ssh默认使用命令提示符中的用户登录,没有任何参数时
[root@taijitao63 ~]# ssh bob@taijitao64 //使用特定用户登录,可以是主机名域名或者IP(能解析)
[root@taijitao63 ~]# ssh -l bob taijitao64 //同上一条命令,不使用@的时候使用-l指定login_name
登录的时候出现第一次需要输入yes的原因:
第一次登录服务器的时候系统没有保存远程主机的信息,为了确认该主机的身份,所以会提示用户是否继续!输入yes后,系统将远程主机信息写入相应用户主目录下的$HOME/.ssh/known_hosts文件,下次登录不用输入yes!(也就是存储对方的公钥)
[root@taijitao63 ~]# ssh -X root@taijitao64 //远端图像回传,X=Xwindows,远程需要运行5级别
[root@taijitao64 ~]# firefox //远程过去运行firefox
[root@taijitao63 ~]# ssh -X -l root taijitao64 -p 2202 //修改端口后的连接方式
SSH默认采用的连接方式是RSA的加密连接方式,存储在know_hosts是对方公钥:
[root@taijitao63 ~]# cat /root/.ssh/known_hosts
taijitao64,192.168.1.64 ssh-rsa AAAAB3NzaC1yc2EAAAABIwAAAQEA4/QbR+ahyQj8+s6EMX1LxxlE6LOV7SJYmCfFs84O0g9+T6QhNFPcemgefIVmKXSfUEfPzwO6hPHEwHZvST6yYyC78DENHAaCazsKqXv9O/gL1JFJB97lqz0+OI7906Be6NBlni0CUgft9bUzn18qm1tq7XmbYdv48Cdb5TO0soJm4m0eCgWQpyVa17LmGg0M6/YC9M1exOS/lYiJf2FNYPZY4X3HdfodNfPd64NRV15N30du66fjlRnvnSRTOGZrfGjnAvJNFB4sGdvAk3cwNJFJDwVbKPXcK0mT8T/JMQ1E1pO5FSvIeJSIkIfwapGD0ztTtWcAkrc3M0l1C5ZnWQ==
去taijitao64查看64主机默认的rsa公钥
[root@taijitao64 ~]# cat /etc/ssh/ssh_host_rsa_key.pub
ssh-rsa AAAAB3NzaC1yc2EAAAABIwAAAQEA4/QbR+ahyQj8+s6EMX1LxxlE6LOV7SJYmCfFs84O0g9+T6QhNFPcemgefIVmKXSfUEfPzwO6hPHEwHZvST6yYyC78DENHAaCazsKqXv9O/gL1JFJB97lqz0+OI7906Be6NBlni0CUgft9bUzn18qm1tq7XmbYdv48Cdb5TO0soJm4m0eCgWQpyVa17LmGg0M6/YC9M1exOS/lYiJf2FNYPZY4X3HdfodNfPd64NRV15N30du66fjlRnvnSRTOGZrfGjnAvJNFB4sGdvAk3cwNJFJDwVbKPXcK0mT8T/JMQ1E1pO5FSvIeJSIkIfwapGD0ztTtWcAkrc3M0l1C5ZnWQ==
SSHD服务端配置文件
~]# vim /etc/ssh/sshd_config
port 22 #默认ssh端口是22,如果需要改动端口,需要把注释去掉,然后修改端口号
ListenAddress 0.0.0.0 #设置sshd服务器绑定的IP,为0表示侦听所有地址,对多网卡时特殊使用
Protocol 2 #SSH协议的版本,要支持旧版选择V1,Centos5.X仅仅支持V2
#HostKey /etc/ssh/ssh_host_rsa_key #rsa主要用于第三方认证
#HostKey /etc/ssh/ssh_host_dsa_key #dsa主要用于签名
SyslogFacility AUTHPRIV #sshd日志文件存放的位置,在/etc/rsyslog.conf中定义位置
#Loglevel INFO #默认日志等级为INFO
#LoginGraceTime 2m #在SSH登陆输入密码的时候等待我们多久,默认是2分钟
PermitRootLogin no #Root用户是否可以登录,默认可以,一般我们关闭
#MaxAuthTries 6 #最多尝试多少次登陆,默认6次,达到一半则会失败
#MaxSessions 10 #登入进来最大可以打开10个进程
#AuthorizedKeysFile .ssh/authorized_keys #授权Key文件存放位置,默认在~/.ssh/authorized_keys
PasswordAuthentication yes #启用密码认证,如果为no,那么就只能使用秘钥登陆
#如果在这个里面一个no,一个yes,那个在上面那个有效
#UsePAM yes #Natively support,性能限制,可以限制登录几次等等
AcceptEnv …… #环境变量,接受这里面设置的变量,对应客户端的SendEnv
X11Forwarding yes #桌面窗口回传
#PrintMotd yes #登录提示信息,信息存放在/etc/motd文件中
#PrintLastLog yes #显示上次登录的信息,就是Last login一行
#ClientAliveInterval 10m #登录多长时间后被踢出来
HostKey /etc/ssh/ssh_host_key #HostKey”设置包含计算机私人密匙的文件。
ServerKeyBits 1024 #”ServerKeyBits”定义服务器密匙的位数。
LoginGraceTime 600 #“LoginGraceTime”设置如果用户不能成功登录,在切断连接之前服务器需要等待的时间(以秒为单位)。
KeyRegenerationInterval 3600 #“KeyRegenerationInterval”设置在多少秒之后自动重新生成服务器的密匙(如果使用密匙)。重新生成密匙是为了防止用 盗用的密匙解密被截获的信息。
PermitRootLogin no #“PermitRootLogin”设置root能不能用ssh登录。这个选项一定不要设成“yes”.
IgnoreRhosts yes #“IgnoreRhosts”设置验证的时候是否使用“rhosts”和“shosts”文件。
IgnoreUserKnownHosts yes #“IgnoreUserKnownHosts”设置ssh daemon是否在进行RhostsRSAAuthentication安全验证的时候忽略用户的“$HOME/.ssh/known_hosts”
StrictModes yes #“StrictModes”设置ssh在接收登录请求之前是否检查用户家目录和rhosts文件的权限和所有权。这通常是必要的,因为新手经常会把自己的目录和文件设成任何人都有写权限。
SyslogFacility AUTH #“SyslogFacility”设置在记录来自sshd的消息的时候,是否给出“facility code”。
LogLevel INFO #“LogLevel”设置记录sshd日志消息的层次。INFO是一个好的选择。
RhostsAuthentication no #“RhostsAuthentication”设置只用rhosts或“/etc/hosts.equiv”进行安全验证是否已经足够了。
RhostsRSAAuthentication no #“RhostsRSA”设置是否允许用rhosts或“/etc/hosts.equiv”加上RSA进行安全验证。
RSAAuthentication yes #“RSAAuthentication”设置是否允许只有RSA安全验证。
PermitEmptyPasswords no #“PermitEmptyPasswords”设置是否允许用口令为空的帐号登录。
AllowUsers admin #“AllowUsers”的后面可以跟着任意的数量的用户名的匹配串(patterns)或user@host这样的匹配串,这些字符串用空格隔开。主机名可以是DNS名或IP地址。
设置监听端口和IP
使用taijitao64作为服务端,taijitao63 作为客户端
[root@taijitao64 ~]# vim /etc/ssh/sshd_config
Port 2202 #修改此行,默认注释掉,需要启用
ListenAddress 192.168.1.64 #侦听那个IP进来的
[root@taijitao64 ~]# systemctl restart sshd
[root@taijitao63 ~]# ssh root@taijitao64 -p 2202
SSH服务日志的位置
[root@taijitao64 ~]# tailf /var/log/secure
Sep 29 15:53:24 taijitao67 sshd[52299]: Received disconnect from 192.168.1.63: 11: disconnected by user
Sep 29 15:53:24 taijitao67 sshd[52299]: pam_unix(sshd:session): session closed for user root
Sep 29 15:53:28 taijitao67 sshd[52348]: Accepted password for root from 192.168.1.63 port 60135 ssh2
Sep 29 15:53:28 taijitao67 sshd[52348]: pam_unix(sshd:session): session opened for user root by (uid=0)
因为secure存放了很多服务器的日志,对日志分析很不友好,我们应该把日志文件另外存放
[root@taijitao64 ~]# vim /etc/ssh/sshd_config
SyslogFacility local1 #原来的AUTHPRIV修改为local1
[root@taijitao64 ~]# vim /etc/rsyslog.conf
local1.* /var/log/sshd.log #末尾追加此行
[root@taijitao64 ~]# systemctl restart rsyslog;systemctl restart sshd
[root@taijitao63 ~]# ssh taijitao64 -p 2202 //登陆测试一下
[root@taijitao64 ~]# tailf /var/log/sshd.log
Sep 29 15:58:30 taijitao64 sshd[52420]: Server listening on 192.168.1.64 port 2202.
Sep 29 15:59:08 taijitao64 sshd[52423]: Accepted password for root from 192.168.1.63 port 60137 ssh2
SSH登陆过慢问题
[root@taijitao64 ~]# vim /etc/ssh/sshd_config
UseDNS no #为了要判断客户单来源是否正常,会使用DNS反解析主机名,设置为no会让连接速度比较快,修改为no
GSSAPIAuthentication no #修改此行,原先为yes,通用安全服务应用程序接口(GSSAPI) 是为了让程序能够访问安全服务的一个应用程序接口认证连接,默认yes
[root@taijitao64 ~]# systemctl restart sshd
使用密钥免密码登陆
taijitao64服务端,我们免密码登陆服务端
服务端生成公司钥
[root@taijitao63 ~]# ssh-keygen
Generating public/private rsa key pair.
Enter file in which to save the key (/root/.ssh/id_rsa): #密钥存放位置
Enter passphrase (empty for no passphrase): #私钥管理密码
Enter same passphrase again:
Your identification has been saved in /root/.ssh/id_rsa.
Your public key has been saved in /root/.ssh/id_rsa.pub.
The key fingerprint is:
8b:95:0b:02:6a:dc:74:7c:54:76:67:1c:21:5f:c9:a9 root@taijitao64
The key's randomart image is:
+--[ RSA 2048]----+
| ..o o.=+.o|
| . . . . =..+ |
| .. o . .. |
|..o.. . . E |
|.o .. . S |
|. . + o |
| . o |
| |
| |
+-----------------+
[root@taijitao64 ~]# ls /root/.ssh
id_rsa(私钥) id_rsa.pub(公钥)
发布公钥
[root@taijitao63 ~]# ssh-copy-id -i /root/.ssh/id_rsa.pub 192.168.1.64
使用ssh-copy-id命令将客户端生成的公钥发布到服务器上,使用-i指定公钥存放位置
使用公钥加密,私钥解密,ssh发起连接请求,服务器收到连接请求,会用你已经存储在服务器的公钥加密一段随机的数据生成所谓的challenge发送给客户端,客户单收到这个challenge之后用自己的私钥解密把结果发送给服务器,因为只能用私钥解密,所以服务器就知道该客户端连接的合法性!
测试登录
[root@taijitao63 ~]# ssh 192.168.1.63
Last login: Tue Sep 29 16:17:25 2015 from taijitao64
查看服务端的存放公钥
[root@taijitao64 ~]# cat /root/.ssh/authorized_keys
ssh-rsa AAAAB3NzaC1yc2EAAAABIwAAAQEAwnBLq3heYOK4nsdUbRZ/Q4GCIK1uo0NPz2L0k4AImUYMR4NISSR7icaeyMFy2gPTUlTVuoLIa/pGi+935EyLU7tTRvNx3pI1dmakE9D9l+hVjtGrh8AKXoRCxZyKprcobLb/FjGosWVuQiYAW5Ii5ojh6aHB6h2Fk+38oxvOlNX9n19DPmQTfiX4DZDwtLsYBS4RvRaf3i5A4b46BTIrqQHCR6LwRvNyDyZx7TTC5ikt2gJpPsTDVJiZWTPgM37JUywi/RnDM2seRLA2LgWt78iqXqvmnbRFT/tLWsDFe12Bd1dsY1RhSYXycX6aTFBO7s1COqB8PLlhCEOcBt+7mQ== root@taijitao63
普通用户免密码登陆
[root@taijitao64 ~]# useradd bob
[root@taijitao64 ~]# echo bob:123456 | chpasswd
[root@taijitao63 ~]# ssh-copy-id -i /root/.ssh/id_rsa.pub bob@192.168.1.64
bob@192.168.1.64's password:
Now try logging into the machine, with "ssh 'bob@192.168.1.64'", and check in:
.ssh/authorized_keys
to make sure we haven't added extra keys that you weren't expecting.
测试登录
[root@taijitao63 ~]# ssh bob@192.168.1.64
[bob@taijitao64 ~]$
数据的安全复制
Openssh提供了scp命令,让我们的数据复制更加安全.
命令格式:
#scp [源] [目的地址]
[root@taijitao63 ~]# scp /etc/passwd root@192.168.1.63:/tmp
passwd 100% 1578 1.5KB/s 00:00
如果没有做密钥免密码登陆,会提示你输入对应用户的密码
针对目录等你相关操作,使用-r参数(递归),和cp命令类似
[root@taijitao63 ~]# scp -r /boot/ bob@192.168.1.64:/tmp
查看结果:
[root@taijitao64 ~]# ls /tmp/boot/
config-2.6.32-431.el6.x86_64 lost+found
efi symvers-2.6.32-431.el6.x86_64.gz
grub System.map-2.6.32-431.el6.x86_64
initramfs-2.6.32-431.el6.x86_64.img vmlinuz-2.6.32-431.el6.x86_64
initrd-2.6.32-431.el6.x86_64kdump.img
ssh变量传递
客户端和在服务端使用变量传递的时候,我们需要修改客户端的ssh_config中添加SendEnv,然后在服务端的sshd_config添加AcceptEnv,这用变量就可以使用了.
客户端的操作:
[root@taijitao63 ~]# vim /etc/ssh/ssh_config //末尾追加此行
SendEnv myenv
[root@taijitao63 ~]# declare -x myenv=`/bin/cat /etc/yum.conf` //定义变量
[root@taijitao63 ~]# echo $myenv
[main] cachedir=/var/cache/yum/$basearch/$releasever keepcache=0 debuglevel=2 logfile=/var/log/yum.log exactarch=1 obsoletes=1 gpgcheck=1 plugins=1 installonly_limit=3 # This is the default, if you make this bigger yum won't see if the metadata # is newer on the remote and so you'll "gain" the bandwidth of not having to # download the new metadata and "pay" for it by yum not having correct # information. # It is esp. important, to have correct metadata, for distributions like # Fedora which don't keep old packages around. If you don't like this checking # interupting your command line usage, it's much better to have something # manually check the metadata once an hour (yum-updatesd will do this). # metadata_expire=90m # PUT YOUR REPOS HERE OR IN separate files named file.repo # in /etc/yum.repos.d
[root@taijitao63 ~]# systemctl restart sshd
服务端的操作:
[root@taijitao64 ~]# vim /etc/ssh/sshd_config //服务端的操作
AcceptEnv XMODIFIERS #此行原有,下面添加下面这行
AcceptEnv myenv
[root@taijitao64 ~]# systemctl restart sshd
测试:
[root@taijitao63 ~]# ssh root@192.168.1.64
[root@taijitao64 ~]# echo $myenv
[main] cachedir=/var/cache/yum/$basearch/$releasever keepcache=0 debuglevel=2 logfile=/var/log/yum.log exactarch=1 obsoletes=1 gpgcheck=1 plugins=1 installonly_limit=3 # This is the default, if you make this bigger yum won't see if the metadata # is newer on the remote and so you'll "gain" the bandwidth of not having to # download the new metadata and "pay" for it by yum not having correct # information. # It is esp. important, to have correct metadata, for distributions like # Fedora which don't keep old packages around. If you don't like this checking # interupting your command line usage, it's much better to have something # manually check the metadata once an hour (yum-updatesd will do this). # metadata_expire=90m # PUT YOUR REPOS HERE OR IN separate files named file.repo # in /etc/yum.repos.d
Ssh防暴力破解
方案一: 足够强和足够负责的密码(举头望明月,低头思故乡 jutouSeeyue@dt4HomeTown)
修改默认端口
拒绝root登陆,判断一个用户是否是管理员,通过用户的UID和GID
通过lastb查看登陆失败的用户,多次尝试的用户可以拒绝此IP
方案二:fail2ban软件防止,官网:http://www.fail2ban.org/
方案三:denyhosts软件防止,官网:http://denyhosts.sourceforge.net/
安装Failban
[root@taijitao64 ~]# tar xvf fail2ban-0.8.14.tar.gz
[root@taijitao64 ~]# cd fail2ban-0.8.14/
[root@taijitao64 fail2ban-0.8.14]# cat README.md //查看软件的安装方式
[root@taijitao64 fail2ban-0.8.14]# python setup.py install //安装Fail2ban
[root@taijitao64 fail2ban-0.8.14]# find . -name *service* //查找fail2ban启动脚本
[root@ taijitao64 fail2ban-0.8.14]# cp files/fail2ban.service /usr/lib/systemd/system/
[root@taijitao64 fail2ban-0.8.14]# systemctl list-unit-files|grep fail2ban
fail2ban.service enabled
[root@taijitao64 fail2ban-0.8.14]# systemctl enable fail2ban;systemctl start fail2ban
[root@taijitao64 fail2ban-0.8.14]# cd ; ls /etc/fail2ban/
action.d #动作文件夹,内含默认文件,iptables以及mail等动作配置
fail2ban.conf #定义了fail2ban日志级别,日志位置和sock文件位置
fail2ban.d
filter.d #条件文件夹,过滤日志关键内容设置
jail.conf #主要配置文件,模块化操作,设置启动ban动作的服务以及动作阀值
#如:bantime=600,把你提出一段时间,ignoreip 忽略过滤IP,findtime maxretry=3 600秒内可以尝试三次,否则被过滤,jail的意思是监狱
jail.d
[root@taijitao64 ~]# systemctl restart fail2ban.service //fail2ban是监控日志文件,动态更新iptables
ssh的过滤规则文件在/etc/fail2ban/filter.d/sshd.conf
[root@taijitao64 ~]# ls /etc/fail2ban/filter.d/sshd.conf
/etc/fail2ban/filter.d/sshd.conf
[root@taijitao64 ~]# fail2ban-client status
Status
|- Number of jail: 0
`- Jail list:
| SysV init设置开机启动方式: [root@taijitao64 fail2ban-0.8.14]# grep -ir chkconfig * //查找软件的启动脚本 [root@taijitao64 fail2ban-0.8.14]# cp files/redhat-initd /etc/init.d/fail2ban [root@taijitao64 fail2ban-0.8.14]# chkconfig --add fail2ban [root@taijitao64 fail2ban-0.8.14]# chkconfig fail2ban on |
设置SSH过滤
设置ssh远程5分钟以内3此密码验证失败,禁止此用户IP访问主机1小时,1小时后自动解除
[root@taijitao64 ~]# vim /etc/fail2ban/jail.conf
[DEFAULT] #全局设置
ignoreip = 127.0.0.1/8 #忽略的 IP 列表,不受设置限制
bantime = 600 #屏蔽时间,单位:秒
findtime = 500 #这个时间段内超过规定次数会被 ban 掉
maxretry = 3 #最大尝试次数
backend = auto #自动处理
[ssh-iptables] #单个服务检查设置,如设置 bantime、findtime、maxretry 和全局冲突,服务优先级大于全局设置。
enabled = true #是否激活此项(true/false)修改成 true
filter = sshd #过滤规则 filter 的名字,对应 filter.d 目录下的 sshd.conf
action = iptables[name=SSH, port=ssh, protocol=tcp] # 动作的相关参数,对应action.d/iptables.conf 文件
sendmail-whois[name=SSH, dest=you@example.com, sender=fail2ban@example.com, sendername="Fail2Ban"] #触发报警的收件人
logpath = /var/log/secure #检测的系统的登陆日志文件。这里要写 sshd 服务日志文件。 默认为logpath = /var/log/sshd.log
#5 分钟内 3 次密码验证失败,禁止用户 IP 访问主机 1 小时。 配置如下
bantime = 3600 #禁止用户 IP 访问主机 1 小时
findtime = 300 #在 5 分钟内内出现规定次数就开始工作
maxretry = 3 #3 次密码验证失败
[root@taijitao64 ~]# service fail2ban restart
[root@taijitao64 ~]# > /var/log/sshd.log //清空日志
[root@taijitao64 ~]# iptables -L -n
Chain INPUT (policy ACCEPT)
target prot opt source destination
fail2ban-SSH tcp -- 0.0.0.0/0 0.0.0.0/0 tcp dpt:22
Chain FORWARD (policy ACCEPT)
target prot opt source destination
Chain OUTPUT (policy ACCEPT)
target prot opt source destination
Chain fail2ban-SSH (1 references)
target prot opt source destination
RETURN all -- 0.0.0.0/0 0.0.0.0/0
[root@taijitao64 ~]# rm -rf /root/.ssh/authorized_keys //删除公钥
[root@taijitao63 ~]# ssh 192.168.1.64 #故意输入3此密码错误
root@192.168.1.64's password:
Permission denied, please try again.
root@192.168.1.64's password:
Permission denied, please try again.
root@192.168.1.64's password:
Permission denied (publickey,gssapi-keyex,gssapi-with-mic,password).
查看是否放进Jail
[root@taijitao64 ~]# fail2ban-client status
Status
|- Number of jail: 1 #测试只有一个,如果为0则配置没有生效
`- Jail list: ssh-iptables #那个放进了Jail
[root@taijitao64 ~]# fail2ban-client status ssh-iptables //具体查看
Status for the jail: ssh-iptables
|- filter
| |- File list: /var/log/sshd.log
| |- Currently failed: 0
| `- Total failed: 3
`- action
|- Currently banned: 1
| `- IP list: 192.168.1.63
`- Total banned: 1
查看防火墙规则
[root@taijitao64 ~]# iptables -L -n
Chain INPUT (policy ACCEPT)
target prot opt source destination
fail2ban-SSH tcp -- 0.0.0.0/0 0.0.0.0/0 tcp dpt:22
Chain FORWARD (policy ACCEPT)
target prot opt source destination
Chain OUTPUT (policy ACCEPT)
target prot opt source destination
Chain fail2ban-SSH (1 references)
target prot opt source destination
REJECT all -- 192.168.1.63 0.0.0.0/0 reject-with icmp-port-unreachable
RETURN all -- 0.0.0.0/0 0.0.0.0/0
查看Fiail2ban日志
[root@taijitao64 ~]# tailf /var/log/fail2ban.log
2015-09-29 17:44:57,418 fail2ban.server [53239]: INFO Changed logging target to /var/log/fail2ban.log for Fail2ban v0.8.14
2015-09-29 17:44:57,418 fail2ban.jail [53239]: INFO Creating new jail 'ssh-iptables'
2015-09-29 17:44:57,419 fail2ban.jail [53239]: INFO Jail 'ssh-iptables' uses Gamin
2015-09-29 17:44:57,427 fail2ban.jail [53239]: INFO Initiated 'gamin' backend
2015-09-29 17:44:57,429 fail2ban.filter [53239]: INFO Added logfile = /var/log/sshd.log
2015-09-29 17:44:57,429 fail2ban.filter [53239]: INFO Set maxRetry = 3
2015-09-29 17:44:57,430 fail2ban.filter [53239]: INFO Set findtime = 300
2015-09-29 17:44:57,430 fail2ban.actions[53239]: INFO Set banTime = 3600
2015-09-29 17:44:57,568 fail2ban.jail [53239]: INFO Jail 'ssh-iptables' started
2015-09-29 17:45:12,652 fail2ban.actions[53239]: WARNING [ssh-iptables] Ban 192.168.1.63
修改端口注意
[root@taijitao64 ~]# vim /etc/fail2ban/jail.conf
action = iptables[name=SSH, port=222, protocol=tcp]…… #修改了端口,记得port端口也要修改
[root@taijitao64 ~]# service fail2ban restart
拓展:deny_host软件防止暴力破解
官网:http://denyhosts.sourceforge.net/
[root@taijitao64 ~]# systemctl stop fail2ban;systemctl disable fail2ban
[root@taijitao64 ~]# tar -zxvf denyhosts-3.0.tar.gz
[root@taijitao64 ~]# cd denyhosts-3.0/
[root@taijitao64 ~]# python3 setup.py install
[root@taijitao64 ~]# find . -name *service*
[root@taijitao64 ~]# cp denyhosts.service /usr/lib/systemd/system/denyhosts.service
[root@taijitao64 ~]# systemctl daemon-reload
[root@taijitao64 ~]# systemctl list-unit-files|grep deny
[root@taijitao64 ~]# systemctl start denyhosts
[root@taijitao64 ~]# systemctl status denyhosts
[root@taijitao64 ~]# vim /etc/denyhosts.conf
SECURE_LOG = /var/log/sshd.log #由于我们修改了日志路径,这里也要修改
DENY_THRESHOLD_INVALID = 3 #修改阀值,几次开始
[root@taijitao64 ~]# vim /etc/hosts.allow //这个是SSH的白名单,格式为sshd: 127.0.0.1
[root@taijitao64 ~]# systemctl restart denyhosts
测试:
记得清空日志Sshd.log
连续三次密码错误之后
[root@taijitao63 ~]# ssh 192.168.1.64
ssh_exchange_identification: Connection closed by remote host
暴力破解是一种在单一或者分布式网络中使用大量(用户名和密码的)组合来尝试连接一个加密系统的方法。可以使用以下软件来应对暴力攻击:
- DenyHosts 是一个基于 Python SSH 安全工具。该工具通过监控授权日志中的非法登录日志并封禁原始 IP 的方式来应对暴力攻击。
- Fail2ban 是另一个类似的用来预防针对 SSH 攻击的工具。
- sshguard 是一个使用 pf 来预防针对 SSH 和其他服务攻击的工具。
- security/sshblock 阻止滥用 SSH 尝试登录。
- IPQ BDB filter 可以看做是 fail2ban 的一个简化版。
相关文章
- Linux修改SSH端口
- VPS CenteOS Linux 上传 下载文件(Apache配置、SSH)
- Linux如何下解压windows下的.zip和.rar文件
- linux下生成 SSH 公钥,用于GitHub
- linux lcd设备驱动剖析一
- jenkins:用jenkins通过ssh部署jar包到远程linux机器(jdk 15 / jenkins 2.257)
- linux经验:deepin20.5开启ssh远程登录
- Linux shell脚本中的命令正确写法
- Linux文件系统的类型及日志文件系统和非日志文件系统的区别
- 【译】Linux概念架构的理解
- 阿里云Linux创建docker容器
- Linux的经常使用命令(1) - 指定执行级别
- L82.linux命令每日一练 -- 第11章 Linux系统管理命令 -- dmidecode和lspci
- L79.linux命令每日一练 -- 第11章 Linux系统管理命令 -- sar和chkconfig
- L74.linux命令每日一练 -- 第十章 Linux网络管理命令 -- nmap和tcpdump
- L73.linux命令每日一练 -- 第十章 Linux网络管理命令 -- dig和host
- L51.linux命令每日一练 -- 第八章 Linux磁盘与文件系统管理命令 -- mkfs和dumpe2fs
- L35.linux命令每日一练 -- 第五章 Linux信息显示与搜索文件命令 -- which和whereis
- 周立功arm linux教程,极速搭建周立功IMX287A ARM Linux开发环境
- Linux内核Thermal框架详解五、Thermal Core(4)
- Linux好用命令之w命令
- 操作系统权限维持(十)之Linux系统-SSH 软连接后门