
利用nginx+fancyindex美化目录索引
Nginx 利用 美化
2023-09-14 09:15:44 时间
利用nginx+fancyindex美化目录索引
1.下载第三方插件
1)下载插件
[root@localhost ~]# wget -O fancyindex.zip https://github.com/aperezdc/ngx-fancyindex/archive/v0.4.3.zip
[root@localhost ~]# wget -O fancytheme.zip https://github.com/Naereen/Nginx-Fancyindex-Theme/archive/master.zip

2)解压
[root@localhost ~]# unzip fancyindex.zip
[root@localhost ~]# unzip fancytheme.zip
2.重新编译nginx
[root@localhost ~]# tar -zxvf nginx-1.16.0.tar.gz
[root@localhost ~]# cd nginx-1.16.0
[root@localhost ~]# ./configure --prefix=/data1/nginx --add-module=/root/ngx-fancyindex-0.4.3/ --user=root --group=root && make && make
3.准备目录索引路径
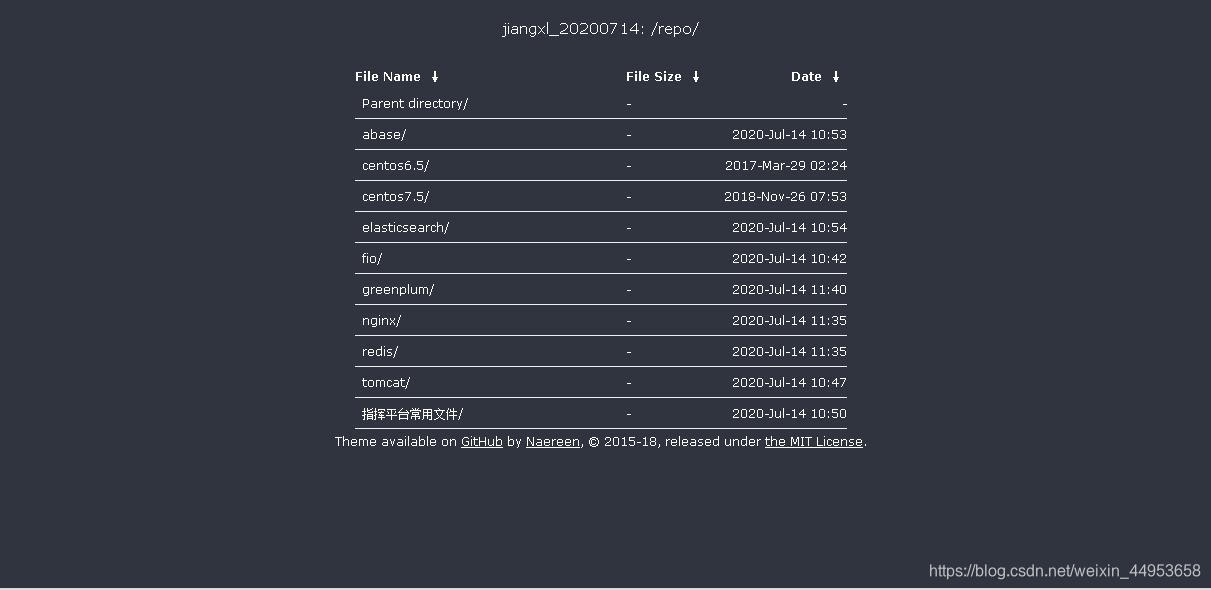
[root@localhost ~]# mkdir /data1/www/html/repo/{centos6.5,centos7.5,tomcat,fio,redis,elasticsearch,abase} -p
4.编写站点配置文件
conf.d目录需要手动创建,然后再主配置文件nginx.conf中配置一个include才能识别其他路径的配置文件
1.创建配置文件路径
[root@localhost ~]# mkdir /data1/nginx/conf/conf.d/

2.修改主配置文件
[root@localhost ~]# vim /data1/nginx/conf/nginx.conf
http {
    ......
    include  /data/nginx/conf/conf.d/*.conf
    ......
 }

3.编写目录索引配置文件
[root@localhost ~]# cd /data1/nginx/conf/conf.d/
[root@localhost conf.d]# vim repo.conf
server {
	listen 888;
	server_name localhost;

	location / {
		fancyindex on;
		fancyindex_localtime on;
		fancyindex_exact_size off;
		fancyindex_footer "/data/www/html/Nginx-Fancyindex-Theme-dark/footer.html";
		fancyindex_header "/data/www/html/Nginx-Fancyindex-Theme-dark/header.html";
		root /data1/www/html;
		charset utf-8,gbk;
	}
}
5.将fancyindex放到站点目录
[root@localhost ~]# mv /root/Nginx-Fancyindex-Theme-master/fancyindex.conf /data1/nginx/conf/
[root@localhost ~]# mv /root/Nginx-Fancyindex-Theme-master/Nginx-Fancyindex-Theme-dark/ /data1/www/html/

将站点标题改成自己的称谓
[root@localhost ~]# vim /data/www/html/Nginx-Fancyindex-Theme-dark/header.html
修改最后一行即可
<h1>jiangxl_20200714
6.启动nginx
[root@localhost ~]# nginx -t
[root@localhost ~]# nginx
7.访问
访问http://192.1.44.123:888/repo
相关文章
- nginx配置ssl证书后报错Request method 'GET' not supported
- Nginx配置文件(nginx.conf)配置详解
- 重识Nginx - 05 热部署_不停机更换新版本的nginx
- Nginx常用操作总结
- phpStudy nginx 解析漏洞复现
- nginx转发服务器_jquery跨域请求
- 借助 Docker 来搭 Nginx 的积木:快速实现高性能二维码服务
- nginx四层代理配置
- 树莓派安装 git, nginx, redis, supervisor, mariadb
- nginx 监听非标准端口80,重定向端口丢失问题解决详解程序员
- nginx域名访问的白名单配置梳理详解程序员
- nginx的80端口跳转到443详解程序员
- nginx后端服务器返回给nginx502、504、404、执行超时等错误状态的解决方法详解程序员
- 情况Linux下查看Nginx进程状态:一招即通(linux查看nginx进程)
- 检查Linux下Nginx服务是否已启动(linux查看nginx是否启动)
- Linux下启动Nginx服务的简易步骤(linux启动nginx)
- 缓存 如何快速删除Linux下Nginx缓存(linux删除nginx)
- 日志解决Linux系统中Nginx删除日志的方法(linux删除nginx)
- 《从0开始学Nginx网站架构实战》
- Nginx网站架构实战——14、反向代理实现nginx+apache动静分离
- Nginx和Tomcat的管理脚本
- Nginx网站架构实战——04、nginx日志管理
- Linux探索Nginx安装路径(linux查看nginx安装目录)
- 为Nginx添加SPDY功能