
RHEL8同步ntp时间
RHEL8同步ntp时间
RHEL7同步ntp时间
参考: http://cn.linux.vbird.org/linux_server/0440ntp/0440ntp-centos4.php#client_systime
测试ntp服务器是否可用
# 查看ntp服务器地址
cat /etc/ntp.conf

# 测试ntp服务器是否可用
ntpdate -d ntp1.aliyun.com

# 使用ntp服务器同步时间
ntpdate ntp1.aliyun.com

# 将系统时间写入硬件时钟
hwclock -w
将ntp配置迁移到chrony
timedatectl设置时区和时间
设置UTC或RTC时间
# 将硬件时钟调整为与本地时钟一致
## 0 为设置为 UTC(协调世界时) 时间
## 1 为设置为 RTC(时钟芯片) 时间
timedatectl set-local-rtc 1

# 将时间写入到硬件
hwclock -w
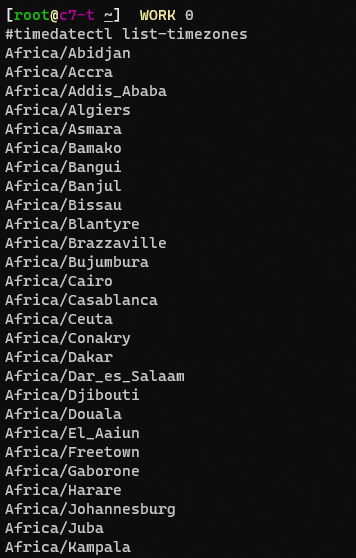
查看所有可用时区
查看所有的时区
# 查看所有可用时区
timedatectl list-timezones
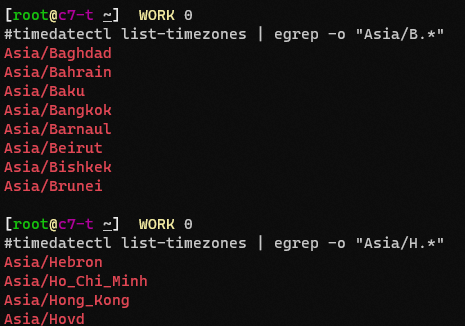
# 过滤时区
timedatectl list-timezones | egrep -o "Asia/H.*"
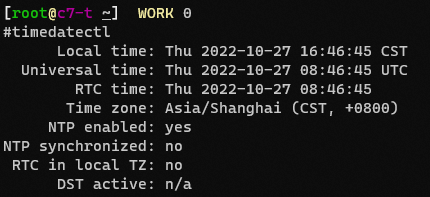
查看当前时区
# 查看系统的当前时区
timedatectl
# 查看时区
date -R

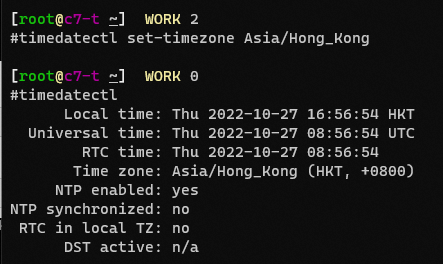
设置系统时区
# 设置系统时区为 Asia/Shanghai
timedatectl set-timezone Asia/Hong_Kong

# 再次查看当前时区
timedatectl
timedatectl时间同步
# 启用/仅用时间同步
## 启动ntp时间同步
timedatectl set-ntp yes

## 禁用ntp时间同步
timedatectl set-ntp no
timedatectl修改当前日期时间
# 修改当前日期时间
$ timedatectl set-time "2019-10-31 15:50:00"
通用设置时区方法
# 不考虑各个发行版的差异化, 从更底层出发的话, 修改时间时区比想象中要简单:
cp /usr/share/zoneinfo/Asia/Shanghai /etc/localtime
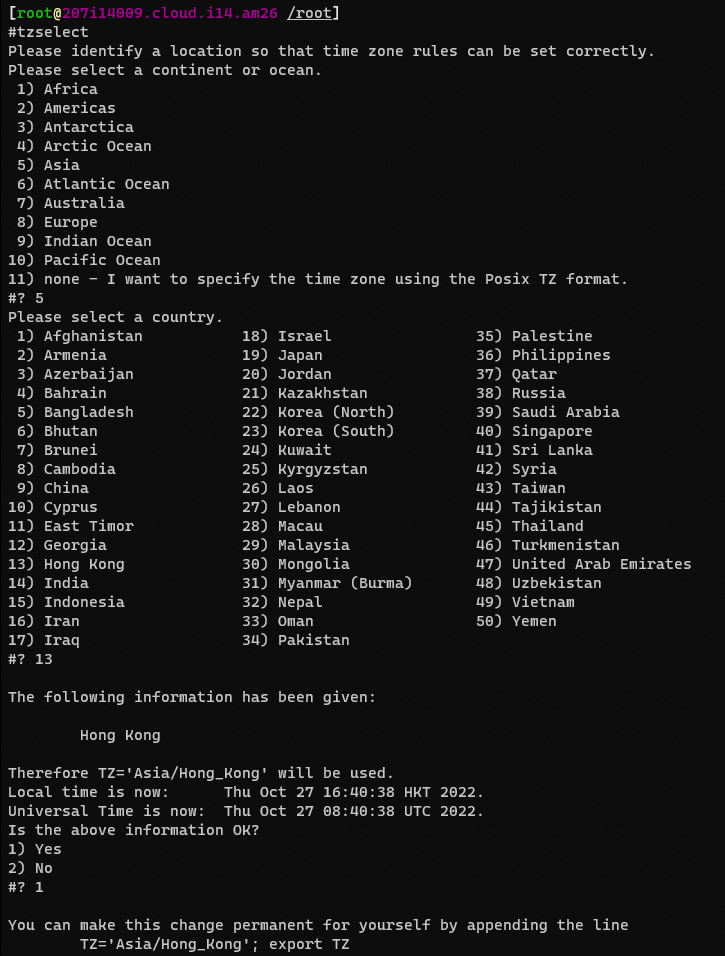
使用tzselect设置时区
# 使用伪图形化设置时区
tzselect
RHEL8同步时间
RHEL8的ntpdate命令取消了,使用了新的命令chronyc
参考地址: https://chrony.tuxfamily.org/doc/4.1/chronyc.html
搭建chronyd时间服务器
使用chrony服务的前置条件
使用chrony,就先必须关闭ntpd服务
# 永久关闭ntpd服务
systemctl disable --now ntpd
安装chrony时间服务–服务端可客户端都要安装
主配置文件:/etc/chrony.conf
客户端程序:/usr/bin/chronyc
服务端程序:/usr/sbin/chronyd
# 安装chrony包
dnf install chrony -y

# 启动chrony服务并开机启动
systemctl enable --now  chronyd

# 防火墙放行ntp服务
firewall-cmd --add-service=ntp
firewall-cmd --add-service=ntp --per
配置chrony服务端
修改完配置
/etc/chrony.conf后,需重启chrony服务
参考: https://www.linuxprobe.com/centos7-chrony-time.html
https://www.cnblogs.com/xiongty/p/14886447.html
更多配置参数详解
iburst 选项当服务器可达时,发送八个数据包而不是通常的一个数据包。
包间隔通常为2秒,可加快初始同步速度.
ibust会在 chrony 启动的2秒内,去快速poll服务器4次来快速矫正当前系统时间.
# 在服务端的/etc/chrony.conf中添加以下配置

# Server配置
#ip address is the stable clock source which customer provided

#可选,指定本机和上级时钟源同步时间的具体IP地址
# bindacqaddress 130.10.95.5

# Server配置,用于设置上级时钟源,一个server打头的一行就表示一台上级时钟源,可以有多台设置
## IP地址是卫星授时服务器的IP地址
## prefer参数--表示优先选择这台作为时钟源
server 130.10.0.79 iburst minpoll 4 maxpoll 6 prefer

# 同步使用的端口-配置本机和上级时钟源同步使用的端口
acquisitionport 1123

# 存储Server时间的本地目录
dumpdir /var/run/chrony

# Ignore stratum in source selection.
## 在源选择中忽略层
stratumweight 0.01

# 记录系统时钟获得/丢失时间的速率。
## 根据实际时间计算出服务器增减时间的比率,然后记录到一个文件中,在系统重启后为系统做出最佳时间补偿调整
driftfile /var/lib/chrony/drift

# 闰秒配置,17h34m消化1s
leapsecmode slew
## 最大转换速率
maxslewrate 1000
smoothtime 400 0.001 leaponly


# 如果时间差超过0.1秒,就在前三次的时钟更新时,启动大步跨方式
## chronyd根据需求减慢或加速时间调整,
## 在某些情况下系统时钟可能漂移过快,导致时间调整用时过长。
## 该指令强制chronyd调整时期,大于某个阀值时步进调整系统时钟。
## 只有在因chronyd启动时间超过指定的限制时(可使用负值来禁用限制)没有更多时钟更新时才生效。
makestep 0.1 3

# 允许哪些网段的客户端访问
allow 0.0.0.0/0

# 拒绝哪些网端访问
#deny 192.168/16


# 服务器绑定ip和端口
bindaddress 0.0.0.0
port 123

# 客户端日志限制
clientloglimit 1073741824
# 限速间隔1
# 限速突发16
# Serve time even if not synchronized to any NTP server.
# 即使未与时间源同步也可提供时间
## 该行注释取消掉不然NTP synchronized: 为no 取消掉后变为 NTP synchronized:yes
local stratum 5 distance 20

maxdistance 20

## Command config
bindcmdaddress 127.0.0.1
bindcmdaddress /var/run/chrony/chronyd.sock
cmdallow all

## Real Time clock(RTC)
## 指定硬件时钟的RTC文件
hwclockfile /etc/adjtime
rtcautotrim 10

# 启用一个内核模式,在该模式中,系统时间每11分钟会拷贝到实时时钟(RTC)
rtcsync

# 指定包含NTP验证密钥的文件
keyfile /etc/chrony.keys

# Specify the key used as password for chronyc.
## 指定用作 chronyc 密碼的密鑰
commandkey 1

# Generate command key if missing.
## 如果没有密钥生成密钥
generatecommandkey

## Log配置

## 如果时钟调整大于 0.1 秒,则向syslog发送消息
logchange 0.1

# 选择log记录哪些信息
log measurements statistics tracking

# 指定日志文件的目录
logdir /var/log/chrony
chrony客户端配置
参考: https://www.xiexianbin.cn/linux/softwares/2016-02-08-chrony/index.html
chronyc add server - 手动添加一台新的NTP服务器。
chronyc clients - 在客户端报告已访问到服务器
chronyc delete - 手动移除NTP服务器或对等服务器
chronyc activity - 查看有多少NTP源在线/离线
chronyc settime - 手动设置守护进程时间
chronyc tracking - 显示系统时间信息
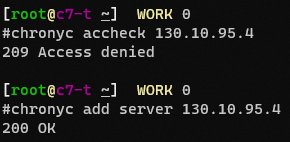
方法1:chronyc add server添加时间服务器
# 检查时间服务器是否可用
chronyc accheck 130.10.95.4

# chronyc添加时间服务器
chronyc add server 130.10.95.4
# 不解析域名查看同步源
chronyc -n sources

方法2:修改配置文件
# 在本机的/etc/chrony.conf中添加以下配置添加该行
# 表示从这台时间服务器去同步时间--指定时间服务器
server 172.20.10.6 iburst
测试时间服务器
# ping下时间服务器通不通
ping -c 1 host.domain10.example.com

# 重启chronyd服务
systemctl restart chronyd
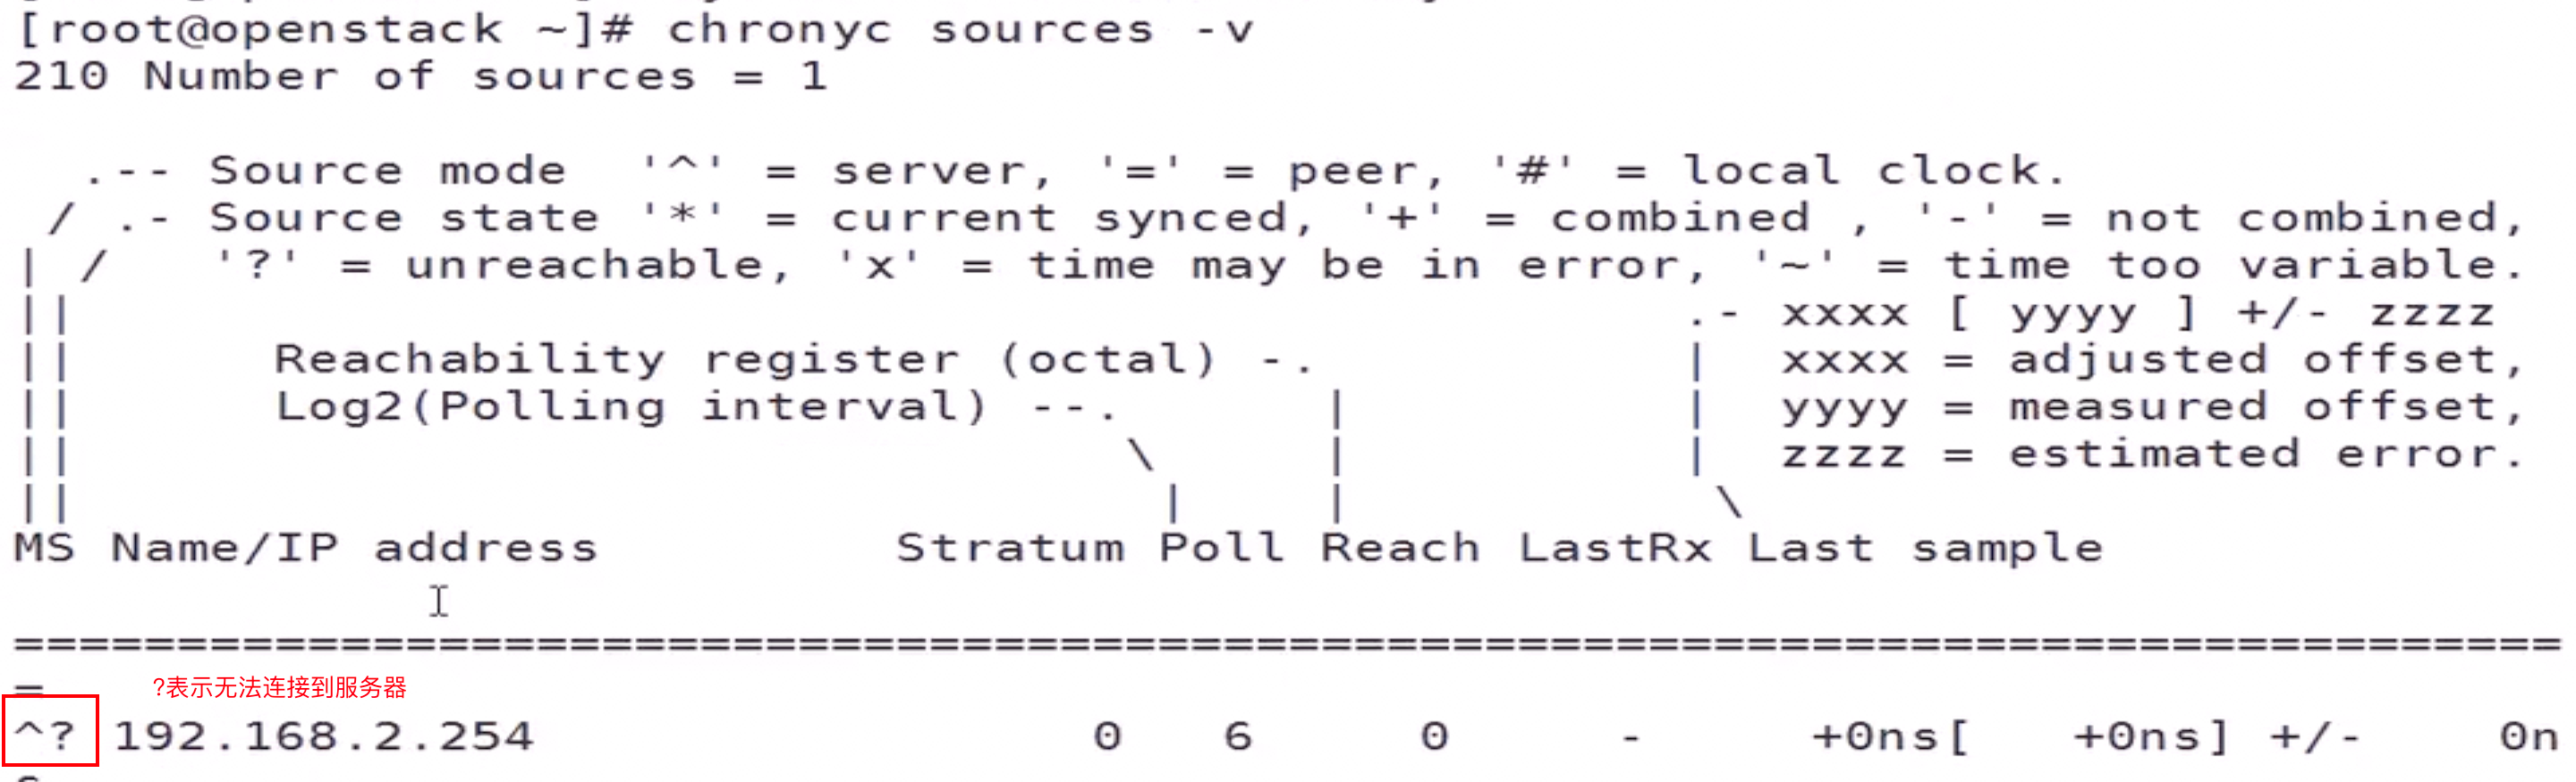
查看时间同步源的误差状态
# 查看时间同步源
chronyc sources -v
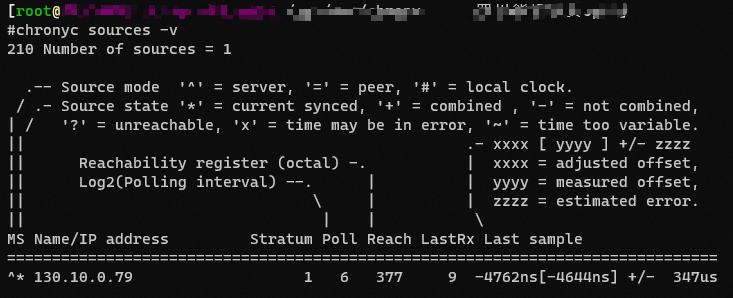
^*表示服务器同步正常。

^?表示服务器无法连接。
# 不解析域名,查看时间同步源
chronyc -n sources

# 查看时间同步源的误差状态
chronyc sourcestats -v

检查时间服务器是否对特定主机可用
#检查NTP访问是否对特定主机可用
chronyc accheck 时间服务地址
208 Access allowed表示该时间服务器允许访问

209 Access denied表示该时间服务器不能访问

同步ntp时间
# 同步ntp时间
chronyc makestep

# 强制同步系统时间
chronyc -a makestep
200 OK

# NTP服务器时间校准详情
chronyc tracking

# 查看时间
date
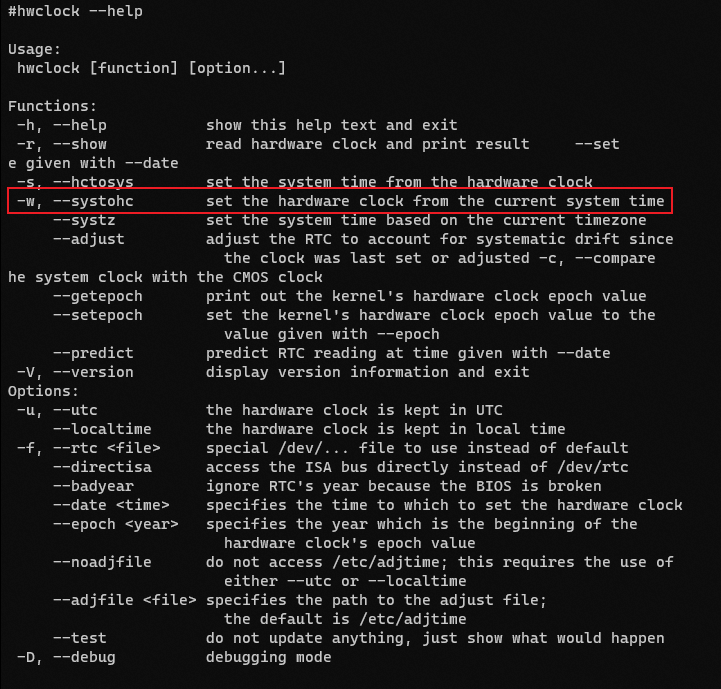
将时间写入到硬件
# 显示硬件时间
## hwclock --show
hwclock -r

# 将系统时间写入到硬件时钟
## sys表示系统,hc表示硬件, systohc表示从系统同步到硬件
# hwclock --systohc
hwclock -w

# 将硬件时间写入系统时间
## sys表示系统,hc表示硬件, hctosys表示从硬件同步到系统
# hwclock --hctosys
hwclock -s
chronyc常用命令
chronyc accheck     #检查NTP访问是否对特定主机可用
chronyc activity    #该命令会显示有多少NTP源在线/离线
chronyc add server  #手动添加一台新的NTP服务器
chronyc clients     #在客户端报告已访问到服务器
chronyc delete      #手动移除NTP服务器或对等服务器
chronyc settime     #手动设置守护进程时间
chronyc tracking    #显示系统时间信息
chronyc sources -v  #查看时间同步源
chronyc sourcestats -v    #查看每个源的偏移率和误差估算过程的信息
chrony中的网络时间安全概述(NTS)
硬件时钟时间配置
参考: https://blog.51cto.com/weili163/1740656
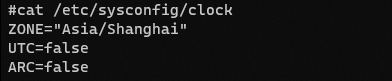
读取bios的实际时间
/etc/sysconfig/clock中如果启用了UTC,显示的其实是经过时区换算的时间而不是BIOS中真正的时间,如果加上 --localtime 选项,则得到的总是 BIOS 中实际的时间.
# 读取bios的实际时间
hwclock -r --localtime

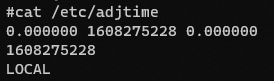
读取硬件时钟的时间文件
只有设置为RTC的时候才读取整个文件
参考: https://linux.cn/lfs/LFS-BOOK-7.7-systemd/chapter07/clock.html
# 读取硬件时钟的本地时间文件
tailf /etc/adjtime
ansible配置时间服务
使用timesync-roles来配置Centos时间服务
先安装和配置roles
# 先安装rhel-role
sudo yum install rhel-system-roles -y

# 配置系统role的路径
roles_path = /usr/share/ansible/roles/
# 查看系统自带的role
ansible-galaxy list
创建playbook
---
- name: timesync
  hosts: all
  vars:
  	timesync_ntp_servers:
  		- hostname: 172.25.254.254
  		- iburst: yes
  roles:
    - rhel-system-roles.timesync
在所有节点上查看ntp服务器
ansible all -a 'chronyc sources'
运行playbook
ansible-playbook play1.yml
运行完再次查看ntp服务器是不是172.25.254.254
ansible all -m shell -a 'chronyc -n sources'
查看iburst参数
ansible all -m shell -a 'grep -i iburst /etc/chronyc.conf'
Linux的date数字格式显示时间
参考: https://blog.51cto.com/daisywei/1687019
# 以数字显示时间,常用语备份时以时间创建文件
[student@workstation]$ date +%Y_%m_%d_%H_%M_%S
2021_11_05_02_32_46

# 使用+%F_%T来显示时间
[student@workstation]$ date +%F_%T
2021-11-06_00:01:35

# 显示年月日时分秒字符串
## %Y 年
## %m 月
## %d 日
## %H 时
## %M 分
## %S 秒
date +%Y%m%d%H%M%S

| Linux时间格式 | 描述 |
|---|---|
| %H | 小时(00…23) |
| %I | 小时(01…12) |
| %k | 小时(0…23) |
| %l | 小时(1…12) |
| %M | 分钟(00…59) |
| %p | 显示本地 AM 或 PM |
| %r | 直接显示时间 (12 小时时制,格式为 hh:mm:ss [AP]M) |
| %s | 从 1970 年 1 月 1 日 00:00:00 UTC 到当前为为止的秒数 |
| %S | 秒(00…61) |
| %T | 直接显示时间 (24 小时制显示时:分:秒) |
| %F | 直接显示年月日 |
sql中的时间格式
| 格式 | 描述 |
|---|---|
| %a | 缩写星期名 |
| %b | 缩写月名 |
| %c | 月,数值 |
| %D | 带有英文前缀的月中的天 |
| %d | 月的天,数值(00-31) |
| %e | 月的天,数值(0-31) |
| %f | 微秒 |
| %H | 小时(00-23) |
| %h | 小时(01-12) |
| %I | 小时(01-12) |
| %i | 分钟,数值(00-59) |
| %k | 小时() |
| %l | 小时() |
| %j | 年的天(001-366) |
| %M | 月名 |
| %m | 月,数值(00-12) |
| %p | AM或PM |
| %r | 时间,12小时(hh:mm:ss AM 或 PM) |
| %S | 秒(00-59) |
| %s | 秒(00-59) |
| %T | 时间,24小时(hh:mm:ss) |
| %U | 周(00-53)星期日是一周的第一天 |
| %u | 周(00-53)星期一是一周的第一天 |
| %V | 周(00-53)星期日是一周的第一天,与 %X 使用 |
| %v | 周(00-53)星期一是一周的第一天,与 %x 使用 |
| %W | 星期名 |
| %w | 周的天 (0=星期日,6=星期六) |
| %X | 年,其中的星期日是周的第一天,4位,与%V使用 |
| %x | 年,其中的星期日是周的第一天,4位,与%v使用 |
| %y | 年,4位 |
| %Y | 年,2位 |
相关文章
- 将Sql Server迁移到Always on集群 - 账号的同步
- 如何解决Docker容器和宿主机时间同步问题
- Rsync+Inotify实现数据实时同步
- 客户端同步服务器端时间方案
- Kotlin 朱涛-22 协程 并发 同步 Mutex Actor
- 解决 Windows 11和 Manjaro 21.2.5 Linux双系统时间不同步(时间不一致)问题:差8小时的问题
- MySQL专题 1 分布式部署数据库同步问题 BinLog
- m软件接收机中同步技术以及LMS-RLS自适应均衡技术的matlab仿真
- CentOS 6.8 时间同步
- NTP方式保证以时间戳同步可靠性
- Internet时间自动同步后,计算机系统时间比北京时间不能同步一致
- LabVIEW 通过网络同步多台计算机系统时间的方法与例程
- NTP工作机制及时间同步的方法
- 关于 视频同步vsync 信号在不同一时候钟域採样问题
- Ubuntu16.04 + Win 10 双系统 时间同步,启动项顺序,NumLock指示灯常亮
- Mysql之半同步复制
- 【日常工作所需,零锁整理一】Linux时间同步配置:chrony和ntpd服务
- 时间同步 | chrony 服务
- 用移位寄存器实现同步FIFO,带空满判断
- Win7 将 resync 命令发送到本地计算机 此计算机没有重新同步,因为要求的时间更改太大
- Pulseaudio之同步/异步(十一)