
nginx模块
目录
配置nginx官方yum源
http://nginx.org/en/linux_packages.html#RHEL-CentOS
vim /etc/yum.repos.d/nginx.repo
[nginx-stable]
name=nginx stable repo
baseurl=http://nginx.org/packages/centos/7/$basearch/
gpgcheck=0
enabled=1
搭建域名虚拟主机
安装nginx并通过修改配置文件来指定网站存放目录为/data。
[root@node1 ~]# yum -y install nginx
[root@node1 ~]# mkdir /data
[root@node1 ~]# vim /etc/nginx/conf.d/www.conf
server {
listen 80;
server_name www.aaa.com;
location / {
root /data;
index index.html index.htm;
}
}
[root@node1 ~]# systemctl start nginx
[root@node1 ~]# cd /data/
[root@node1 data]# echo "192.168.1.10" > index.html
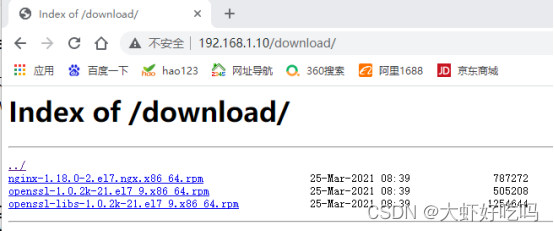
此时可以看到网页存放在/data下,访问浏览器看到内容即可。

nginx索引
在/data网站下,创建download下载目录,启用索引显示。
[root@node1 ~]# mkdir -p /data/download
[root@node1 ~]# cp -rp /media/nginx-rpm/* /data/download/ //复制网页下载内容到download目录下,文件或安装包都可。
[root@node1 ~]# vim /etc/nginx/conf.d/data.conf //编辑配置文件
server {
location /download {
root /data;
autoindex on; //启用索引显示
charset utf-8,gbk; //字符编码为中文
autoindex_exact_size on; //显示文件大小
autoindex_localtime on; //显示文件创建时间
}
}
[root@node1 ~]# nginx -t
nginx: the configuration file /etc/nginx/nginx.conf syntax is ok
nginx: configuration file /etc/nginx/nginx.conf test is successful
[root@node1 ~]# systemctl restart nginx
[root@node1 ~]# chmod -R 707 /data/download/
状态索引
针对网站启用状态化追踪。(在server字段下添加status模块)
[root@node1 ~]# vim /etc/nginx/conf.d/data.conf
server {
//省略部分内容
location /status {
stub_status; //启用状态化追踪
access_log off; //关闭status的日志记录
}
}
[root@node1 ~]# systemctl restart nginx
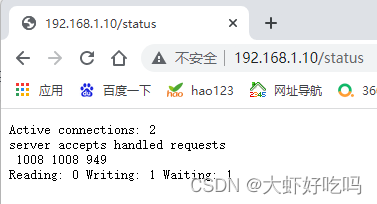
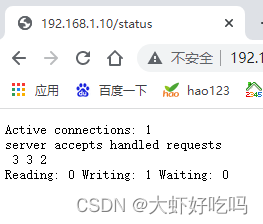
访问http://192.168.1.10/status,可以看到下图所示内容。
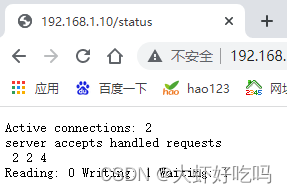
Active connections: 2 当前活跃的连接数
server accepts 2 当前的总tcp连接数
handled 2 成功的连接数
requests 4 总HTTP请求数
下面可以通过客户端使用压力测试工具对nginx服务器进行压测。
[root@client ~]# yum -y install httpd-tools
[root@client ~]# ab -c 1000 -n 1000 http://192.168.1.10/status
在次刷新后可以看到相关数据
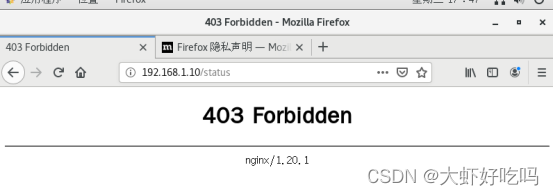
访问控制
基于ip限制
启用access模块,仅允许对内部网段或vpn访问status。在status模块中添加两行内容,测试时可以仅允许一个主机访问或划分子网。
[root@node1 ~]# vim /etc/nginx/conf.d/data.conf
//省略部分内容
location /status {
stub_status;
access_log off;
allow 192.168.1.100; //仅允许1.100主机访问
deny all; //拒绝所有主机访问
}
[root@node1 ~]# systemctl restart nginx
测试使用1.100主机访问刷新几次显示正常,再用1.4客户端访问为Forbidden说明配置成功。

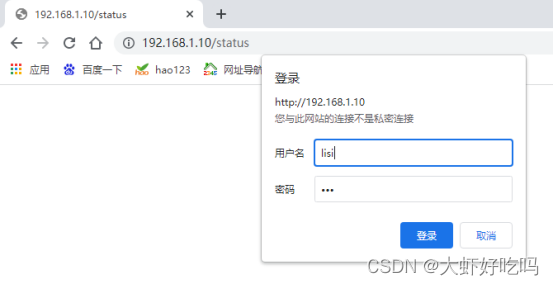
基于用户限制
启用auth模块,设置访问/status用户需要密码验证。
[root@node1 ~]# yum -y install httpd-tools
[root@node1 ~]# htpasswd -b -c /etc/nginx/.auth_conf lisi 123 //用户lisi密码123
Adding password for user lisi
[root@node1 ~]# vim /etc/nginx/conf.d/data.conf
//省略部分内容
location /status {
stub_status;
access_log off;
allow 192.168.1.100;
deny all;
auth_basic "input your passwd:"; //用户登录描述信息
auth_basic_user_file /etc/nginx/.auth_conf; //用户验证文件路径
}
[root@node1 ~]# systemctl restart nginx
根据下图所示输入用户密码后才能查看status内容,上面因为启用了IP限制,所以只能使用1.100主机访问。
相关文章
- Nginx配置文件_nginx.conf
- CVPR2022丨BatchFormer: 简单有效、即插即用的探索样本关系模块
- Apache站点优化-模块优化
- Ansible-fetch模块
- minipcie usb总线_ipadmini2换wifi模块
- 上手Python之模块
- 光有源模块组装过程及激光器的应用
- 学python:使用python的pyRanges模块中的read_gtf函数读取gtf文件报错的解决办法
- ThinkPHP5、nginx 超时 模块不存在:error 解决
- SQLMAP插件tamper模块简介
- Nginx的nginx.conf配置文件中文注释说明详解程序员
- nginx location模块–匹配规则详解程序员
- Python开发系列课程(7) – 函数和模块的使用详解编程语言
- python的argpare和click模块详解编程语言
- Linux重启Nginx的简单操作指南(linux重启nginx命令)
- Linux下启动Nginx服务的简易步骤(linux启动nginx)
- 文件如何在Linux系统中删除Nginx文件(linux删除nginx)
- 日志文件Linux如何快速删除Nginx日志文件(linux删除nginx)
- 配置Linux下快速删除Nginx配置的技巧(linux删除nginx)
- Linux下删除Nginx服务器的方法(linux删除nginx)
- Linux探索Nginx安装路径(linux查看nginx安装目录)
- 据说是Google首页的网页模块拖动代码
- linux下为nginx添加jvmroute模块的方法