
win10环境下基于face_recognition搭建自己的人脸识别软件
在win10环境下安装face_recognition,了解face_recognition中api的使用,如人脸截取、人脸矫正、人脸特征提取、人脸关键点提取、人脸mask获取、人脸特征比对等功能。最后构建自己的人脸数据库,使用knn实现人脸识别软件。
1、安装face_recognition
face_recognition库依赖于dlib库,安装dlib库则需要安装cmake,故此安装命令分别为:
pip3 install cmake
特别说明
在安装cmake后,可能会由于python环境路径没有添加到环境变量中,故此需要将程序输出的路径添加到系统环境变量path中
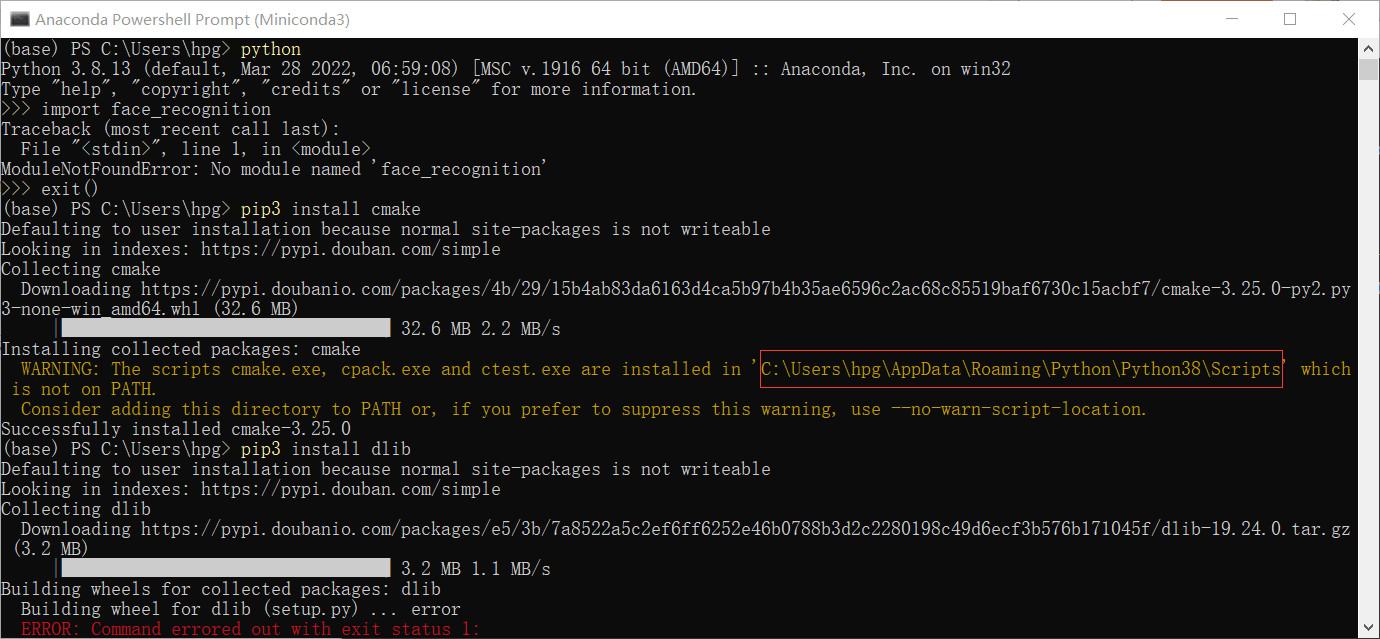
安装好cmake后即可安装dlib和face_recognition
pip3 install dlib
pip3 install face_recognition
2、api使用
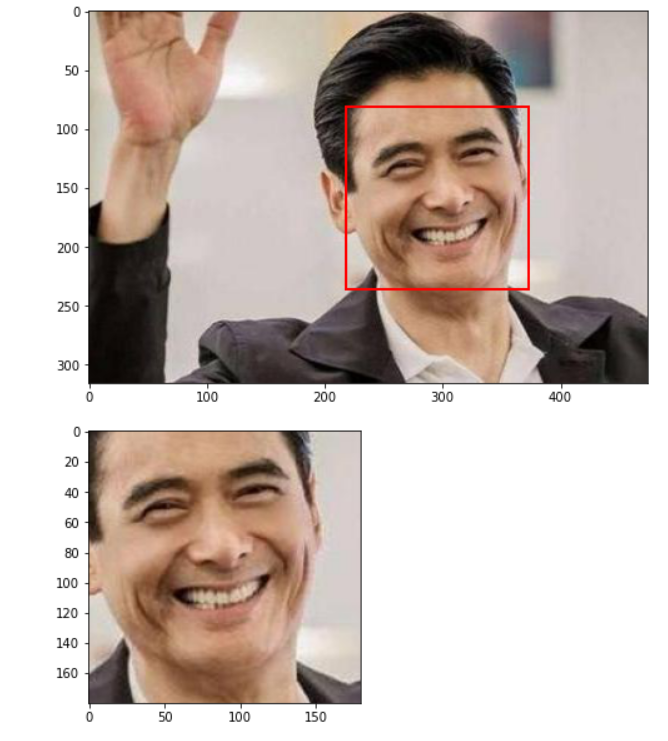
2.1、获取图像中人脸的位置
关键函数:face_recognition.face_locations(img)
传入img图像(whc格式的np数组),返回图像中多个人脸的坐标,坐标格式为y0, x1, y1, x0
from skimage import io
import face_recognition
img=io.imread('D:\深度学习\人脸识别模型\database\zhou1-rui4-fa1.jpg')
face_locations = face_recognition.face_locations(img)
print(face_locations)
输出为
[(81, 373, 236, 218)]
封装为函数测试
import os
import face_recognition
from skimage import io,transform
from PIL import Image, ImageDraw,ImageFont
import matplotlib.pyplot as plt
import matplotlib.patches as patches
##----------------------------
#1、定位图像中的人脸
def dect_crop_face(image):
    '''
    在一张包含人脸的图片中圈出来人脸
    '''
    fig,ax = plt.subplots(1,figsize=(8,12))
    ax.imshow(image)
    face_locations = face_recognition.face_locations(image)
    heads=[]
    for one in face_locations:
        y0, x1, y1, x0=one
        rect = patches.Rectangle((x0,y0),x1-x0,y1-y0,linewidth=2,edgecolor='r',facecolor='none')
        ax.add_patch(rect)
        x1, y1 =x1+25,y1+25
        cropped = image[y0:y1,x0:x1]
        if True:
            fig,ax2 = plt.subplots(1)
            #plt.title('dect_face crop')
            ax2.imshow(cropped)
        heads.append(cropped)
    #plt.figure(figsize=(8,12))
    plt.show()
    return face_locations,heads
face_locations,heads=dect_crop_face(img)
测试效果为
将识别出的多个人脸保存为图像
将识别出的多个人脸裁剪出来,并缩放到指定大小(200, 200),然后保存为图像
#2、裁剪出识别到的人脸
#扩大裁剪出人脸的范围
def scale_rect(y0, x1, y1, x0,width=None,height=None,rate=0):
    if rate>0:
        sx,sy=x1-x0,y1-y0
        #x0=0 if int(x0-sx*rate)<0 else int(x0-sx*rate)
        #y0=0 if int(y0-sy*rate)<0 else int(y0-sy*rate)
        x1=width if int(x1+sx*rate)>width else int(x1+sx*rate)
        y1=height if int(y1+sy*rate)>height else int(y1+sy*rate)
    return y0, x1, y1, x0
def crop_face(image,face_locations=None,show=None):
    '''
    图片中人脸截图保存
    '''
    if not face_locations:
        face_locations = face_recognition.face_locations(image)  #(top, right, bottom, left)
    head=[]
    for i in range(len(face_locations)):
        y0, x1, y1, x0 = face_locations[i]
        y0, x1, y1, x0 =scale_rect(y0, x1, y1, x0,width=image.shape[1],height=image.shape[0])
        cropped = image[y0:y1,x0:x1] # (left, upper, right, lower)  左上角  右下角
        head.append(cropped)
        cropped=transform.resize(cropped, (200, 200))
        if show:
            plt.figure(figsize=(7,7))
            #plt.title('face crop')
            plt.imshow(cropped)
            plt.show()
        io.imsave('face_tmp.png',cropped)
    return head
2.2 提取人脸特征进行比对
提取人脸特征,具体流程为:先定位人脸,然后编码
通过face_encoding函数可以将图像中的多个人脸编码为多个128维的向量
#3、将图片中的每张人脸编码成一个128维长度的向量
def face_encoding(image):
    face_locations = face_recognition.face_locations(image)  #(top, right, bottom, left)
    face_encodings = face_recognition.face_encodings(image, face_locations)  #将单个人脸数据转化为一个128维的向量
    return face_encodings
人脸比对,具体思路为,根据人脸特征向量的距离判断其相似性,如果距离小于阈值则判断为相似。判断人脸特征距离的函数为face_distance,具体封装使用如下所示
#4、对比两张脸是否一致 image1:要对比的图像,image2:unknow的图像
def face_feature_contrast(known_encoding,unknown_encoding,rate=0.6):
    '''
    给定两个人脸特征,判断是否是同一个人
    '''
    #face_recognition.compare_faces
    rate = face_recognition.face_distance([known_encoding], unknown_encoding)
    boolres=True if rate<0.6 else False
    return 1-rate,boolres
def face_contrast(image1,image2,rate=0.6):
    '''
    给定两张图片,判断是否是同一个人
    '''
    known_encoding = face_encoding(image1)
    unknown_encoding = face_encoding(image2)
    return face_feature_contrast(known_encoding,unknown_encoding,rate=0.6)
2.3 脸部关键点识别、标注
通过face_recognition.face_landmarks(image) 函数获取人脸关键点坐标,函数返回一个json数组,数组中元素的keys包含[‘chin’, ‘left_eyebrow’, ‘right_eyebrow’, ‘nose_bridge’, ‘nose_tip’, ‘left_eye’, ‘right_eye’, ‘top_lip’, ‘bottom_lip’]
def face_key_point(image,show=False):
    face_landmarks_list = face_recognition.face_landmarks(image)
    #print("I found {} face(s) in this photograph.".format(len(face_landmarks_list)))
   # plt.figure(figsize=(8,12))
    pil_image = Image.fromarray(image)
    draw = ImageDraw.Draw(pil_image)
    font = ImageFont.truetype("consola.ttf", 12, encoding="unic")#设置字体
    for face_landmarks in face_landmarks_list:
        point_nums=0
        for facial_feature in face_landmarks.keys():
            #draw.line(face_landmarks[facial_feature], width=1,fill='blue')
            for point in face_landmarks[facial_feature]:
                #draw.point(point,fill='blue')
                x,y=point
                r=1
                draw.ellipse((x-r, y-r, x+r, y+r), 'red', 'red')
                point_nums+=1
                #draw.text(point, str(point_nums), 'red',font)
            print("The {} feature: {}".format(facial_feature, face_landmarks[facial_feature]))
    if show:
        plt.imshow(pil_image)
        plt.show()
    return pil_image,face_landmarks
pil_image,face_landmarks=face_key_point(img,show=True)
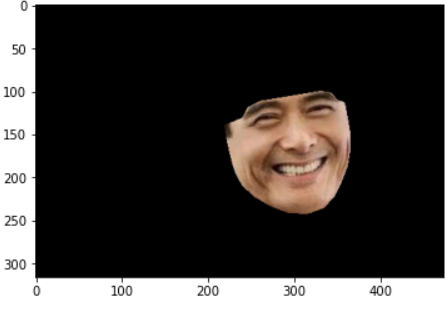
2.4 获取人脸的mask
使用dlib加载模型,使用模型detector预测出人脸的位置,然后使用predictor 预测出每一个人脸的mask
import face_recognition_models
import dlib
import cv2
import numpy as np
#获取原始人脸特征点
def get_landmarks(image):
    predictor_68_path = face_recognition_models.pose_predictor_model_location()#
    detector = dlib.get_frontal_face_detector()
    predictor = dlib.shape_predictor(predictor_68_path)
    img_gray = cv2.cvtColor(image, cv2.COLOR_RGB2GRAY)
    rects = detector(img_gray, 0)

    for i in range(len(rects)):
        landmarks = np.matrix([[p.x, p.y] for p in predictor(image, rects[i]).parts()])
    return landmarks
#根据特征点提取人脸的掩码
def get_image_hull_mask(image,show=False, ie_polys=None):
    image_shape=image.shape
    image_landmarks=get_landmarks(image)
    # get the mask of the image
    if image_landmarks.shape[0] != 68:
        raise Exception(
            'get_image_hull_mask works only with 68 landmarks')
    int_lmrks = np.array(image_landmarks, dtype=np.int)

    #hull_mask = np.zeros(image_shape[0:2]+(1,), dtype=np.float32)
    hull_mask = np.full(image_shape[0:2] + (1,), 0, dtype=np.float32)

    cv2.fillConvexPoly(hull_mask, cv2.convexHull(
        np.concatenate((int_lmrks[0:9],
                        int_lmrks[17:18]))), (1,))

    cv2.fillConvexPoly(hull_mask, cv2.convexHull(
        np.concatenate((int_lmrks[8:17],
                        int_lmrks[26:27]))), (1,))

    cv2.fillConvexPoly(hull_mask, cv2.convexHull(
        np.concatenate((int_lmrks[17:20],
                        int_lmrks[8:9]))), (1,))

    cv2.fillConvexPoly(hull_mask, cv2.convexHull(
        np.concatenate((int_lmrks[24:27],
                        int_lmrks[8:9]))), (1,))

    cv2.fillConvexPoly(hull_mask, cv2.convexHull(
        np.concatenate((int_lmrks[19:25],
                        int_lmrks[8:9],
                        ))), (1,))

    cv2.fillConvexPoly(hull_mask, cv2.convexHull(
        np.concatenate((int_lmrks[17:22],
                        int_lmrks[27:28],
                        int_lmrks[31:36],
                        int_lmrks[8:9]
                        ))), (1,))

    cv2.fillConvexPoly(hull_mask, cv2.convexHull(
        np.concatenate((int_lmrks[22:27],
                        int_lmrks[27:28],
                        int_lmrks[31:36],
                        int_lmrks[8:9]
                        ))), (1,))
    # nose
    cv2.fillConvexPoly(
        hull_mask, cv2.convexHull(int_lmrks[27:36]), (1,))
    image[hull_mask[:,:,0]==0]=0

    if ie_polys is not None:
        ie_polys.overlay_mask(hull_mask)
    plt.imshow(image)
    return hull_mask
hull_mask=get_image_hull_mask(img,True)
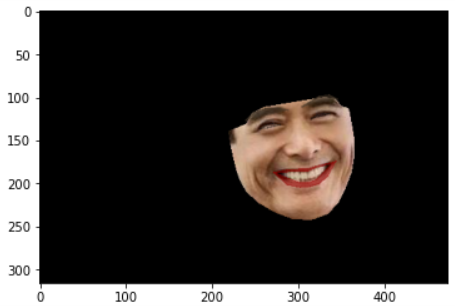
根据提取出的人脸进行化妆
#6、根据第5部分脸部关键点识别进行自动化妆
def face_makeup(image,show=False):
    face_landmarks_list = face_recognition.face_landmarks(image)
    pil_image = Image.fromarray(image)
    for face_landmarks in face_landmarks_list:
        demo = ImageDraw.Draw(pil_image, 'RGBA')
        demo.polygon(face_landmarks['left_eyebrow'], fill=(68, 54, 39, 128))
        demo.polygon(face_landmarks['right_eyebrow'], fill=(68, 54, 39, 128))
        demo.line(face_landmarks['left_eyebrow'], fill=(68, 54, 39, 150), width=2)
        demo.line(face_landmarks['right_eyebrow'], fill=(68, 54, 39, 150), width=2)

        demo.polygon(face_landmarks['top_lip'], fill=(150, 0, 0, 128))
        demo.polygon(face_landmarks['bottom_lip'], fill=(150, 0, 0, 128))
        demo.line(face_landmarks['top_lip'], fill=(150, 0, 0, 64), width=2)
        demo.line(face_landmarks['bottom_lip'], fill=(150, 0, 0, 64), width=2)

        demo.polygon(face_landmarks['left_eye'], fill=(255, 255, 255, 30))
        demo.polygon(face_landmarks['right_eye'], fill=(255, 255, 255, 30))

        demo.line(face_landmarks['left_eye'] + [face_landmarks['left_eye'][0]], fill=(0, 0, 0, 110), width=2)
        demo.line(face_landmarks['right_eye'] + [face_landmarks['right_eye'][0]], fill=(0, 0, 0, 110), width=2)
    if show:
        plt.imshow(image)
        plt.imshow(pil_image)
        plt.show()
    return pil_image
pil_image=face_makeup(img,True)
2.5 裁剪人脸并矫正
由于通过face_recognition.face_locations获取的人脸存在一定倾斜,故使用dlib.get_face_chips获取矫正后的人脸切片。
import dlib
import face_recognition_models
from skimage import io
import matplotlib.pyplot as plt
predictor_5_path = face_recognition_models.pose_predictor_five_point_model_location()#
predictor_68_path = face_recognition_models.pose_predictor_model_location()#
print(predictor_68_path)
detector = dlib.get_frontal_face_detector()
sp = dlib.shape_predictor(predictor_68_path)
img=io.imread('D:\深度学习\人脸识别模型\database\zhou1-rui4-fa1.jpg')
plt.imshow(img)
plt.show()
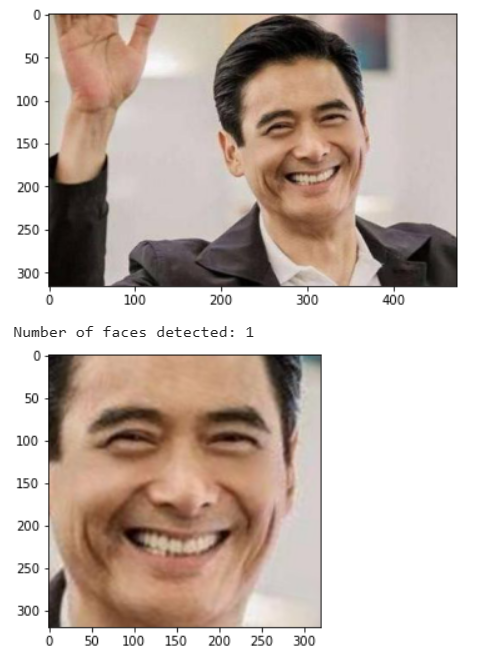
if True:
# 检测脸部
dets = detector(img, 1)
print("Number of faces detected: {}".format(len(dets)))
num_faces = len(dets)
# 查找脸部位置
faces = dlib.full_object_detections()
for detection in dets:
faces.append(sp(img, detection))
images = dlib.get_face_chips(img, faces, size=320)
for image in images:
plt.imshow(image)
plt.show()
#image = dlib.get_face_chip(img, faces[0], size=320)
3、搭建自己的人脸识别系统
基于face_recognition的人脸特征提取,和knn分类算法,我们可以搭建自己的人脸识别系统。这里采用各类明星的公开数据集进行测试
3.1 数据集准备
目标采集到以下明星的照片,存入database目录,作为标准人脸照片。可以针对每一个明星采集多个样本,那则需要将样本数据存入同一个文件夹下。这里每个样本数据中只允许存在一个人脸。

针对上述人脸基础数据,再次采集第二张图片作为测试数据,数据存入database-test目录。

3.2 构建人脸数据集
遍历传入的路径,判断是单个样本还是多个样本,并提取每一个样本的第一个人脸(如果存在多个人脸,则跳过该样本),将人脸图像存入faces数组,人脸特征存入encodings 数组,人脸标签存入labels 数组(这里采用文件名或者文件夹名作为人脸的标签),将存在多个人脸的数据存入unknown数组。其中train_dir 存储的是人脸的文件名,也就是姓名。
from matplotlib import pyplot as plt
import face_recognition
from sklearn import svm
import os
import numpy as np
def img_encoding(path):
    faces=[]
    encodings = []
    labels = []
    # Training directory
    train_dir = os.listdir(path)
    unknown=[]
    # Loop through each person in the training directory
    for person in train_dir:
        if os.path.isdir(path + person):#目录文件夹,多样本模式
            pix = os.listdir(path + person)
            for person_img in pix:
                # Get the face encodings for the face in each image file
                face = face_recognition.load_image_file(path + person + "/" + person_img)
                face_bounding_boxes = face_recognition.face_locations(face)
                #If training image contains exactly one face
                if len(face_bounding_boxes) == 1:
                    faces.append(face)
                    face_enc = face_recognition.face_encodings(face)[0]
                    encodings.append(face_enc)
                    labels.append(train_dir.index(person))
                else:
                    print(person+"/"+person_img+" was skipped and can't be used for training")
                    unknown.append(person + "/" + person_img)
        else:#文件样本单一模式
            face = face_recognition.load_image_file(path + person)
            face_bounding_boxes = face_recognition.face_locations(face)
            if len(face_bounding_boxes) == 1:
                faces.append(face)
                face_enc = face_recognition.face_encodings(face)[0]
                encodings.append(face_enc)
                labels.append(train_dir.index(person))
            else:
                print(person+"/"+person_img+" was skipped and can't be used for training")
                unknown.append(person + "/" + person_img)
    print('data of % had load!'%path)
    return np.array(train_dir),np.array(faces),np.array(encodings),np.array(labels),np.array(unknown)
3.3 测试人脸数据
先调用img_encoding函数加载出人脸数据(filenams、人脸图像数据、人脸特征编码、人脸标签数据和unknown数据),然后训练knn,最后使用knn来进行人脸分类。
def myimshows(imgs, titles=False, fname="test.jpg", size=6):
lens = len(imgs)
fig = plt.figure(figsize=(size * lens,size))
if titles == False:
titles="0123456789"
for i in range(1, lens + 1):
cols = 100 + lens * 10 + i
plt.xticks(())
plt.yticks(())
plt.subplot(cols)
if len(imgs[i - 1].shape) == 2:
plt.imshow(imgs[i - 1], cmap='Reds')
else:
plt.imshow(imgs[i - 1])
plt.title(titles[i - 1])
plt.xticks(())
plt.yticks(())
#plt.savefig(fname, bbox_inches='tight')
plt.show()
# Create and train the SVC classifier
#clf = svm.SVC(gamma='auto')
#clf.fit(encodings,names)
train_dir,faces,encodings,names,unknown=img_encoding('D:\\深度学习\\人脸识别模型\\database\\')
knn_clf = neighbors.KNeighborsClassifier(n_neighbors=int(round(math.sqrt(encodings[0].shape[0]))-2), algorithm='ball_tree', weights='distance')
knn_clf.fit(encodings, names)
test_dir='D:\\深度学习\\人脸识别模型\\databse-test\\'
test_list=os.listdir(test_dir)
correct=0
#遍历图片
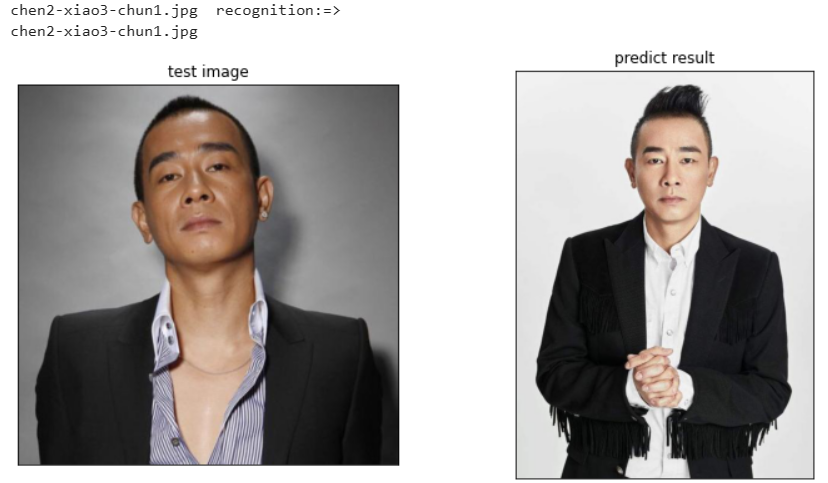
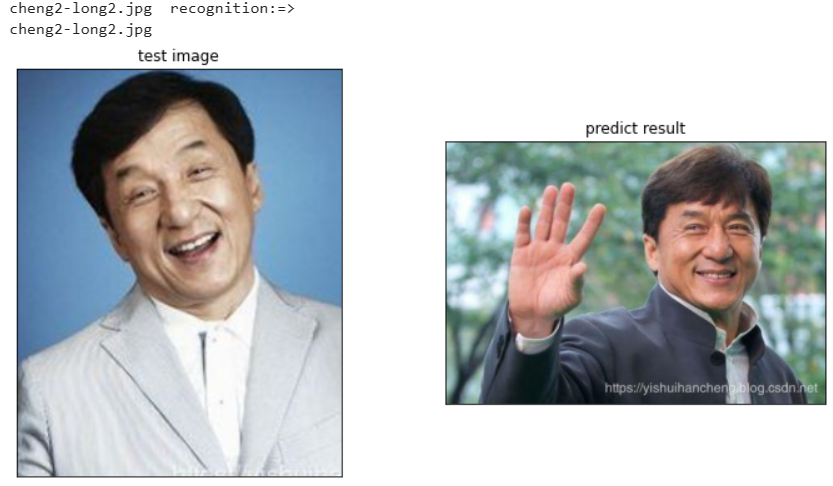
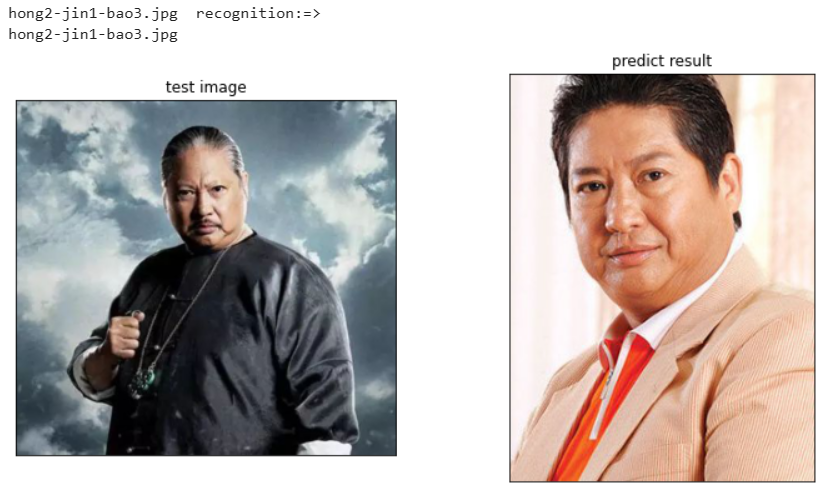
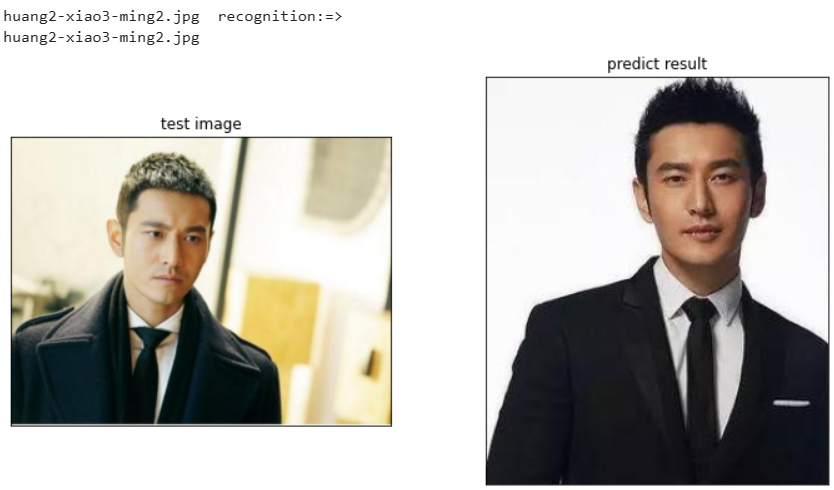
for file in test_list:
test_image = face_recognition.load_image_file(test_dir+file)
face_locations = face_recognition.face_locations(test_image)
no = len(face_locations)
print(file," recognition:=> ")
#遍历人脸
for i in range(no):
test_image_enc = face_recognition.face_encodings(test_image)[i]
cls_p = knn_clf.predict([test_image_enc])[0]
#以文件名判断是否预测正确
if file.split('.')[0]==train_dir[cls_p].split('.')[0]:
correct+=1
else:
print("---recognition:error---")
print(train_dir[cls_p])
myimshows([test_image,faces[cls_p]],['test image','predict result'])
print(correct/len(test_list))
print("------------end-----------")
上述程序遍历了databse-test下所有的图片文件,并截取出图像中的每一个人脸图片使用knn预测其类型,然后调用myimshows进行绘图展示

相关文章
- 管家婆软件【货位管理】使用教程
- Filmage Editor for mac(专业音视频编辑软件) v1.3.6激活版
- 苹果电脑MacBook Air、MacBook Pro怎么安装win10双系统或Windows软件
- 《量子化学软件基础》习题 (3)
- Photoshop CC2015软件安装教程(支持32位/64位)--PS软件全版本
- win10专业版的办公软件在哪里下载,安装哪个版本?
- GB-软件需求说明书【列文】2022-5.6
- Lumion是什么软件?Lumion建筑可视化渲染中文版,Lumion软件安装
- 如何启动Win10隐藏的勒索软件防护功能
- 软件Linux下的CRM软件:实现客户关系管理的利器(linuxcrm)
- 双赢:Win10与Linux双系统并存(win10和linux双系统)
- Oracle的DBD软件下载获得更多可用性 (dbd oracle下载)
- Win10环境下轻松链接Redis(win10链接redis)
- Win10环境下测试Redis功能(win10测试redis)
- Win10上使用Redis的简单指南(win10使用redis)
- Oracle软件让保单表变得更简单(oracle 保单表)