
【微服务】Nacos服务发现源码分析
💖Spring家族及微服务系列文章
✨【微服务】SpringBoot监听器机制以及在Nacos中的应用
✨【微服务】SpringCloud中使用Ribbon实现负载均衡的原理
✨【微服务】SpringBoot启动流程注册FeignClient
目录
💫SpringCloud原生项目spring-cloud-commons
💫NacosServiceDiscovery#getInstances()获取服务实例
💖前言
这篇文章就介绍下,服务发现的入口是什么?本地缓存数据结构、缓存时机、如果缓存中没有如何处理?使用了定时任务,那定时任务的底层基于什么的、它是干什么的、定时间隔?监听服务端UDP通知、发送ACK?发送http请求到服务端,谁发的、如何接收?服务端如何推送服务实例的、采用什么方式?带着这些问题,下面我们来探究探究。
注意:Nacos源码版本为1.x
💖Nacos服务发现
✨流程图
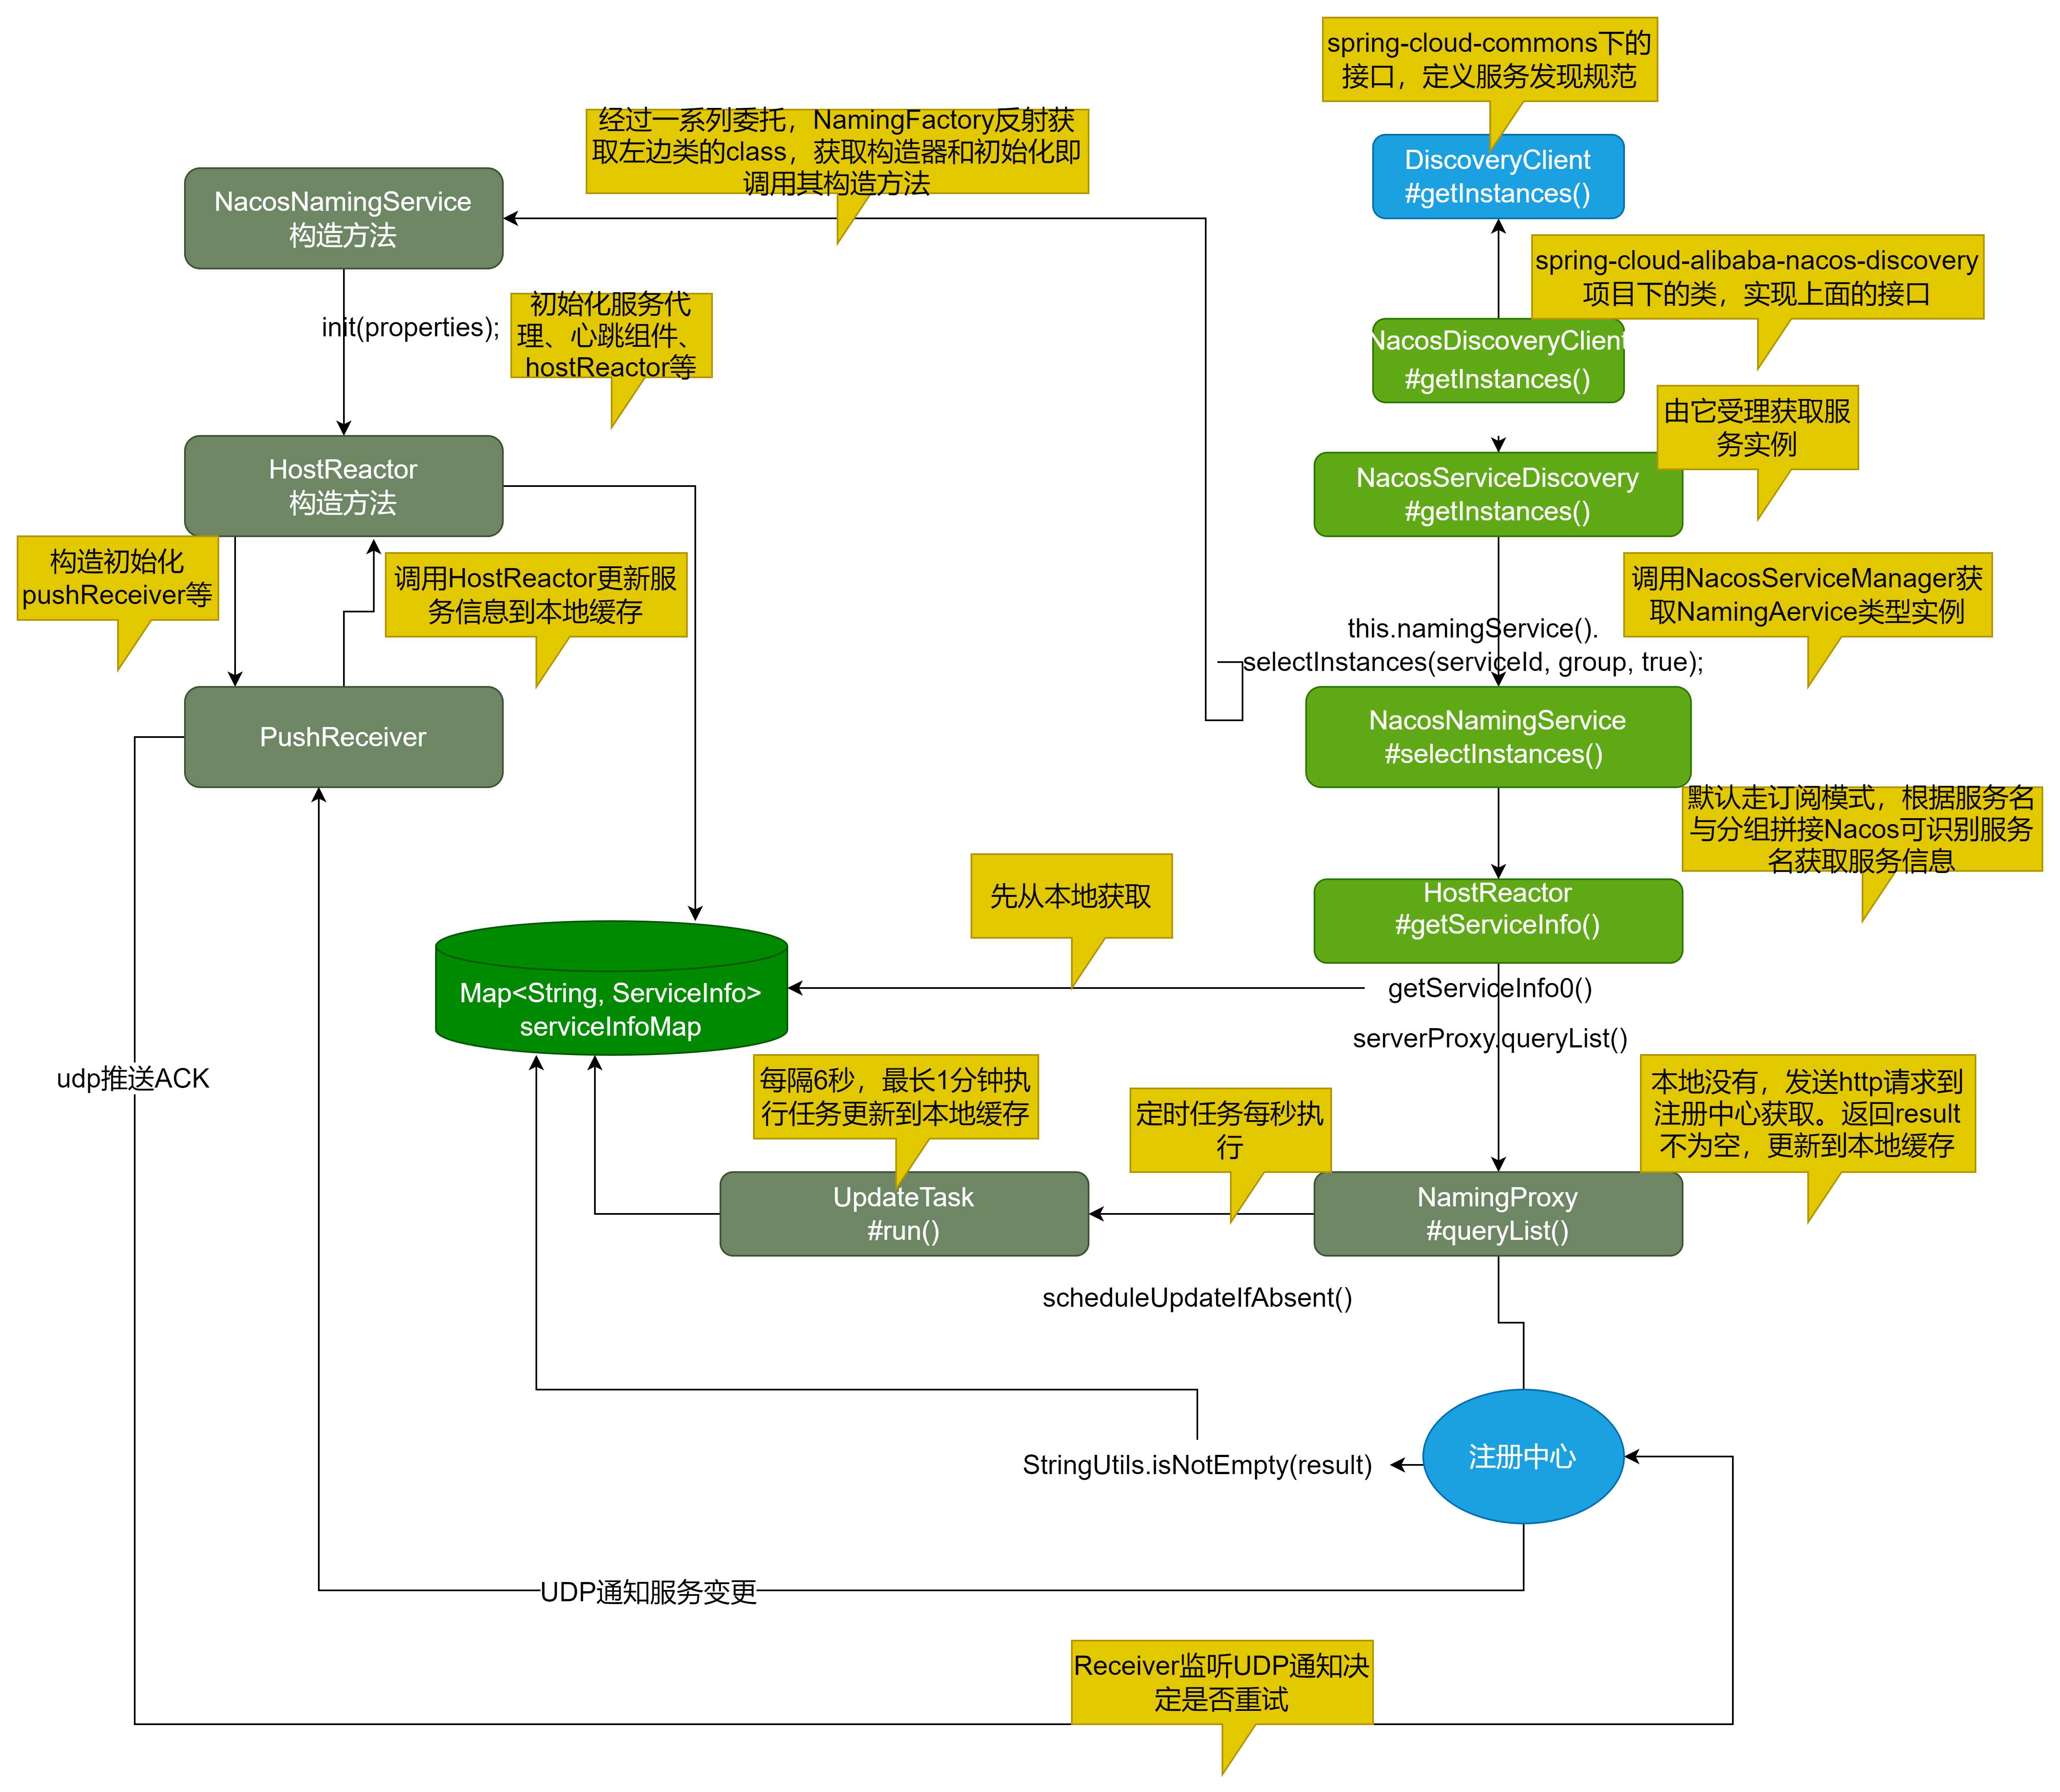
✨服务发现的入口
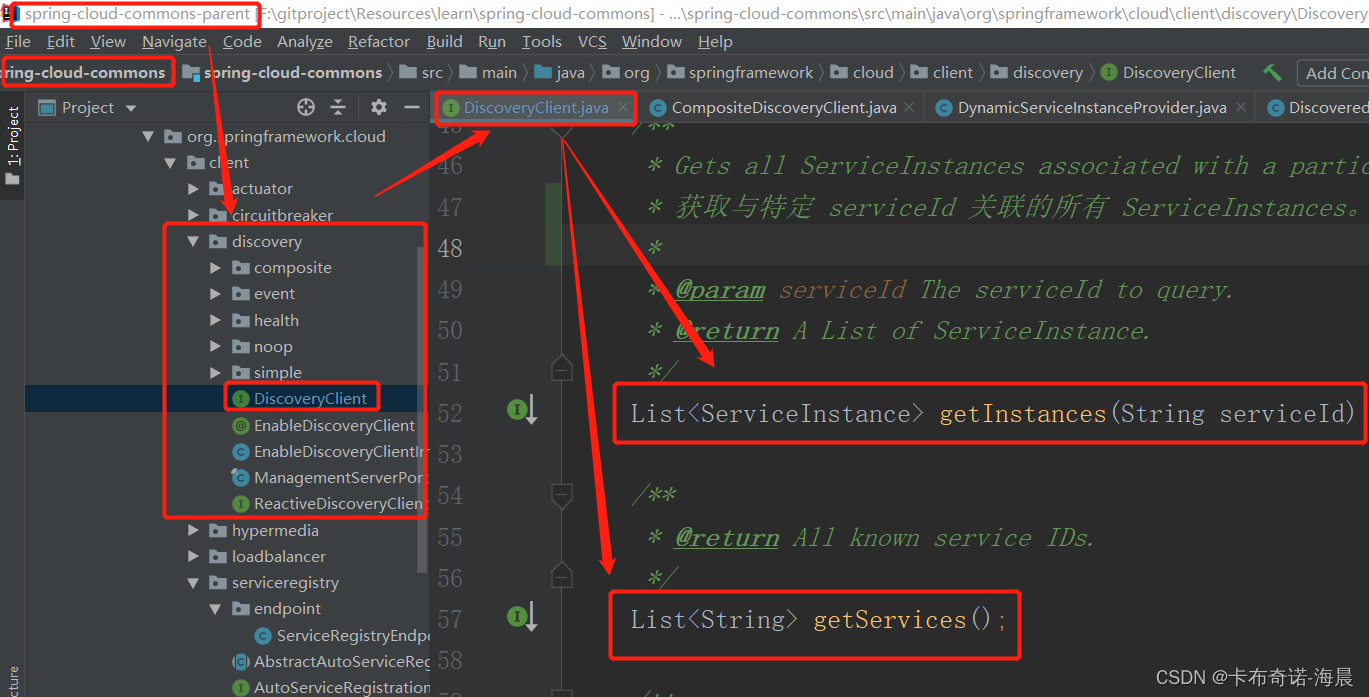
💫SpringCloud原生项目spring-cloud-commons
你会发现@EnableDiscoveryClient注解也是在spring-cloud-commons项目,还有个discovery文件夹。我们本节注意下DiscoveryClient接口,以及其中声明的接口方法。SpringCloud是由几个关键项目组成的,spring-cloud-commons项目是其中之一。SpringCloud Alibaba也不是完全替代SpringCloud的,一些基本的规范还是继承下来了,做扩展等。
💫Nacos是如何继承下来的?
Nacos是通过自己的spring-cloud-alibaba-nacos-discovery项目去集成到SpringCloud的以及基于SpringBoot的自动装配机制集成到SpringBoot项目的。而服务发现方面,NacosDiscoveryClient 实现了spring-cloud-commons项目的DiscoveryClient接口,即Nacos中服务发现入口是NacosDiscoveryClient类。
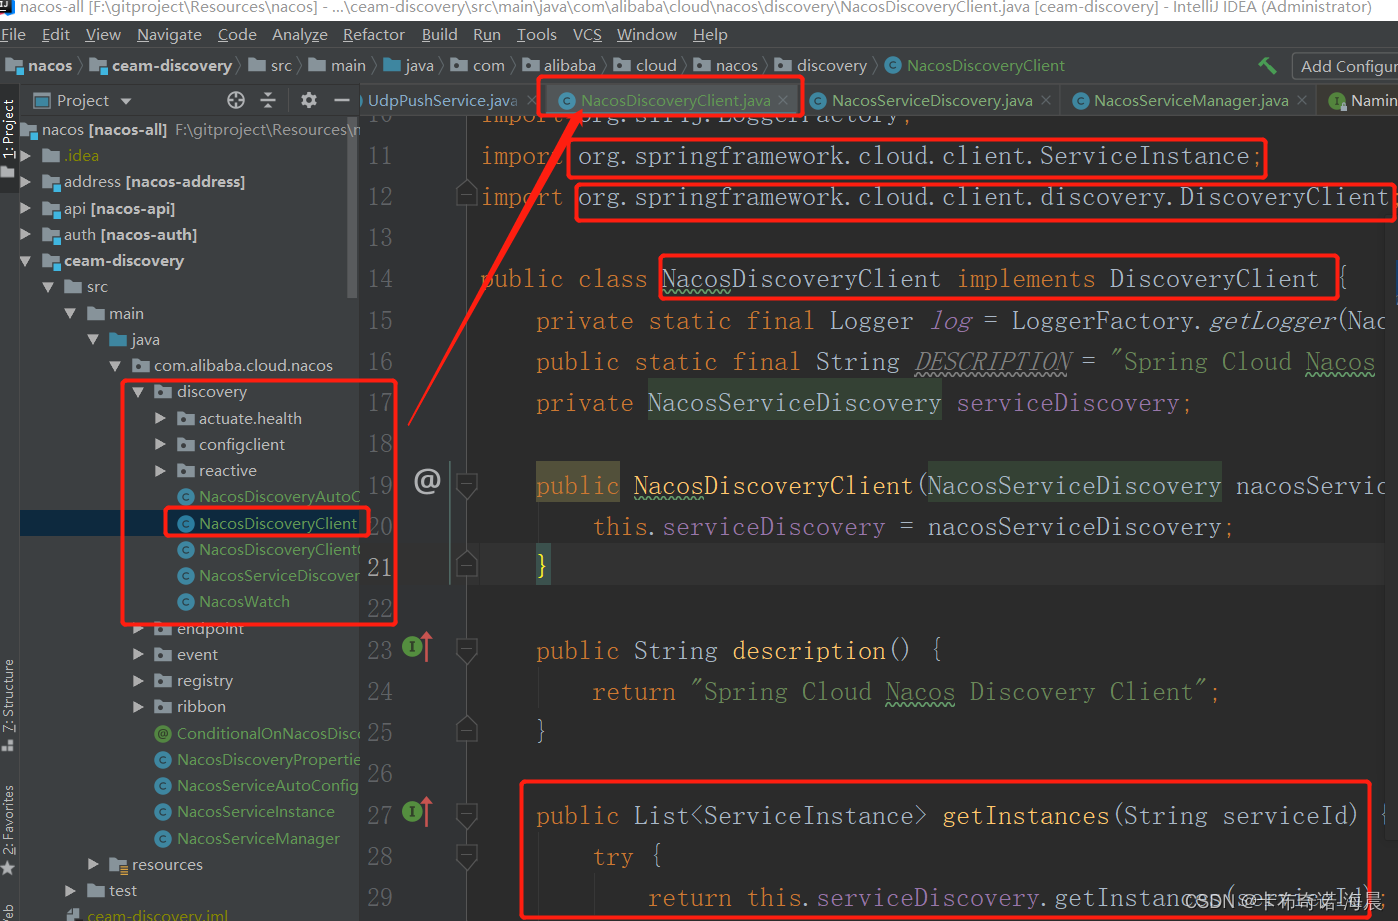
点击方法继续跟进到下面的逻辑
💫NacosServiceDiscovery#getInstances()获取服务实例
public List<ServiceInstance> getInstances(String serviceId) throws NacosException {
// 获取配置文件组信息
String group = this.discoveryProperties.getGroup();
// 调用API模块中NamingService的selectInstances()方法,
// 引用是NacosNamingService的反射获取,之前文章已分析
List<Instance> instances = this.namingService().selectInstances(serviceId, group, true);
// 将Nacos的服务实例适配为SpringCloud的ServiceInstance服务实例
return hostToServiceInstanceList(instances, serviceId);
}

主要逻辑:
- 获取配置文件组信息
- 调用API模块中NamingService接口的selectInstances()方法。引用是NacosNamingService的,通过反射获取,之前文章已详细分析。NacosNamingService是Nacos的client模块里面的一个组件,下面分析。
- 将Nacos的服务实例适配为SpringCloud的ServiceInstance服务实例
✨NacosNamingService初始化流程
它的构造方法是在NamingFactory通过反射方式调用的,上面也提到了。因为这个流程也是不小的,故在获取服务实例前先讲解。
💖NacosNamingService构造初始化
    public NacosNamingService(Properties properties) throws NacosException {
        init(properties);
    }

    private void init(Properties properties) throws NacosException {
        ValidatorUtils.checkInitParam(properties);
        this.namespace = InitUtils.initNamespaceForNaming(properties);
        InitUtils.initSerialization();
        initServerAddr(properties);
        InitUtils.initWebRootContext();
        initCacheDir();
        initLogName(properties);

        this.eventDispatcher = new EventDispatcher();
        // 初始化服务代理
        this.serverProxy = new NamingProxy(this.namespace, this.endpoint, this.serverList, properties);
        // 初始化心跳组件
        this.beatReactor = new BeatReactor(this.serverProxy, initClientBeatThreadCount(properties));
        // 初始化hostReactor
        this.hostReactor = new HostReactor(this.eventDispatcher, this.serverProxy, beatReactor, this.cacheDir,
                isLoadCacheAtStart(properties), initPollingThreadCount(properties));
    }
初始化服务代理、心跳发送组件以及hostReactor,重点看hostReactor的构造初始化
💫HostReactor构造初始化
    public HostReactor(EventDispatcher eventDispatcher, NamingProxy serverProxy, BeatReactor beatReactor,
            String cacheDir, boolean loadCacheAtStart, int pollingThreadCount) {
        // init executorService
        this.executor = new ScheduledThreadPoolExecutor(pollingThreadCount, new ThreadFactory() {
            @Override
            public Thread newThread(Runnable r) {
                Thread thread = new Thread(r);
                thread.setDaemon(true);
                thread.setName("com.alibaba.nacos.client.naming.updater");
                return thread;
            }
        });
        this.eventDispatcher = eventDispatcher;
        this.beatReactor = beatReactor;
        this.serverProxy = serverProxy;
        this.cacheDir = cacheDir;
        // 初始化本地缓存
        if (loadCacheAtStart) {
            this.serviceInfoMap = new ConcurrentHashMap<String, ServiceInfo>(DiskCache.read(this.cacheDir));
        } else {
            this.serviceInfoMap = new ConcurrentHashMap<String, ServiceInfo>(16);
        }

        this.updatingMap = new ConcurrentHashMap<String, Object>();
        this.failoverReactor = new FailoverReactor(this, cacheDir);
        // 初始化pushReceiver
        this.pushReceiver = new PushReceiver(this);
    }
初始化本地缓存、pushReceiver,重点关注PushReceiver的构造方法
💖PushReceiver构造初始化
    public PushReceiver(HostReactor hostReactor) {
        try {
            this.hostReactor = hostReactor;
            // 初始化udp套接字
            this.udpSocket = new DatagramSocket();
            // 启动一个线程
            this.executorService = new ScheduledThreadPoolExecutor(1, new ThreadFactory() {
                @Override
                public Thread newThread(Runnable r) {
                    Thread thread = new Thread(r);
                    thread.setDaemon(true);
                    thread.setName("com.alibaba.nacos.naming.push.receiver");
                    return thread;
                }
            });
            // 执行任务,下面的run()
            this.executorService.execute(this);
        } catch (Exception e) {
            NAMING_LOGGER.error("[NA] init udp socket failed", e);
        }
    }
初始化udp套接字用于监听注册中心变更服务推送以及发送ack确认、启动一个线程死循环用于监听注册中心udp推送服务变更、执行任务,this就是PushReceiver的引用即任务,所以执行下面的run()逻辑。
💫PushReceiver#run
    @Override
    public void run() {
        while (!closed) {
            try {

                // byte[] is initialized with 0 full filled by default
                byte[] buffer = new byte[UDP_MSS];
                DatagramPacket packet = new DatagramPacket(buffer, buffer.length);
                // 监听Nacos服务端服务实例信息变更后的通知
                udpSocket.receive(packet);

                String json = new String(IoUtils.tryDecompress(packet.getData()), UTF_8).trim();
                NAMING_LOGGER.info("received push data: " + json + " from " + packet.getAddress().toString());

                PushPacket pushPacket = JacksonUtils.toObj(json, PushPacket.class);
                String ack;
                if ("dom".equals(pushPacket.type) || "service".equals(pushPacket.type)) {
                    // 将数据缓存到本地
                    hostReactor.processServiceJson(pushPacket.data);

                    // send ack to server
                    ack = "{\"type\": \"push-ack\"" + ", \"lastRefTime\":\"" + pushPacket.lastRefTime + "\", \"data\":"
                            + "\"\"}";
                } else if ("dump".equals(pushPacket.type)) {
                    // dump data to server
                    ack = "{\"type\": \"dump-ack\"" + ", \"lastRefTime\": \"" + pushPacket.lastRefTime + "\", \"data\":"
                            + "\"" + StringUtils.escapeJavaScript(JacksonUtils.toJson(hostReactor.getServiceInfoMap()))
                            + "\"}";
                } else {
                    // do nothing send ack only
                    ack = "{\"type\": \"unknown-ack\"" + ", \"lastRefTime\":\"" + pushPacket.lastRefTime
                            + "\", \"data\":" + "\"\"}";
                }
                // 发送ack到服务端
                udpSocket.send(new DatagramPacket(ack.getBytes(UTF_8), ack.getBytes(UTF_8).length,
                        packet.getSocketAddress()));
            } catch (Exception e) {
                NAMING_LOGGER.error("[NA] error while receiving push data", e);
            }
        }
    }
主要逻辑:
- 监听Nacos服务端服务实例信息变更后的通知
- 解析注册中心推送的结果,组装回调ack报文,将注册中心推送的变更服务信息缓存到本地
- 发送ack到注册中心,以便注册中心决定是否需要重试。
✨从集成的client模块本地服务发现
本节点讲解的就是客户端服务发现,之所以这样说是因为SpringBoot的自动装配将Nacos的client模块集成进来了,想了解更多去看前面的文章分析。
💫获取服务实例列表
调用重载的selectInstances()方法,healthy默认true即健康,subscribe默认true即订阅

    @Override
    public List<Instance> selectInstances(String serviceName, String groupName, List<String> clusters, boolean healthy,
            boolean subscribe) throws NacosException {

        ServiceInfo serviceInfo;
        // 默认订阅模式
        if (subscribe) {
            // 委托hostReactor处理
            serviceInfo = hostReactor.getServiceInfo(NamingUtils.getGroupedName(serviceName, groupName),
                    StringUtils.join(clusters, ","));
        } else {
            serviceInfo = hostReactor
                    .getServiceInfoDirectlyFromServer(NamingUtils.getGroupedName(serviceName, groupName),
                            StringUtils.join(clusters, ","));
        }
        // 选取健康实例
        return selectInstances(serviceInfo, healthy);
    }
默认使用订阅模式,但是委托hostReactor去获取服务信息,以服务名、分组拼接作为入参即Nacos可识别的服务名。
💖从本地缓存/发送http从服务端获取服务信息
    public ServiceInfo getServiceInfo(final String serviceName, final String clusters) {
        // failover-mode:默认false
        NAMING_LOGGER.debug("failover-mode: " + failoverReactor.isFailoverSwitch());
        String key = ServiceInfo.getKey(serviceName, clusters);
        if (failoverReactor.isFailoverSwitch()) {
            return failoverReactor.getService(key);
        }
        // 从本地缓存serviceInfoMap获取
        ServiceInfo serviceObj = getServiceInfo0(serviceName, clusters);
        // 如果本地缓存中没有,则发送HTTP调用从Nacos服务端获取
        if (null == serviceObj) {
            serviceObj = new ServiceInfo(serviceName, clusters);

            serviceInfoMap.put(serviceObj.getKey(), serviceObj);

            updatingMap.put(serviceName, new Object());
            // 更新服务
            updateServiceNow(serviceName, clusters);
            updatingMap.remove(serviceName);

        } else if (updatingMap.containsKey(serviceName)) {

            if (UPDATE_HOLD_INTERVAL > 0) {
                // hold a moment waiting for update finish等待更新完成
                synchronized (serviceObj) {
                    try {
                        serviceObj.wait(UPDATE_HOLD_INTERVAL);
                    } catch (InterruptedException e) {
                        NAMING_LOGGER
                                .error("[getServiceInfo] serviceName:" + serviceName + ", clusters:" + clusters, e);
                    }
                }
            }
        }
        // 开启一个定时任务,每隔1秒从Nacos服务端获取最新的服务实例信息,
        // 更新到本地缓存seriveInfoMap中
        scheduleUpdateIfAbsent(serviceName, clusters);
        // 从本地缓存serviceInfoMap中获取服务实例信息
        return serviceInfoMap.get(serviceObj.getKey());
    }
主要逻辑:
- 从本地缓存serviceInfoMap获取
- 如果本地缓存中没有,则发送HTTP调用从Nacos服务端获取
- 开启一个定时任务,每隔1秒从Nacos服务端获取最新的服务实例信息, 更新到本地缓存seriveInfoMap中
- 从本地缓存serviceInfoMap中获取服务实例信息
💫从本地缓存获取
    private ServiceInfo getServiceInfo0(String serviceName, String clusters) {

        String key = ServiceInfo.getKey(serviceName, clusters);
        // 本地缓存serviceInfoMap获取
        return serviceInfoMap.get(key);
    }
就单纯地从本地缓存serviceInfoMap获取
💫发送HTTP调用从Nacos服务端获取
    public void updateService(String serviceName, String clusters) throws NacosException {
        ServiceInfo oldService = getServiceInfo0(serviceName, clusters);
        try {
            // 通过NamingProxy发送HTTP调用,获取服务信息
            String result = serverProxy.queryList(serviceName, clusters, pushReceiver.getUdpPort(), false);

            if (StringUtils.isNotEmpty(result)) {
                // 更新本地缓存serviceInfoMap
                processServiceJson(result);
            }
        } finally {
            if (oldService != null) {
                synchronized (oldService) {
                    oldService.notifyAll();
                }
            }
        }
    }
通过NamingProxy发送HTTP调用,获取服务信息;响应结果不为空更新本地缓存serviceInfoMap
💫scheduleUpdateIfAbsent()
public void scheduleUpdateIfAbsent(String serviceName, String clusters) {
if (futureMap.get(ServiceInfo.getKey(serviceName, clusters)) != null) {
return;
}
synchronized (futureMap) {
if (futureMap.get(ServiceInfo.getKey(serviceName, clusters)) != null) {
return;
}
// 启动定时任务
ScheduledFuture<?> future = addTask(new UpdateTask(serviceName, clusters));
futureMap.put(ServiceInfo.getKey(serviceName, clusters), future);
}
}

DEFAULT_DELAY默认1000在这里即1秒。启动定时任务,每隔1秒执行一次,任务逻辑如下:
💫UpdateTask#run()任务逻辑
        @Override
        public void run() {
            long delayTime = DEFAULT_DELAY;

            try {
                // 尝试从本地获取
                ServiceInfo serviceObj = serviceInfoMap.get(ServiceInfo.getKey(serviceName, clusters));

                if (serviceObj == null) {
                    // 本地还是没有则发送http从服务端获取,并缓存到本地
                    updateService(serviceName, clusters);
                    return;
                }

                // 过期服务(服务的最新更新时间小于等于缓存刷新时间),从注册中心重新查询
                if (serviceObj.getLastRefTime() <= lastRefTime) {
                    updateService(serviceName, clusters);
                    serviceObj = serviceInfoMap.get(ServiceInfo.getKey(serviceName, clusters));
                } else {
                    // if serviceName already updated by push, we should not override it
                    // since the push data may be different from pull through force push
                    // 如果 serviceName 已经通过 push 更新,我们不应该覆盖它,
                    // 因为 push 数据可能与 pull through force push 不同
                    refreshOnly(serviceName, clusters);
                }
                // 刷新更新时间
                lastRefTime = serviceObj.getLastRefTime();

                if (!eventDispatcher.isSubscribed(serviceName, clusters) && !futureMap
                        .containsKey(ServiceInfo.getKey(serviceName, clusters))) {
                    // abort the update task
                    NAMING_LOGGER.info("update task is stopped, service:" + serviceName + ", clusters:" + clusters);
                    return;
                }
                if (CollectionUtils.isEmpty(serviceObj.getHosts())) {
                    incFailCount();
                    return;
                }
                delayTime = serviceObj.getCacheMillis();
                // 重置失败数量为0
                resetFailCount();
            } catch (Throwable e) {
                incFailCount();
                NAMING_LOGGER.warn("[NA] failed to update serviceName: " + serviceName, e);
            } finally {
                // 下次调度刷新时间,下次执行的时间与failCount有关
                // failCount=0,则下次调度时间为6秒,最长为1分钟,即当无异常情况下缓存实例的刷新时间是6秒
                executor.schedule(this, Math.min(delayTime << failCount, DEFAULT_DELAY * 60), TimeUnit.MILLISECONDS);
            }
        }
主要逻辑:
- 尝试从本地缓存获取
- 本地还是没有则发送http从服务端获取,并缓存到本地
- 过期服务,从注册中心重新查询;否则如果 serviceName 已经通过 push 更新,不应该覆盖它,因为 push 数据可能与 pull through force push 不同
- 刷新更新时间、重置失败数量为0等
- 下次调度刷新时间,下次执行的时间与failCount有关failCount=0,则下次调度时间为6秒,最长为1分钟,即当无异常情况下缓存实例的刷新时间是6秒
💫queryList()发送http请求注册中心
里面会调用重载的reqApi()方法,调用前组装入参、拼接URL等。
    public String queryList(String serviceName, String clusters, int udpPort, boolean healthyOnly)
            throws NacosException {

        final Map<String, String> params = new HashMap<String, String>(8);
        params.put(CommonParams.NAMESPACE_ID, namespaceId);
        params.put(CommonParams.SERVICE_NAME, serviceName);
        params.put("clusters", clusters);
        params.put("udpPort", String.valueOf(udpPort));
        params.put("clientIP", NetUtils.localIP());
        params.put("healthyOnly", String.valueOf(healthyOnly));

        return reqApi(UtilAndComs.nacosUrlBase + "/instance/list", params, HttpMethod.GET);
    }
这篇文章是基于Nacos地1.x版本地,Nacos已经发布了新的2.x版本,官方也推荐使用新的。故还会出新的关于服务发现的文章。
相关文章
- Nacos 集群部署
- Nacos 笔记
- 构建安全可靠的微服务 | Nacos 在颜铺 SaaS 平台的应用实践
- docker-compose部署nacos derby(官网文档)
- nacos安装包下载地址
- 【项目实战】一文告别结合Nacos后,Springboot的配置文件看不懂的痛苦
- 【异常】记一次因没有在配置文件中正确添加Nacos的账号和密码导致报错Caused by: java.lang.NullPointerException: pattern
- “基于Spring Cloud Alibaba的微服务架构实战:Nacos配置管理“
- SpringCloud Alibaba微服务第4章Docker安装Nacos
- 【Nacos】Nacos原理详解(注册中心,配置中心)
- Nacos版本升级