
nginx 、vue - nginx同一个端口配置多个vue工程 和 vue 配套打包具体配置 教程
2023-09-14 09:06:39 时间
1.背景
我只有一个服务器,一个服务器只有一个443端口,但是我又多个vue工程,该怎么共同使用一个端口??
根据网上的配置,基本都是cv大佬,仿若机器人,要脸不?标点符号都不愿意改一下,牛皮,搜一下关键字,整页都是一样的文章
好好好,我自己琢磨,花费一番功夫,终于成功了
实现了访问
https://域名:443/xct/vue/
https://域名:443/elm/vue/
访问不同的工程
下面以
https://域名:443/xct/vue/
为例子
2.解决
先看一下vue的配套配置修改了哪些
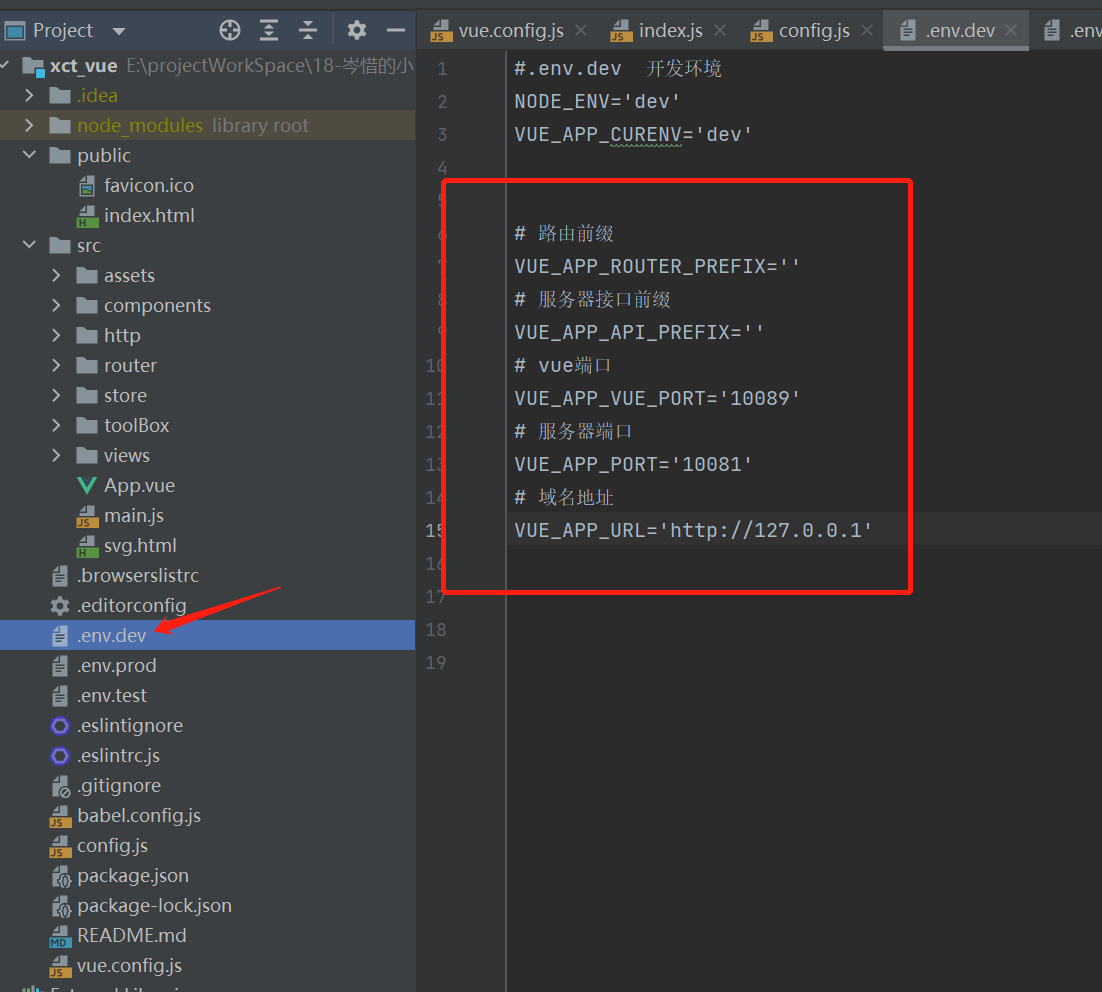
修改环境配置文件,我这是用于打包的配置文件
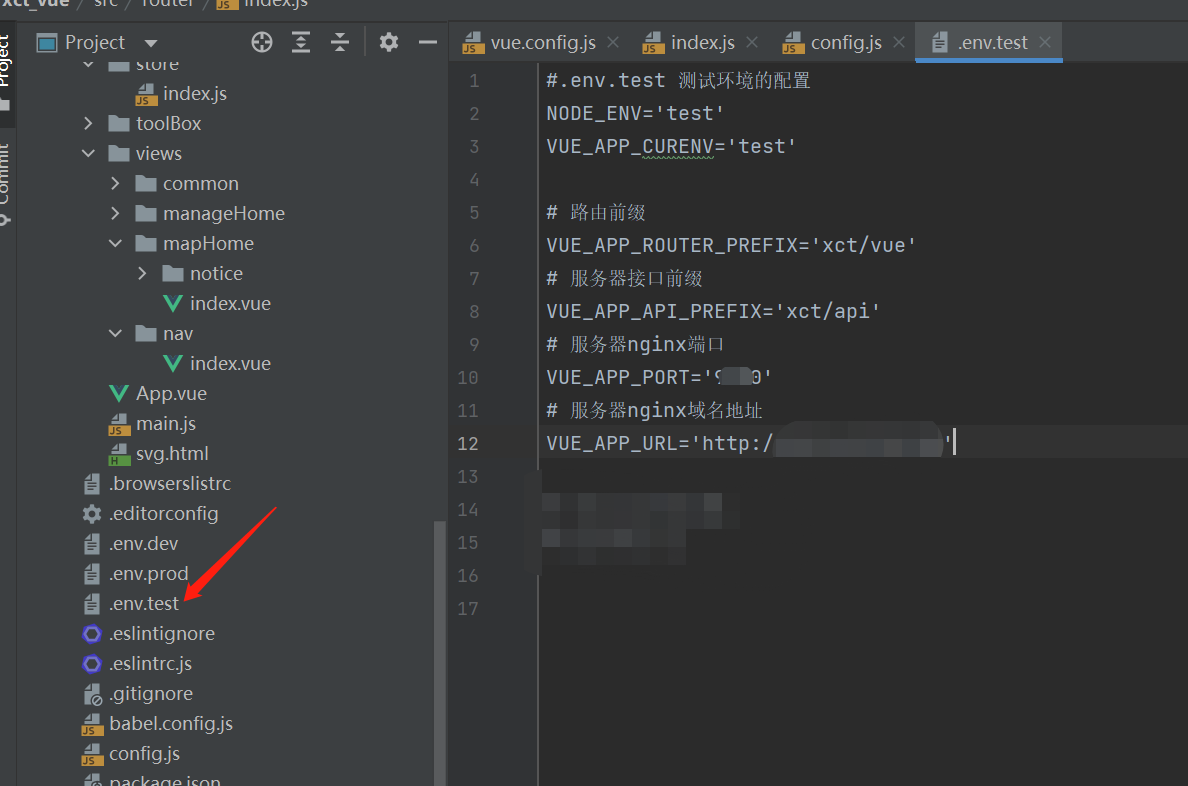
当然,如果想要兼容本地启动,dev可以这样改
那么导出文件这样改
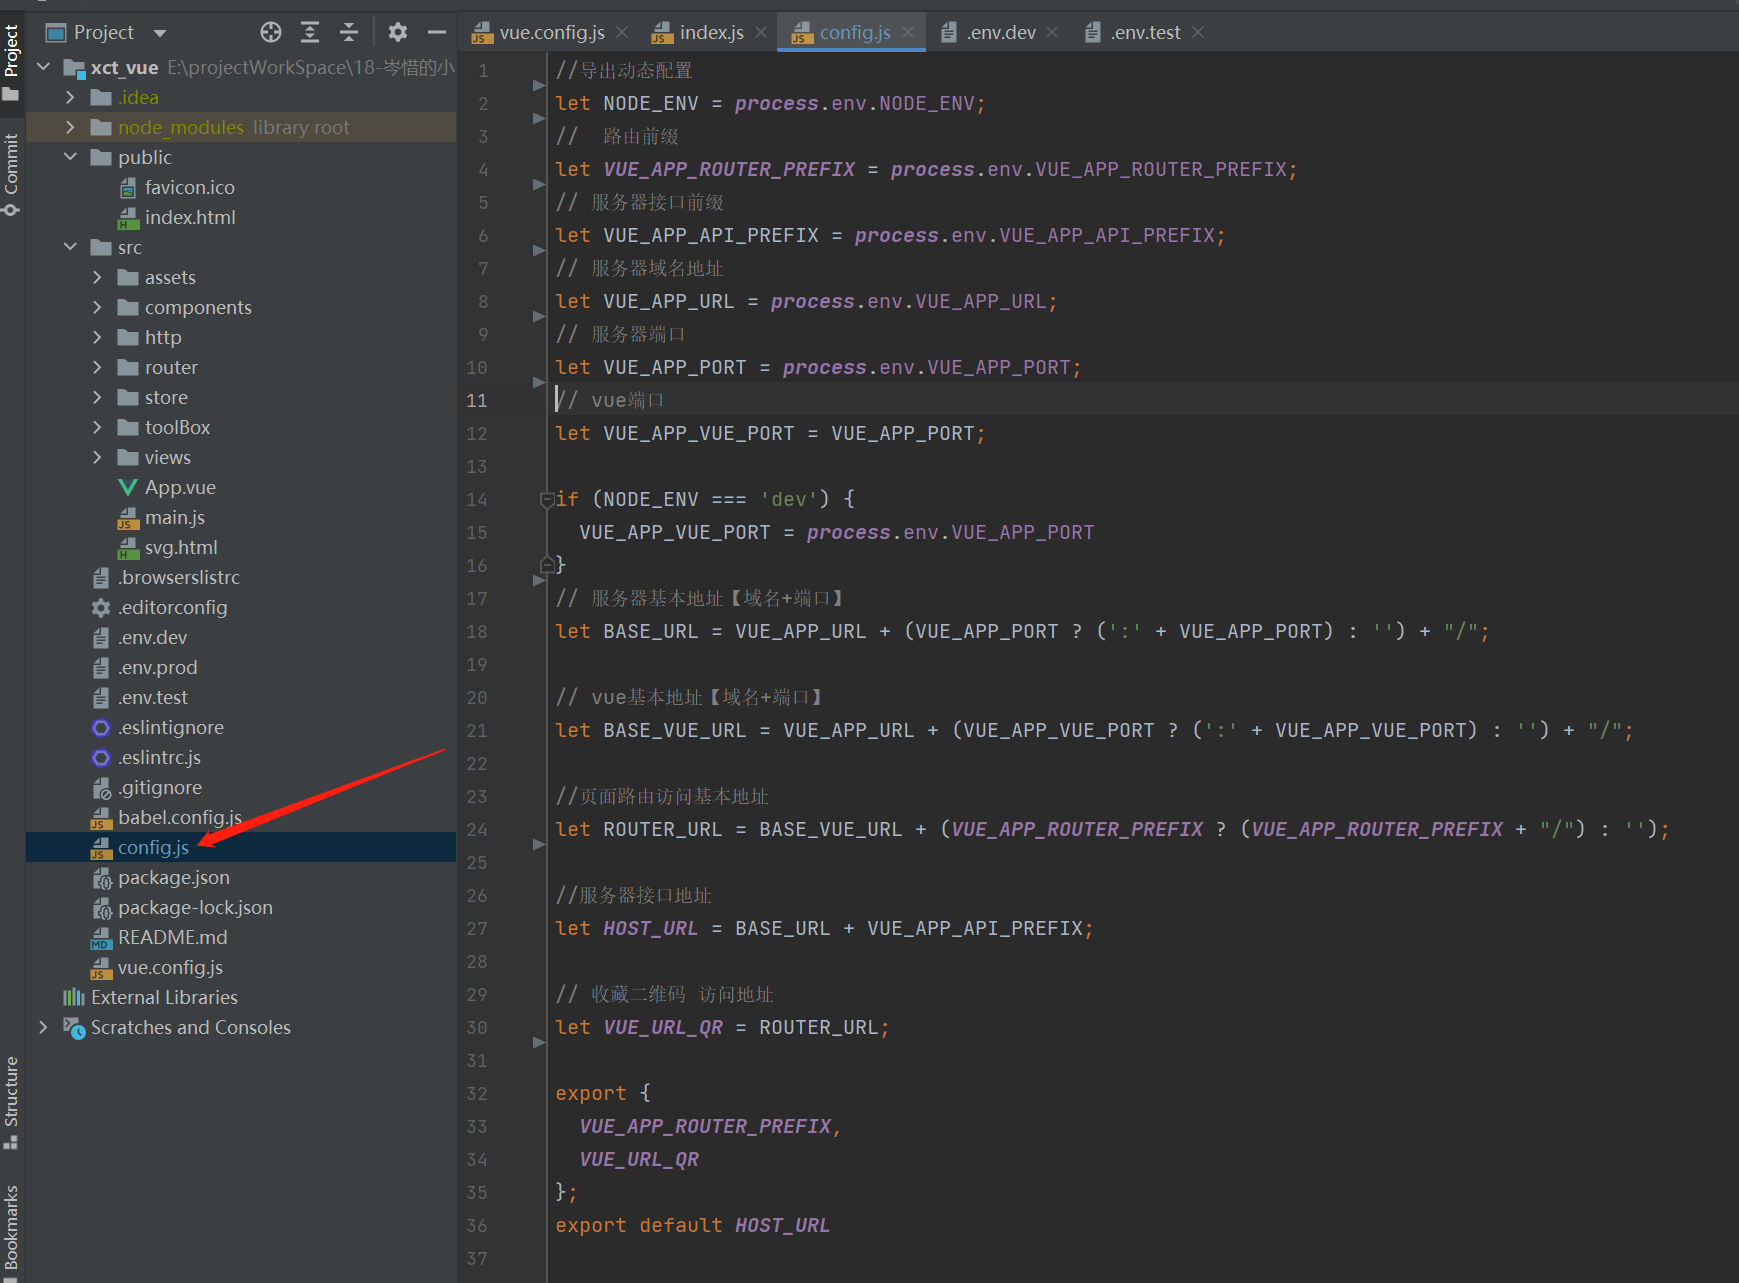


//导出动态配置

let NODE_ENV = process.env.NODE_ENV;

//  路由前缀
let VUE_APP_ROUTER_PREFIX = process.env.VUE_APP_ROUTER_PREFIX;

// 服务器接口前缀
let VUE_APP_API_PREFIX = process.env.VUE_APP_API_PREFIX;

// 服务器域名地址
let VUE_APP_URL = process.env.VUE_APP_URL;

// 服务器端口
let VUE_APP_PORT = process.env.VUE_APP_PORT;

// vue端口
let VUE_APP_VUE_PORT = VUE_APP_PORT;

if (NODE_ENV === 'dev') {
  VUE_APP_VUE_PORT = process.env.VUE_APP_PORT
}

// 服务器基本地址【域名+端口】
let BASE_URL = VUE_APP_URL + (VUE_APP_PORT ? (':' + VUE_APP_PORT) : '') + "/";

// vue基本地址【域名+端口】
let BASE_VUE_URL = VUE_APP_URL + (VUE_APP_VUE_PORT ? (':' + VUE_APP_VUE_PORT) : '') + "/";

//页面路由访问基本地址
let ROUTER_URL = BASE_VUE_URL + (VUE_APP_ROUTER_PREFIX ? (VUE_APP_ROUTER_PREFIX + "/") : '');

//服务器接口地址
let HOST_URL = BASE_URL + VUE_APP_API_PREFIX;

// 收藏二维码 访问地址
let VUE_URL_QR = ROUTER_URL;


export {
  VUE_APP_ROUTER_PREFIX,
  VUE_URL_QR
};
export default HOST_URL
打包配置这样改
//打包文件指定输出位置
  outputDir: 'E:/projectWorkSpace/xxxxx/1-code/java/vue',
  //不使用 static 就会默认使用 dist
  assetsDir: 'static',
  //公共文件路径
  publicPath: "./",
  //是否生成map文件
  productionSourceMap: (NODE_ENV !== "prod"),
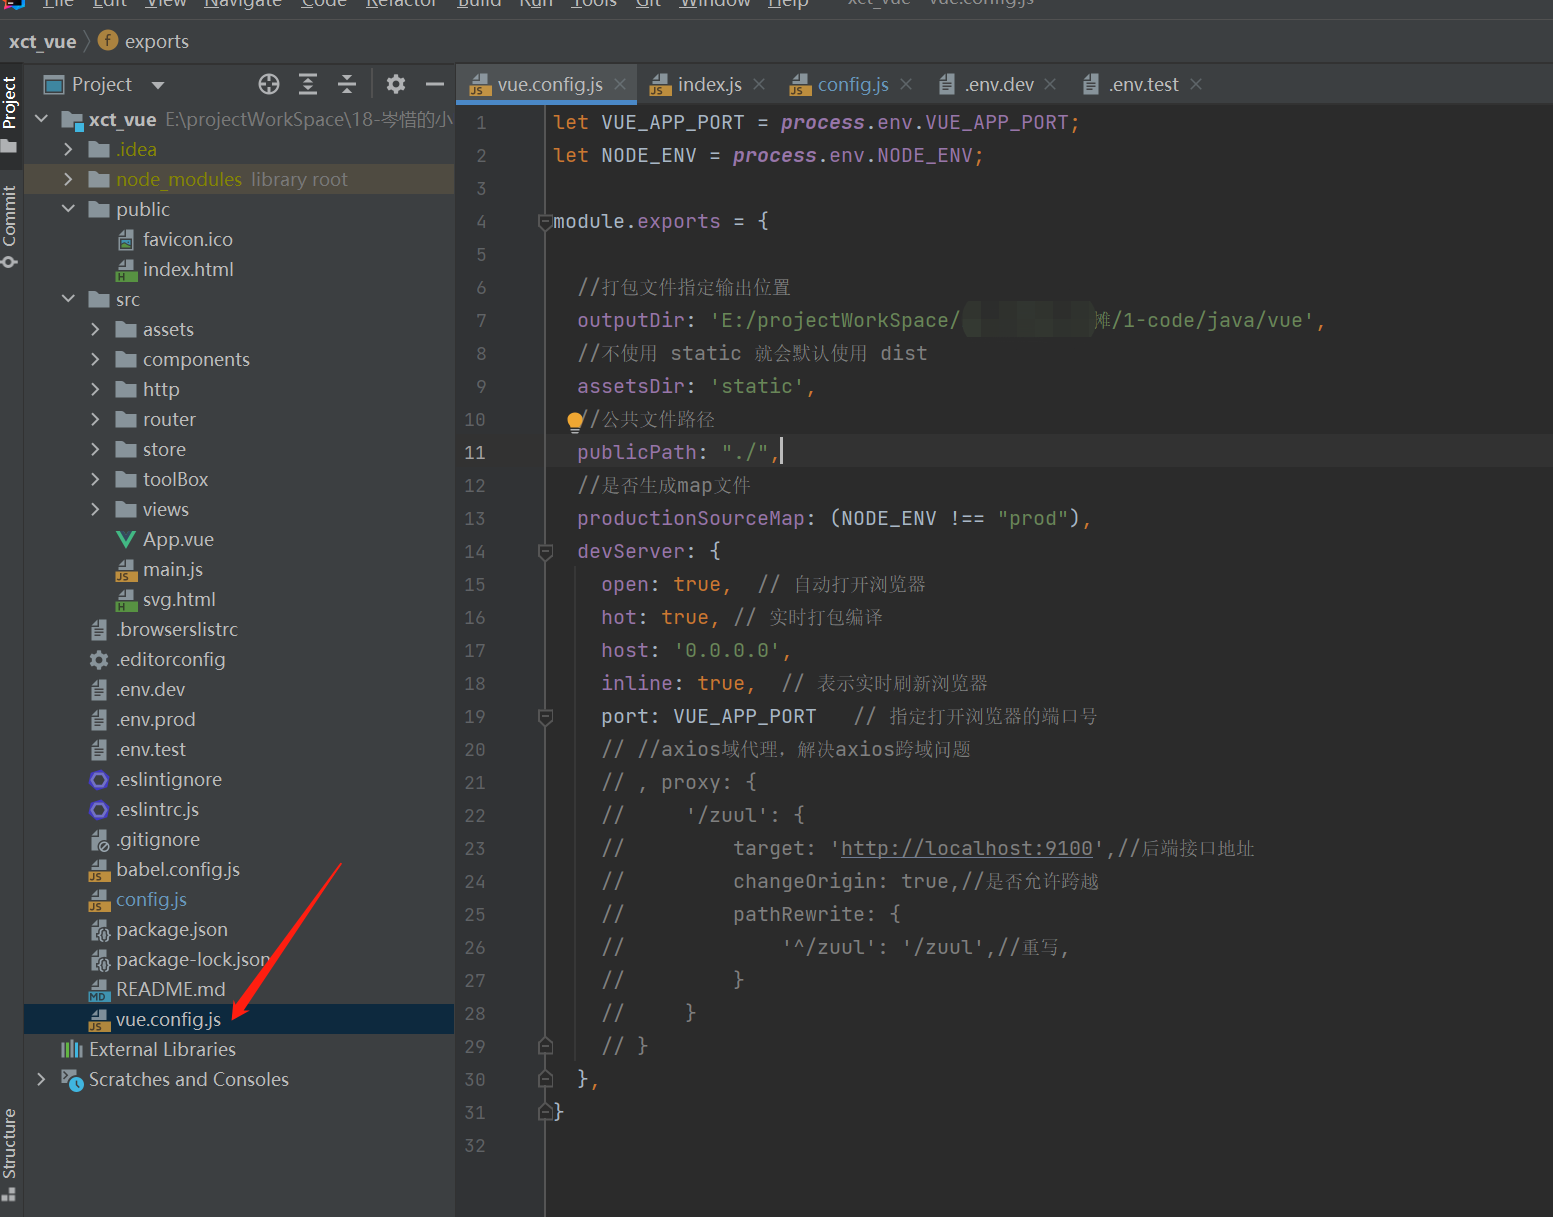
因为使用的路由 history 模式
因此需要更改base

记得导入文件

这个值就是上面的路由前缀参数

那么nginx该怎么配置?
win版本
#user  nobody;
worker_processes  2;

#error_log  logs/error.log;
#error_log  logs/error.log  notice;
#error_log  logs/error.log  info;

#pid        logs/nginx.pid;

events {
    worker_connections  1024;
}

http {
    include       mime.types;
    default_type  application/octet-stream;

    sendfile       on;
    tcp_nopush     on;

    #keepalive_timeout  0;
    #网关连接时间最长1600秒
    keepalive_timeout  3600;

#     定义各个项目的接口地址
#     项目1后管服务地址
    upstream xct_api {
         server 127.0.0.1:10081;
    }

server {
    listen       9100;
    server_name  tx.cenxi.cn;

    #gzip  on;

    #---------------------------------
#     定义各个项目的常量
#     项目1vue
    set $xct_vue E:/projectWorkSpace/xxxxxx/1-code/java/vue/;


    #---------------------------------

    #上传包的大小
    client_max_body_size     500m;
    # 从建立连接开始到发送完head的时间
    client_header_timeout    10s;
    #发送完head以后到发送完body的时间
    client_body_timeout     10s;
    #和后端建立连接的时间(3次握手)
    proxy_connect_timeout    600s;
    proxy_read_timeout      600s;
    proxy_send_timeout      600s;

    proxy_set_header   Host             $host;
    proxy_set_header   X-Real-IP        $remote_addr;
    proxy_set_header   X-Forwarded-For  $proxy_add_x_forwarded_for;

    #---------------------------------

    location ^~ /xct/api/ {
        proxy_pass  http://xct_api/;

        proxy_set_header Host $host;
        proxy_set_header  X-Real-IP  $remote_addr;
        proxy_set_header X-Forwarded-For $remote_addr;
        #proxy_set_header Host $host:$server_port;
        proxy_set_header X-Forwarded-Proto $scheme;
        proxy_set_header X-Forwarded-Port $server_port;
    }

    # /xct/vue/ 前缀必须添加进入默认路径
    location ^~/xct/vue/ {
        alias   $xct_vue;
        try_files $uri $uri/ /xct/vue/index.html;
        index index.html;
    }


    # redirect server error pages to the static page /50x.html
    #
    error_page   500 502 503 504  /50x.html;
    location = /50x.html {
        root   html;
    }
}


}
linux版本
#user  nobody;
worker_processes  2;

#error_log  logs/error.log;
#error_log  logs/error.log  notice;
#error_log  logs/error.log  info;

#pid        logs/nginx.pid;

events {
    worker_connections  1024;
}

http {
    include       mime.types;
    default_type  application/octet-stream;

    sendfile       on;
    tcp_nopush     on;

    #keepalive_timeout  0;
    #网关连接时间最长1600秒
    keepalive_timeout  3600;

#     定义各个项目的接口地址
#     工程1后端地址
    upstream xct_api {
         server 127.0.0.1:10081;
    }

server {
    listen       9100;
    server_name  tx.cenxi.cn;

    #gzip  on;

    #---------------------------------
#     定义各个项目的常量
#     工程1vue
    set $xct_vue /home/workspace/xxxxxxxxx/project/vue/;


    #---------------------------------

    #上传包的大小
    client_max_body_size     500m;
    # 从建立连接开始到发送完head的时间
    client_header_timeout    10s;
    #发送完head以后到发送完body的时间
    client_body_timeout     10s;
    #和后端建立连接的时间(3次握手)
    proxy_connect_timeout    600s;
    proxy_read_timeout      600s;
    proxy_send_timeout      600s;

    proxy_set_header   Host             $host;
    proxy_set_header   X-Real-IP        $remote_addr;
    proxy_set_header   X-Forwarded-For  $proxy_add_x_forwarded_for;

    #---------------------------------

    location ^~ /xct/api/ {
        proxy_pass  http://xct_api/;

        proxy_set_header Host $host;
        proxy_set_header  X-Real-IP  $remote_addr;
        proxy_set_header X-Forwarded-For $remote_addr;
        #proxy_set_header Host $host:$server_port;
        proxy_set_header X-Forwarded-Proto $scheme;
        proxy_set_header X-Forwarded-Port $server_port;
    }

    # /xct/vue/ 前缀必须添加进入默认路径
    location ^~/xct/vue/ {
        alias   $xct_vue;
        try_files $uri $uri/ /xct/vue/index.html;
        index index.html;
    }


    # redirect server error pages to the static page /50x.html
    #
    error_page   500 502 503 504  /50x.html;
    location = /50x.html {
        root   html;
    }
}


}
相关文章
- vue.js - 解决vue-cli打包后自动压缩代码
- vue-cli内部webpack的打包优化
- vue.js3.2.20: 在打包时取消生成.map文件
- 部署vue.js3.x项目到线上(vue.js 3.2.6/nginx 1.18.0)
- vue项目使用webpack loader把px转换为rem
- vue-resource插件使用
- vue.js3: 用jszip打包压缩图片文件(vue@3.2.37 / jszip@3.10.0 / file-saver@2.0.5)
- vue.js3: 用xmp-js读取xmp信息(vue@3.2.36 / xmp-js@0.0.5)
- 怎样在Vue中使用websocket传输数据
- Vue-CLI234使用方法:安装和卸载
- events.js:292 throw er; // Unhandled ‘error‘ event,vue项目打包失败
- vue 使用editor 编辑器以及打包线上不显示问题
- vue-seamless-scroll 好用的无缝滚动插件
- vue - chunk-vendors.js文件太大,实现拆分打包的具体配置
- vue-cli3打包项目不同环境:开发环境、生产环境、测试环境
- vue-cli打包之后的项目在nginx的部署
- webpack与vue-cli的关系
- Vue 中 CSS scoped 的原理
- 【三十天精通Vue 3】第九天 Vue 3 路由详解