
Centos7 tiup搭建tiBD集群、扩容、缩容存储节点、修改监控节点
一、TiDB介绍
1、TiDB介绍:
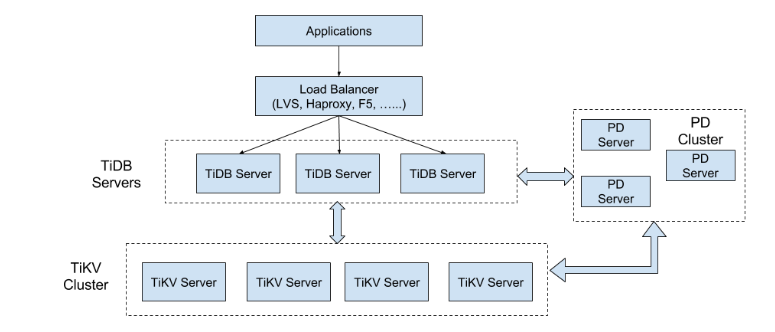
TiDB 是 PingCAP 公司受 Google Spanner / F1 论文启发而设计的开源分布式 HTAP (Hybrid Transactional and Analytical Processing) 数据库,结合了传统的 RDBMS 和 NoSQL 的最佳特性。TiDB 兼容 MySQL,支持无限的水平扩展,具备强一致性和高可用性。
2、逻辑图:
二、 离线安装部署
1、外网下载离线安装包
curl --proto '=https' --tlsv1.2 -sSf https://tiup-mirrors.pingcap.com/install.sh | sh
  % Total    % Received % Xferd  Average Speed   Time    Time     Time  Current
                                 Dload  Upload   Total   Spent    Left  Speed
100 4410k  100 4410k    0     0  2064k      0  0:00:02  0:00:02 --:--:-- 2063k
2、测试tiup工具
[root@localhost tidb-tiup]# source /root/.bash_profile
[root@localhost tidb-tiup]# which tiup
/root/.tiup/bin/tiup
3、查看可以下载的tidb版本
[root@deam tidb]# tiup list tidb
Available versions for tidb:
Version        Installed  Release                              Platforms
-------        ---------  -------                              ---------
nightly                   2020-07-08T06:39:00+08:00            linux/arm64,darwin/amd64,linux/amd64
v3.0                      2020-04-16T16:58:06+08:00            darwin/amd64,linux/amd64
v3.0.0                    2020-04-16T14:03:31+08:00            darwin/amd64,linux/amd64
v3.0.1                    2020-04-27T19:38:36+08:00            linux/arm64,darwin/amd64,linux/amd64
v3.0.2                    2020-04-16T23:55:11+08:00            darwin/amd64,linux/amd64
v3.0.3                    2020-04-17T00:16:31+08:00            darwin/amd64,linux/amd64
v3.0.4                    2020-04-17T00:22:46+08:00            darwin/amd64,linux/amd64
v3.0.5                    2020-04-17T00:29:45+08:00            darwin/amd64,linux/amd64
v3.0.6                    2020-04-17T00:39:33+08:00            darwin/amd64,linux/amd64
v3.0.7                    2020-04-17T00:46:32+08:00            darwin/amd64,linux/amd64
v3.0.8                    2020-04-17T00:54:19+08:00            darwin/amd64,linux/amd64
v3.0.9                    2020-04-17T01:00:58+08:00            darwin/amd64,linux/amd64
v3.0.10                   2020-03-13T14:11:53.774527401+08:00  darwin/amd64,linux/amd64
v3.0.11                   2020-04-17T01:09:20+08:00            darwin/amd64,linux/amd64
v3.0.12                   2020-04-17T01:16:04+08:00            darwin/amd64,linux/amd64
v3.0.13                   2020-04-26T17:25:01+08:00            darwin/amd64,linux/amd64
v3.0.14                   2020-05-09T21:11:49+08:00            linux/arm64,darwin/amd64,linux/amd64
v3.0.15                   2020-06-05T16:50:59+08:00            linux/arm64,darwin/amd64,linux/amd64
v3.0.16                   2020-07-03T20:05:15+08:00            linux/arm64,darwin/amd64,linux/amd64
v3.1.0-beta               2020-05-22T14:35:59+08:00            linux/arm64,darwin/amd64,linux/amd64
v3.1.0-beta.1             2020-05-22T15:22:30+08:00            linux/arm64,darwin/amd64,linux/amd64
v3.1.0-beta.2             2020-05-22T15:28:20+08:00            linux/arm64,darwin/amd64,linux/amd64
v3.1.0-rc                 2020-05-22T15:56:23+08:00            linux/arm64,darwin/amd64,linux/amd64
v3.1.0                    2020-05-22T15:34:33+08:00            linux/arm64,darwin/amd64,linux/amd64
v3.1.1                    2020-04-30T21:02:32+08:00            linux/arm64,darwin/amd64,linux/amd64
v3.1.2                    2020-06-04T17:53:39+08:00            linux/arm64,darwin/amd64,linux/amd64
v4.0.0-beta               2020-05-26T11:18:05+08:00            linux/arm64,darwin/amd64,linux/amd64
v4.0.0-beta.1             2020-05-26T11:42:48+08:00            linux/arm64,darwin/amd64,linux/amd64
v4.0.0-beta.2             2020-05-26T11:56:51+08:00            linux/arm64,darwin/amd64,linux/amd64
v4.0.0-rc                 2020-05-26T14:56:06+08:00            linux/arm64,darwin/amd64,linux/amd64
v4.0.0-rc.1               2020-04-29T01:03:31+08:00            linux/arm64,darwin/amd64,linux/amd64
v4.0.0-rc.2               2020-05-15T21:54:51+08:00            linux/arm64,darwin/amd64,linux/amd64
v4.0.0                    2020-05-28T16:23:23+08:00            linux/arm64,darwin/amd64,linux/amd64
v4.0.1                    2020-06-15T12:00:45+08:00            linux/arm64,darwin/amd64,linux/amd64
v4.0.2                    2020-07-01T19:57:14+08:00            linux/arm64,darwin/amd64,linux/amd64
4、生成需要的tidb离线版本(这儿生成的v4.0.2)
[root@localhost tidb-tiup]# tiup mirror clone tidb-community-server-v4.0.2-linux-amd64 v4.0.2 --os=linux --arch=amd64
Start to clone mirror, targetDir is tidb-community-server-v4.0.2-linux-amd64, selectedVersions are [v4.0.2]
If this does not meet expectations, please abort this process, read `tiup mirror clone --help` and run again
Arch [amd64]
OS [linux]
download https://tiup-mirrors.pingcap.com/alertmanager-v0.17.0-linux-amd64.tar.gz 22.54 MiB / 22.54 MiB 100.00% 2.03 MiB p/s                                    download

https://tiup-mirrors.pingcap.com/bench-v1.0.7-linux-amd64.tar.gz 3.55 MiB / 3.55 MiB 100.00% ? p/s                                                     download https://tiup-
5、打包离线文件
tar czvf tidb-community-server-v4.0.2-linux-amd64.tar.gz tidb-community-server-v4.0.2-linux-amd64
6、内网tidb安装
将离线包发送到目标集群的中控机后,执行以下命令安装 TiUP 组件:
tar xzvf tidb-community-server-v4.0.2-linux-amd64.tar.gz && sh tidb-community-server-v4.0.2-linux-amd64/local_install.sh
source /home/tidb/.bash_profile
7、TiKV 数据盘挂载
磁盘大于1T方法
#fdisk -l
Disk /dev/vdb: 1000 GB
#parted -s -a optimal /dev/vdb mklabel gpt -- mkpart primary ext4 1 -1   #创建分区
#mkfs.ext4 /dev/vdb1                                                     #格式化磁盘
#echo "UUID=`lsblk -f|grep vdb1|awk '{print $3}'` /data1 ext4 defaults,nodelalloc,noatime 0 2" >> /etc/fstab  #配置开机自动挂载
#more /etc/fstab
#mkdir /data1  && mount -a  #挂载盘
----------------------------
磁盘小于1T方法
pvcreate /dev/vdb
vgcreate vg_data /dev/vdb
lvcreate -l 100%VG -n lv_tidb vg_data
mkdir /data1
mkfs.ext4 /dev/mapper/vg_data-lv_tidb
echo "UUID=`lsblk -f|grep vg_data-lv_tidb|awk '{print $3}'` /data1 ext4 defaults,nodelalloc,noatime 0 2" >> /etc/fstab
more /etc/fstab
mount -a
8、配置ssh免密登陆
ssh-keygen                           #一直回车
ssh-copy-id root@10.0.0.1   #输入密码配置免密登陆
ssh-copy-id root@10.0.0.2
ssh-copy-id root@10.0.0.3
ssh-copy-id root@10.0.0.4
ssh-copy-id root@10.0.0.5
ssh-copy-id root@10.0.0.6
ssh-copy-id root@10.0.0.7
9、集群初始化配置文件需要手动编写,需要在中控机上面创建 YAML 格式配置文件,例如 topology.yaml:
# # Global variables are applied to all deployments and used as the default value of
# # the deployments if a specific deployment value is missing.
global:
  user: "tidb"
  ssh_port: 22
  deploy_dir: "/tidb-deploy"
  data_dir: "/tidb-data"

server_configs:
  pd:
    replication.enable-placement-rules: true

pd_servers:
  - host: 10.0.1.4
  - host: 10.0.1.5
  - host: 10.0.1.6
tidb_servers:
  - host: 10.0.1.7
  - host: 10.0.1.8
  - host: 10.0.1.9
tikv_servers:
  - host: 10.0.1.1
  - host: 10.0.1.2
  - host: 10.0.1.3
tiflash_servers:
  - host: 10.0.1.10
    data_dir: /data1/tiflash/data,/data2/tiflash/data
cdc_servers:
  - host: 10.0.1.6
  - host: 10.0.1.7
  - host: 10.0.1.8
monitoring_servers:
  - host: 10.0.1.4
grafana_servers:
  - host: 10.0.1.4
alertmanager_servers:
  - host: 10.0.1.4
#以前版本没有缓存服务器的配置
pd_servers:
  - host: 172.16.5.134
    name: pd-134
  - host: 172.16.5.139
    name: pd-139
  - host: 172.16.5.140
    name: pd-140

tidb_servers:
  - host: 172.16.5.134
  - host: 172.16.5.139
  - host: 172.16.5.140

tikv_servers:
  - host: 172.16.5.134
  - host: 172.16.5.139
  - host: 172.16.5.140

grafana_servers:
  - host: 172.16.5.134

monitoring_servers:
  - host: 172.16.5.134
10、部署 TiDB 集群
useradd tidb      #每台服务器创建tidb用户
echo 'yourpasswd'|passwd --stdin tidb
export TIUP_MIRRORS=/path/to/mirror   #/path/to/mirror 是执行 local_install.sh 命令时输出的离线镜像包的位置
tiup cluster deploy tidb-cluster v4.0.2 topology.yaml --user tidb
tiup cluster start tidb-cluster
11、tidb常用命令
[root@localhost tidb-tiup]# tiup cluster
The component `cluster` is not installed; downloading from repository.
download https://tiup-mirrors.pingcap.com/cluster-v1.0.7-linux-amd64.tar.gz 9.62 MiB / 9.62 MiB 100.00% 245.11 MiB p/s
Starting component `cluster`: /root/.tiup/components/cluster/v1.0.7/tiup-cluster
Deploy a TiDB cluster for production

Usage:
  tiup cluster cluster [flags]
  tiup cluster [command]

Available Commands:
  check       Perform preflight checks for the cluster.
  deploy      Deploy a cluster for production
  start       Start a TiDB cluster
  stop        Stop a TiDB cluster
  restart     Restart a TiDB cluster
  scale-in    Scale in a TiDB cluster
  scale-out   Scale out a TiDB cluster
  destroy
  upgrade     Upgrade a specified TiDB cluster
  exec        Run shell command on host in the tidb cluster
  display     Display information of a TiDB cluster
  list        List all clusters
  audit       Show audit log of cluster operation
  import      Import an exist TiDB cluster from TiDB-Ansible
  edit-config Edit TiDB cluster config
  reload      Reload a TiDB cluster's config and restart if needed
  patch       Replace the remote package with a specified package and restart the service
  help        Help about any command

Flags:
  -h, --help               help for tiup
      --ssh-timeout int    Timeout in seconds to connect host via SSH, ignored for operations that don't need an SSH connection. (default 5)
  -v, --version            version for tiup
      --wait-timeout int   Timeout in seconds to wait for an operation to complete, ignored for operations that don't fit. (default 60)
  -y, --yes                Skip all confirmations and assumes 'yes'

Use "tiup cluster help [command]" for more information about a command.
三、在线部署安装
1、所有节点需配置ssh免密登录
ssh-keygen                           #一直回车
ssh-copy-id root@10.0.0.1   #输入密码配置免密登陆
ssh-copy-id root@10.0.0.2
ssh-copy-id root@10.0.0.3
ssh-copy-id root@10.0.0.4
ssh-copy-id root@10.0.0.5
ssh-copy-id root@10.0.0.6
ssh-copy-id root@10.0.0.7
2、关闭SElinux、关闭防火墙
# 关闭防火墙
systemctl stop firewalld
systemctl disable firewalld

# 关闭selinux
sed -i 's/enforcing/disabled/' /etc/selinux/config  # 永久
setenforce 0  # 临时
3、安装tiup工具
curl --proto '=https' --tlsv1.2 -sSf https://tiup-mirrors.pingcap.com/install.sh | sh
4、安装完成后重新声明环境变量
source .bash_profile
5、确认安装位置
which tiup
6、安装 TiUP cluster 组件
tiup cluster
7、创建 topology.yaml 文件
global:
  user: "bbders"
  ssh_port: 22
  deploy_dir: "/ssd/tidb-deploy"
  data_dir: "/ssd/tidb-data"

monitored:
  node_exporter_port: 9100
  blackbox_exporter_port: 9115
  deploy_dir: "/ssd/tidb-deploy/monitored-9100"
  data_dir: "/ssd/tidb-data/monitored-9100"
  log_dir: "/ssd/tidb-deploy/monitored-9100/log"

server_configs:
  pd:
    replication.enable-placement-rules: true

pd_servers:
  - host: 10.28.100.151
  - host: 10.28.100.160
  - host: 10.28.100.161

tidb_servers:
  - host: 10.28.100.151
  - host: 10.28.100.160
  - host: 10.28.100.161

tikv_servers:
  - host: 10.28.100.151
  - host: 10.28.100.160
  - host: 10.28.100.161

monitoring_servers:
  - host: 10.28.100.161

grafana_servers:
  - host: 10.28.100.161

alertmanager_servers:
  - host: 10.28.100.161
8、TiDB基本操作命令
查看已部署的集群
$ tiup cluster list
启动集群
$ tiup cluster start bbders-tidb
查看集群状态
$ tiup cluster display bbders-tidb
9、访问地址
dashboard访问地址:http://10.28.100.161:2379/dashboard
默认用户/密码:root/空

Grafana访问地址:http://10.28.100.161:3000/
默认用户/密码:admin/admin
四、扩容主机
1、查看当前配置
tiup cluster list                                     #查看当前的集群名称列表
tiup cluster edit-config <cluster-name>               #查看集群配置、拷贝对应的配置
2、编写扩容脚本,复制上一步看到得配置信息即可
vi scale-out.yaml
tikv_servers:
- host: 192.168.112.60
  ssh_port: 22
  port: 20160
  status_port: 20180
  deploy_dir: /ssd/tidb-deploy/tikv-20160
  data_dir: /ssd/tidb-data/tikv-20160
  arch: amd64
  os: linux
- host: 192.168.112.61
  ssh_port: 22
  port: 20160
  status_port: 20180
  deploy_dir: /ssd/tidb-deploy/tikv-20160
  data_dir: /ssd/tidb-data/tikv-20160
  arch: amd64
  os: linux
- host: 192.168.112.62
  ssh_port: 22
  port: 20160
  status_port: 20180
  deploy_dir: /ssd/tidb-deploy/tikv-20160
  data_dir: /ssd/tidb-data/tikv-20160
  arch: amd64
  os: linux
3、执行扩容脚本
tiup cluster scale-out <cluster-name> scale-out.yaml
4、检查集群状态
tiup cluster display <cluster-name>
5、重启grafana
tiup cluster restart <cluster-name> -R grafana
五、缩容主机节点
1、 查看集群信息
tiup cluster display <cluster-name> 查看集群信息
2、执行缩容操作
tiup cluster scale-in <cluster-name> --node 10.0.1.5:20160
六、修改监控节点
1、扩容一个监控节点
tiup cluster list #查看当前的集群名称列表
tiup cluster edit-config <cluster-name> #查看集群配置、拷贝对应的配置
2、编写扩容脚本
vi scale-out.yaml

grafana_servers:
- host: 192.168.6.123
ssh_port: 22
port: 3000
deploy_dir: /ssd/tidb-deploy/grafana-3000
arch: amd64
os: linux
username: admin
password: admin
alertmanager_servers:
- host: 192.168.6.123
ssh_port: 22
web_port: 9093
cluster_port: 9094
deploy_dir: /ssd/tidb-deploy/alertmanager-9093
data_dir: /ssd/tidb-data/alertmanager-9093
arch: amd64
os: linux

执行扩容脚本
tiup cluster scale-out <cluster-name> scale-out.yaml
3、修改监控节点
tiup cluster edit-config bbders-tidb

grafana_servers:
- host: 192.168.112.60 #换成你主节点的IP
ssh_port: 22
port: 3000
deploy_dir: /ssd/tidb-deploy/grafana-3000
arch: amd64
os: linux
username: admin
password: admin
anonymous_enable: false
root_url: ""
domain: ""
- host: 192.168.112.65 #换成你要下线的IP
ssh_port: 22
port: 3000
deploy_dir: /ssd/tidb-deploy/grafana-3000
arch: amd64
os: linux
username: admin
password: admin
anonymous_enable: false
root_url: ""
domain: ""

重新应用
tiup cluster reload s1-tidb
4、剔除监控节点
tiup cluster scale-in bbders-tidb --node 192.168.112.60:3000
5、以此操作勾选的其他服务

相关文章
- CentOS7下安装python-pip
- CentOS7 防火墙设置
- CentOS7 关闭防火墙
- Centos7 squid安装与配置
- Centos7二进制部署k8s-v1.20.2 ipvs版本(controller-manager、kube-scheduler、kubelet)
- Centos7 tiup搭建tiBD集群、扩容、缩容存储节点、修改监控节点
- Docker - 在CentOS7中安装Docker
- CentOS7下Elastic Stack 5.0日志分析系统搭建
- Centos7部署Open-Falcon监控
- CentOS7 安装mysql(YUM方式)
- centos7安装Logwatch配合msmtp邮件客户端发送服务器监控分析日志
- Linux centos7下pycharm的安装教程
- centos7上部署prometheus并结合node_exporter监控Linux主机