
Istio(四):创建部署Gateway并使用网关暴露服务
一.模块概览
在Kubernetes集群中,服务的发布方式有:ClusterIP,NodePort,LoadBalancer,nginx-ingress。今天介绍使用istio-ingressgateway进行服务的发布。
使用istio网关的前提是已经安装好了istio,关于istio的安装部署,请查看博客《Istio(二):在Kubernetes(k8s)集群上安装部署istio1.14》https://www.cnblogs.com/renshengdezheli/p/16836404.html
二.系统环境
| 服务器版本 | docker软件版本 | Kubernetes(k8s)集群版本 | Istio软件版本 | CPU架构 |
|---|---|---|---|---|
| CentOS Linux release 7.4.1708 (Core) | Docker version 20.10.12 | v1.21.9 | Istio1.14 | x86_64 |
Kubernetes集群架构:k8scloude1作为master节点,k8scloude2,k8scloude3作为worker节点
| 服务器 | 操作系统版本 | CPU架构 | 进程 | 功能描述 |
|---|---|---|---|---|
| k8scloude1/192.168.110.130 | CentOS Linux release 7.4.1708 (Core) | x86_64 | docker,kube-apiserver,etcd,kube-scheduler,kube-controller-manager,kubelet,kube-proxy,coredns,calico | k8s master节点 |
| k8scloude2/192.168.110.129 | CentOS Linux release 7.4.1708 (Core) | x86_64 | docker,kubelet,kube-proxy,calico | k8s worker节点 |
| k8scloude3/192.168.110.128 | CentOS Linux release 7.4.1708 (Core) | x86_64 | docker,kubelet,kube-proxy,calico | k8s worker节点 |
三.Gateway网关
3.1 使用 Gateway
作为 Istio 安装的一部分,我们安装了 Istio 的入口和出口网关。这两个网关都运行一个 Envoy 代理实例,它们在网格的边缘作为负载均衡器运行。入口网关接收入站连接,而出口网关接收从集群出去的连接。
#istio-ingressgateway-75bc568988-69k8j是入口网关
#istio-egressgateway-58949b7c84-k7v6f是出口网关
[root@k8scloude1 addons]# kubectl get pod -n istio-system
NAME                                    READY   STATUS    RESTARTS   AGE
grafana-6c5dc6df7c-cnc9w                1/1     Running   2          28h
istio-egressgateway-58949b7c84-k7v6f    1/1     Running   8          10d
istio-ingressgateway-75bc568988-69k8j   1/1     Running   6          3d22h
istiod-84d979766b-kz5sd                 1/1     Running   14         10d
kiali-5db6985fb5-8t77v                  1/1     Running   0          69m
prometheus-699b7cc575-dx6rp             2/2     Running   8          2d22h
zipkin-6cd5d58bcc-hxngj                 1/1     Running   1          18h
使用入口网关,我们可以对进入集群的流量应用路由规则。我们可以有一个指向入口网关的单一外部 IP 地址,并根据主机头将流量路由到集群内的不同服务。
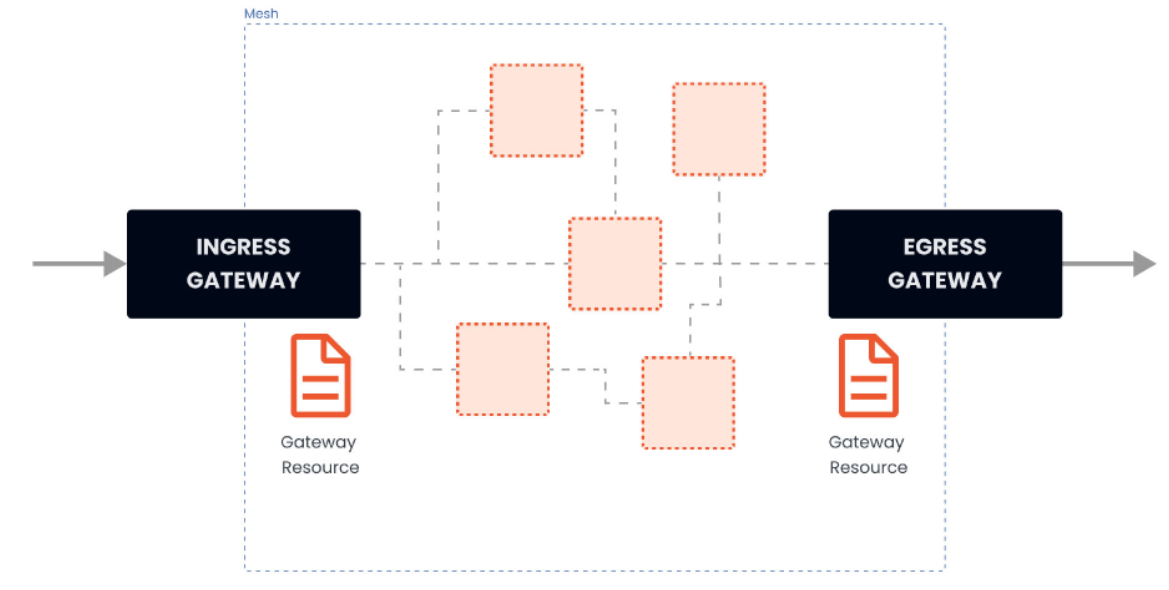
我们可以使用 Gateway 资源来配置网关。网关资源描述了负载均衡器的暴露端口、协议、SNI(服务器名称指示)配置等。
网关资源在背后控制着 Envoy 代理在网络接口上的监听方式以及它出示的证书。
下面是一个网关资源的例子:
 apiVersion: networking.istio.io/v1alpha3
 kind: Gateway
 metadata:
   name: my-gateway
   namespace: default
 spec:
   selector:
     istio: ingressgateway
   servers:
   - port:
       number: 80
       name: http
       protocol: HTTP
     hosts:
     - dev.example.com
     - test.example.com
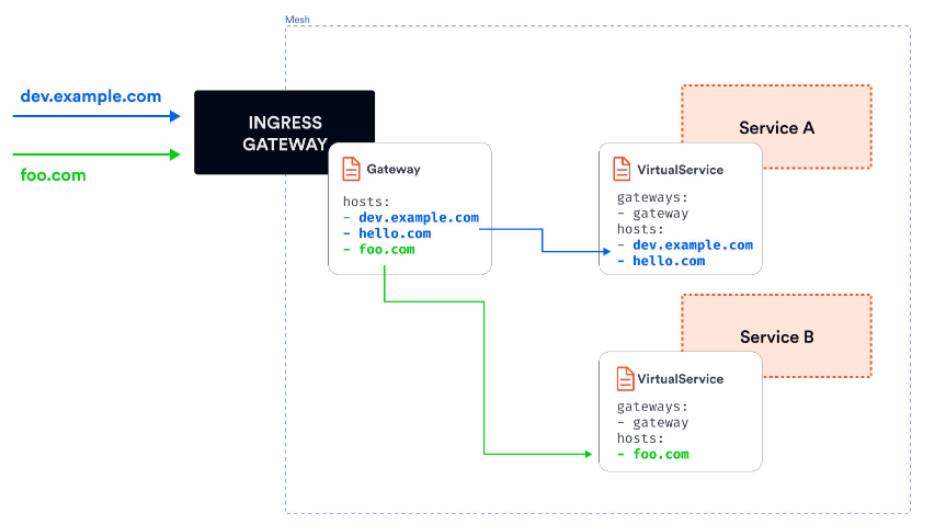
上述网关资源设置了一个代理,作为一个负载均衡器,为入口暴露 80 端口。网关配置被应用于 Istio 入口网关代理,我们将其部署到 istio-system 命名空间,并设置了标签 istio: ingressgateway。通过网关资源,我们只能配置负载均衡器。hosts 字段作为一个过滤器,只有以 dev.example.com 和 test.example.com 为目的地的流量会被允许通过。
为了控制和转发流量到集群内运行的实际 Kubernetes 服务,我们必须用特定的主机名(例如 dev.example.com 和 test.example.com)配置一个VirtualService,然后将网关连接到它。
例如,我们作为 Istio 安装 demo 的一部分而部署的 Ingress 网关创建了一个具有 LoadBalancer 类型的 Kubernetes 服务,并为其分配了一个外部 IP:
#可以看到istio-ingressgateway的service类型为LoadBalancer,外部IP为192.168.110.190
[root@k8scloude1 addons]# kubectl get svc -n istio-system
NAME                   TYPE           CLUSTER-IP       EXTERNAL-IP       PORT(S)                                                                      AGE
istio-egressgateway    ClusterIP      10.102.56.241    <none>            80/TCP,443/TCP                                                               10d
istio-ingressgateway   LoadBalancer   10.107.131.65    192.168.110.190   15021:30093/TCP,80:32126/TCP,443:30293/TCP,31400:30628/TCP,15443:30966/TCP   10d
istiod                 ClusterIP      10.103.37.59     <none>            15010/TCP,15012/TCP,443/TCP,15014/TCP                                        10d
kiali                  NodePort       10.109.42.120    <none>            20001:30754/TCP,9090:31573/TCP                                               85m
LoadBalancer Kubernetes 服务类型的工作方式取决于我们运行 Kubernetes 集群的方式和地点。对于云托管的集群(GCP、AWS、Azure等),在你的云账户中配置了一个负载均衡器资源,Kubernetes LoadBalancer 服务将获得一个分配给它的外部 IP 地址。假设我们正在使用 Minikube 或 Docker Desktop。在这种情况下,外部 IP 地址将被设置为 localhost(Docker Desktop),或者,如果我们使用 Minikube,它将保持待定,我们将不得不使用 minikube tunnel 命令来获得一个IP地址。
除了入口网关,我们还可以部署一个出口网关来控制和过滤离开网格的流量。
就像我们配置入口网关一样,我们可以使用相同的网关资源来配置出口网关。这使我们能够集中管理所有流出的流量、日志和授权。
四.实战:使用Gateway发布服务
4.1 创建部署并使用网关暴露
在这个实验中,我们将在集群中部署一个 tomcat 应用程序。然后我们将部署一个 Gateway 资源和一个与 Gateway 绑定的 VirtualService,以便在外部 IP 地址上公开该应用程序。
让我们先从部署 Gateway 资源开始。我们将把 hosts 字段设置为 *,所以我们可以直接从外部 IP 地址访问入口网关。如果我们想通过域名访问入口网关,我们可以将 hosts 的值设置为域名(例如 example.com),然后将外部 IP 地址添加到该域名的 A 记录中。按照如下方法创建网关
[root@k8scloude1 istioyaml]# vim ingressgateway80.yaml

[root@k8scloude1 istioyaml]# cat ingressgateway80.yaml
apiVersion: networking.istio.io/v1alpha3
kind: Gateway
metadata:
  name: ingressgateway80
spec:
  selector:
    istio: ingressgateway
  servers:
    - port:
        number: 80
        name: http
        protocol: HTTP
      hosts:
        - '*'

[root@k8scloude1 istioyaml]# kubectl apply -f ingressgateway80.yaml
gateway.networking.istio.io/ingressgateway80 created

#网关创建完成,名字为ingressgateway80
[root@k8scloude1 istioyaml]# kubectl get gateway
NAME               AGE
ingressgateway80   75s
如果我们试图访问入口网关的外部 IP 地址,我们将得到一个 HTTP 404,因为没有任何绑定到网关的 VirtualService。因为我们还没有定义任何路由,所以入口代理不知道要把流量路由到哪里。
要获得入口网关的外部 IP 地址,请运行下面的命令并查看 EXTERNAL-IP 列的值:
[root@k8scloude1 istioyaml]# kubectl get service -l istio=ingressgateway -n istio-system
NAME                   TYPE           CLUSTER-IP      EXTERNAL-IP       PORT(S)                                                                      AGE
istio-ingressgateway   LoadBalancer   10.107.131.65   192.168.110.190   15021:30093/TCP,80:32126/TCP,443:30293/TCP,31400:30628/TCP,15443:30966/TCP   17d

#访问入口网关的80端口,什么内容都没有
[root@k8scloude1 istioyaml]# curl 192.168.110.190:80
之后当我们谈到入口网关的外部 IP 时,我们将在例子和文本中使用 GATEWAY_URL。
下一步是创建 Tomcat 部署和服务。首先拉取所需的镜像:
#在k8s集群的worker节点拉取tomcat镜像,以k8scloude2节点为例
[root@k8scloude2 ~]# docker pull hub.c.163.com/library/tomcat

[root@k8scloude2 ~]# docker images | grep tomcat
hub.c.163.com/library/tomcat                                                 latest                72d2be374029   5 years ago     292MB

#查看tomcat镜像的历史信息,可以发现镜像端口为8080/tcp
[root@k8scloude2 ~]# docker history hub.c.163.com/library/tomcat:latest
IMAGE          CREATED       CREATED BY                                      SIZE      COMMENT
72d2be374029   5 years ago   /bin/sh -c #(nop)  CMD ["catalina.sh" "run"]    0B
<missing>      5 years ago   /bin/sh -c #(nop)  EXPOSE 8080/tcp              0B
<missing>      5 years ago   /bin/sh -c set -e  && nativeLines="$(catalin…   0B
......
<missing>      5 years ago   /bin/sh -c #(nop)  CMD ["bash"]                 0B
<missing>      5 years ago   /bin/sh -c #(nop) ADD file:ebba725fb97cea45d…   100MB
创建deploy:
#使用hub.c.163.com/library/tomcat:latest镜像创建deploy,生成deploy的yaml文件
[root@k8scloude1 istioyaml]# kubectl create deploy tomcat --image=hub.c.163.com/library/tomcat:latest --dry-run=client -o yaml >tomcatdeploy.yaml

[root@k8scloude1 istioyaml]# vim tomcatdeploy.yaml

#yaml文件如下,标签设置为app: tomcat ,副本数为1
#- containerPort: 8080表示Tomcat镜像的端口为8080
[root@k8scloude1 istioyaml]# cat tomcatdeploy.yaml
apiVersion: apps/v1
kind: Deployment
metadata:
  creationTimestamp: null
  labels:
    app: tomcat
  name: tomcat
spec:
  replicas: 1
  selector:
    matchLabels:
      app: tomcat
  strategy: {}
  template:
    metadata:
      creationTimestamp: null
      labels:
        app: tomcat
    spec:
      containers:
      - image: hub.c.163.com/library/tomcat:latest
        imagePullPolicy: IfNotPresent
        name: tomcat
        ports:
          - containerPort: 8080
        resources: {}
status: {}

#创建deploy
[root@k8scloude1 istioyaml]# kubectl apply -f tomcatdeploy.yaml
deployment.apps/tomcat created

#deploy创建成功
[root@k8scloude1 istioyaml]# kubectl get deploy
NAME     READY   UP-TO-DATE   AVAILABLE   AGE
tomcat   1/1     1            1           6s

#pod创建成功,pod里有2个容器
#**如果我们看一下创建的 Pod,我们会发现有两个容器在运行。一个是 Envoy sidecar 代理,第二个是应用程序**。
[root@k8scloude1 istioyaml]# kubectl get pod
NAME                      READY   STATUS    RESTARTS   AGE
tomcat-545f7745d4-bsxhh   2/2     Running   0          10s
接着创建service
#生成service的yaml文件
[root@k8scloude1 istioyaml]# kubectl expose deployment tomcat --name=tomcat --port=80 --target-port=8080 --dry-run=client -o yaml >tomcatsvc.yaml

[root@k8scloude1 istioyaml]# vim tomcatsvc.yaml

#- port: 80使service暴露的端口,targetPort: 8080 是tomcat容器的端口
[root@k8scloude1 istioyaml]# cat tomcatsvc.yaml
apiVersion: v1
kind: Service
metadata:
  creationTimestamp: null
  labels:
    app: tomcat
  name: tomcat
spec:
  ports:
  - port: 80
    name: tcp
    protocol: TCP
    targetPort: 8080
  selector:
    app: tomcat
status:
  loadBalancer: {}

#创建service
[root@k8scloude1 istioyaml]# kubectl apply -f tomcatsvc.yaml
service/tomcat created

#svc的类型为ClusterIP,外界环境访问不了
[root@k8scloude1 istioyaml]# kubectl get svc -o wide
NAME     TYPE        CLUSTER-IP      EXTERNAL-IP   PORT(S)   AGE   SELECTOR
tomcat   ClusterIP   10.101.44.117   <none>        80/TCP    9s    app=tomcat
下一步是为 tomcat 服务创建一个 VirtualService,并将其绑定到 Gateway 资源上:
[root@k8scloude1 istioyaml]# vim tomcat-virtualservice.yaml

[root@k8scloude1 istioyaml]# cat tomcat-virtualservice.yaml
apiVersion: networking.istio.io/v1alpha3
kind: VirtualService
metadata:
  name: tomcat-virtualservice
spec:
  hosts:
    - "*"
  #把VirtualService绑定到ingressgateway80这个网关
  gateways:
    - ingressgateway80
  http:
    - route:
        #表示路由到tomcat这个service,microservice表示命名空间
        - destination:
            host: tomcat.microservice.svc.cluster.local
            port:
              number: 80

#创建virtualservice
[root@k8scloude1 istioyaml]# kubectl apply -f tomcat-virtualservice.yaml
virtualservice.networking.istio.io/tomcat-virtualservice created

#virtualservices创建成功
[root@k8scloude1 istioyaml]# kubectl get virtualservices -o wide
NAME                    GATEWAYS               HOSTS   AGE
tomcat-virtualservice   ["ingressgateway80"]   ["*"]   43s
我们在 hosts 字段中使用 *,就像我们在 Gateway 中做的那样。我们还将之前创建的 Gateway 资源(gateway)添加到 gateways 数组中。最后,我们指定了一个目的地为 Kubernetes 服务 tomcat.microservice.svc.cluster.local 的单一路由。
如果我们对 GATEWAY_URL 运行 cURL 或在浏览器中打开它,我们将得到 tomcat 的响应:
#查看istio-ingressgateway的EXTERNAL-IP
[root@k8scloude1 istioyaml]# kubectl get svc -l istio=ingressgateway -n istio-system
NAME TYPE CLUSTER-IP EXTERNAL-IP PORT(S) AGE
istio-ingressgateway LoadBalancer 10.107.131.65 192.168.110.190 15021:30093/TCP,80:32126/TCP,443:30293/TCP,31400:30628/TCP,15443:30966/TCP 17d
#访问EXTERNAL-IP的80端口
#curl -v 参数表示显示一次 http 通信的整个过程,包括端口连接和 http request 头信息
[root@k8scloude1 istioyaml]# curl -v 192.168.110.190:80
* About to connect() to 192.168.110.190 port 80 (#0)
* Trying 192.168.110.190...
* Connected to 192.168.110.190 (192.168.110.190) port 80 (#0)
> GET / HTTP/1.1
> User-Agent: curl/7.29.0
> Host: 192.168.110.190
> Accept: */*
>
< HTTP/1.1 200 OK
< content-type: text/html;charset=UTF-8
< date: Tue, 11 Oct 2022 04:34:20 GMT
< x-envoy-upstream-service-time: 1390
< server: istio-envoy
< transfer-encoding: chunked
<
<!DOCTYPE html>
<html lang="en">
<head>
<meta charset="UTF-8" />
<title>Apache Tomcat/8.5.20</title>
......
<p class="copyright">Copyright ©1999-2022 Apache Software Foundation. All Rights Reserved</p>
</div>
</body>
</html>
* Connection #0 to host 192.168.110.190 left intact
另外,注意到 server 头设置为 istio-envoy,告诉我们该请求通过了 Envoy 代理。
4.2 清理
删除 Deployment、Service、VirtualService 和 Gateway:
[root@k8scloude1 istioyaml]# kubectl delete deployments tomcat
deployment.apps "tomcat" deleted

[root@k8scloude1 istioyaml]# kubectl delete service tomcat
service "tomcat" deleted

[root@k8scloude1 istioyaml]# kubectl delete virtualservices tomcat-virtualservice
virtualservice.networking.istio.io "tomcat-virtualservice" deleted

[root@k8scloude1 istioyaml]# kubectl delete gateways ingressgateway80
gateway.networking.istio.io "ingressgateway80" deleted
相关文章
- [PHP] 静态工厂模式-创建型设计模式
- [PHP] 单例模式-创建型设计模式
- [MySQL] MVCC 多版本并发控制实现的事务
- [PHP] 简单工厂模式-创建型设计模式
- [PHP] 原型模式-创建型设计模式
- [HTTP] tcp/ip详解 链路层 网络层 传输层 应用层
- [MySQL] mysql 的行级显式锁定和悲观锁
- [PHP] 对象池模式-创建型设计模式
- [MySQL] mysql的事务隔离和幻读和死锁问题
- [MySQL] mysql 的读写锁与并发控制
- [PHP] try catch在日常中的使用
- [PHP] 工厂方法设计模式-创建型设计模式
- [PHP] 生成器模式-创建型设计模式
- [PHP] 按位与& 或| 异或^ 的日常使用
- [PHP] pow指数运算函数与二进制
- [PHP] 抽象工厂设计模式-创建型设计模式
- [MySQL] 索引中的b树索引
- [PHP] 新浪企业邮箱登录功能难点梳理
- [PHP] strpos stripos strrpos strripos的区别
- [PHP]MySQL的wait_timeout与pdo对象