
Java GUI编程(6)- AWT | 事件监听
2023-02-18 16:23:24 时间
事件监听
事件监听:当某个事情发生的时候,干什么?
 1 //addActionListener事件监听
 2 public class TestActionEvent {
 3     public static void main(String[] args) {
 4         //按下按钮,触发一些事件
 5         Frame frame = new Frame();
 6         Button button = new Button("1-1");
 7         //因为,addActionListener()需要一个ActionListener,所以我们构造一个ActionListener
 8         MyActionListenner myActionListenner = new MyActionListenner();
 9         button.addActionListener(myActionListenner);
10
11         frame.add(button,BorderLayout.CENTER);
12         frame.pack(); //frame大小自适应
13         frame.setVisible(true);
14         windowClose(frame);
15     }
16
17     //关闭窗体事件
18     private static void windowClose(Frame frame){
19         frame.addWindowListener(new WindowAdapter() {
20             @Override
21             public void windowClosing(WindowEvent e) {
22                 System.exit(0);
23             }
24         });
25     }
26 }
27
28 //事件监听
29 class MyActionListenner implements ActionListener{
30     @Override
31     public void actionPerformed(ActionEvent e) {
32         System.out.println("HelloWorld");
33     }
34 }
 1 public class TestActionTwo {
 2     public static void main(String[] args) {
 3         //两个按钮,实现同一个监听
 4         Frame frame = new Frame();
 5         Button button1 = new Button("start");
 6         Button button2 = new Button("stop");
 7
 8         //可以显示的定义触发会返回的命令,如果不显示定义,则会走默认的值
 9         //可以多个按钮只写一个监听器
10         button2.setActionCommand("button2-stop");
11         MyMonitor myMonitor = new MyMonitor();
12         button1.addActionListener(myMonitor);
13         button2.addActionListener(myMonitor);
14
15         frame.add(button1, BorderLayout.NORTH);
16         frame.add(button2, BorderLayout.SOUTH);
17
18         frame.pack();
19         frame.setVisible(true);
20     }
21 }
22
23 class MyMonitor implements ActionListener{
24
25     @Override
26     public void actionPerformed(ActionEvent e) {
27         System.out.println("按钮被点击了:msg===>"+e.getActionCommand());//e.getActionCommand获取按钮信息
28
29         if (e.getActionCommand().contains("stop")){
30             System.out.println("游戏结束");
31         }
32     }
33 }
输入框事件监听
 1 public class TestText01 {
 2     public static void main(String[] args) {
 3         new MyFrame();
 4     }
 5 }
 6
 7 class MyFrame extends Frame{
 8     public MyFrame(){
 9         TextField textField = new TextField();
10         add(textField);
11
12         //监听这个文本框输入的文字
13         MyActionListen myActionListen = new MyActionListen();
14         //按下enter,就会触发这个输入框的事件
15         textField.addActionListener(myActionListen);
16
17         //设置替换编码,将输入内容,在输入过程中加密
18         textField.setEchoChar('*');
19
20         setVisible(true);
21         pack();
22     }
23 }
24
25 class MyActionListen implements ActionListener {
26
27     @Override
28     public void actionPerformed(ActionEvent e) {
29         TextField textField = (TextField) e.getSource();//获取一些资源,返回的是一个对象
30         System.out.println(textField.getText()); //获取文本框内容
31         textField.setText("");
32     }
33 }
简易计算器,回顾组合+内部类
目前代码为面向过程
 1 //简易计算器
 2 public class TestCalc {
 3     public static void main(String[] args) {
 4         new Claculator();
 5     }
 6 }
 7
 8 //计算器类
 9 class Claculator extends Frame {
10     public Claculator(){
11         //3个文本框
12         TextField num1 = new TextField(10);
13         TextField num2 = new TextField(10);
14         TextField num3 = new TextField(20);
15
16         //1个按钮
17         Button button = new Button("=");
18         MyTextListen myTextListen = new MyTextListen(num1,num2,num3);
19         button.addActionListener(myTextListen);
20
21         //1个标签
22         Label label = new Label("+");
23
24
25         //布局
26         setLayout(new FlowLayout());
27         add(num1);
28         add(label);
29         add(num2);
30         add(button);
31         add(num3);
32
33         setVisible(true);
34         pack();
35
36     }
37 }
38
39 //监听器类
40 class MyTextListen implements ActionListener {
41
42     //获取三个变量
43     private TextField num11,num22,num33;
44     public MyTextListen(TextField num1,TextField num2,TextField num3){
45         this.num11 = num1;
46         this.num22 = num2;
47         this.num33 = num3;
48     }
49
50     @Override
51     public void actionPerformed(ActionEvent e) {
52         int n1=Integer.parseInt(num11.getText());
53         int n2=Integer.parseInt(num22.getText());
54         num33.setText(""+(n1+n2));
55         num11.setText("");
56         num22.setText("");
57     }
58 }
优化-面向对象写法
 1 //简易计算器
 2 public class TestCalc {
 3     public static void main(String[] args) {
 4         new Claculator().loadFrame();
 5     }
 6 }
 7
 8 //计算器类
 9 class Claculator extends Frame {
10
11     //属性
12     TextField num1,num2,num3;
13
14     //方法
15     public void loadFrame(){
16         num1 = new TextField(10);
17         num2 = new TextField(10);
18         num3 = new TextField(20);
19
20         Button button = new Button("=");
21         MyTextListen myTextListen = new MyTextListen(this);
22         button.addActionListener(myTextListen);
23
24         Label label = new Label("+");
25
26         setLayout(new FlowLayout());
27         add(num1);
28         add(label);
29         add(num2);
30         add(button);
31         add(num3);
32
33         setVisible(true);
34         pack();
35
36     }
37 }
38
39 //监听器类
40 class MyTextListen implements ActionListener {
41
42     Claculator claculator=null;
43     public MyTextListen(Claculator claculator){
44         this.claculator=claculator;
45     }
46
47     @Override
48     public void actionPerformed(ActionEvent e) {
49         int n1=Integer.parseInt(claculator.num1.getText());
50         int n2=Integer.parseInt(claculator.num2.getText());
51         claculator.num3.setText(""+(n1+n2));
52         claculator.num1.setText("");
53         claculator.num2.setText("");
54     }
55 }
内部类
 1 //简易计算器
 2 public class TestCalc {
 3     public static void main(String[] args) {
 4         new Claculator().loadFrame();
 5     }
 6 }
 7
 8 //计算器类
 9 class Claculator extends Frame {
10
11     //属性
12     TextField num1,num2,num3;
13
14     //方法
15     public void loadFrame(){
16         num1 = new TextField(10);
17         num2 = new TextField(10);
18         num3 = new TextField(20);
19
20         Button button = new Button("=");
21         MyTextListen myTextListen = new MyTextListen();
22         button.addActionListener(myTextListen);
23
24         Label label = new Label("+");
25
26         setLayout(new FlowLayout());
27         add(num1);
28         add(label);
29         add(num2);
30         add(button);
31         add(num3);
32
33         setVisible(true);
34         pack();
35
36     }
37
38     //监听器类
39     //内部类最大的好处,就是可以畅通无阻的访问外部的属性和方法
40     private class MyTextListen implements ActionListener {
41         @Override
42         public void actionPerformed(ActionEvent e) {
43             int n1=Integer.parseInt(num1.getText());
44             int n2=Integer.parseInt(num2.getText());
45             num3.setText(""+(n1+n2));
46             num1.setText("");
47             num2.setText("");
48         }
49     }
50 }
画笔Panint
 1 public class TestPaint {
 2     public static void main(String[] args) {
 3         new MyPanint().loadFrame();
 4     }
 5 }
 6 class MyPanint extends Frame{
 7     public void loadFrame(){
 8         setBounds(200,200,600,500);
 9         setVisible(true);
10     }
11
12     @Override
13     public void paint(Graphics g) {
14         //画笔为红色
15         g.setColor(Color.red);
16         //空心圆
17         g.drawOval(100,100,100,100);
18         //实心圆
19         g.fillOval(100,100,100,100);
20         //设置为绿色
21         g.setColor(Color.GREEN);
22         //实心矩形
23         g.fillRect(150,200,200,200);
24     }
25 }
鼠标监听事件、模拟画图工具
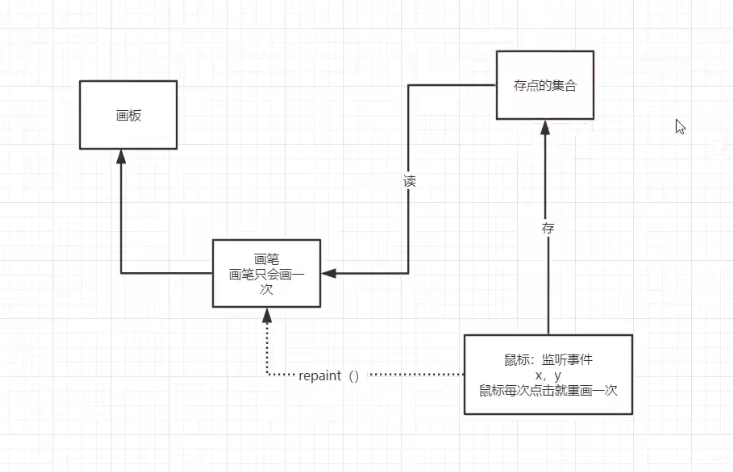
 1 //鼠标监听事件
 2 public class TestMouseListener {
 3     public static void main(String[] args) {
 4      new MyFrame("画图");
 5     }
 6 }
 7 //鼠标类
 8 class MyFrame extends Frame{
 9     //画画需要画笔,需要监听鼠标当前的位置,需要集合来存储这个点
10     ArrayList points;
11
12     public MyFrame(String title){
13         super(title);
14         setBounds(200,200,400,300);
15         //存鼠标点击的点
16         points=new ArrayList<>();
17
18         //鼠标监听器,针对这个窗口
19         setVisible(true);
20         this.addMouseListener(new MyMouseListener());
21
22     }
23     @Override
24     public void paint(Graphics g) {
25         //画画,监听鼠标的事件
26         Iterator iterator = points.iterator();
27         while (iterator.hasNext()){
28             Point point =(Point) iterator.next();
29             g.setColor(Color.GREEN);
30             g.fillOval(point.x,point.y,10,10);
31         }
32     }
33
34     //添加一个点到界面上
35     public void addPaint(Point point){
36         points.add(point);
37
38     }
39     //适配器模式
40     private class MyMouseListener extends MouseAdapter{
41         //鼠标 按下,谈起,按住不放
42         @Override
43         public void mouseClicked(MouseEvent e) {
44             MyFrame frame =(MyFrame) e.getSource();
45             //这个我们点击得时候就会在界面上有一个点!,点需要画出来
46             //这个点就是鼠标的点
47             frame.addPaint(new Point(e.getX(),e.getY()));
48             //每次点击鼠标需要重新画一遍
49             frame.repaint();//刷新
50         }
51     }
52 }
窗口监听
 1 public class TestWindow {
 2     public static void main(String[] args) {
 3         new MyWindow();
 4     }
 5 }
 6 class MyWindow extends Frame {
 7     public MyWindow(){
 8         setBackground(Color.blue);
 9         setSize(200,200);
10         setVisible(true);
11         this.addWindowListener(new WindowAdapter() {//匿名内部类
12             //激活窗口
13             @Override
14             public void windowActivated(WindowEvent e) {
15                 MyWindow myWindow =(MyWindow) e.getSource();
16                 myWindow.setTitle("窗口被激活了");
17             }
18
19             //关闭窗口
20             @Override
21             public void windowClosing(WindowEvent e) {
22                 super.windowClosing(e);
23                 System.exit(0);
24             }
25         });
26     }
27 }
键盘监听
 1 public class TestKeylistenner {
 2     public static void main(String[] args) {
 3         new MyKey();
 4     }
 5 }
 6 class MyKey extends Frame{
 7     public MyKey(){
 8         setBounds(1,1,300,300);
 9         setVisible(true);
10         addKeyListener(new KeyAdapter() {
11             //键盘按下
12             @Override
13             public void keyPressed(KeyEvent e) {
14                 int keyCode = e.getKeyCode();
15                 System.out.println(keyCode);
16                 if (keyCode==KeyEvent.VK_UP){
17                     System.out.println("你按下了上键");
18                 }
19             }
20         });
21     }
22 }
总结
按钮、输入框事件监听: addActionListener
画笔:
 @Override
 public void paint(Graphics g) {}
鼠标监听: addMouseListener
键盘监听: addKeyListener
相关文章
- Jmeter扩展组件开发(7) - 自定义java请求的开发
- c字符串详细解析
- 断网了怎么办?那就快去体验【Microsoft Edge浏览器】提供的离线冲浪小游戏~娱乐一下
- 大一学生课设c——服装管理系统
- 1篇文章教会你MarkDown语法,从此开始博客之路
- 蓝桥杯每日一刷(第一天)
- 蓝桥杯每日一刷(第二天)
- 蓝桥杯每日一刷(第三天)
- 二叉树的三种遍历方式
- CONCATENATEX函数的不归路
- 搜索算法dfs和bfs解析(附有例题)
- 蓝桥杯每日一刷(第四天2016)
- 听说你还不会滑动窗口?来一篇文章带你学会滑动窗口算法
- Microsoft VS Code安装教程
- 肝一个周整理Java中容易混淆的基础知识
- ASICS的报表有哪些值得学习的地方?
- 蓝桥杯每日一刷(第六天)——暂会哈希
- 旅行商问题近似解——NP完全问题
- 【DHCP实验】使用三层交换机配置DHCP Server服务器(基于全局地址池配置)
- 前端和后端到底有什么区别?——第100篇文章(送给迷茫的你)