【JAVA定时器】四种常见定时器的原理和简单实现,有图易懂 中
3.Timer().schedule创建任务
3.1.样例
使用非常简单,这里先给出样例,在对照进行介绍
代码如下
package com.yezi_tool.demo_basic.test;

import org.springframework.stereotype.Component;

import java.util.Date;
import java.util.Timer;
import java.util.TimerTask;

@Component
public class TimerTest {
    private Integer count = 0;

    public TimerTest() {
        testTimer();
    }

    public void testTimer() {
        new Timer().schedule(new TimerTask() {
            @Override
            public void run() {
                try {
                    //do Something
                    System.out.println(new Date().toString() + ": " + count);
                    count++;
                } catch (Exception e) {
                    e.printStackTrace();
                }
            }
        }, 0, 1000);
    }
}
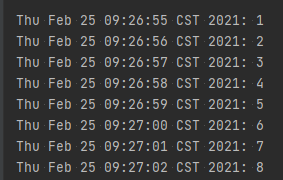
执行结果

可以看到每隔1s打印一次count并自增1
3.2.介绍
核心包括Timer和TimerTask,均为jkd自带的工具类,代码量分别为721行和162行(包括注释),都不多,有兴趣的可以直接看看源码
3.2.1.TimerTask
TimerTask实际上就是一个Runnable而已,继承Runnable并添加了几个自定义的参数和方法,没啥好介绍的,有兴趣可以看源码
3.2.2.Timer
Timer字面意思即定时器,为jkd自带的工具类,提供定时执行任务的相关功能
实际上包括三个类:
Timer:即定时器主类,负责管理所有的定时任务,每个Timer拥有一个私有的TaskQueue和TimerThread,
TaskQueue:即任务队列,Timer生产任务,然后推到TaskQueue里存放,等待处理,被处理掉的任务即被移除掉
TaskQueue实质上只有一个长度为128的数组用于存储TimerTask、一个int型变量size表示队列长度、以及对这两个数据的增删改查
TimerThread:即定时器线程,线程会共享TaskQueue里面的数据,TimerThread会对TaskQueue里的任务进行消耗
TimerThread实际上就是一个Thread线程,会不停的监听TaskQueue,如果队列里面有任务,那么就执行第一个,并将其删除(先删除再执行)
流程分析
Timer生产任务(实际上是从外部接收到任务),并将任务推到TaskQueue里面存放,并唤醒TaskQueue线程(queue.notify())
TimerThread监听TaskQueue,若里面有任务则将其执行并移除队里,若没有任务则让队列等待(queue.wait())
这么一看,这不就是典型的==生产者/消费者模式==,timer负责生产(实际上是接受),而TimerThread负责消费,TaskQueue作为中转仓库
构造方法
构造的时候会设置定时器线程的名字并将其启动
完整格式如下,其中两个参数均可缺省
public Timer(String name, boolean isDaemon)
1
name:即线程名,用于区分不同的线程,缺省的时候默认使用"Timer-" + serialNumber()生成唯一线程名
isDaemon:是否是守护线程,缺省的时候默认为否,有啥区别请自行了解,有机会的话我也会整理笔记
核心方法
核心方法有添加任务、取消任务和净化三种
添加任务有6中公用方法(实际最后使用同一种私有方法)
schedule(TimerTask task, long delay):指定任务task,在delay毫秒延迟后执行
schedule(TimerTask task, Date time):指定任务task,在time时间点执行一次
schedule(TimerTask task, long delay, long period):指定任务task,延迟delay毫秒后执行第一次,并在之后每隔period毫秒执行一次
schedule(TimerTask task, Date firstTime, long period):指定任务task,在firstTime的时候执行第一次,之后每隔period毫秒执行一次
scheduleAtFixedRate(TimerTask task, long delay, long period):作用与schedule一致
scheduleAtFixedRate(TimerTask task, Date firstTime, long period):作用与schedule一致
实际上最后都会使用sched(TimerTask task, long time, long period),即指定任务task,在time执行第一次,之后每隔period毫秒执行一次
schedule使用系统时间计算下一次,即System.currentTimeMillis()+period
而scheduleAtFixedRate使用本次预计时间计算下一次,即time + period
对于耗时任务,两者区别较大,请按需求选择,瞬时任务无区别
取消任务方法:cancel(),会将任务队列清空,并堵塞线程,且不再能够接受任务(接受时报错),并不会销毁本身的实例和其内部的线程
净化方法:purge(),净化会将队列里所有被取消的任务移除,对剩余任务进行堆排序,并返回移除任务的数量
补充
如何保证第一个任务是执行时间最早的
任务队列会在每一次添加任务和删除任务时,进行堆排序矫正,净化也会对剩余任务重新堆排序
cancel的时候线程如何处理
定时器线程进行堵塞处理,并没有销毁,在执行当前任务后就不会执行下一次了,但是**线程并没有销毁**
所以尽量不要创建太多timer对象,会增加服务器负担
3.3.使用步骤
1.初始化Timer
Timer timer=new Timer();2.初始化task
private class MyTask extends TimerTask {
        @Override
        public void run() {
            try {
                //do Something
                System.out.println(new Date().toString() + ": " + count);
                count++;
            } catch (Exception e) {
                e.printStackTrace();
            }
        }
    }
}
MyTask myTask=new MyTask();
3.添加任务
timer.schedule(myTask, 5000, 3000);完整代码:
package com.yezi_tool.demo_basic.test;

import org.springframework.stereotype.Component;

import java.util.Date;
import java.util.Timer;
import java.util.TimerTask;

@Component
public class TimerTest {
    private Integer count = 0;

    public TimerTest() {
        testTimer2();
    }

    public void testTimer2() {
        Timer timer = new Timer();
        MyTask myTask = new MyTask();
        timer.schedule(myTask, 0, 1000);
    }

    private class MyTask extends TimerTask {
        @Override
        public void run() {
            try {
                //do Something
                System.out.println(new Date().toString() + ": " + count);
                count++;
            } catch (Exception e) {
                e.printStackTrace();
            }
        }
    }

}
当然可以缩写为样例里面的写法,更加简洁,请按照自己需求修改
4.线程
线程应该是最常见的实现方案,创建一个线程执行任务即可,举例几个不同的写法,代码如下
4.1.使用thread + runnable
package com.yezi_tool.demo_basic.test;

import org.springframework.stereotype.Component;

import java.util.Date;

@Component
public class ThreadTest {

    private Integer count = 0;

    public ThreadTest() {
        test1();
    }

    public void test1() {
        new Thread(() -> {
            while (count < 10) {
                System.out.println(new Date().toString() + ": " + count);
                count++;
                try {
                    Thread.sleep(3000);
                } catch (InterruptedException e) {
                    e.printStackTrace();
                }
            }
        }).start();
    }
}
4.2.使用线程池 + runnable
package com.yezi_tool.demo_basic.test;

import org.springframework.stereotype.Component;

import java.util.Date;
import java.util.concurrent.ExecutorService;
import java.util.concurrent.Executors;

@Component
public class ThreadTest {

    private static final ExecutorService threadPool = Executors.newFixedThreadPool(5);// 线程池
    private Integer count = 0;

    public ThreadTest() {
        test2();
    }

    public void test2() {
        threadPool.execute(() -> {
            while (count < 10) {
                System.out.println(new Date().toString() + ": " + count);
                count++;
                try {
                    Thread.sleep(3000);
                } catch (InterruptedException e) {
                    e.printStackTrace();
                }
            }
        });
    }
}
4.3.使用ScheduledTask + runnable
ScheduledTask 有11种添加任务的方法,详情直接查看文件TaskScheduler.java,这里给出常用的几个示例
设置触发频率为3000毫秒
package com.yezi_tool.demo_basic.test;

import org.springframework.scheduling.TaskScheduler;
import org.springframework.stereotype.Component;

import java.util.Date;

@Component
public class ThreadTest {

    private Integer count = 0;
    private final TaskScheduler taskScheduler;

    public ThreadTest(TaskScheduler taskScheduler) {
        this.taskScheduler = taskScheduler;
        test3();
    }

    public void test3() {
        taskScheduler.scheduleAtFixedRate(() -> {
            System.out.println(new Date().toString() + ": " + count);
            count++;
        }, 3000);
    }
}
设置触发时间为每天凌晨1点
package com.yezi_tool.demo_basic.test;

import org.springframework.scheduling.TaskScheduler;
import org.springframework.scheduling.support.CronTrigger;
import org.springframework.stereotype.Component;

import java.util.Date;

@Component
public class ThreadTest {

    private Integer count = 0;
    private final TaskScheduler taskScheduler;

    public ThreadTest(TaskScheduler taskScheduler) {
        this.taskScheduler = taskScheduler;
        test4();
    }

    public void test4() {
        taskScheduler.schedule(() -> {
            System.out.println(new Date().toString() + ": " + count);
            count++;
        }, new CronTrigger("0 0 1 * * ?"));
    }
}
相关文章
- Java要抛弃祖宗的基业,Java程序员危险了!
- 十大 Java 语言特性
- JVM 三色标记算法,原来是这么回事!
- 聊聊 Spring 事务控制策略以及 @Transactional 失效问题避坑
- 写给 Java 程序员的前端 Promise 教程
- 写给 Java 程序员的前端 Promise 教程,你学会了吗?
- Java 中为什么不全部使用 Static 方法?
- Java 池化技术你了解多少?
- Java 服务 Docker 容器化优秀实践
- Spring Boot + EasyExcel导入导出,简直太好用了!
- 我们一起聊聊 Java 内存泄漏
- CentOS 下安装 Docker 极简教程
- JDK 19 功能集冻结:Java 19 只有七个新特性
- 关于 CMS 垃圾回收器,你真的懂了吗?
- 为什么会有这么多编程语言?
- 改善Java代码的八个建议
- 接口流量突增,如何做好性能优化?
- Java 以编程方式创建JAR文件
- POJO、Java Bean是如何定义的
- Spring 的 Bean 明明设置了 Scope 为 Prototype,为什么还是只能获取到单例对象?

